|
第一课:什么是树莓派 第二课:树莓派能做什么 第三课:购买您的第一个树莓派 第四课:如何安装树莓派系统 第五课:树莓派Python编程手册 树莓派可以使用C语言,java,Python,而用python控制树莓派的人越来越多,刚把C语言教程专栏写完,接下来着手python教程。因为要控制硬件,所以我们需要安装一个模块RPi.GPIO.
我们是如何使用RPi.GPIO模块的
下面是简单点亮一个灯的代码,所有硬件操作的函数(方法)都是通过RPi.GPIO这个模块来操作的。 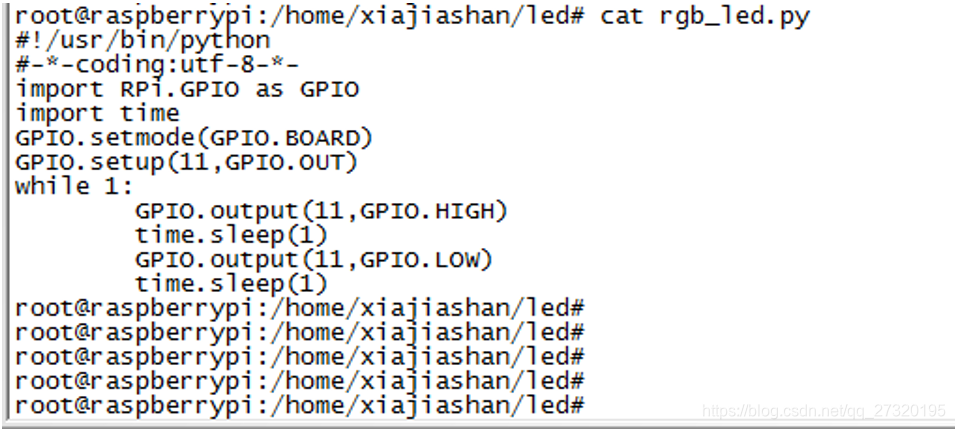
为什么叫RPi.GPIO:
RPi这里的R是树莓raspberry的意思,Pi就是派(π)的意思,关于树莓派的历史和来源请参考《什么是树莓派》。 GPIO是通用引脚输入输出的意思,就是可以控制树莓派这个硬件上的引脚。该知识后面会细讲。
RPi.GPIO模块如何安装
安装方法有几种,我介绍最好的一种: 1)打开https://pypi.org网站 2)在搜索框里面输入RPi.GPIO 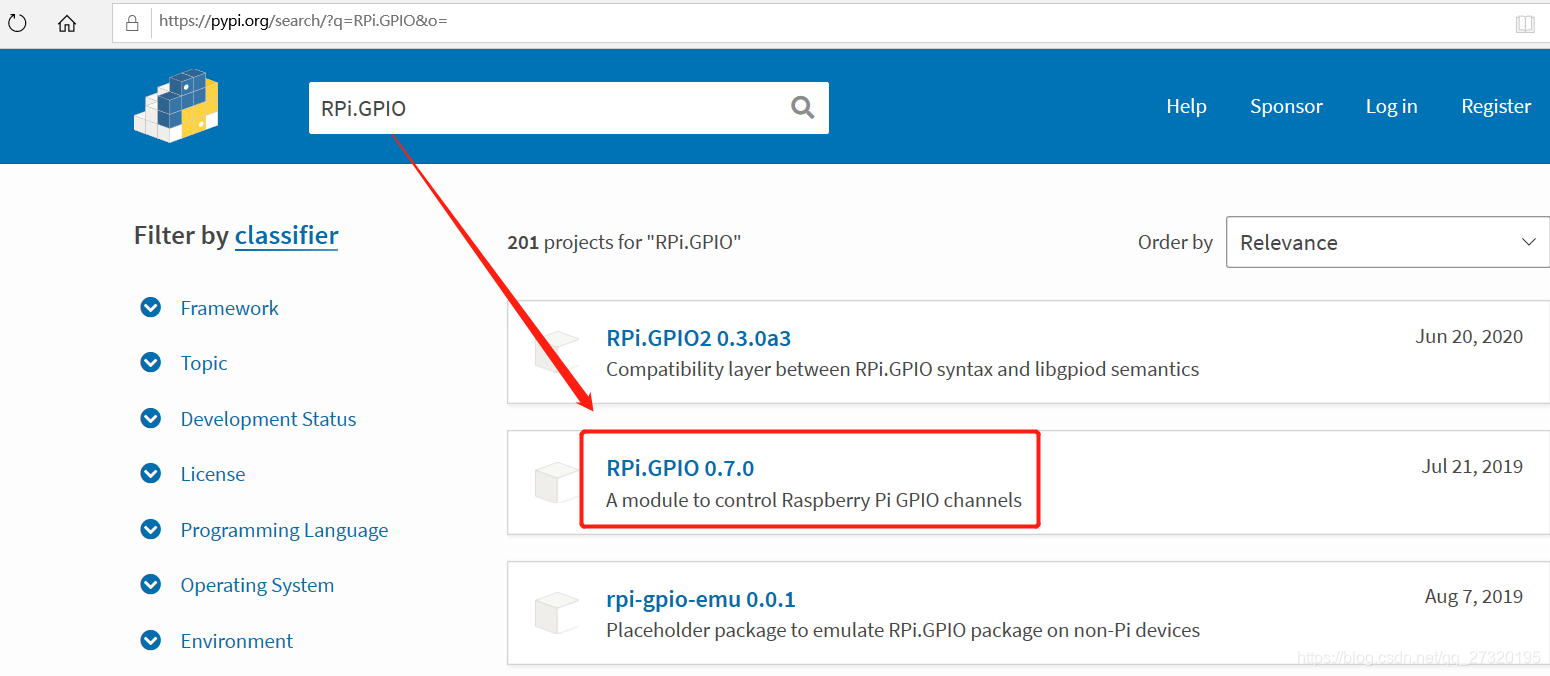 3)下载下来,得到源码 想办法放到树莓派中,就像这样(我用RPi.GPIO-0.6.3讲解) 3)下载下来,得到源码 想办法放到树莓派中,就像这样(我用RPi.GPIO-0.6.3讲解)  4)解压 4)解压 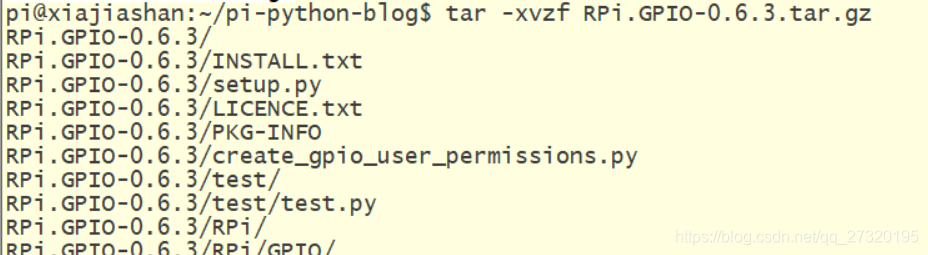 5)进入源码目录 5)进入源码目录  6)安装模块 sudo python setup.py install 一切就这么简单,别想得太难太复杂… 6)安装模块 sudo python setup.py install 一切就这么简单,别想得太难太复杂…
树莓派python编程手册介绍
树莓派的两大编程语言主要是C和Python,大家有C语言需求的请看我C部分的专栏。 Python编程手册,其实就是RPi.GPIO这个模块中的一些函数的使用方法。
如何快速查看帮助信息
该模块下的函数(用面向对象的术语说叫方法)可以这样查看: 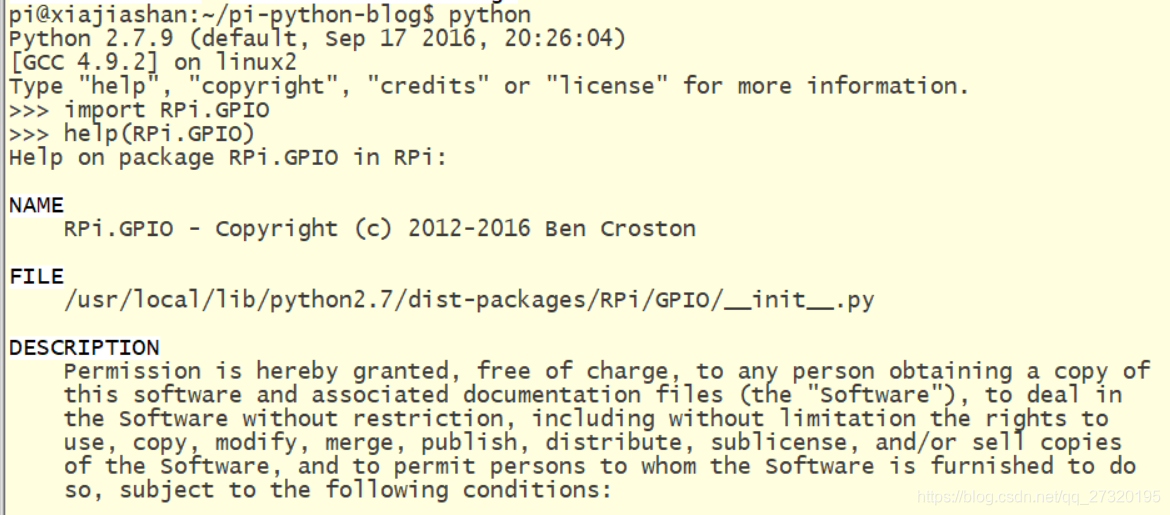 完整帮助信息如下: 完整帮助信息如下:
CLASSES
__builtin__.object
PWM
class PWM(__builtin__.object)
| Pulse Width Modulation class
|
| Methods defined here:
|
| ChangeDutyCycle(...)
| Change the duty cycle
| dutycycle - between 0.0 and 100.0
|
| ChangeFrequency(...)
| Change the frequency
| frequency - frequency in Hz (freq > 1.0)
|
| __init__(...)
| x.__init__(...) initializes x; see help(type(x)) for signature
|
| start(...)
| Start software PWM
| dutycycle - the duty cycle (0.0 to 100.0)
|
| stop(...)
:
CLASSES
__builtin__.object
PWM
class PWM(__builtin__.object)
| Pulse Width Modulation class
|
| Methods defined here:
|
| ChangeDutyCycle(...)
| Change the duty cycle
| dutycycle - between 0.0 and 100.0
|
| ChangeFrequency(...)
| Change the frequency
| frequency - frequency in Hz (freq > 1.0)
|
| __init__(...)
| x.__init__(...) initializes x; see help(type(x)) for signature
|
| start(...)
| Start software PWM
| dutycycle - the duty cycle (0.0 to 100.0)
|
| stop(...)
| Stop software PWM
|
| ----------------------------------------------------------------------
| Data and other attributes defined here:
|
| __new__ =
| T.__new__(S, ...) -> a new object with type S, a subtype of T
FUNCTIONS
add_event_callback(...)
Add a callback for an event already defined using add_event_detect()
channel - either board pin number or BCM number depending on which mode is set.
callback - a callback function
add_event_detect(...)
Enable edge detection events for a particular GPIO channel.
channel - either board pin number or BCM number depending on which mode is set.
edge - RISING, FALLING or BOTH
[callback] - A callback function for the event (optional)
[bouncetime] - Switch bounce timeout in ms for callback
cleanup(...)
Clean up by resetting all GPIO channels that have been used by this program to INPUT with no pullup/pulldown and no event detection
[channel] - individual channel or list/tuple of channels to clean up. Default - clean every channel that has been used.
event_detected(...)
Returns True if an edge has occured on a given GPIO. You need to enable edge detection using add_event_detect() first.
channel - either board pin number or BCM number depending on which mode is set.
getmode(...)
Get numbering mode used for channel numbers.
Returns BOARD, BCM or None
gpio_function(...)
Return the current GPIO function (IN, OUT, PWM, SERIAL, I2C, SPI)
channel - either board pin number or BCM number depending on which mode is set.
input(...)
Input from a GPIO channel. Returns HIGH=1=True or LOW=0=False
channel - either board pin number or BCM number depending on which mode is set.
output(...)
Output to a GPIO channel or list of channels
channel - either board pin number or BCM number depending on which mode is set.
value - 0/1 or False/True or LOW/HIGH
remove_event_detect(...)
Remove edge detection for a particular GPIO channel
channel - either board pin number or BCM number depending on which mode is set.
setmode(...)
Set up numbering mode to use for channels.
BOARD - Use Raspberry Pi board numbers
BCM - Use Broadcom GPIO 00..nn numbers
setup(...)
Set up a GPIO channel or list of channels with a direction and (optional) pull/up down control
channel - either board pin number or BCM number depending on which mode is set.
direction - IN or OUT
[pull_up_down] - PUD_OFF (default), PUD_UP or PUD_DOWN
[initial] - Initial value for an output channel
setwarnings(...)
Enable or disable warning messages
wait_for_edge(...)
Wait for an edge. Returns the channel number or None on timeout.
channel - either board pin number or BCM number depending on which mode is set.
edge - RISING, FALLING or BOTH
[bouncetime] - time allowed between calls to allow for switchbounce
[timeout] - timeout in ms
DATA
BCM = 11
BOARD = 10
BOTH = 33
FALLING = 32
HARD_PWM = 43
HIGH = 1
I2C = 42
IN = 1
LOW = 0
OUT = 0
PUD_DOWN = 21
PUD_OFF = 20
PUD_UP = 22
RISING = 31
RPI_INFO = {'MANUFACTURER': 'Sony', 'P1_REVISION': 3, 'PROCESSOR': 'BC...
RPI_REVISION = 3
SERIAL = 40
SPI = 41
UNKNOWN = -1
VERSION = '0.6.3'
(END)
RPi.GPIO函数介绍
参考资料:
https://sourceforge.net/p/raspberry-gpio-python/wiki/BasicUsage/
1:导入这个模块
要导入这个模块,需要执行下面的代码:
import RPi.GPIO as GPIO
By doing it this way, you can refer to it as just GPIO through the rest of your script.
通过这种方式,后续代码(也称为脚本script)你可以通过GPIO这个名字来使用这个模块(实际上上是使用了一个简称)
To import the module and check to see if it is successful:
如果要导入模块的同时检查是否成功,可以这样做
try:
import RPi.GPIO as GPIO
except RuntimeError:
print(“Error importing RPi.GPIO! This is probably because you need superuser privileges. You can achieve this by using ‘sudo’ to run your script”)
说明:
关键字Try和except的组合在Python中常用于捕捉异常(编程术语叫陷阱),在执行完
import RPi.GPIO as GPIO这条语句,会判断是否发生了RuntimeError错误(即运行错误),如果发生了,则条件成立,打印print函数里面的提示信息。
2. 引脚编号
当使用Rpi.GPIO模块编程的时候,树莓派的IO引脚有两种编码方式,第一种是BOARD编码方式,第二种是BCM编码方式,如下图所示:  你还可以通过命令查看,其实这种方式更方便 你还可以通过命令查看,其实这种方式更方便 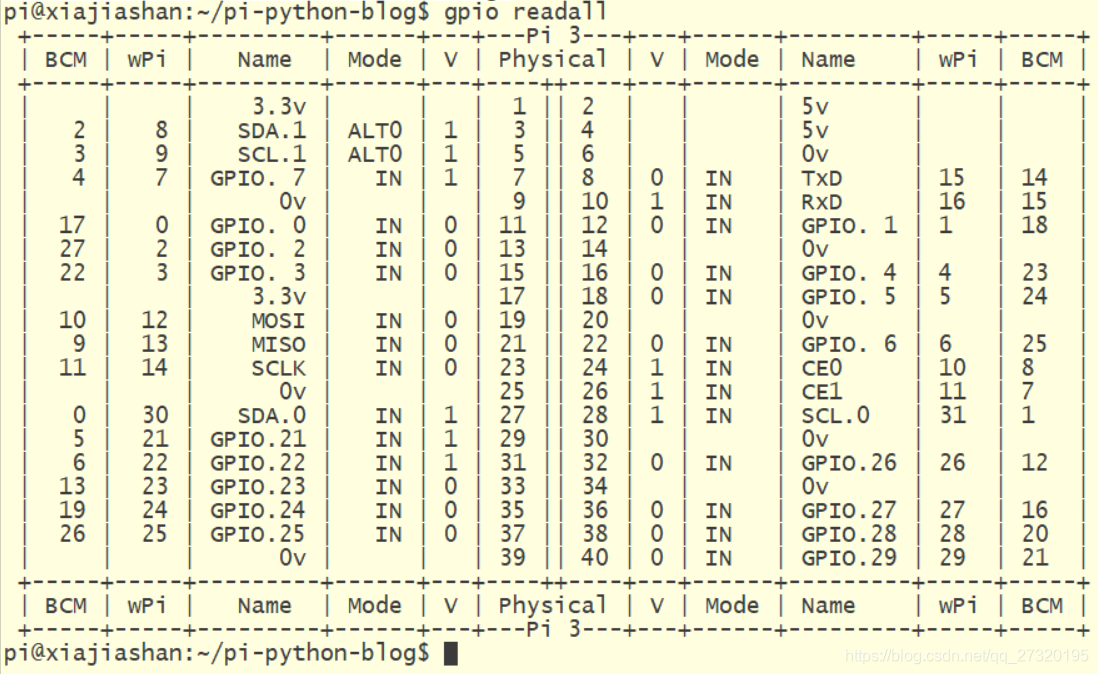 可以使用下面的代码设置你需要的引脚编码方式: GPIO.setmode(GPIO.BOARD) 可以使用下面的代码设置你需要的引脚编码方式: GPIO.setmode(GPIO.BOARD)
或者
GPIO.setmode(GPIO.BCM)
想知道你现在是什么引脚编码方式,可以执行下面的代码得到 mode = GPIO.getmode() 返回结果 mode 将是下面三种情况之一 GPIO.BOARD, GPIO.BCM or None
3.关于警告
It is possible that you have more than one script/circuit on the GPIO of your Raspberry Pi. As a result of this, if RPi.GPIO detects that a pin has been configured to something other than the default (input), you get a warning when you try to configure a script. To disable these warnings: 很有可能你需要设置你的树莓派引脚多种功能,此时,如果Rpi.GPIO模块检测到某个引脚被配置了默认功能以外的功能(默认是输入),你将得到一个警告,比如: 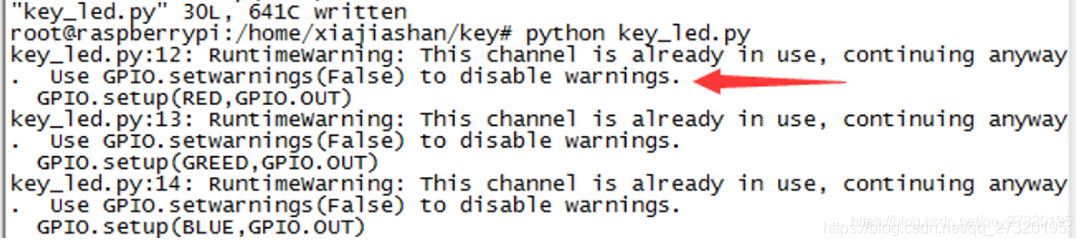 要解决这个问题,你只需要加入如下代码: GPIO.setwarnings(False) 要解决这个问题,你只需要加入如下代码: GPIO.setwarnings(False)
4.设置一个通道
(注意这里面的通道就是指引脚) 当你要使用一个引脚作为输入或者输出功能的时候,你必须要配置它。如果要配置某个通道(引脚)作为输入,执行如下脚本(代码) GPIO.setup(channel, GPIO.IN)
(这里的通道是指BOARD or BCM模式下的编码引脚). 配置某个引脚作为输出,执行如下代码: GPIO.setup(channel, GPIO.OUT) 你还可以在设置某个引脚为输入或者输出的同时,初始化它为高电平或者低电平,代码如下: GPIO.setup(channel, GPIO.OUT, initial=GPIO.HIGH)
5.一次设置多个引脚
你可以利用Python中的列表或者元组功能一次设置多个引脚: pin_list = [11,12] #使用列表方式同时设置第11号引脚和12号引脚为输出!
#你还可以以元组的方式来设置: pin_tulpe = (11,12) GPIO.setup(chan_list, GPIO.OUT)
6.关于输入
通过以下方式可以得到一个输入引脚的值: GPIO.input(channel) 上面的代码将返回一个0 / GPIO.LOW / False或者1 / GPIO.HIGH / True. 0代表低电平,False表示假,GPIO.LOW也表示低电平 1代表高电平,True表示真,GPIO.HIGH表示高电平
7.关于输出
要设置引脚的输出状态,代码如下: GPIO.output(channel, state) 这里State 可以是 0 / GPIO.LOW / False或者1 / GPIO.HIGH / True.
8.一次设置多个引脚输出状态
你能够一次设置多个引脚的输出状态. For example: chan_list = [11,12] # 列表的方式定义11和12引脚 GPIO.output(chan_list, GPIO.LOW) # sets all to GPIO.LOW GPIO.output(chan_list, (GPIO.HIGH, GPIO.LOW)) # 设置11号引脚为高电平,12号引脚为低电平
9.Cleanup(释放资源)
一个好的编程习惯是:在程序结束的时候,通过cleanup函数释放所有资源。虽然系统会帮你释放,但是养成这种习惯是很好的,比如你在某个时候需要切换引脚的状态,之前是输入,某个时候要切换到输出,那么在设置输出状态的时候,你应该先释放着引脚,然后切换到输出。 通过下面的代码你可以释放正在使用的所有引脚: GPIO.cleanup() 你还可以释放某个引脚,或者通过列表或者元组方式释放多个引脚: GPIO.cleanup(channel) GPIO.cleanup( (channel1, channel2) ) GPIO.cleanup( [channel1, channel2] )
10.树莓派开发板信息和GPIO模块版本信息
想知道你现在树莓派开发板信息,可以执行如下代码: GPIO.RPI_INFO 要知道你的树莓派的版本信息可以执行如下代码: GPIO.RPI_INFO[‘P1_REVISION’] GPIO.RPI_REVISION (deprecated) 想获取Python中 RPi.GPIO模块的版本信息,执行如下代码: GPIO.VERSION 
END
本文到这里结束,因为是智能拼音,打字难免有误,如果发现麻烦在评论区提醒一下。 如果觉得本文对您有帮助就收藏吧! 第一课:什么是树莓派 第二课:树莓派能做什么 第三课:购买您的第一个树莓派 第四课:如何安装树莓派系统 第五课:树莓派Python编程手册
|