| Ubuntu系统下用VSCode断点调试C++代码 | 您所在的位置:网站首页 › ubuntu下的vscode配置 › Ubuntu系统下用VSCode断点调试C++代码 |
Ubuntu系统下用VSCode断点调试C++代码
|
文章目录
0 引言1 创建vsdebug工程1.1 创建文件夹和文件1.2 C++代码1.3 CMakeLists.txt1.4 build.sh脚本
2 VSCode配置文件2.1 tasks.json2.2 launch.json
3 编译运行和调试3.1 编译运行3.2 调试
0 引言
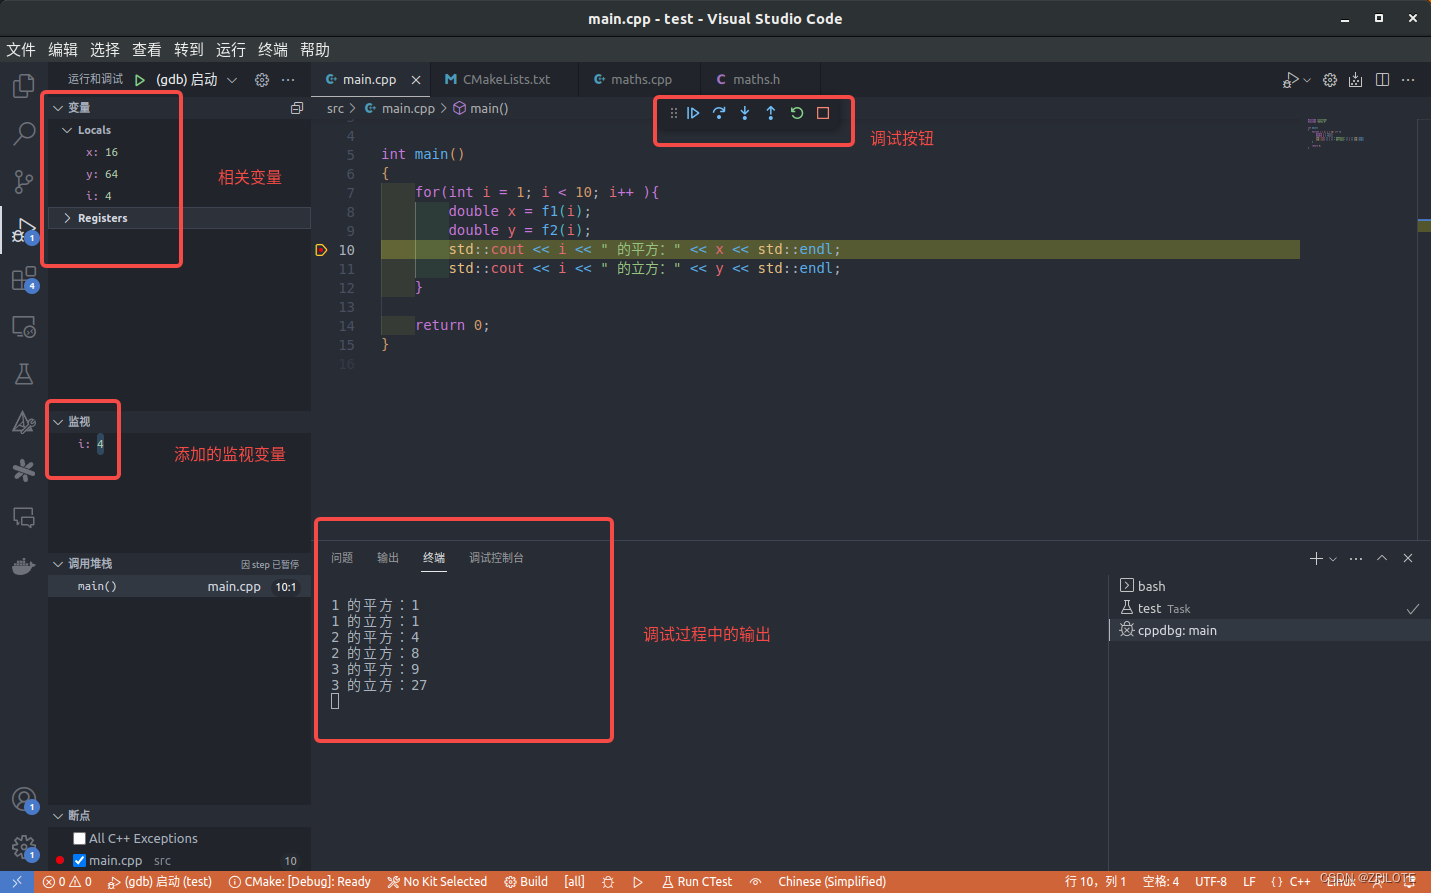
Ubuntu下不能像Windows下使用Visual Studio那样方便Debug调试C++代码,所以学习记录一种用VSCode断点调试C++代码的方法。 默认已在Ubuntu下安装了VSCode 以下示例工程vsdebug文件夹下的文件目录: # vsdebug文件夹下 . ├── build.sh ├── CMakeLists.txt ├── include │ └── maths.h ├── src │ ├── main.cpp │ └── maths.cpp └── .vscode ├── launch.json ├── settings.json └── tasks.json👉本文代码GitHub:https://github.com/MRZHUGH/CSDN/tree/main/cpp/vsdebug 1 创建vsdebug工程 1.1 创建文件夹和文件 # 新开终端,比如home目录下 mkdir vsdebug cd vsdebug mkdir include src touch CMakeLists.txt build.sh touch include/maths.h src/main.cpp src/maths.cpp然后把这个vsdebug工程在VSCode中打开。 1.2 C++代码整体示例代码为了实现打印出1~9的平方和立方,其中输入一个数返回这个数的平方和立方的函数在maths.h和maths.cpp实现,调用函数计算1~9的平方和立方在main.cpp实现。 打开maths.h,声明f1, f2函数: #ifndef MATHS_H_ #define MATHS_H_ double f1(double a); double f2(double b); #endif /* MATHS_H_ */打开maths.cpp,定义f1 , f2函数: #include "maths.h" // 平方计算 double f1(double a) { return a * a; } // 立方计算 double f2(double b) { return b * b * b; }打开main.cpp,调用f1, f2函数: #include #include "maths.h" int main() { for(double i = 1.0; i // See https://go.microsoft.com/fwlink/?LinkId=733558 // for the documentation about the tasks.json format "version": "2.0.0", "tasks": [ { "label": "vsdebug", "type": "shell", "command": "bash ./build.sh", "args": [], "group": { "kind": "build", "isDefault": true } } ] } 2.2 launch.jsonVSCode中launch.json文件主要是设置如何调试,直接点击左侧边栏的Run and Debug图标,点击create a launch.json file,选择C++(GDB/LLDB),选择Default Configuration,就能自动生成launch.json文件。 一般情况下只需要改program部分内容改为项目路径下生成的执行文件即可,如果需要调试前重新编译一遍,可以新增一条preLaunchTask,内容改为tasks.json中的label名称,这里修改成vsdebug { // 使用 IntelliSense 了解相关属性。 // 悬停以查看现有属性的描述。 // 欲了解更多信息,请访问: https://go.microsoft.com/fwlink/?linkid=830387 "version": "0.2.0", "configurations": [ { "name": "(gdb) 启动", "type": "cppdbg", "request": "launch", "program": "${workspaceFolder}/bin/main", //只修改这里 "args": [], "stopAtEntry": false, "cwd": "${fileDirname}", "environment": [], "externalConsole": false, "MIMode": "gdb", "setupCommands": [ { "description": "为 gdb 启用整齐打印", "text": "-enable-pretty-printing", "ignoreFailures": true } ], "preLaunchTask": "vsdebug" // 可以新增一条 } ] } 3 编译运行和调试 3.1 编译运行因为已经把mkdir build && cd build , cmake .. , make 编译三件套写到 build.sh中,所以可以直接执行: # 第一次给可执行权限 sudo chmod +x build.sh bash build.sh编译运行后的结果,打印出: 1 的平方:1 1 的立方:1 2 的平方:4 2 的立方:8 3 的平方:9 3 的立方:27 4 的平方:16 4 的立方:64 5 的平方:25 5 的立方:125 6 的平方:36 6 的立方:216 7 的平方:49 7 的立方:343 8 的平方:64 8 的立方:512 9 的平方:81 9 的立方:729 3.2 调试VSCode调试可以直接摁F5,或者点击VSCode的运行–>运行调试,调试前可先设定断点,比如在main函数中给double y = f2(i);设置断点,也可以把某个变量添加到监视中,比如对main函数中的 i 添加监视,执行调试后,可以执行 单步跳过调试 或 单步调试
至此,成功在Ubuntu系统中用VSCode断点调试C++代码。 须知少时凌云志,曾许人间第一流。⭐️👍👍👍👍👍👍👍👍👍👍👍👍👍👍👍👍👍👍👍👍👍👍👍👍👍👍👍👍👍👍👍👍👍👍👍👍👍👍👍👍👍👍👍👍👍👍🌔 |
【本文地址】