| Autoware.universe部署01:Ubuntu20.04安装Autoware.universe并与Awsim联调 | 您所在的位置:网站首页 › mujiverse › Autoware.universe部署01:Ubuntu20.04安装Autoware.universe并与Awsim联调 |
Autoware.universe部署01:Ubuntu20.04安装Autoware.universe并与Awsim联调
|
文章目录
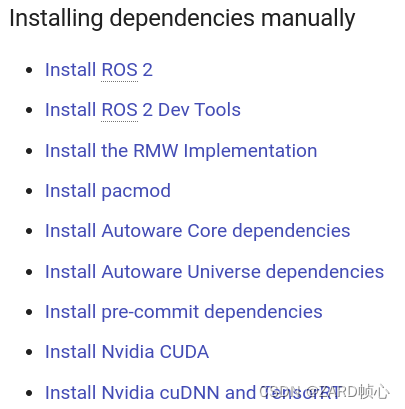
引言一、安装依赖1.1 安装git1.2 克隆Autoware到本地1.3 自动安装相关依赖1.4 安装显卡驱动1.5 安装ROS2 Galactic1.6 安装ros2_dev_tools1.7 安装rmw_implementation1.8 安装pacmod1.9 安装autoware_core1.10 安装autoware universe dependencies1.11 安装pre_commit1.12 安装CUDA1.13 安装cuDNN and TensorRT
二、编译源码2.1 下载Universe代码库2.2 安装 Autoware ROS依赖包2.3 编译工作空间2.4 编译报错
三、 运行示例3.1 路径规划与车道跟随3.2 倒车入库3.3 添加行人与车辆3.4 交通灯识别仿真3.5 靠边停车3.5.1 平移停靠3.5.2 几何停靠3.5.3 后向停靠
3.6 路边起步3.6.1 平移起步3.6.2 几何起步与后向起步
3.7 变道3.8 禁停区
四、安装Awsim五、Autoware与Awsim联调
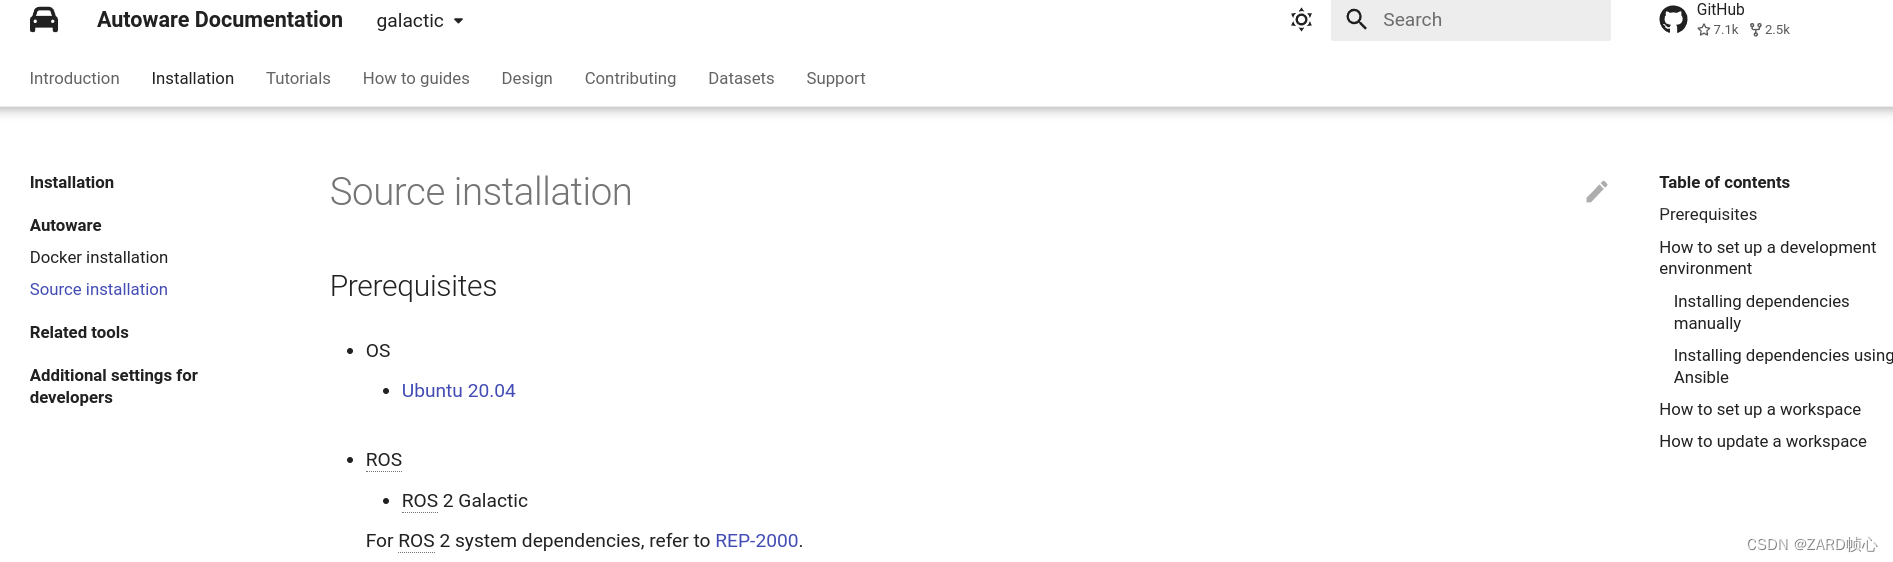
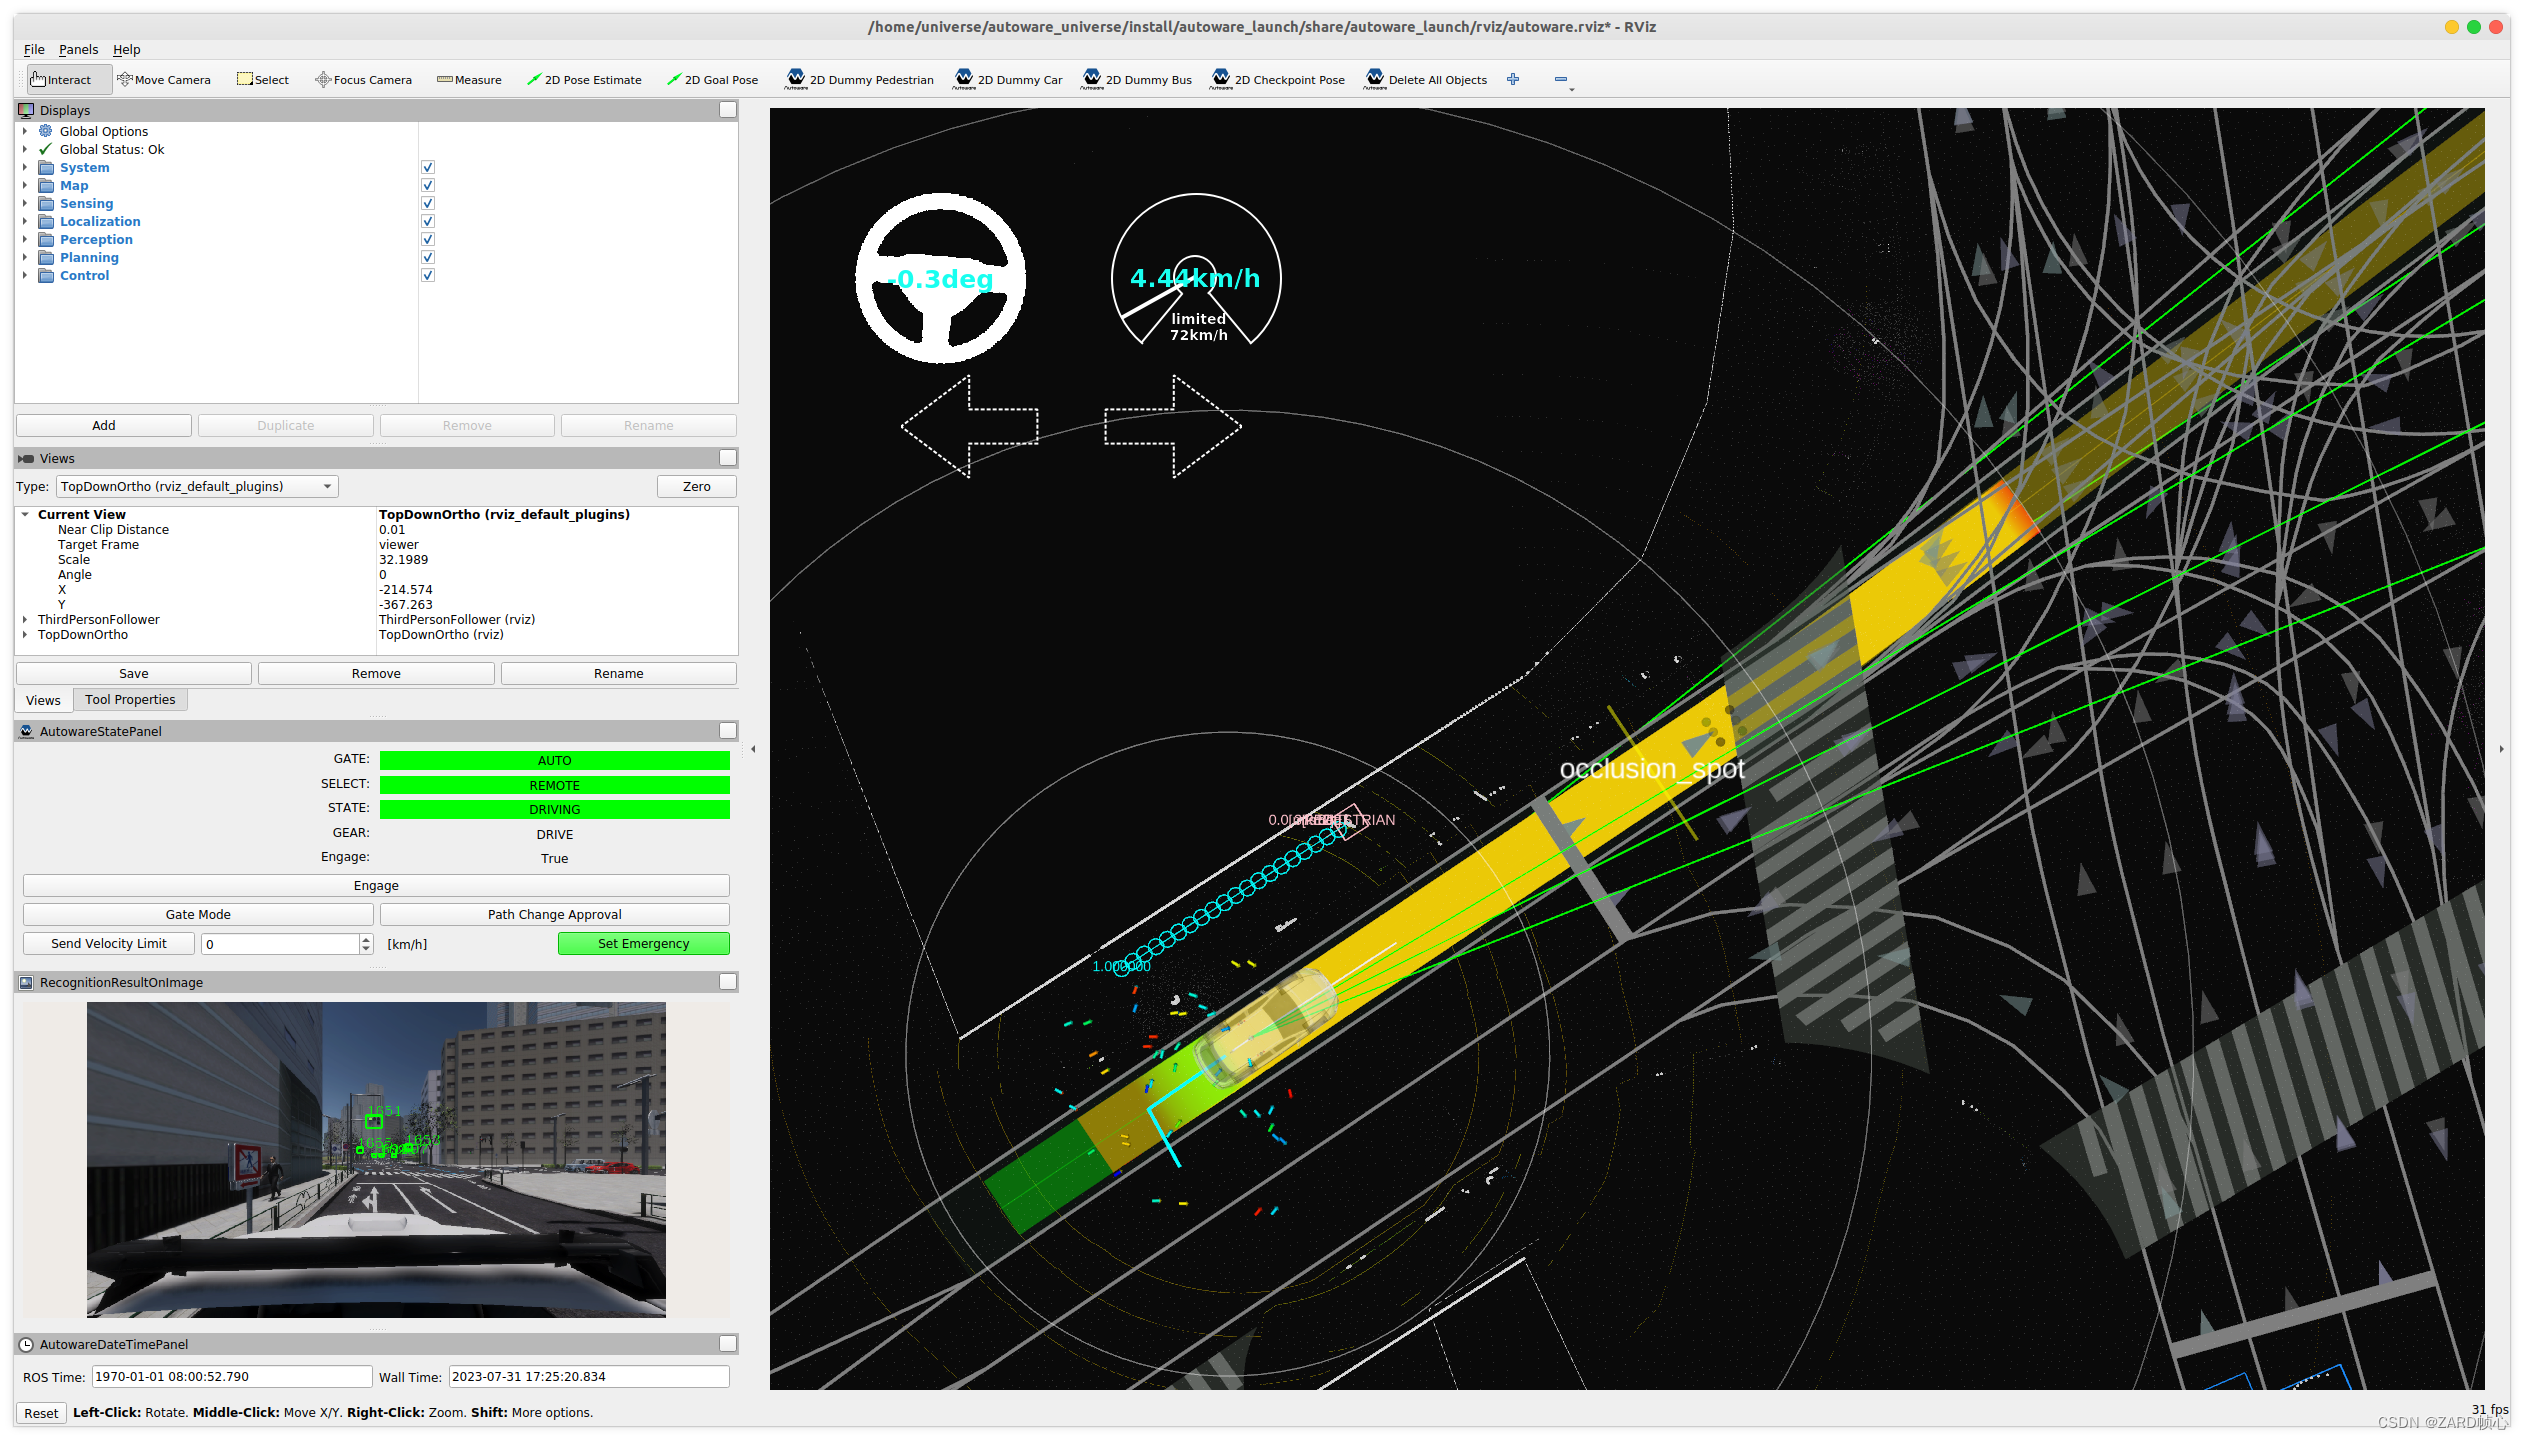
本文介绍Autoware.universe在Ubuntu20.04中的详细安装步骤,并测试一些Autoware.universe的基本功能,最后测试使用官方模拟器进行联调,本系列其他文章: Autoware.universe部署02:高精Lanelet2地图的绘制 Autoware.universe部署03:与Carla(二进制版)联调 Autoware.universe部署04:universe传感器ROS2驱动 引言本文介绍Autoware.universe在Ubuntu20.04中的详细安装步骤,基于ROS2 Galactic,其官方网站:Autoware Documentation 注意:左上角选择Galactic版本 最终运行效果: 在第3步自动安装依赖时,可以将ROS2 Galactic一并安装,也可以提前自己手动安装。 1.1 安装git sudo apt-get -y update sudo apt-get -y install git 1.2 克隆Autoware到本地 mkdir autoware_universe cd autoware_universe/ git clone https://github.com/autowarefoundation/autoware.git -b galactic 1.3 自动安装相关依赖 cd autoware ./setup-dev-env.sh
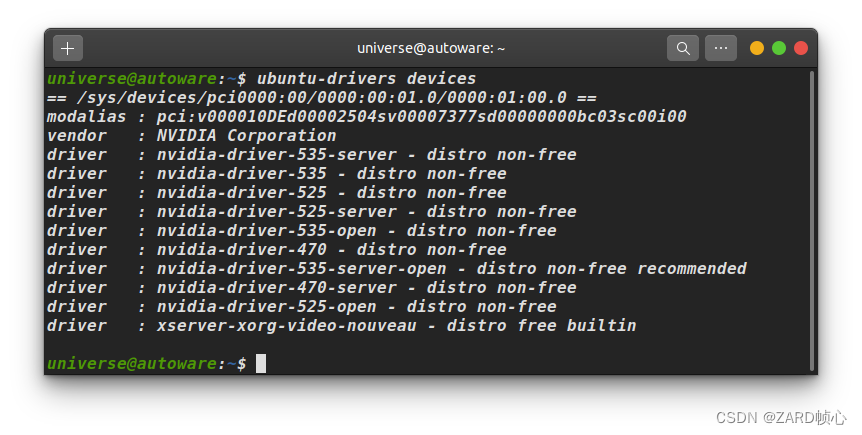
试了一下这个不太行,接下来再全部手动安装,按照官方给定的每一步骤链接进入获得安装命令(注意:进入之后要选择Galactic版本,如下图左上角,但是官方给的实际上有一点点问题,可以参考我下面的步骤): 查看推荐显卡 ubuntu-drivers devices
安装recommend推荐显卡版本,这里推荐的是535版本 sudo apt-get install nvidia-driver-535要选择版本不然会自动更新内核。 但是我安装535会黑屏,只能安装了510,由于是刚安装的系统,更新了内核也没太大的影响,另外安装版本太低的话也不行,因为下面安装CUDA要求最小版本 1.5 安装ROS2 Galactic鱼香ros一键安装: wget http://fishros.com/install -O fishros && . fishros 选择[1]:一键安装:ROS(支持ROS和ROS2,树莓派Jetson)选择[1]:更换系统源再继续安装,若是已经换过源可以选择[2]不更换源选择[2]:更换系统源并清理第三方源选择[3]:galactic(ROS2)选择[1]:galactic(ROS2)桌面版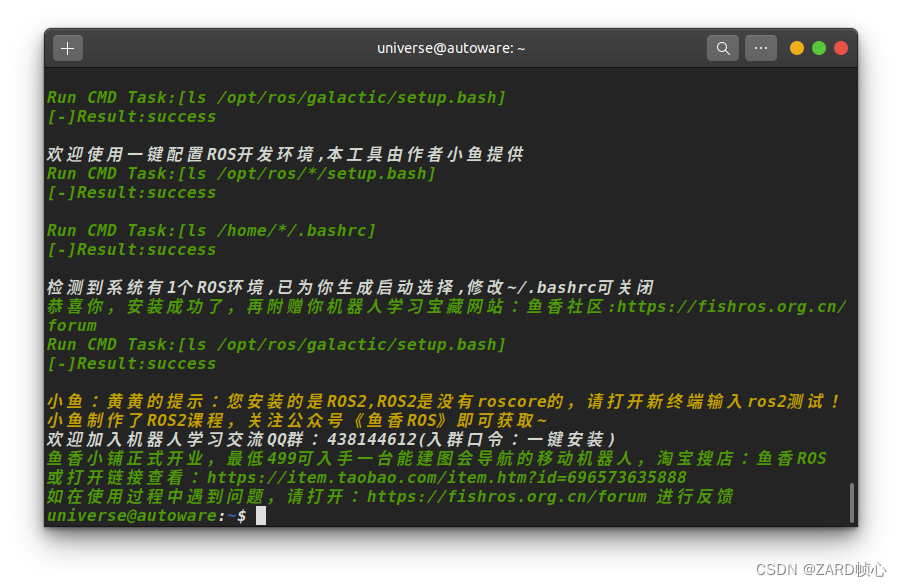 1.6 安装ros2_dev_tools
sudo apt update && sudo apt install -y \
build-essential \
cmake \
git \
python3-colcon-common-extensions \
python3-flake8 \
python3-pip \
python3-pytest-cov \
python3-rosdep \
python3-setuptools \
python3-vcstool \
wget
python3 -m pip install -U \
flake8-blind-except \
flake8-builtins \
flake8-class-newline \
flake8-comprehensions \
flake8-deprecated \
flake8-docstrings \
flake8-import-order \
flake8-quotes \
pytest-repeat \
pytest-rerunfailures \
pytest \
setuptools
1.6 安装ros2_dev_tools
sudo apt update && sudo apt install -y \
build-essential \
cmake \
git \
python3-colcon-common-extensions \
python3-flake8 \
python3-pip \
python3-pytest-cov \
python3-rosdep \
python3-setuptools \
python3-vcstool \
wget
python3 -m pip install -U \
flake8-blind-except \
flake8-builtins \
flake8-class-newline \
flake8-comprehensions \
flake8-deprecated \
flake8-docstrings \
flake8-import-order \
flake8-quotes \
pytest-repeat \
pytest-rerunfailures \
pytest \
setuptools
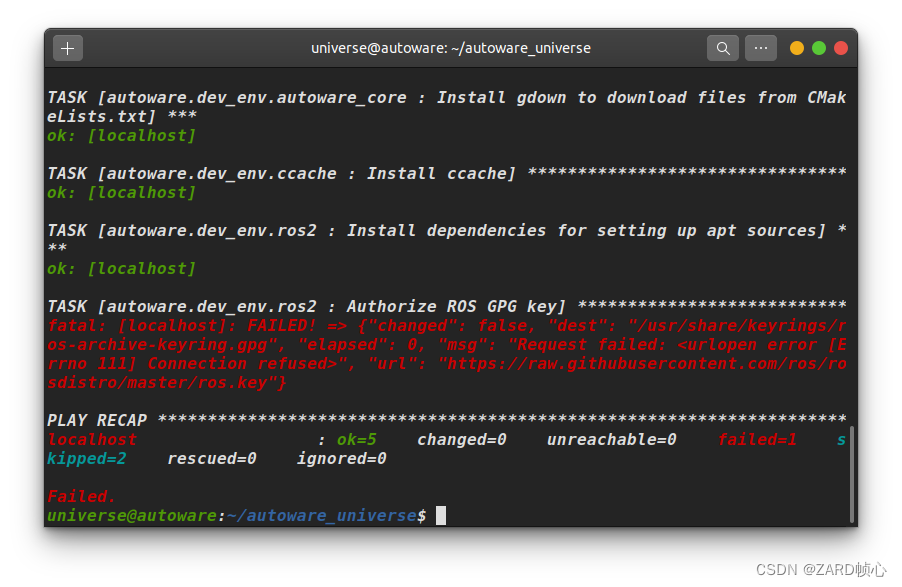
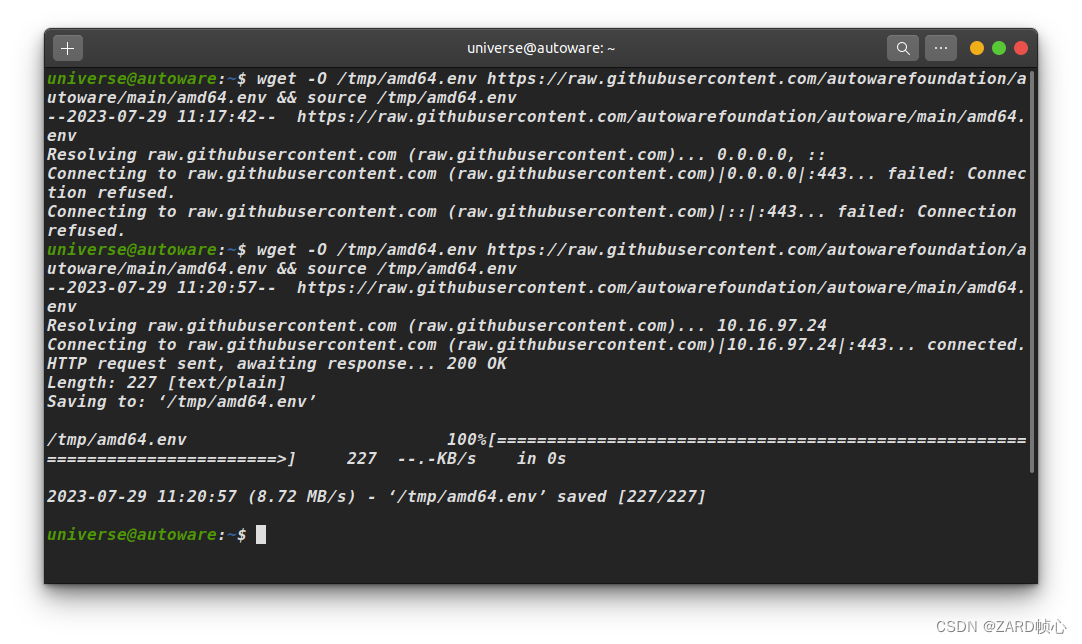
如果报以上的错误,就安装依赖: sudo apt install python3-testresources下面命令若是遇到问题可以参考文章:Ubuntu20.04同时安装ROS1和ROS2共存,科学上网或者使用鱼香ROS rosdepc sudo rosdep init rosdep update若报错: ERROR: cannot download default sources list from: https://raw.githubusercontent.com/ros/rosdistro/master/rosdep/sources.list.d/20-default.list Website may be down.原因是GitHub的raw.githubusercontent.com无法连接,需要解决GitHub的raw.githubusercontent.com无法连接问题 通过https://www.ipaddress.com/首页,输入raw.githubusercontent.com查询到真实IP地址,修改hosts Ubuntu: sudo gedit /etc/hosts添加查到的ip内容保存,再重启网络就好了即可 185.199.108.133 raw.githubusercontent.com sudo /etc/init.d/network-manager restart然后输入sudo rosdep init就可以了 注:后面我又发现一种更好的办法,参考:https://mirrors.tuna.tsinghua.edu.cn/help/rosdistro/ # 手动模拟 rosdep init sudo mkdir -p /etc/ros/rosdep/sources.list.d/ sudo curl -o /etc/ros/rosdep/sources.list.d/20-default.list https://mirrors.tuna.tsinghua.edu.cn/github-raw/ros/rosdistro/master/rosdep/sources.list.d/20-default.list # 为 rosdep update 换源 export ROSDISTRO_INDEX_URL=https://mirrors.tuna.tsinghua.edu.cn/rosdistro/index-v4.yaml # 后面的参数是为了不跳过ROS版本 rosdep update --include-eol-distros # 每次 rosdep update 之前,均需要增加该环境变量 # 为了持久化该设定,可以将其写入 .bashrc 中,例如 echo 'export ROSDISTRO_INDEX_URL=https://mirrors.tuna.tsinghua.edu.cn/rosdistro/index-v4.yaml' >> ~/.bashrc 1.7 安装rmw_implementation # wget -O /tmp/amd64.env https://raw.githubusercontent.com/autowarefoundation/autoware/main/amd64.env && source /tmp/amd64.env # 注意官网给的是mian,humble的,需要改成galactic wget -O /tmp/amd64.env https://raw.githubusercontent.com/autowarefoundation/autoware/galactic/amd64.env && source /tmp/amd64.env如果第一句报以下问题:拒绝连接,有两种解决办法(推荐第二种) (1)科学上网 (2)amd64.env是一些软件对应版本的环境变量,我们其实在1.2节已经下载了,source一下就好了 cd autoware_universe/ source amd64.env
下面这句报以下错误,将ROS版本变量改成galactic(报这个错是因为下载了main-对应humble的amd.env,上面改成galactic版本理论上就不会报这个错) wget上面已经处理过一次了,这里可以只source(找不到就再复制一次) 1.9 安装autoware_core pip3 install gdown 1.10 安装autoware universe dependencies sudo apt install geographiclib-tools # Add EGM2008 geoid grid to geographiclib # 下面过程很慢,耐心等待 sudo geographiclib-get-geoids egm2008-1 1.11 安装pre_commit clang_format_version=14.0.6 pip3 install pre-commit clang-format==${clang_format_version} # Install Golang (Add Go PPA for shfmt) sudo add-apt-repository ppa:longsleep/golang-backports sudo apt install golang 1.12 安装CUDA # wget -O /tmp/amd64.env https://raw.githubusercontent.com/autowarefoundation/autoware/galactic/amd64.env && source /tmp/amd64.env cd autoware_universe/ source amd64.env # Modified from: # https://developer.nvidia.com/cuda-11-4-4-download-archive?target_os=Linux&target_arch=x86_64&Distribution=Ubuntu&target_version=20.04&target_type=deb_network wget https://developer.download.nvidia.com/compute/cuda/repos/ubuntu2004/x86_64/cuda-ubuntu2004.pin sudo mv cuda-ubuntu2004.pin /etc/apt/preferences.d/cuda-repository-pin-600 sudo apt-key adv --fetch-keys https://developer.download.nvidia.com/compute/cuda/repos/ubuntu2004/x86_64/3bf863cc.pub sudo add-apt-repository "deb https://developer.download.nvidia.com/compute/cuda/repos/ubuntu2004/x86_64/ /" sudo apt-get update cuda_version_dashed=$(eval sed -e "s/[.]/-/g" PATH}} export LD_LIBRARY_PATH=/usr/local/cuda-11.6/lib64${LD_LIBRARY_PATH:+:${LD_LIBRARY_PATH}}或者终端输入以下命令添加: # Taken from: https://docs.nvidia.com/cuda/cuda-installation-guide-linux/index.html#post-installation-actions echo 'export PATH=/usr/local/cuda-11.6/bin${PATH:+:${PATH}}' >> ~/.bashrc echo 'export LD_LIBRARY_PATH=/usr/local/cuda-11.6/lib64${LD_LIBRARY_PATH:+:${LD_LIBRARY_PATH}}' >> ~/.bashrc验证是否安装成功 nvcc -V
(1)创建 src 文件夹 cd autoware_universe/ mkdir src(2)修改 autoware.repos 文件 sudo gedit autoware.repos在autoware.repos 文件中,28行位置加入以下内容 universe/external/open_planner: type: git url: https://github.com/ZATiTech/open_planner.git version: main(3)下载代码库到本地 vcs import src |


【本文地址】
| 今日新闻 |
| 推荐新闻 |
| 专题文章 |