| 海思3559 yolov5模型转wk详细笔记 | 您所在的位置:网站首页 › 华为海思3559开机自动挂载nfs › 海思3559 yolov5模型转wk详细笔记 |
海思3559 yolov5模型转wk详细笔记
|
文章目录
前言1.编译caffer1.1安装虚拟机1.2安装caffer1.3编译python接口
2.适应wk的yolov5模型训练2.1下载yolov5-6.0项目源码2.2安装yolov5-6.0运行环境2.3修改模型2.4修改数据集2.5修改模型算子2.6 模型训练
3.模型转换:pt->onnx->caffe->wk3.1 pt->onnx3.2 onnx->caffe3.4 caffe->wk
总结
前言
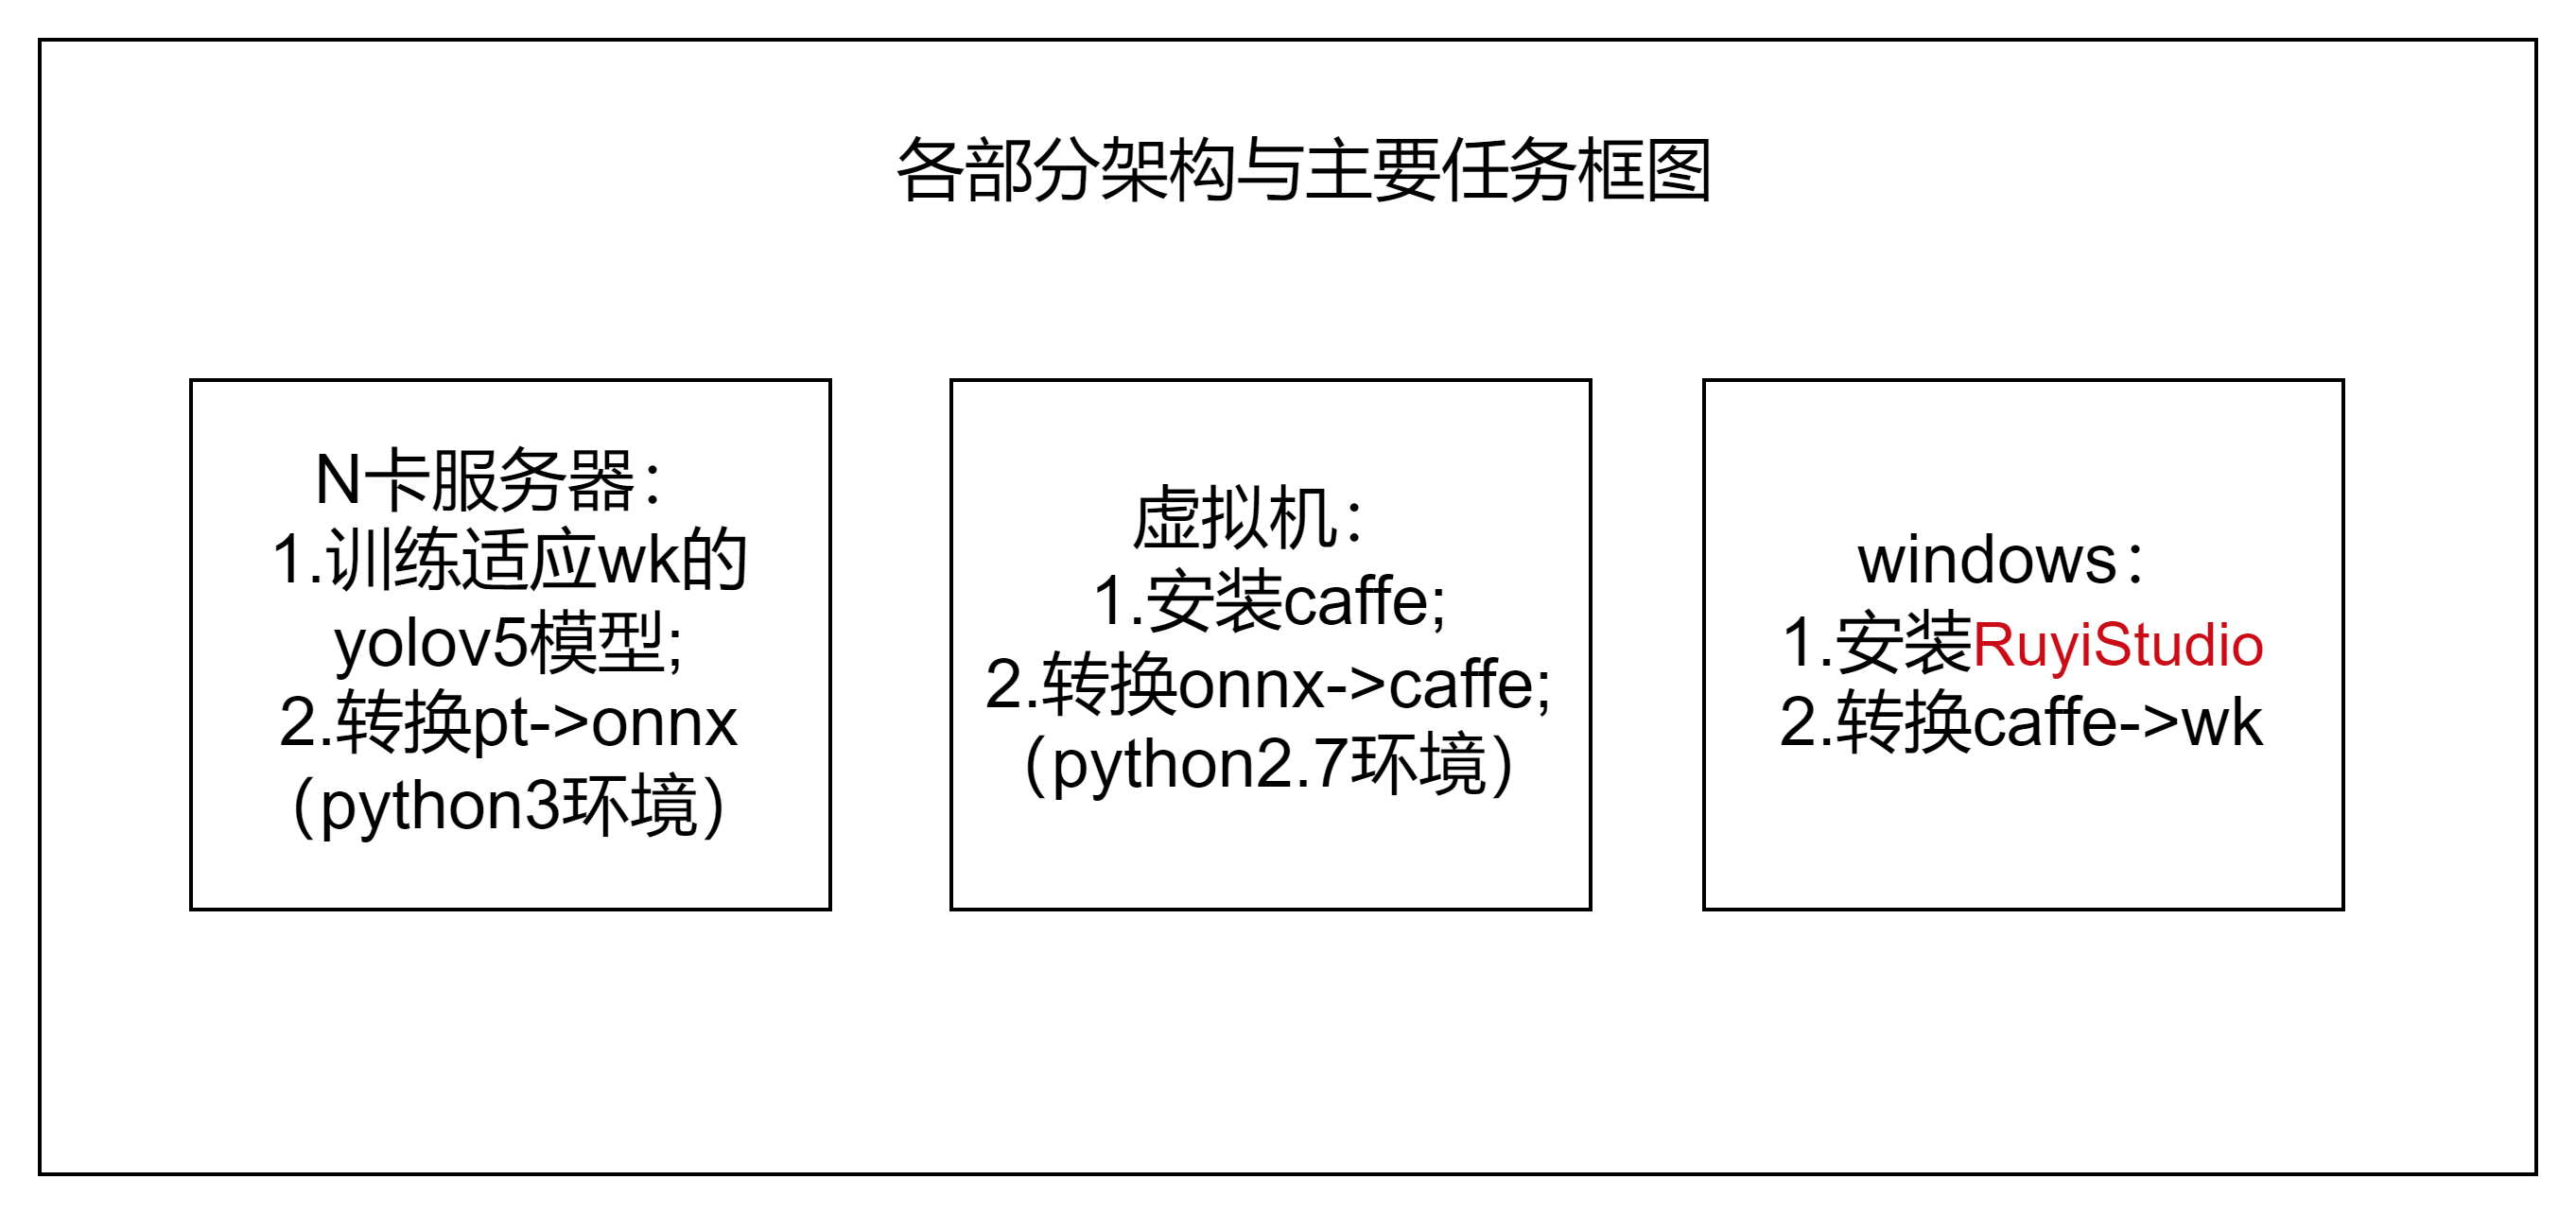
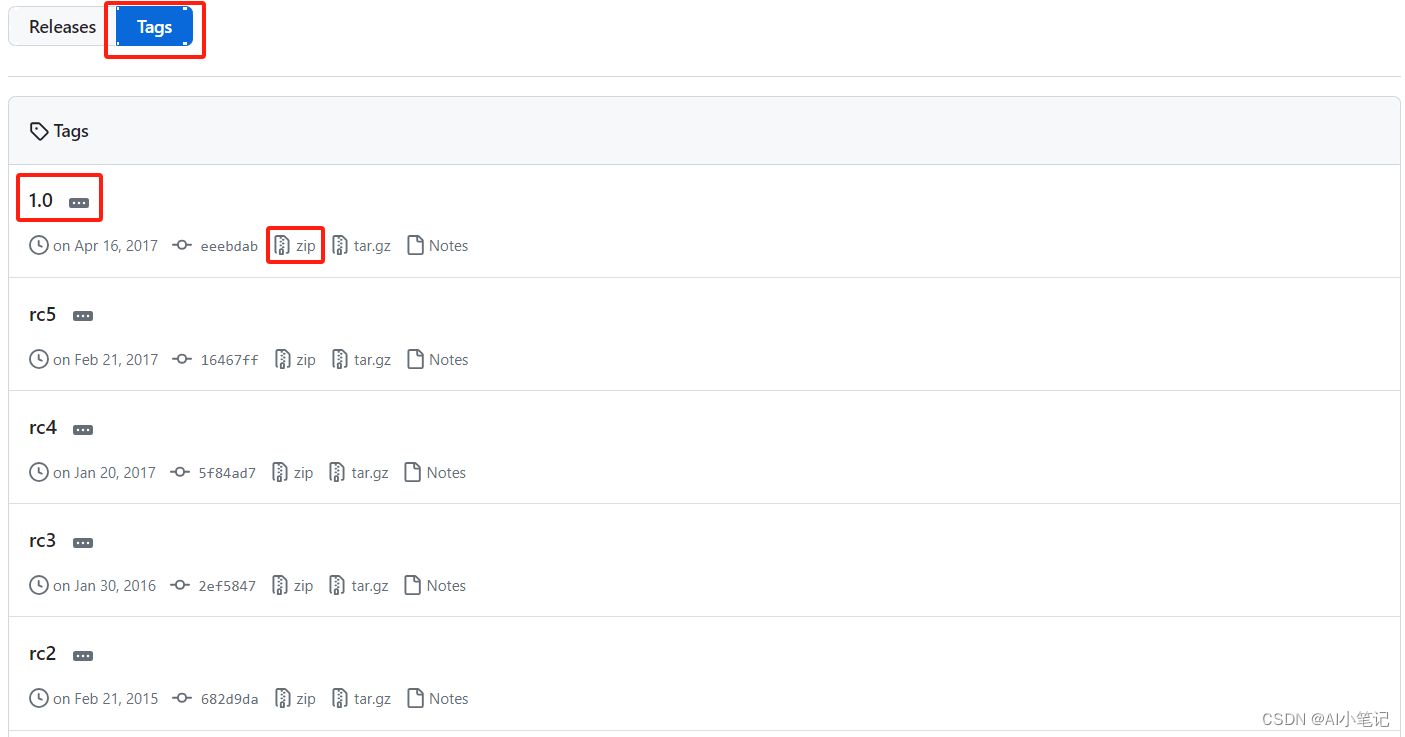
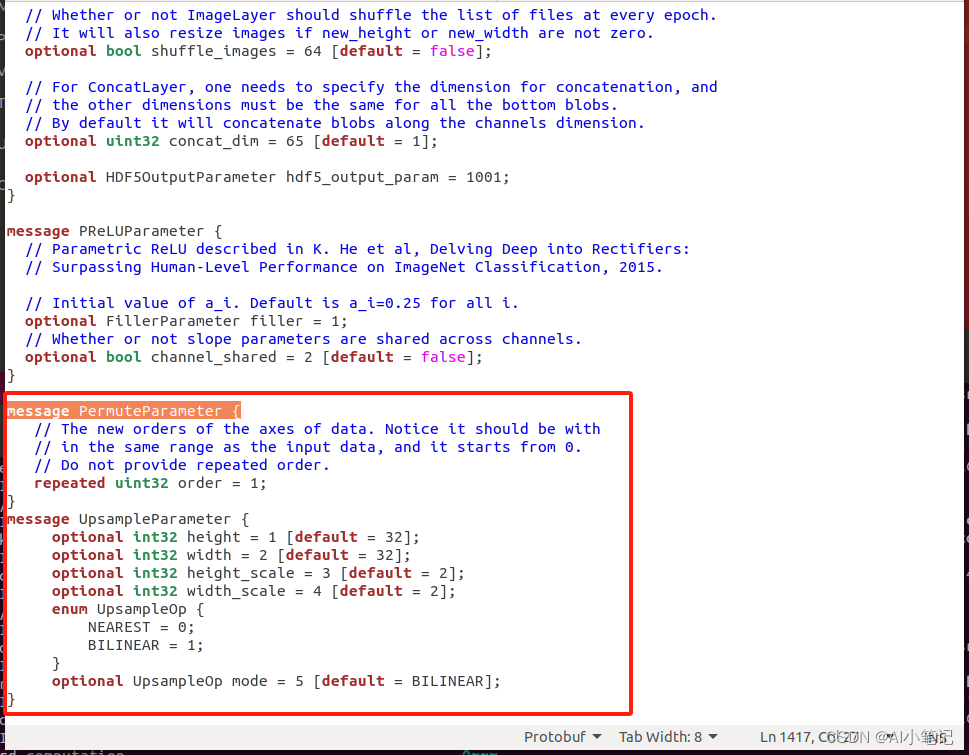
目前项目需要在海思3559上开发,但查了相关文档,感觉还是比较复杂的。相比于3403、3519的使用atc工具直接从onnx->om,3559需要从onnx->caffer->wk则显得复杂许多,特此记录一下。 下面先给笔者自己在此过程中的架构与各架构的主要任务框图: 笔者使用的是VM安装的Ubuntu18.04 这里关于安装虚拟机与换源等操作不再赘述,默认读者都已经准备完成了。 1.2安装caffer安装依赖库 sudo apt-get update sudo apt-get install libprotobuf-dev sudo apt-get install libleveldb-dev sudo apt-get install libsnappy-dev sudo apt-get install libopencv-dev sudo apt-get install libhdf5-serial-dev sudo apt-get install protobuf-compiler sudo apt-get install libgflags-dev sudo apt-get install libgoogle-glog-dev sudo apt-get install liblmdb-dev sudo apt-get install libatlas-base-dev sudo apt-get install --no-install-recommends libboost-all-dev下载项目源码 由于笔者虚拟机上没梯子,就用zip包的方式下载源码。 下载caffer源码 https://github.com/BVLC/caffe/tags 添加upsample层和transpose层 将caffe_plus/include/caffe/layers/upsample_layer.hpp caffe_plus/include/caffe/layers/permute_layer.hpp 复制到caffe/include/caffe/layers/ 将caffe_plus/src/caffe/layers/upsample_layer.cpp caffe_plus/src/caffe/layers/upsample_layer.cu caffe_plus/src/caffe/layers/permute_layer.cpp caffe_plus/src/caffe/layers/permute_layer.cu 复制到caffe/src/caffe/layers/ 修改caffe.proto文件 gedit caffe/src/caffe/proto/caffe.proto 在optional WindowDataParameter window_data_param = 129;(约第407行)后增加代码: optional PermuteParameter permute_param = 150; optional UpsampleParameter upsample_param = 151;
在末尾增加代码: message PermuteParameter { // The new orders of the axes of data. Notice it should be with // in the same range as the input data, and it starts from 0. // Do not provide repeated order. repeated uint32 order = 1; } message UpsampleParameter { optional int32 height = 1 [default = 32]; optional int32 width = 2 [default = 32]; optional int32 height_scale = 3 [default = 2]; optional int32 width_scale = 4 [default = 2]; enum UpsampleOp { NEAREST = 0; BILINEAR = 1; } optional UpsampleOp mode = 5 [default = BILINEAR]; }
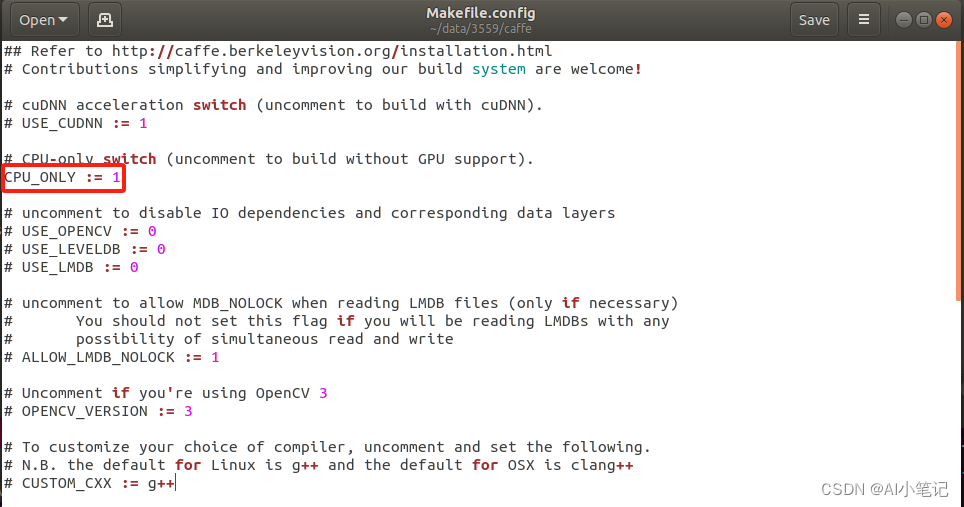
配置Makefike.config //进入caffe目录 cd caffe //备份配置文件 cp Makefike.config.example Makefike.config //打开配置文件 gedit Makefile.config去掉CPU_ONLY前面的#号注释,使得CPU_ONLY := 1
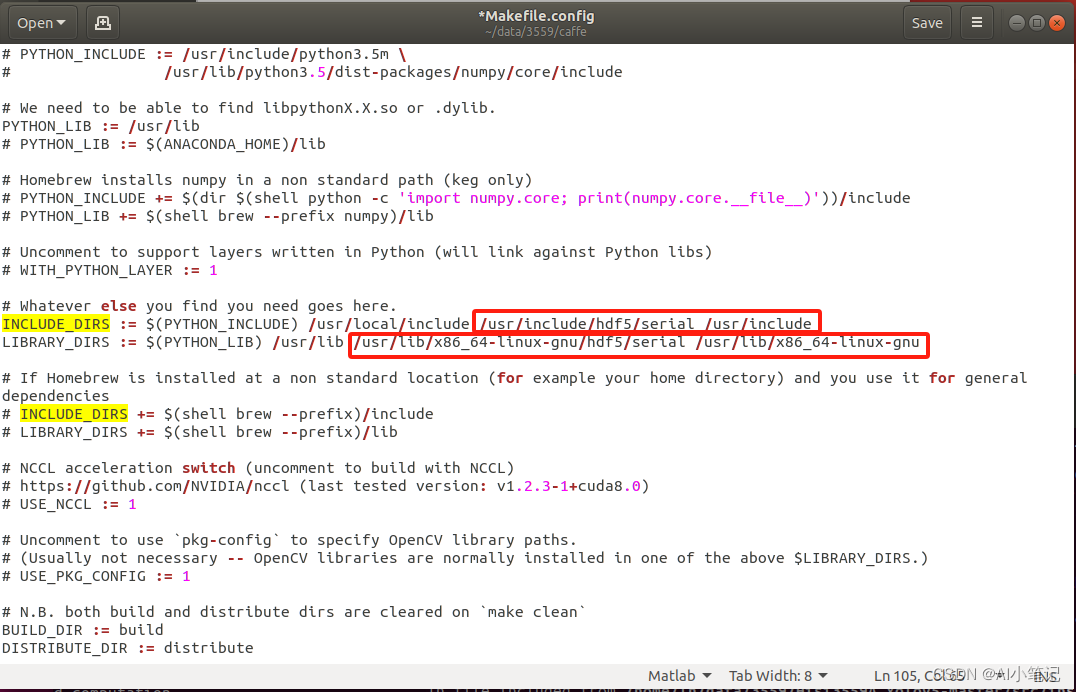
找到INCLUDE_DIRS 其后面新增内容 /usr/include/hdf5/serial与/usr/include 找到LIBRARY_DIRS 其后面新增内容 /usr/lib/x86_64-linux-gnu/hdf5/serial与/usr/lib/x86_64-linux-gnu,删除/usr/local/lib 这里的新增/usr/include 、/usr/lib/x86_64-linux-gnu与删除/usr/local/lib为opencv的配置,需要根据自己的时间情况进行修改,保证能找到对应版本的opencv就行。
执行编译 make all make test make runtest
Ubuntu18.04安装的是python2.7(python)与python3.6(python3),以下操作都是在python2.7下进行的。 先安装pip与fortran sudo apt install python-pip sudo apt-get install gfortran pip install --upgrade pip==20.3.4打开caffer/python/requirements.txt 将python-dateutil>=1.4,caffe的操作,所以需要安装onnx包,这里推荐安装1.9.0版本 pip install onnx==1.9.0 -i https://pypi.tuna.tsinghua.edu.cn/simple将caffe根目录下的python文件所在路径加入到全局环境变量 vim ~/.bashrc在末尾添加一句: export PYTHONPATH=/home/lh/data/3559/caffe/python:$PYTHONPATH路径需根据自己的实际情况修改。 打开caffer目录下的Makefile.config,找到文件中的PYTHON_INCLUDE 查看python2.7路径是否与实际一致,不一致则需要修改,笔者这里需要修改。 保存关闭后执行 make pycaffe输出以下信息表示编译python接口成功: PROTOC (python) src/caffe/proto/caffe.proto 验证python接口 python import caffe
https://github.com/ultralytics/yolov5/tags
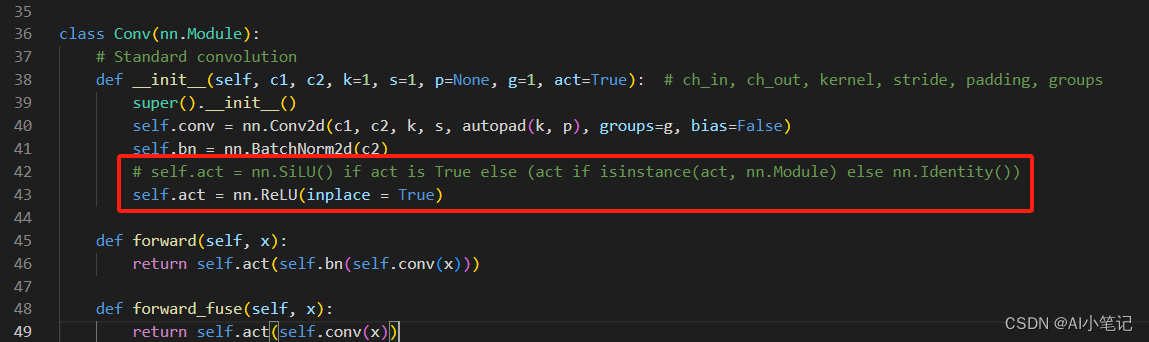
参考之前写的文章:https://blog.csdn.net/JulyLi2019/article/details/111666353 2.3修改模型打开yolov5-6.0项目工程,将models目录下新建一个yolov5s_hs.yaml: # YOLOv5 🚀 by Ultralytics, GPL-3.0 license # Parameters nc: 80 # number of classes depth_multiple: 0.33 # model depth multiple width_multiple: 0.50 # layer channel multiple anchors: - [10,13, 16,30, 33,23] # P3/8 - [30,61, 62,45, 59,119] # P4/16 - [116,90, 156,198, 373,326] # P5/32 # YOLOv5 v6.0 backbone backbone: # [from, number, module, args] [[-1, 1, Conv, [64, 6, 2, 2]], # 0-P1/2 [-1, 1, Conv, [128, 3, 2]], # 1-P2/4 [-1, 3, C3, [128]], [-1, 1, Conv, [256, 3, 2]], # 3-P3/8 [-1, 6, C3, [256]], [-1, 1, Conv, [512, 3, 2]], # 5-P4/16 [-1, 9, C3, [512]], [-1, 1, Conv, [1024, 3, 2]], # 7-P5/32 [-1, 3, C3, [1024]], [-1, 1, SPPF, [1024, 5]], # 9 ] # YOLOv5 v6.0 head head: [[-1, 1, Conv, [512, 1, 1]], # [-1, 1, nn.Upsample, [None, 2, 'nearest']], [ -1, -1, nn.ConvTranspose2d,[ 256, 256, 2, 2 ] ], [[-1, 6], 1, Concat, [1]], # cat backbone P4 [-1, 3, C3, [512, False]], # 13 [-1, 1, Conv, [256, 1, 1]], #[-1, 1, nn.Upsample, [None, 2, 'nearest']], [ -1, -1, nn.ConvTranspose2d,[ 128, 128, 2, 2 ] ], [[-1, 4], 1, Concat, [1]], # cat backbone P3 [-1, 3, C3, [256, False]], # 17 (P3/8-small) [-1, 1, Conv, [256, 3, 2]], [[-1, 14], 1, Concat, [1]], # cat head P4 [-1, 3, C3, [512, False]], # 20 (P4/16-medium) [-1, 1, Conv, [512, 3, 2]], [[-1, 10], 1, Concat, [1]], # cat head P5 [-1, 3, C3, [1024, False]], # 23 (P5/32-large) [[17, 20, 23], 1, Detect, [nc, anchors]], # Detect(P3, P4, P5) ]这里主要是将上采样层换成了反卷积层,以适应HISI3559平台。 2.4修改数据集打开yolov5-6.0项目工程,将data目录下新建一个hs.yaml: # COCO 2017 dataset http://cocodataset.org # Train command: python train.py --data coco.yaml # Default dataset location is next to /yolov5: # /parent_folder # /coco # /yolov5 # download command/URL (optional) # download: bash data/scripts/get_coco.sh # train and val data as 1) directory: path/images/, 2) file: path/images.txt, or 3) list: [path1/images/, path2/images/] train: /data/20220221_yolov5_train.txt # 118287 images val: /data/20210122_torchssd_test.txt # 5000 images # test: /data/devin/data/head_shoulder/yolo_data/20210122_torchssd_test.txt # 20288 of 40670 images, submit to https://competitions.codalab.org/competitions/20794 # number of classes nc: 2 # class names names: [ 'person', 'car' ] # Print classes # with open('data/coco.yaml') as f: # d = yaml.load(f, Loader=yaml.FullLoader) # dict # for i, x in enumerate(d['names']): # print(i, x)这里根据自己的数据情况进行修改。 2.5修改模型算子打开yolov5-6.0项目工程,将models目录下common.py中Conv类的激活函数SiLU->ReLU: 此处修改,是因为之前使用的海思的某款芯片对sigmoid激活函数支持不友好,推理很慢,留下了心理阴影,所以采用relu激活函数代替,有时间的同学,也可以不更改尝试一下。 进入yolov5的anaconda环境并cd项目根目录,运行: python3 train.py --data hs.yaml --cfg yolov5s_hs.yaml
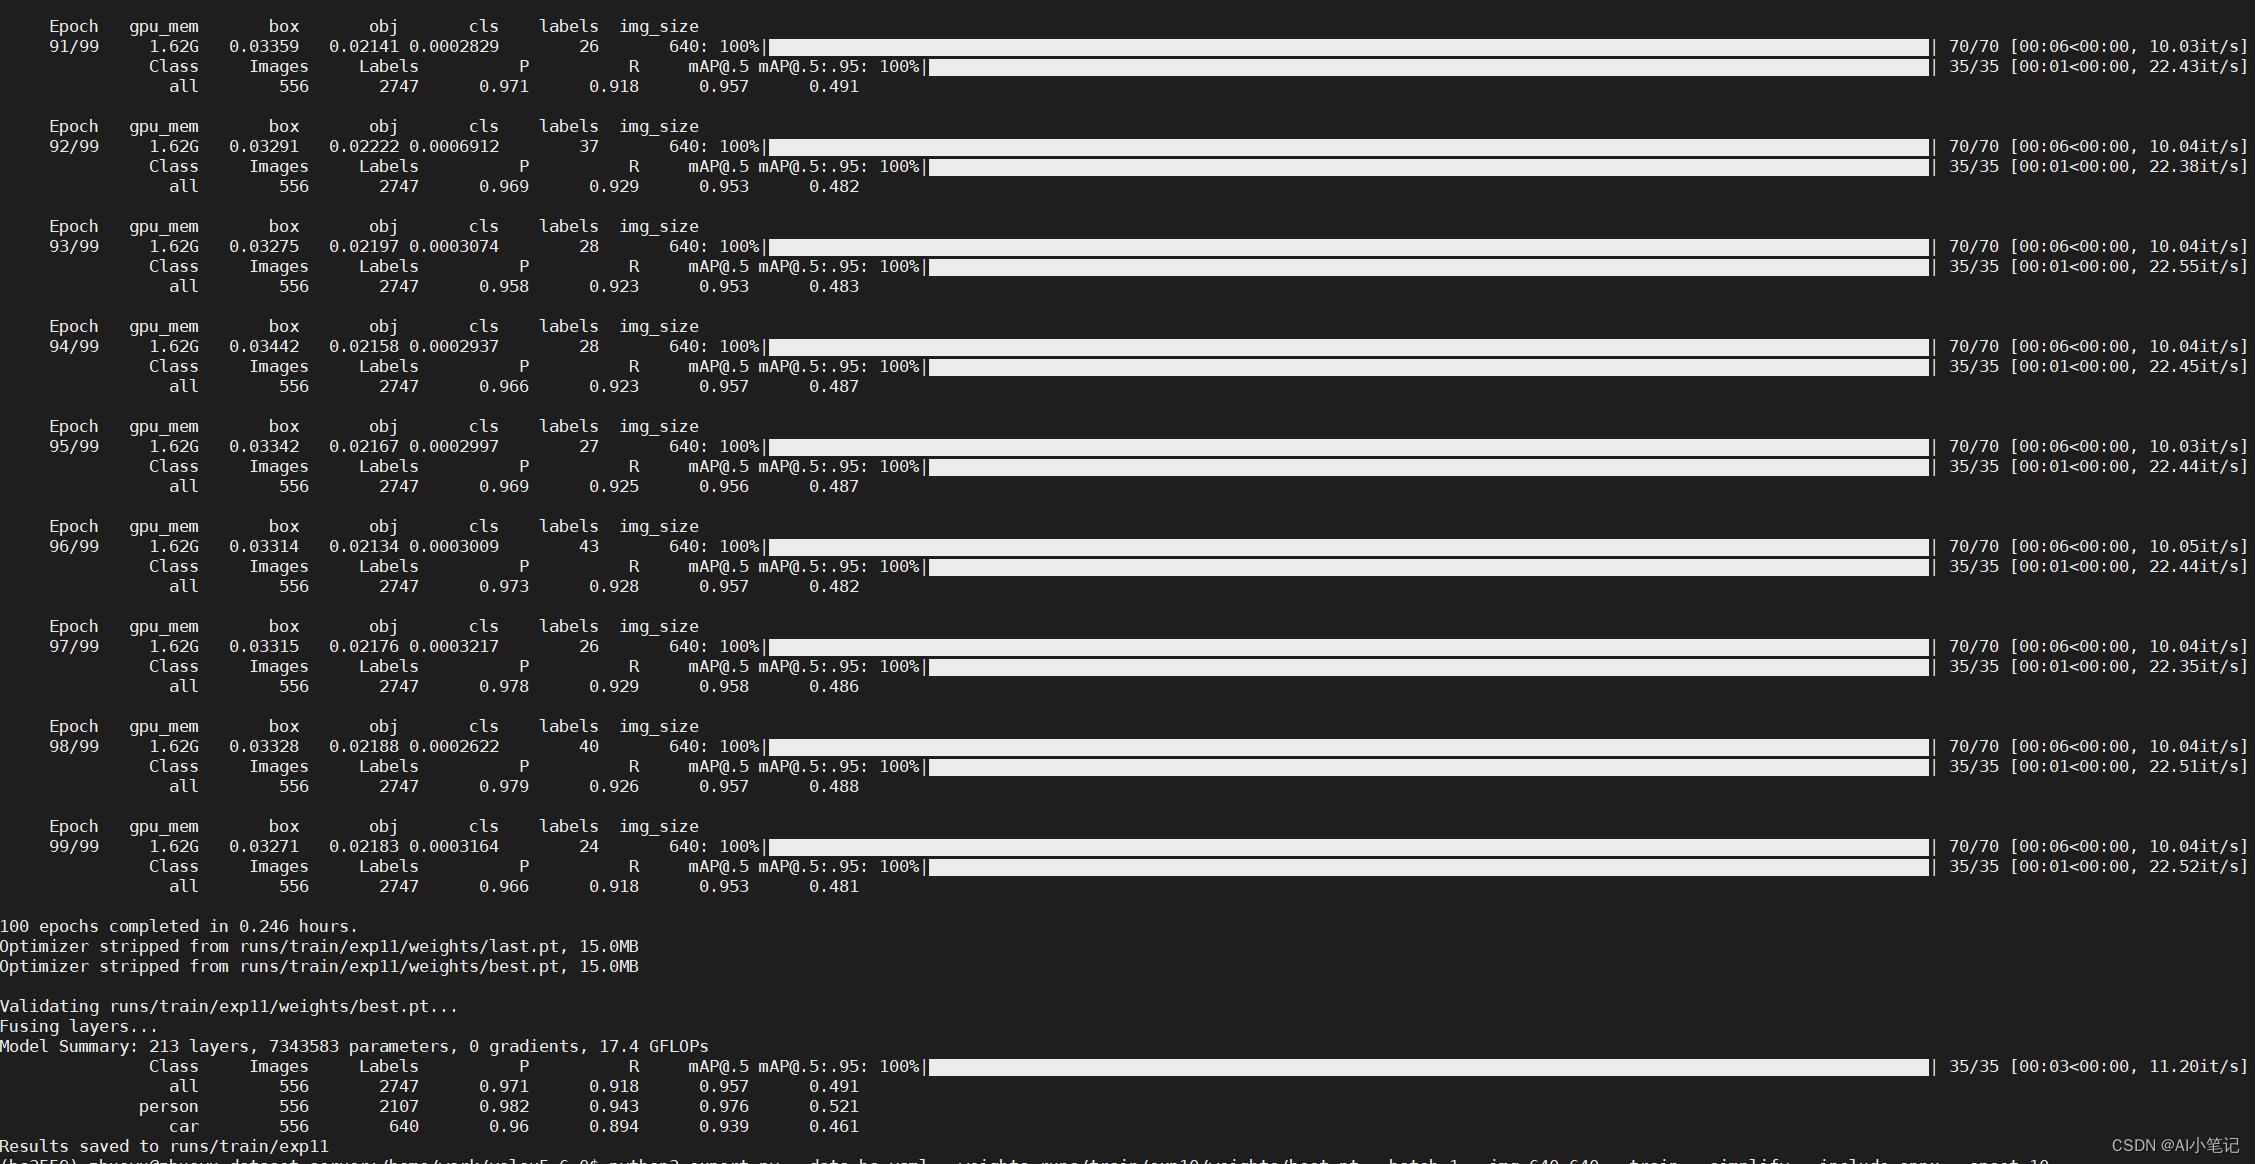
训练好的模型在yolov5工程中的、/runs/train/exp/weights/目录下执行: python3 export.py --data hs.yaml --weights runs/train/exp/weights/best.pt --batch 1 --img 640 640 --train --simplify --include onnx --opset 10将会在runs/train/exp/weights目录下生成一个best.onnx文件。 这里需要注意一下,默认转出来的onnx,名称是是含有“.”这个特殊字符的,如果不修正,会在后续caffe->wk转换中出错。 因此需要修改下模型的输入输出的名称: # -*- coding: UTF-8 -*- import onnx # 加载模型文件 model = onnx.load("/home/work/yolov5-6.0/runs/train/exp/weights/best.onnx") # 修改图输入张量名称中的点 for input in model.graph.input: input.name = input.name.replace('.', '_') # 修改图输出张量名称中的点 for output in model.graph.output: output.name = output.name.replace('.', '_') # 保存修改后的模型 onnx.save(model, "modified_model.onnx") print("finish")
获取yolov5_onnx2caffe项目:https://github.com/Wulingtian/yolov5_onnx2caffe
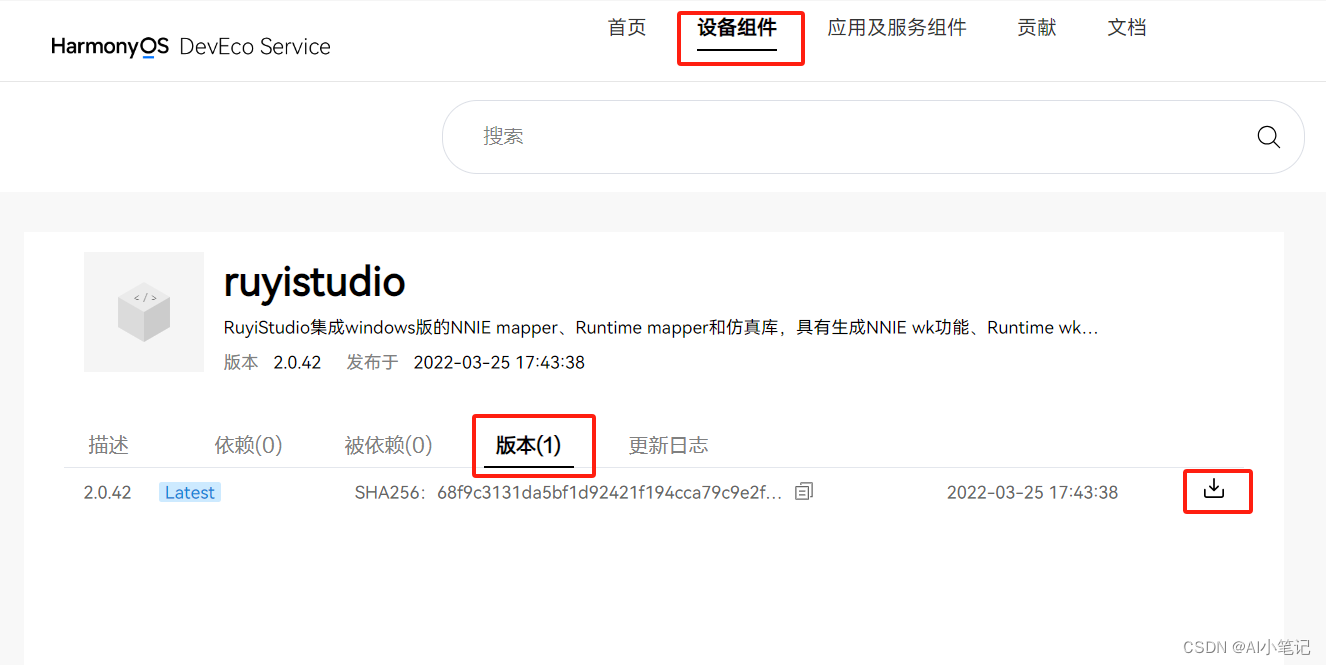
出现以上信息则说明onnx->caffe成功,将生成的.caffemodel和.prototxt文件copy到windows上,进行下一步操作。 3.4 caffe->wk下载安装RuyiStudio:https://repo.harmonyos.com/#/cn/bundles/@huawei%2Fruyistudio/v/2.0.42 其他参数参考一下配置:
海思3559是早些年的芯片,因此在模型转换的方式上相比于3403、3519的使用atc工具直接从onnx->om,3559需要从onnx->caffer->wk则显得稍显复杂。本文记录了yolov5模型由pt->onnx->caffe->wk的过程,希望对读者有所帮助。 后续工作就是要把转换好的wk模型在板端部署了,继续加油咯!!! 参考文档: https://blog.csdn.net/m0_51714298/article/details/127513820 https://github.com/BVLC/caffe https://github.com/jnulzl/caffe_plus https://github.com/Wulingtian/yolov5_onnx2caffe https://github.com/JimmyLauren/yolo5_caffe_hisi3559?tab=readme-ov-file https://www.codenong.com/cs106856166/ 如果阅读本文对你有用,欢迎关注点赞留言收藏呀!!! 2024年1月18日17:06:42 |
 下载caffe-plus工程 https://github.com/jnulzl/caffe_plus
 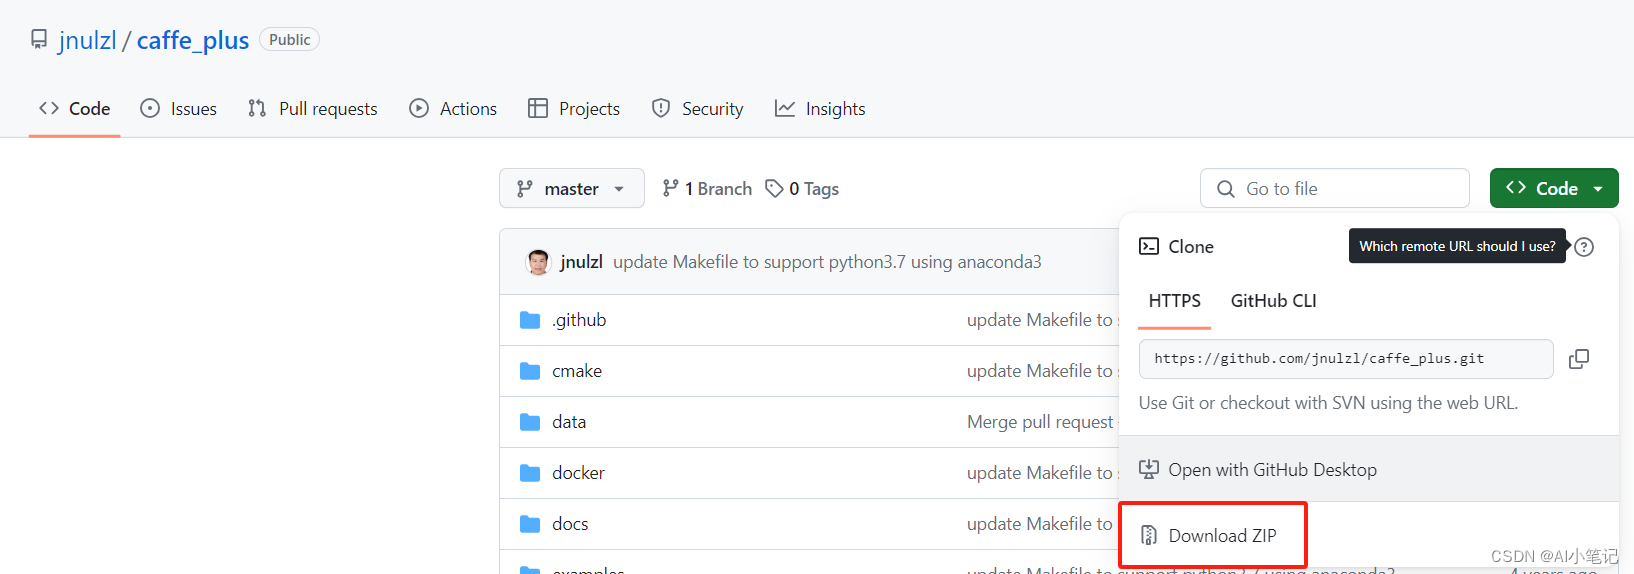 将以上两份zip源码分别解压为caffer与caffe-plus。
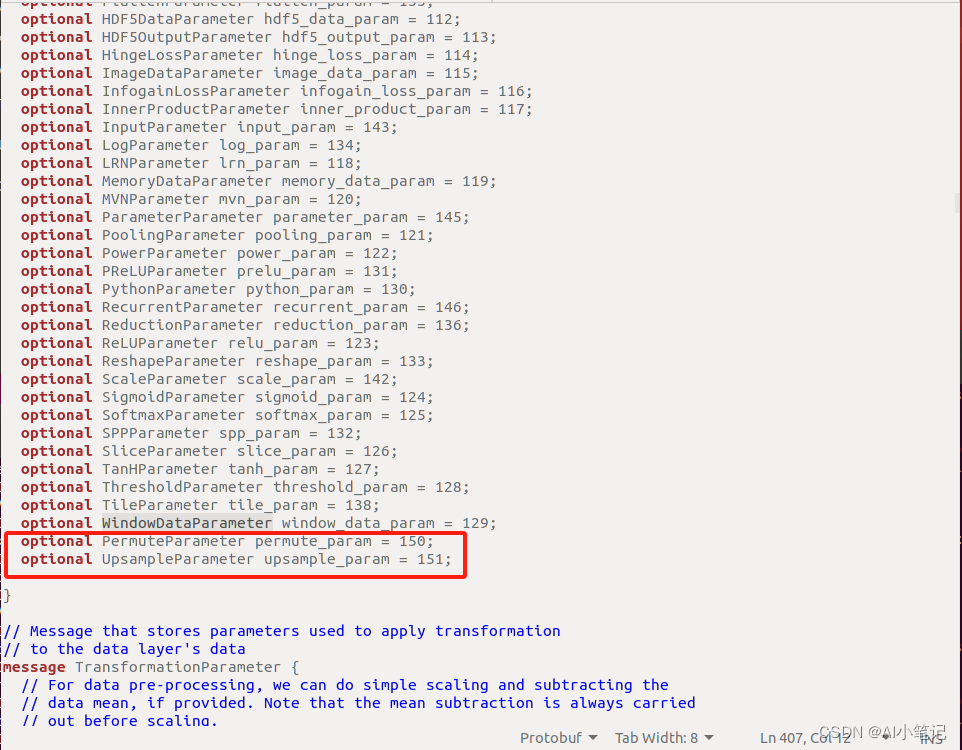
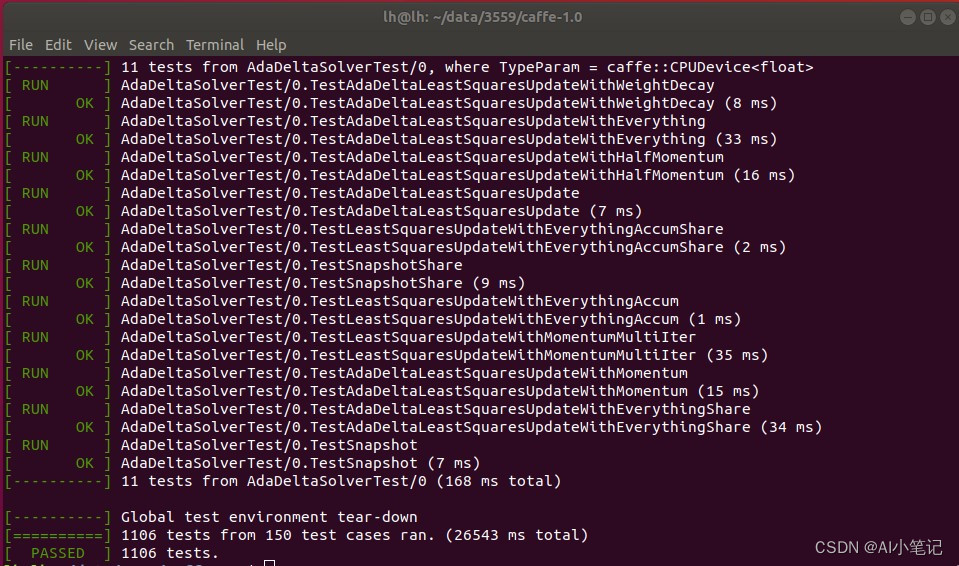 安装完成没有报错,全绿说明caffe安装成功,如果其中一项发生错误,make clean重新编译即可。
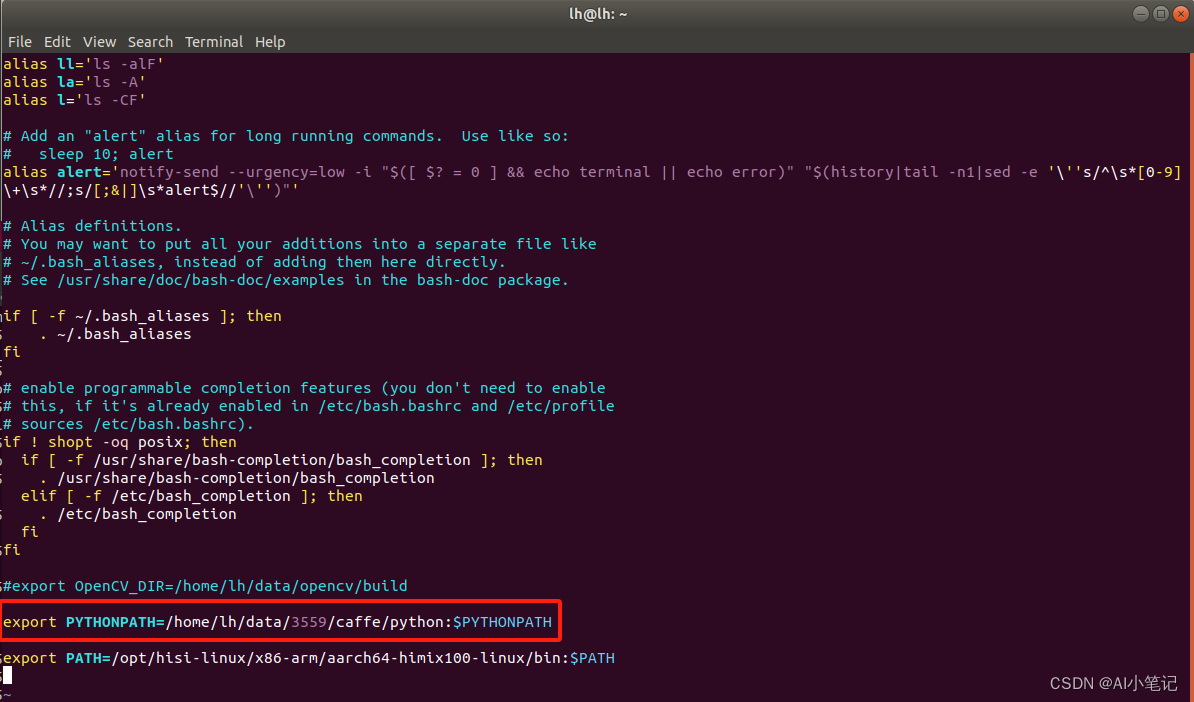 保存后,并使其生效:
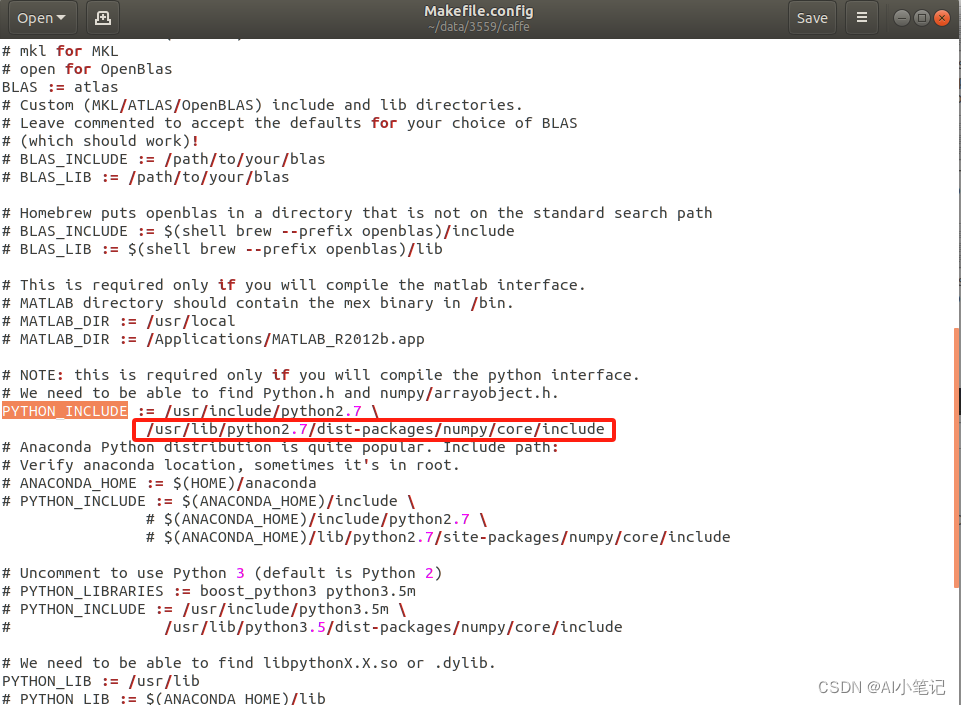
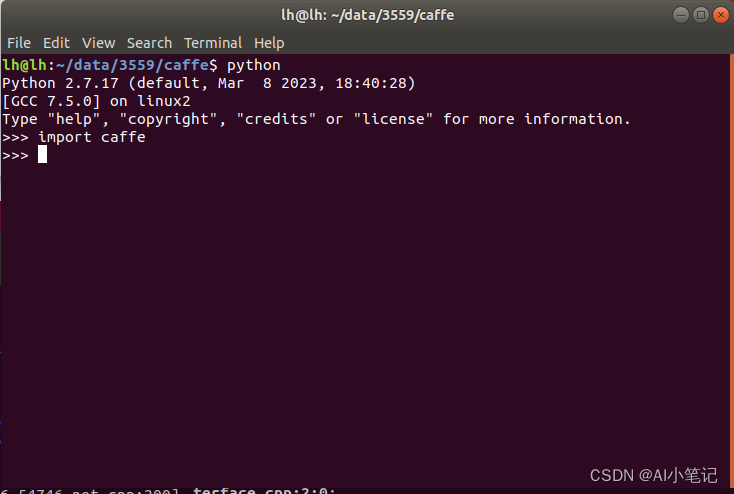 导入caffe模块不报错,则表示安装成功。
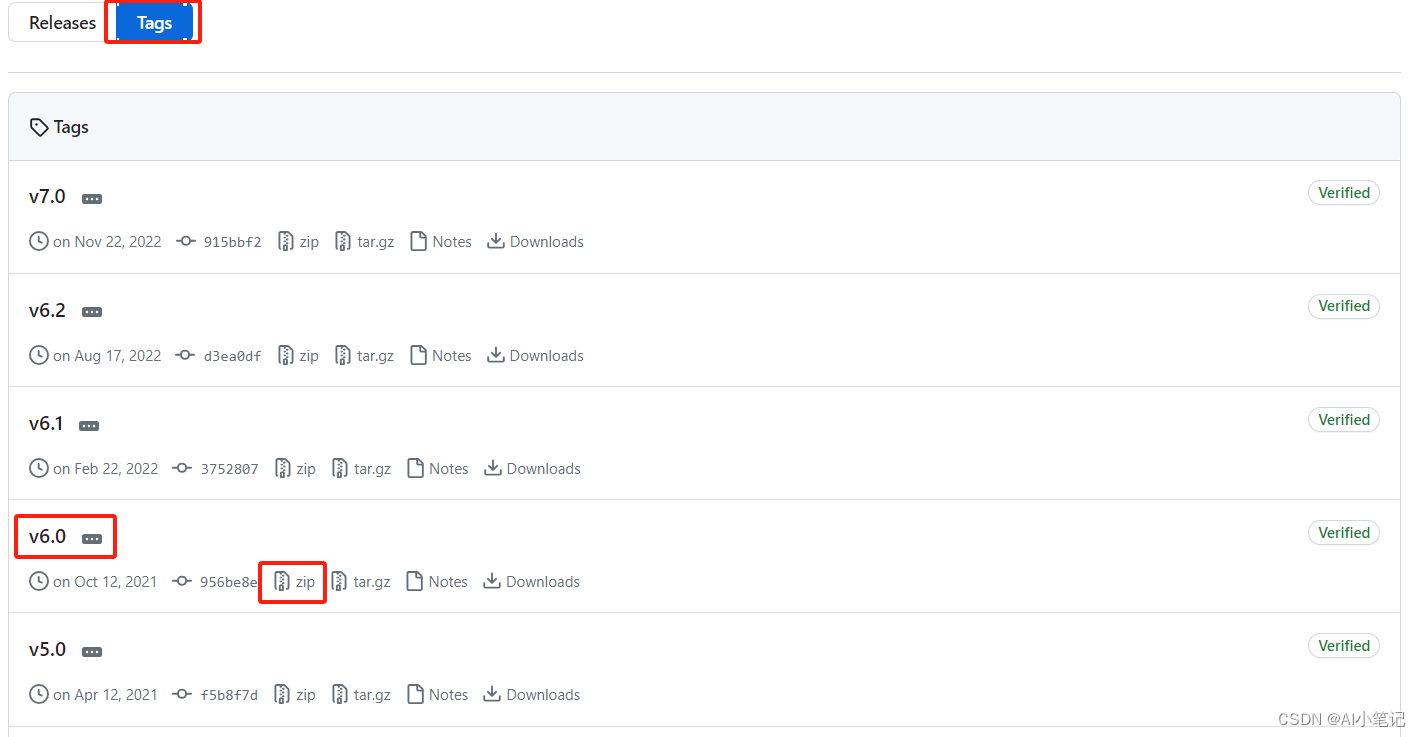
 会生成对应的pt模型。
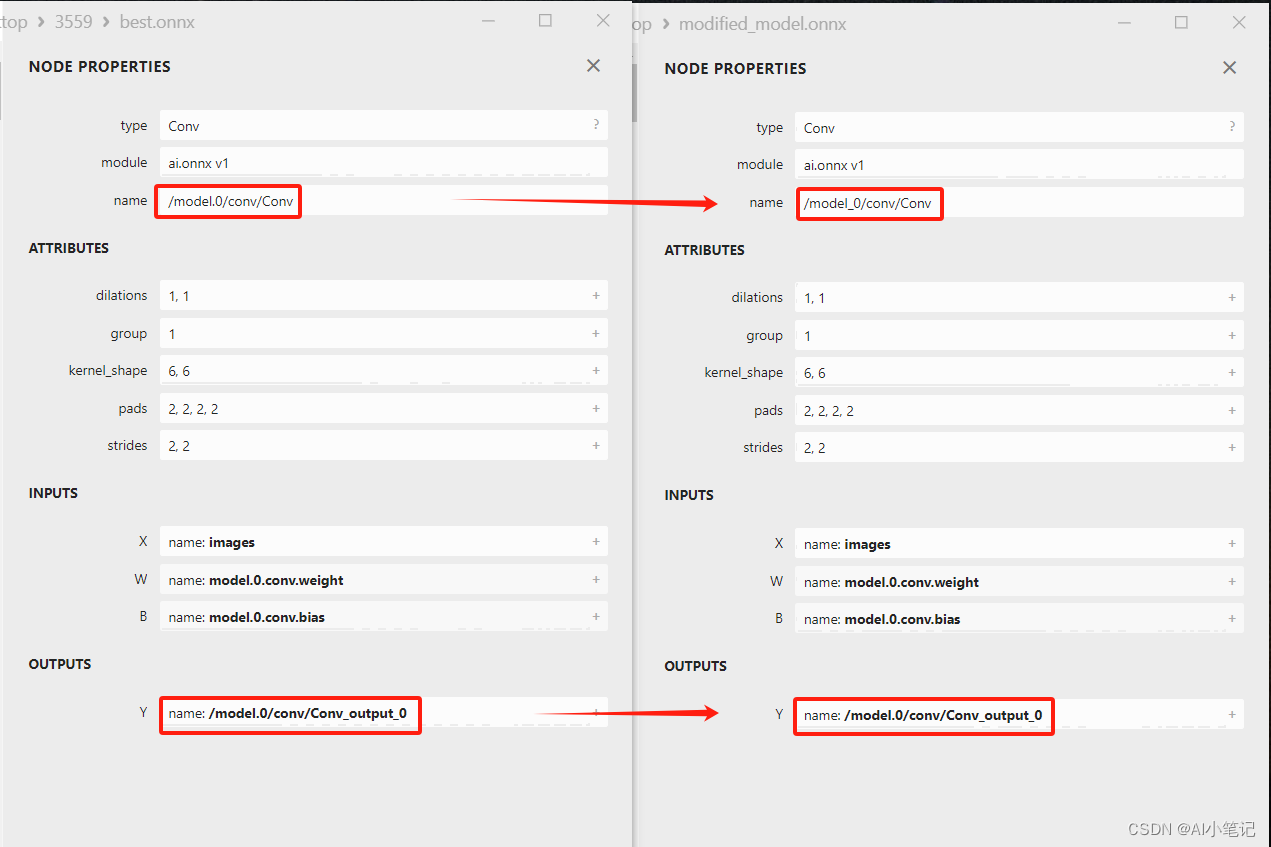
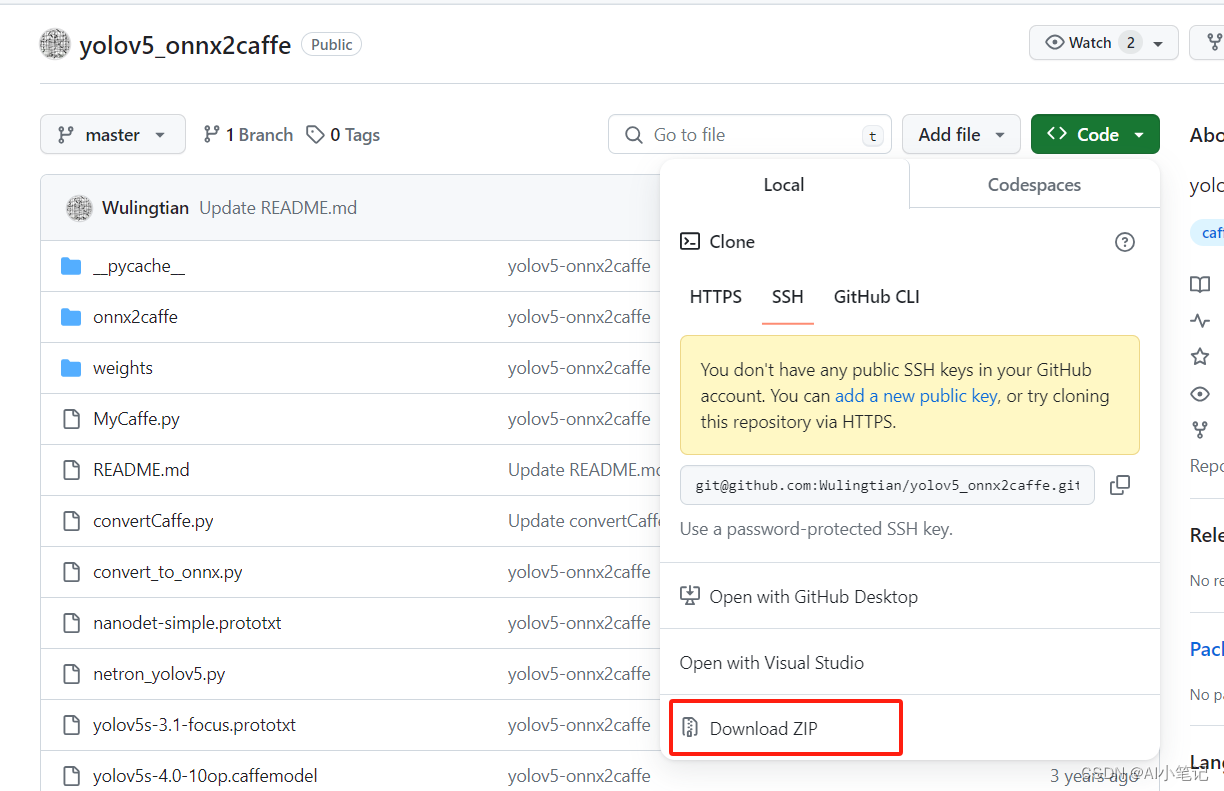 下载zip包后解压到虚拟机上,打开convertCaffe.py文件,将上一步生成的onnx文件copy到虚拟机上,根据自己实际的模型名称进行修改。
 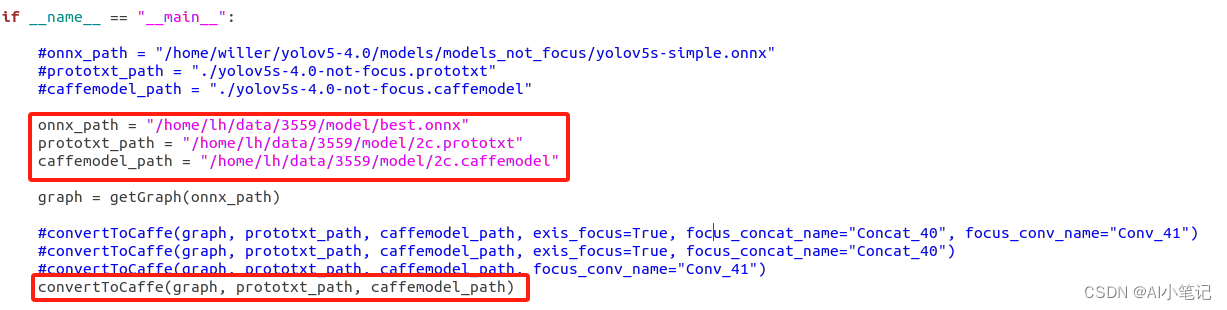 由于convertCaffe.py、onnx2caffe/_operators.py、onnx2caffe/_weightloader.py这个三个文件中含有中文注释,需要其文件的加上
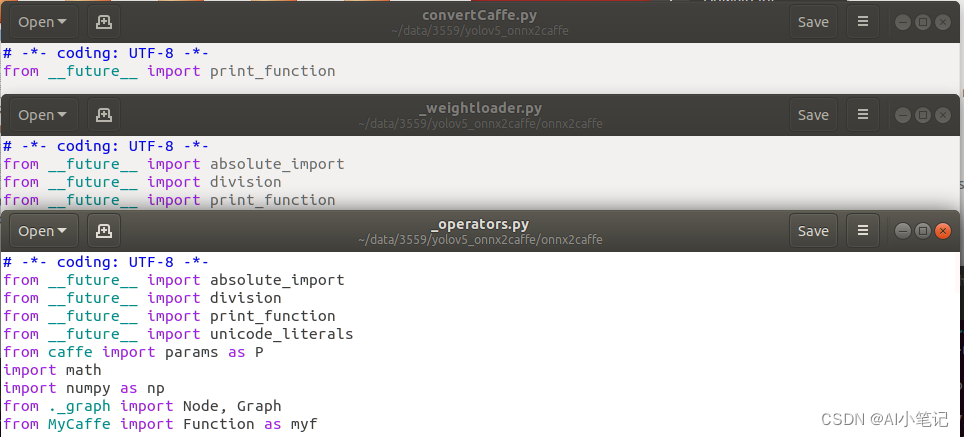 之后,yolov5_onnx2caffe目录下,运行:
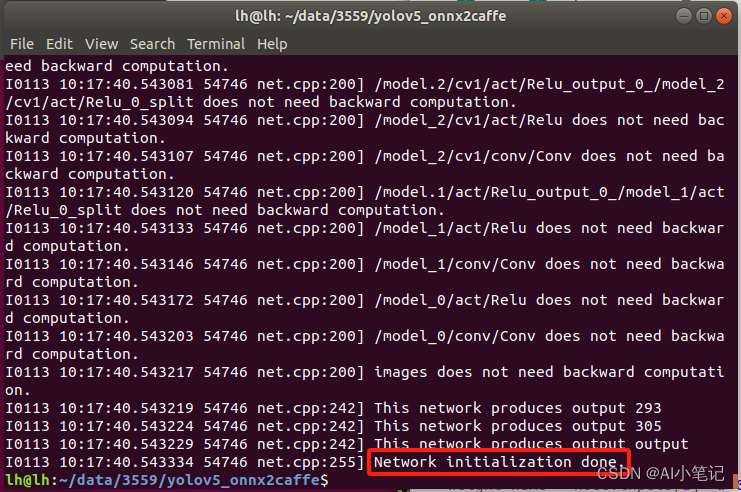
 解压,直接运行exe
 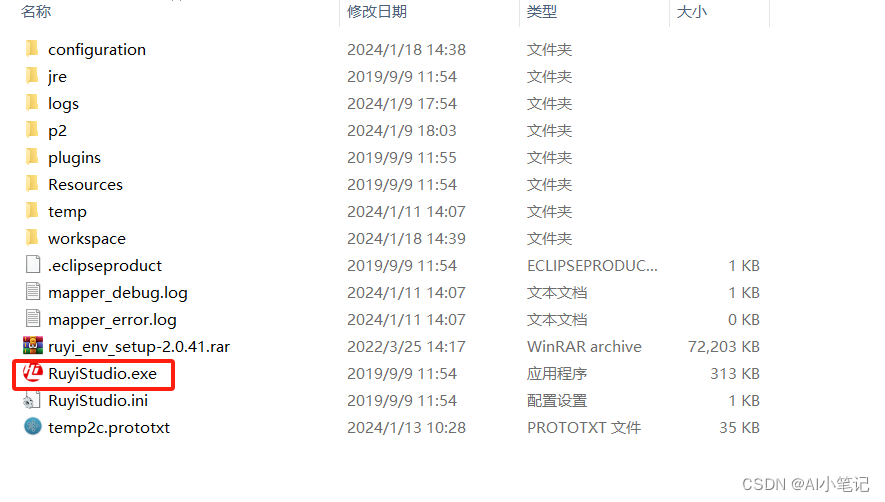 创建NNIE工程
  设置名称、选择Empty Project、Cross GCC,点击Next;
 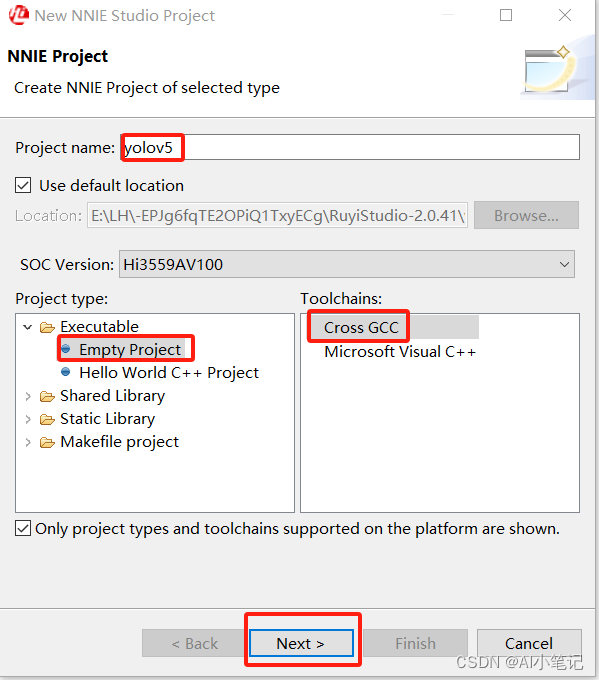 默认操作,点击Next;
 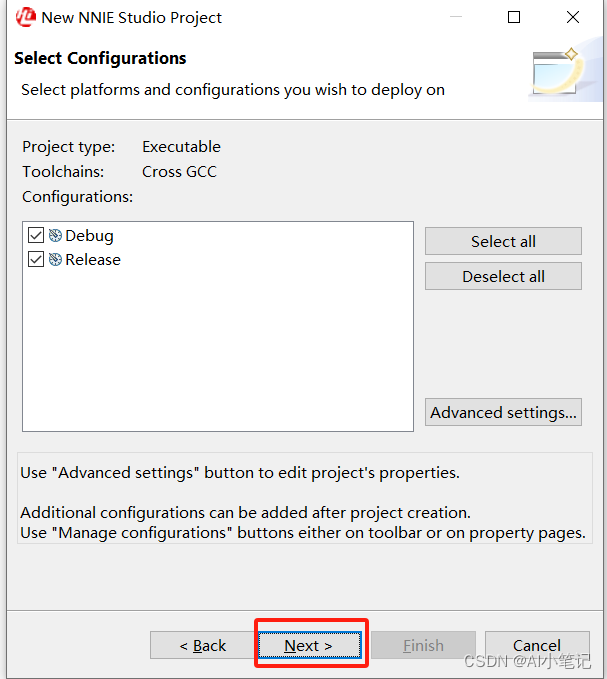 默认操作,点击Finish;
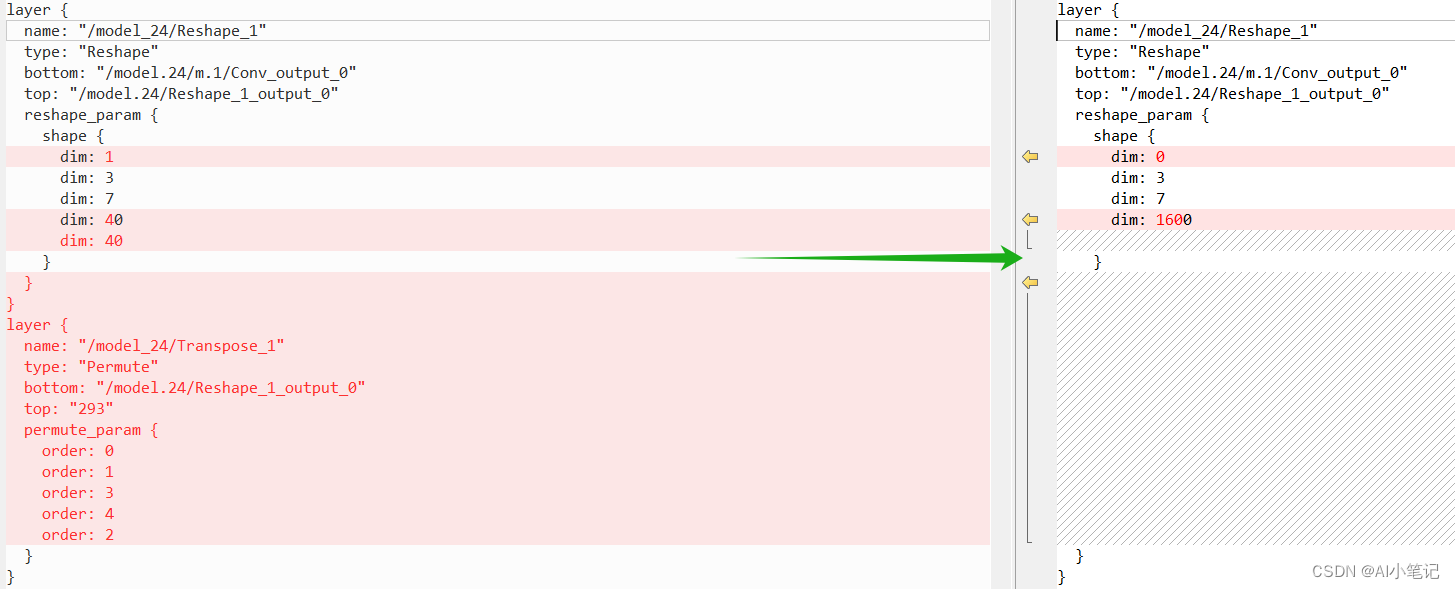
 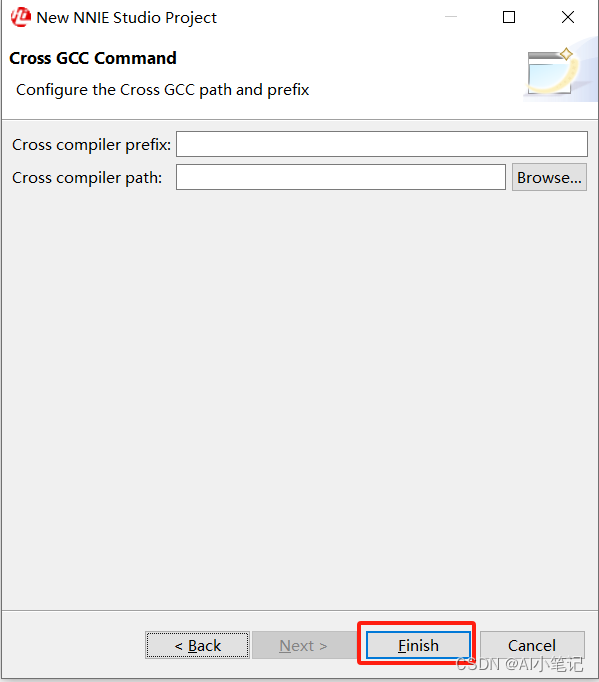 打开项目下的cfg文件,加载prototxt文件后进行如下Edit配置: 删除最后的三个Transpose层; 修改后面的三个Reshape层,第一个dim改为0,删除第五个dim,第四个dim改为dim的平方。
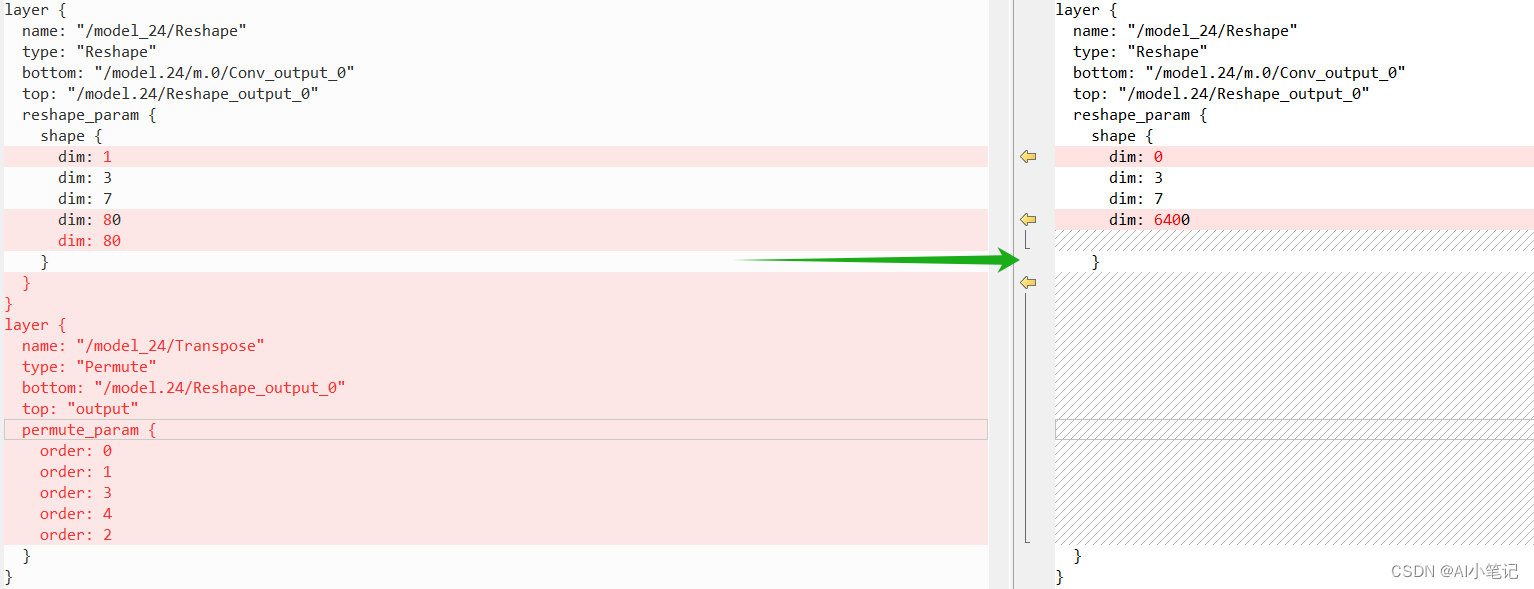

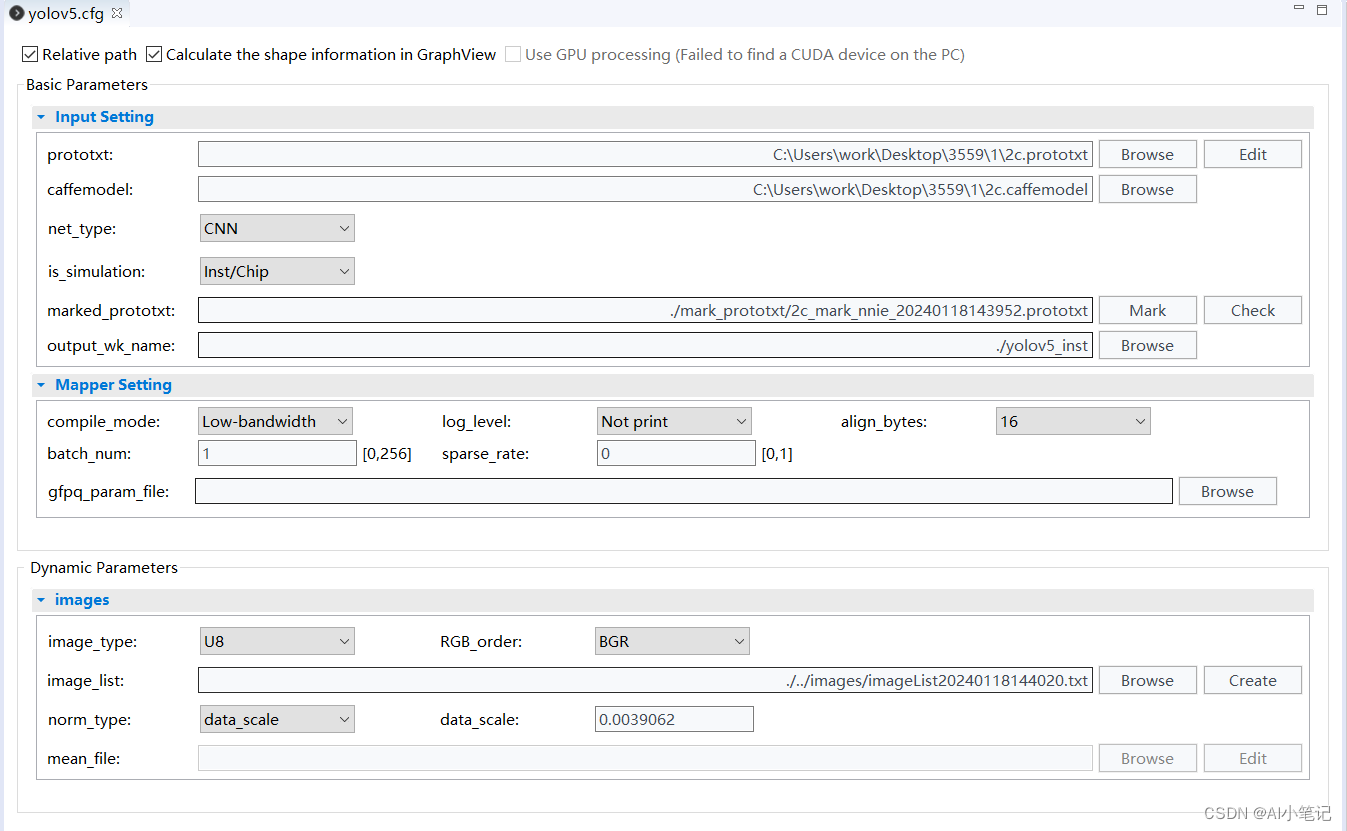 配置完成后保存运行:
  成功后log如下:
 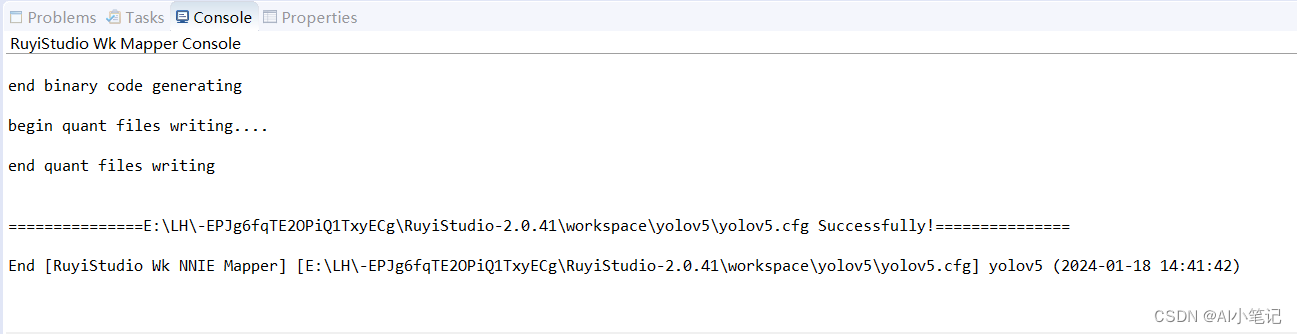 生成wk文件:
 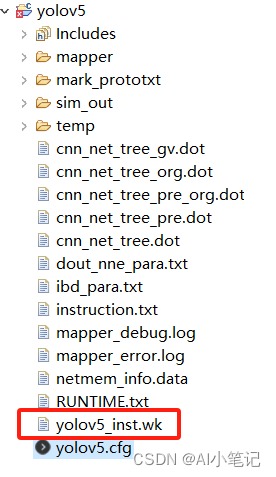 至此,模型转换整个流程就完成了。
【本文地址】