Four Horsemen (Classic) |
您所在的位置:网站首页 › slack-jawed › Four Horsemen (Classic) |
Four Horsemen (Classic)
 Race
Varies (Undead)Level
?? BossReaction
Alliance HordeLocation
Military Quarter, Naxxramas
Naxxramas (Classic)
Spider Wing Race
Varies (Undead)Level
?? BossReaction
Alliance HordeLocation
Military Quarter, Naxxramas
Naxxramas (Classic)
Spider Wing
Anub'Rekhan Grand Widow Faerlina Maexxna (lore) (lore) (lore) Abomination WingPatchwerk Grobbulus Gluth Thaddius (lore) (lore) (lore) (lore) Plague WingNoth the Plaguebringer Heigan the Unclean Loatheb (lore) (lore) (lore) Deathknight WingInstructor Razuvious Gothik the Harvester The Four Horsemen (lore) (lore) (lore) The Four HorsemenLady Blaumeux Thane Korth'azz Highlord Mograine Sir Zeliek (lore) (lore) (lore) (lore) Frostwyrm LairSapphiron Kel'Thuzad (lore) (lore) Other NPCsTarsis Kir-Moldir Master Craftsman Omarion Mr. Bigglesworth (lore) (lore) (lore) LootThe Four Horsemen, Highlord Alexandros Mograine , Thane Korth'azz, Lady Blaumeux, and Sir Zeliek, are four powerful death knights in the service of Kel'Thuzad. Together they comprise the third and final encounter of the Deathknight wing of Naxxramas. Generally regarded as one of the most difficult encounters of the original World of Warcraft, the coordination, timing, and relatively unforgiving nature makes them one of the hardest bosses in the instance. Contents 1 Abilities 1.1 Shared Abilities 1.2 Unique Abilities 1.2.1 Highlord Mograine 1.2.2 Thane Korth'azz 1.2.3 Sir Zeliek 1.2.4 Lady Blaumeux 2 Strategies 2.1 Marks 2.2 Tanking 3 Loot 4 Quotes 4.1 Conversation 4.2 Thane Korth'azz 4.3 Sir Zeliek 4.4 Lady Blaumeux 4.5 Highlord Mograine 4.6 Outro 5 Trivia 6 Patch changes 7 References 8 External links Abilities[] Shared Abilities[]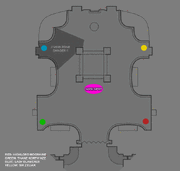 The Four Horsemen Positioning The Four Horsemen are a single-phase council encounter that depend entirely on proper positioning for each Horseman, as well as predetermined positioning, rotation, and responsibility for each raid member in order to properly manage the Horsemen's Marks and their unique abilities. From the mechanics of the Mark, each Horseman must be taken to a separate assigned corner, and tanked there. Whilst having one Mark stack up will do too much damage and kill you, it is possible to have all 4 marks stack to a lesser extent and survive. 4 stacks of Mark of Mograine (3000 damage) hurt a lot more than one stack of a Mark from each Horseman (no damage at all). The range of these marks is 70 yards, and with a 75 second duration, proper rotation timing is key. Marks[]Marks are the signature ability of the Four Horsemen that shape the entire encounter. Each Horseman has its own mark, but these marks function identically to one another. The mechanics are as follows: 75 second duration, refreshed every time a stack is applied. 65 yard range, pierces line of sight. First mark cast at 20 seconds. Cast every 12 seconds following first mark. Deals unresistable Shadow damage. Damage depends on stacks: The first stack deals no damage. The second stack deals 250, third deals 1000, fourth deals 3000, fifth deals 5000. Each stack after five deals 1000 additional damage. Each time a player is struck by a mark their total threat is reduced by 50% against the Horseman who the mark belongs to. Cannot be resisted or removed by immunities. Tanking[]Eight tanks are required for this encounter, two per Horseman. On pull, each Horseman should be picked up by its first tank and dragged to their assigned corner, where they will be tanked for the entire encounter. Tanks must rotate in and out from their assigned Horseman, otherwise they will die from the Mark stacking too high. A second tank must be ready to taunt off the first tank as soon as the Mark reaches a fatal number of stacks. As While some had speculated that the Four Horsemen's loot tables were generated in similar fashion to the Silithid Royalty of the Temple of Ahn'Qiraj, with the kill order determining the loot awarded, repeated kills have now indicated that the kill order does not affect the loot. In addition to their non-set drops, the Four Horsemen also drop two Tier 3 chest tokens. Tier 3 Set Tokens Item ClassWhen players pass beyond Gothik the Harvester, the Four Horsemen have a sort of conversation during which they are all introduced. Thane Korth'azz yells: To arms, ye roustabouts! We've got company! Sir Zeliek yells: Invaders! Cease this foolish venture at once! Turn away while you still can! Lady Blaumeux yells: Come, Zeliek, do not drive them out. Not until we've had our fun! Highlord Mograine yells: Enough prattling. Let them come. We shall grind their bones to dust. Lady Blaumeux yells: I do hope they stay long enough for me to... introduce myself. Sir Zeliek yells: Perhaps they will come to their senses... and run away as fast as they can. Thane Korth'azz yells: I've heard enough a' yer snivelin'! Shut your flytrap before I shut it for ye'! Highlord Mograine yells: Conserve your anger. Harness your rage. You will all have outlets for your frustrations soon enough. Thane Korth'azz[] Taunt I'm gonna enjoy killin' these slack-jawed daffodils! Aggro Come out and fight, ye wee ninny! Killing a player Next time, bring more friends! Special I like my meat extra crispy! Death What a bloody waste this is! Sir Zeliek[] Taunt Do not continue! Turn back while there's still time! Flee, before it's too late! Aggro I have no choice but to obey! Killing a player Forgive me! Death It is... as it should be. Lady Blaumeux[] Taunt The first kill goes to me! Anyone care to wager? Aggro Defend yourself! Killing a player Who's next? Special Your life is mine! Death Touche... Highlord Mograine[] Taunt Life is meaningless. It is in death that we are truly tested. Aggro You seek death? None shall pass. Be still! Killing a player You'll find no peace in death! The master's will is done. Special Bow to the might of the Highlord! Death I...am...released! Perhaps it's not too late to—NOO! I need...more time... Outro[] Killed first Kel'Thuzad yells: Who dares violate the sanctity of my domain? Be warned, all who trespass here are doomed. Killed second Kel'Thuzad yells: Fools, you think yourselves triumphant? You have only taken one step closer to the abyss! Killed third Kel'Thuzad yells: I grow tired of these games. Proceed, and I will banish your souls to oblivion! Killed last Kel'Thuzad yells: You have no idea what horrors lie ahead. You have seen nothing! The frozen heart of Naxxramas awaits you! Trivia[] They appear to be based on the Four Horsemen of the Apocalypse from the Book of Revelation, said to bring the end of the world — Zeliek as the White Rider of Conquest, [1] Mograine as the Red Rider of War, Blaumeux as the Black Rider of Famine, and Korth'azz as the Pale Rider of Death. The Four Horsemen encounter stands to this day as the most amount of time a single encounter laid undefeated while also not requiring any re-tuning (nerfing) or bug fixing, at approximately 7 weeks from first engagement (time determined from Death and Taxes, who achieved the first world kill of the Horsemen on 25 August 2006, seven weeks after first engaging them). This was primarily due to the encounter requiring an excessive number of tanks, meaning that even once guilds had figured out what to do, it took a lot of time to gear and prepare all eight warrior tanks. Though some encounters had gone undefeated for a longer duration, this figure excludes encounters who have received tuning adjustments (nerfs) or bug fixes prior to being defeated, as well as bosses in Molten Core and Onyxia's Lair (due to those raids being available upon release of World of Warcraft). The Four Horsemen did not receive any adjustments or bug fixes prior to their first defeat. Patch changes[] |
【本文地址】
今日新闻 |
点击排行 |
|
推荐新闻 |
图片新闻 |
|
专题文章 |