openjdk:8镜像中安装工具命令的方法 |
您所在的位置:网站首页 › 货车标准尺寸是多少米的 › openjdk:8镜像中安装工具命令的方法 |
openjdk:8镜像中安装工具命令的方法
|
文章目录
前言一、获取openjdk:8环境1.下载并运行openjdk:82.获取当前镜像的基础环境信息3.更换源并安装软件
二、更新Dockerfile1.增加命令2.尝试构建3.测试镜像是否可用
总结
前言
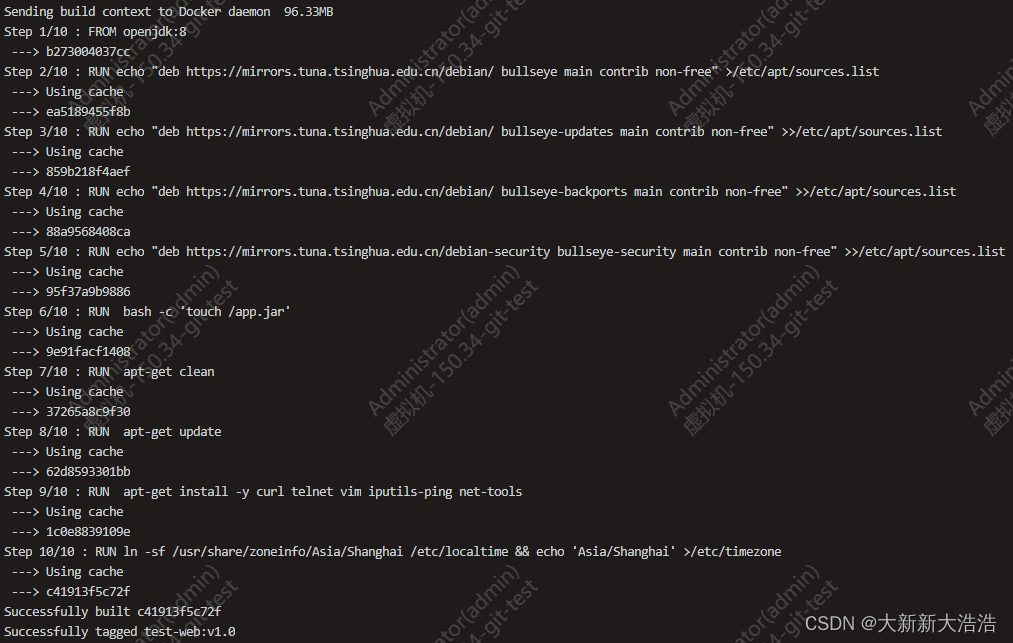
记录一下openjdk:8镜像安装命令的方法 同事使用openjdk:8作为基础镜像构建业务镜像,但是使用中发现镜像里面没有ping、telnet等基础命令,要求把基础命令安装进去。 一、获取openjdk:8环境 1.下载并运行openjdk:8 docker pull openjdk:8 docker run -id --name openjdk8 openjdk:8 docker exec -it openjdk8 /bin/bash 2.获取当前镜像的基础环境信息执行命令 cat /proc/version cat /etc/os-release结果如下 root@483715bfde28:/# cat /proc/version Linux version 3.10.0-1160.81.1.el7.x86_64 ([email protected]) (gcc version 4.8.5 20150623 (Red Hat 4.8.5-44) (GCC) ) #1 SMP Fri Dec 16 17:29:43 UTC 2022 root@483715bfde28:/# cat /etc/os-release PRETTY_NAME="Debian GNU/Linux 11 (bullseye)" NAME="Debian GNU/Linux" VERSION_ID="11" VERSION="11 (bullseye)" VERSION_CODENAME=bullseye ID=debian HOME_URL="https://www.debian.org/" SUPPORT_URL="https://www.debian.org/support" BUG_REPORT_URL="https://bugs.debian.org/"获取到了基础镜像是debain的bullseye 3.更换源并安装软件将源更换为清华源 cat > /etc/apt/sources.list /etc/apt/sources.list RUN echo "deb https://mirrors.tuna.tsinghua.edu.cn/debian/ bullseye-updates main contrib non-free" >>/etc/apt/sources.list RUN echo "deb https://mirrors.tuna.tsinghua.edu.cn/debian/ bullseye-backports main contrib non-free" >>/etc/apt/sources.list RUN echo "deb https://mirrors.tuna.tsinghua.edu.cn/debian-security bullseye-security main contrib non-free" >>/etc/apt/sources.list RUN apt-get clean RUN apt-get update RUN apt-get install -y curl telnet vim iputils-ping net-tools 2.尝试构建构建命令 docker build -t test-web:v1.0 .输出如下 [root@test test-web]# docker build -t test-web:v1.0 . Step 1/10 : FROM openjdk:8 ---> b273004037cc Step 2/10 : RUN echo "deb https://mirrors.tuna.tsinghua.edu.cn/debian/ bullseye main contrib non-free" >/etc/apt/sources.list ---> Using cache ---> ea5189455f8b Step 3/10 : RUN echo "deb https://mirrors.tuna.tsinghua.edu.cn/debian/ bullseye-updates main contrib non-free" >>/etc/apt/sources.list ---> Using cache ---> 859b218f4aef Step 4/10 : RUN echo "deb https://mirrors.tuna.tsinghua.edu.cn/debian/ bullseye-backports main contrib non-free" >>/etc/apt/sources.list ---> Using cache ---> 88a9568408ca Step 5/10 : RUN echo "deb https://mirrors.tuna.tsinghua.edu.cn/debian-security bullseye-security main contrib non-free" >>/etc/apt/sources.list ---> Using cache ---> 95f37a9b9886 Step 6/10 : RUN bash -c 'touch /app.jar' ---> Using cache ---> 9e91facf1408 Step 7/10 : RUN apt-get clean ---> Using cache ---> 37265a8c9f30 Step 8/10 : RUN apt-get update ---> Using cache ---> 62d8593301bb Step 9/10 : RUN apt-get install -y curl telnet vim iputils-ping net-tools ---> Using cache ---> 1c0e8839109e Step 10/10 : RUN ln -sf /usr/share/zoneinfo/Asia/Shanghai /etc/localtime && echo 'Asia/Shanghai' >/etc/timezone ---> Using cache ---> c41913f5c72f Successfully built c41913f5c72f Successfully tagged test-web:v1.0截图如下 构建完毕,测试下是否达到了预期 3.测试镜像是否可用启动测试容器,检查服务是否安装 docker run -id --name testweb test-web:v1.0 docker exec -it testweb /bin/bash dpkg -l |grep vpn检查正常 总结记录一下openjdk:8安装命令的方式,感觉最主要的还是确认基础环境的系统版本,然后切换一个好使的软件源。 |
【本文地址】
公司简介
联系我们
今日新闻 |
点击排行 |
|
推荐新闻 |
图片新闻 |
|
专题文章 |