| bigsur efi文件 | 您所在的位置:网站首页 › macosbigsur1166 › bigsur efi文件 |
bigsur efi文件
|
Big Sur安装教程 Part 2
安装后的系统设置
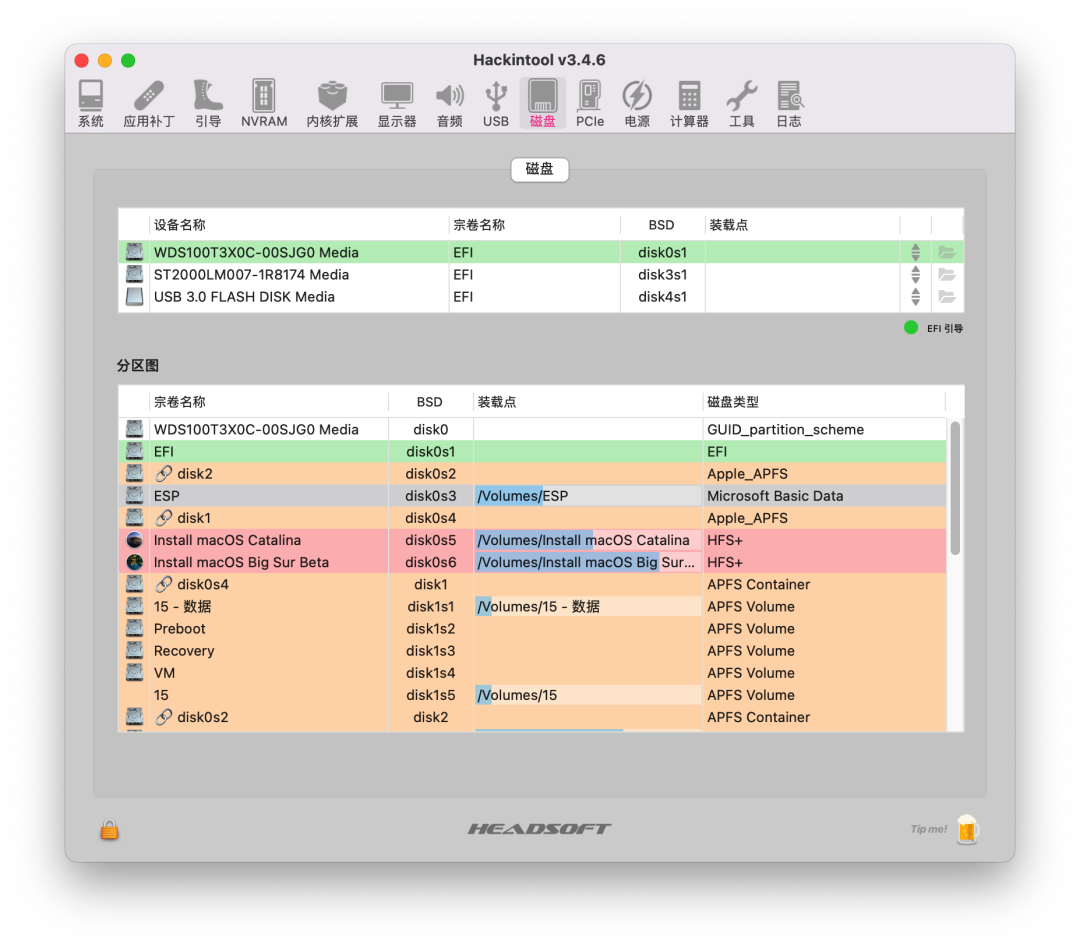
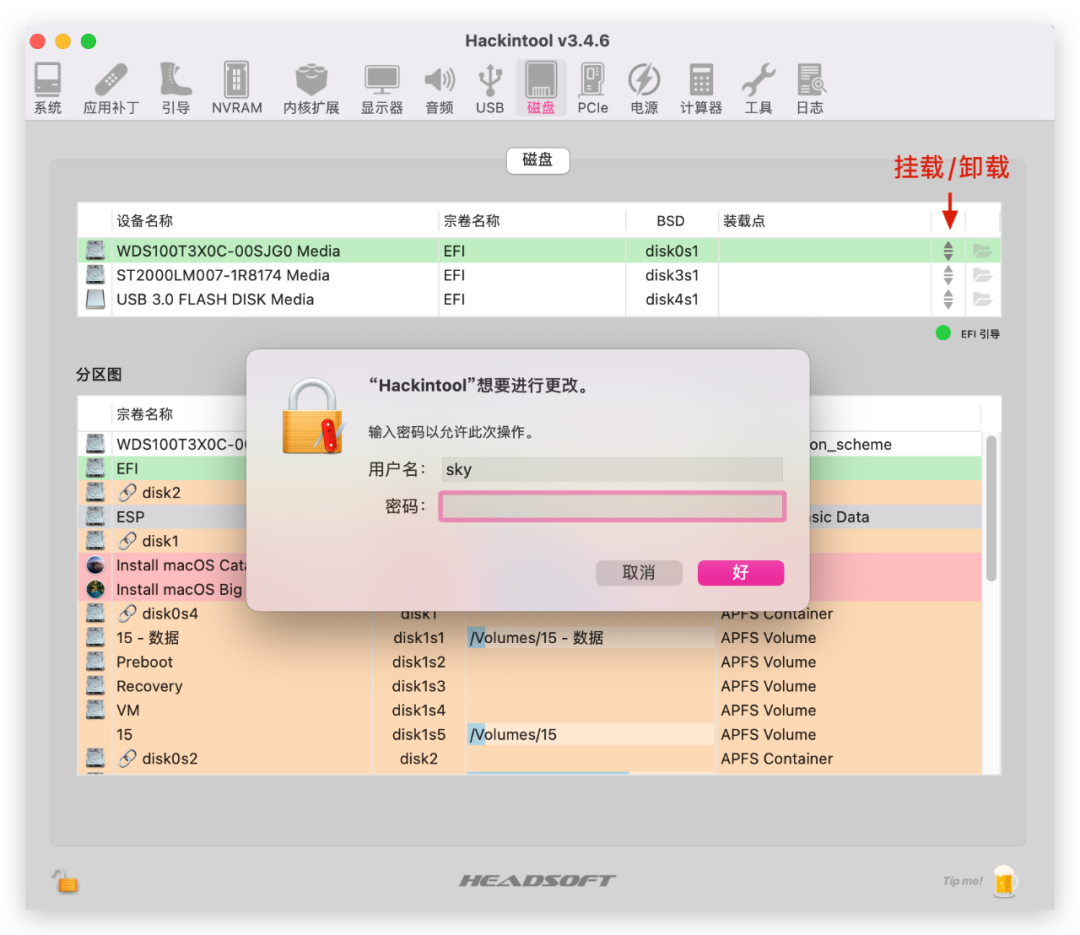
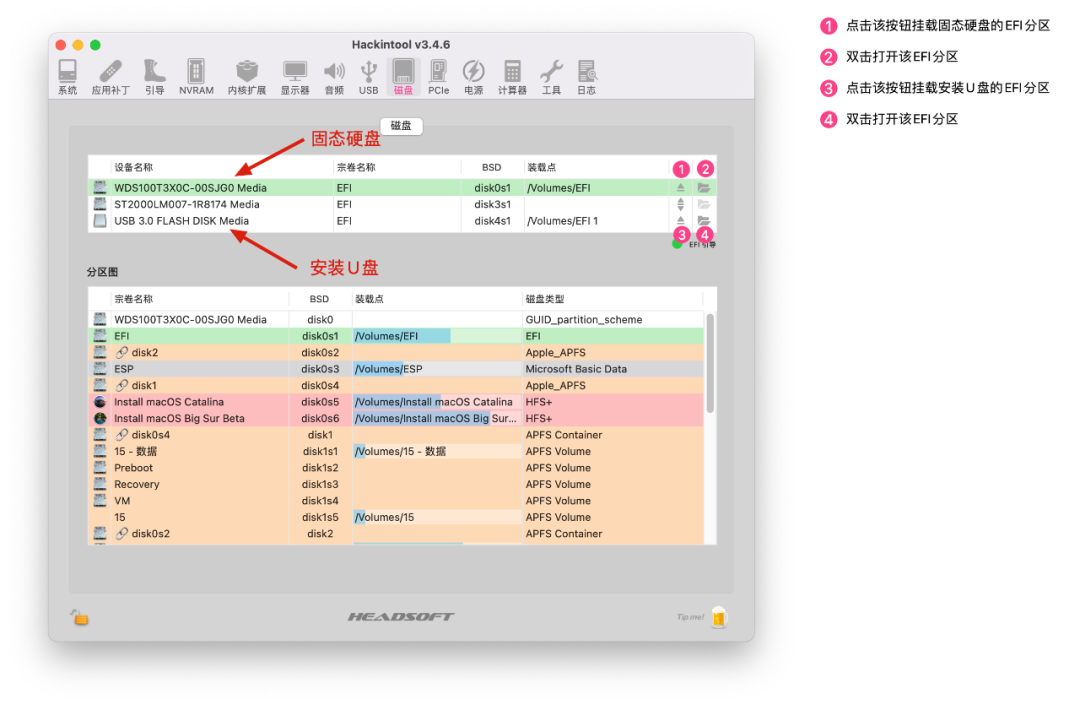
系统安装后,你可以先喝杯咖啡兴奋会儿,马上还有更艰巨的任务在等着你呢 先打开终端,输入几行命令: sudo spctl --master-disable # 启用macOS安装应用允许任何来源sudo kextcache -i / # 重建缓存如果出于某些原因,在/System/Library/Extensions/或者/Library/Extensions/修改了某些驱动,请使用以下命令重建缓存: sudo chown -R root:wheel /System/Library/Extensions/sudo chmod -R 755 /System/Library/Extensions/sudo kmutil install --update-allsudo kcditto 将U盘中的EFI复制进硬盘 工具篇目的是脱离U盘引导使用macOS,所以它是最优先需要执行的动作 最简单的方法:使用工具Hackintool,如图所示: 打开Hackintool工具,点击磁盘图标 点击挂载图标,输入用户密码
/dev/disk0(internal, physical): #: TYPE NAME SIZE IDENTIFIER 0: GUID_partition_scheme 256 GB disk0 1: EFI EFI 200 MB disk0s1 2: Apple_APFS Container disk1 128 GB disk0s2 3: Microsoft Basic Data WIN10 127.7 GB disk0s3/dev/disk2(external, physical): #: TYPE NAME SIZE IDENTIFIER 0: GUID_partition_scheme 16 GB Disk2 1: EFI EFI 200 MB disk2s1 2: Microsoft Basic Data PE 716.8MB Disk2s2 3: Apple_HFS Install macOS Big Sur 15.8 GB Disk2s3 挂载固态硬盘EFI分区 sudo diskutil mount disk0s1 挂载U盘EFI分区 sudo diskutil mount disk2s1打开Finder,注意后面有个. open .左侧会显示挂载了两个EFI分区,将U盘EFI目录全部复制到磁盘的EFI分区即可。 完善驱动刚安装完的系统,只能算是万里长征走完的第一步,对于驱动部分的完善才是重中之重。除非你有相同机型的EFI可供借鉴,否则请耐心阅读下面的内容。 显卡:在所有的驱动里,显卡驱动是应该最优先解决的。 参考的文章: 黑苹果必备:Intel核显platform ID整理[1] 利用Hackintool工具驱动核显[2] 利用Hackintool打开第8代核显HDMI/DVI输出的正确姿势[3] 醉渔小站:使用 WhateverGreen 驱动 Intel 核显[4] WhateverGreen: 英特尔® 核芯显卡 常见问答[5] 网卡如果幸运的话,安装好的黑苹果系统默认已经支持有线网线的连接了,这是因为它内置的通常都是RTL8111或者INTEL等的驱动,而无线网卡的驱动就需要单独添加 博通:绝大多数的博通(Boardcom)可以得到免驱或者通过添加驱动得到支持; DW1820A/BCM94350ZAE/BCM94356ZEPA50DX插入的正确姿势[6] INTEL:感谢 OpenIntelWireless[7] 提供 AirportItlwm[8],HeliPort[9] 和 itlwm[10] 感谢stevezhengshiqi[11]更新维护的 驱动内置英特尔无线网卡[12] 准备在这个教程里,我们将介绍两种方式来驱动我们的英特尔无线网卡。 使用 itlwm 和 HeliPort[13] 使用 AirportItlwm[14]如果想使用 AirportItlwm 和 itlwm, 您可以从以下链接来下载最新 releases: https://github.com/OpenIntelWireless/itlwm/releases如果想使用 HeliPort, 您可以从以下链接来下载最新 releases: https://github.com/OpenIntelWireless/HeliPort/releases 如何使用 使用 itlwm 和 HeliPort 首先,进入系统偏好设置 - 网络 - Wi-Fi,关闭在菜单栏中显示 Wi-Fi 状态。 然后,解压所有下载的包并拷贝 itlwm.kext 到 /EFI/CLOVER/kexts/Other/ 或者 /EFI/OC/Kexts/。 如果您是 OC 用户,您需要添加以下代码到 config.plist: Arch x86_64 BundlePath itlwm.kext Comment Intel Wi-Fi driver Enabled ExecutablePath Contents/MacOS/itlwm MaxKernel MinKernel 16.0.0 PlistPath Contents/Info.plist 重启,然后移动 HeliPort.app 到您的 应用程序 文件夹。 打开 HeliPort.app,完成。 您需要先允许任意来源。 打开 终端.app 并运行 sudo spctl --master-disable。 使用 AirportItlwm 首先,确保你的 macOS 版本 >= 10.15,此教程只涵盖 OpenCore 引导。 移除 itlwm 和 HeliPort 并进入系统偏好设置 - 网络 - Wi-Fi 打开 在菜单栏中显示 Wi-Fi 状态。 然后,解压下载的包并拷贝 AirportItlwm.kext 到 /EFI/CLOVER/kexts/Other 或者 /EFI/OC/Kexts/。 如果是 Clover 用户 打开 /EFI/CLOVER/config.plist 并在 KernelAndKextPatches - ForceKextsToLoad 里添加以下代码: ForceKextsToLoad \System\Library\Extensions\IO80211Family.kext 如果是 OpenCore 用户 打开 /EFI/OC/config.plist 并更改以下代码: Arch x86_64 BundlePath AirportItlwm.kext Comment Intel Wi-Fi driver Enabled- + ExecutablePath Contents/MacOS/AirportItlwm MaxKernel MinKernel 19.0.0 PlistPath Contents/Info.plist 同时,修改 SecureBootModel 来允许加载 immutablekernel。如果您的 macOS 版本 >= macOS11 (KernelCollection),就不需要做以下步骤: DmgLoading- Any+ Signed SecureBootModel- Disabled+ Default 如果上述方法不管用,还原对 DmgLoading 和 SecureBootModel 的修改,然后强制加载 IO80211Family。打开 /EFI/OC/config.plist 并更改以下代码: Force Arch Any BundlePath System/Library/Extensions/IO80211Family.kext Comment Enabled- + Identifier com.apple.iokit.IO80211Family ExecutablePath Contents/MacOS/IO80211Family MaxKernel 19.99.99 MinKernel PlistPath Contents/Info.plist 如果你是 macOS10.13 用户,你还需要强制加载 corecapture.kext。在 IO80211Family.kext 条目前添加以下代码: Arch Any BundlePath System/Library/Extensions/corecapture.kext Comment Enabled Identifier com.apple.driver.corecapture ExecutablePath Contents/MacOS/corecapture MaxKernel 17.99.99 MinKernel 17.0.0 PlistPath Contents/Info.plist 讨论 如果您对驱动有任何疑问,请进入 https://gitter.im/OpenIntelWireless/itlwm 来参与讨论。 如果您想反馈问题,请使用 https://github.com/OpenIntelWireless/itlwm/issues 声卡 AppleALC声卡仿冒ID查询[15] 利用hackintool工具驱动你的声卡[16] 声卡仿冒教程:使用AppleALC声卡仿冒驱动AppleHDA的正确姿势[17]通常台式机的声卡可以尝试注入ID:layout 1, 2, 3, 5, 7, 11 笔记本的声卡ID需要注入正确的ID:AppleALC声卡仿冒ID查询[18] 其它驱动@宪武 提供的hotpatch的全套方法: 适用于CLOVER 的 P-little[19] ; 适用于 OpenCore 的 OC-little[20] 未完待续 感谢名单 Apple[21] 的 macOS RehabMan[22]维护的项目:OS-X-Clover-Laptop-Config[23]Laptop-DSDT-Patch[24]OS-X-USB-Inject-All[25]等 Acidanthera[26] 维护的项目:OpenCorePkg[27]lilu[28]AirportBrcmFixup[29]WhateverGreen[30]VirtualSMC[31]AppleALC[32]BrcmPatchRAM[33]MaciASL[34] 等 headkaze[35] 提供的工具:hackintool[36]PinConfigurator[37]BrcmPatchRAM[38] CloverHackyColor[39]维护的项目:CloverBootloader[40]CloverThemes[41] 宪武整理的:P-little[42]OC-little[43] chris1111[44]维护的项目:VoodooHDA[45]Wireless USB Adapter Clover[46] zxystd[47]开发的itlwm[48]IntelBluetoothFirmware[49] lihaoyun6[50]提供的工具:CPU-S[51]macOS-Displays-icon[52]SidecarPatcher[53] sukka[54]更新维护的从 Clover 到 OpenCore —— Clover 迁移 OpenCore 指南[55] xzhih[56]提供的工具:one-key-hidpi[57] Bat.bat[58]更新维护的精解OpenCore[59] shuiyunxc[60] 更新维护的OpenCore配置错误、故障与解决办法[61] athlonreg[62]更新维护的OpenCore 0.5+ 部件补丁[63]Common-patches-for-hackintosh[64] github.com[65] 码云 gitee.io[66] 扣钉 coding.net[67] 参考及引用: https://deviwiki.com/wiki/Dell https://deviwiki.com/wiki/Dell_Wireless_1820A_(DW1820A) [Hervé](https://osxlatitude.com/profile/4953-herv%C3%A9/[68]) 更新的Broadcom 4350:https://osxlatitude.com/forums/topic/12169-bcm4350-cards-registry-of-cardslaptops-interop/ [Hervé](https://osxlatitude.com/profile/4953-herv%C3%A9/[69]) 更新的DW1820A支持机型列表:https://osxlatitude.com/forums/topic/11322-broadcom-bcm4350-cards-under-high-sierramojave/ nickhx[70] 提供的蓝牙驱动:https://osxlatitude.com/forums/topic/11540-dw1820a-for-7490-help/?do=findComment&comment=92833 xjn819[71]:使用OpenCore引导黑苹果[72]300系列主板正确使用AptioMemoryFix.efi的姿势(重写版)[73] insanelymac.com[74] tonymacx86.com[75] 远景论坛[76] applelife.ru[77] olarila.com[78] 参考资料[1] Intel核显platform ID整理: https://blog.daliansky.net/Intel-core-display-platformID-finishing.html [2] 利用Hackintool工具驱动核显: https://blog.daliansky.net/Intel-FB-Patcher-tutorial-and-insertion-pose.html#%E6%A0%B8%E5%BF%83%E5%8A%9F%E8%83%BD%E7%BB%99%E7%BC%93%E5%86%B2%E5%B8%A7%E6%89%93%E8%A1%A5%E4%B8%81 [3] 利用Hackintool打开第8代核显HDMI/DVI输出的正确姿势: https://blog.daliansky.net/Tutorial-Using-Hackintool-to-open-the-correct-pose-of-the-8th-generation-core-display-HDMI-or-DVI-output.html [4] 使用 WhateverGreen 驱动 Intel 核显: https://blog.zuiyu1818.cn/posts/Hac_Intel_Graphics.html [5] 英特尔® 核芯显卡 常见问答: https://github.com/acidanthera/WhateverGreen/blob/master/Manual/FAQ.IntelHD.cn.md [6] DW1820A/BCM94350ZAE/BCM94356ZEPA50DX插入的正确姿势: https://blog.daliansky.net/DW1820A_BCM94350ZAE-driver-inserts-the-correct-posture.html [7] OpenIntelWireless: https://github.com/OpenIntelWireless [8] AirportItlwm: https://github.com/OpenIntelWireless/itlwm [9] HeliPort: https://github.com/OpenIntelWireless/HeliPort [10] itlwm: https://github.com/OpenIntelWireless/itlwm [11] stevezhengshiqi: https://github.com/stevezhengshiqi [12] 驱动内置英特尔无线网卡: https://github.com/daliansky/XiaoMi-Pro-Hackintosh/wiki/驱动内置英特尔无线网卡 [13] 使用 itlwm 和 HeliPort: #使用-itlwm-和-heliport [14] 使用 AirportItlwm: #使用-airportitlwm [15] AppleALC声卡仿冒ID查询: https://github.com/acidanthera/AppleALC/wiki/Supported-codecs [16] 利用hackintool工具驱动你的声卡: https://blog.daliansky.net/Intel-FB-Patcher-tutorial-and-insertion-pose.html#声卡修补 [17] 使用AppleALC声卡仿冒驱动AppleHDA的正确姿势: https://blog.daliansky.net/Use-AppleALC-sound-card-to-drive-the-correct-posture-of-AppleHDA.html [18] AppleALC声卡仿冒ID查询: https://github.com/acidanthera/AppleALC/wiki/Supported-codecs [19] P-little: https://github.com/daliansky/P-little [20] OC-little: https://github.com/daliansky/OC-little [21] Apple: https://www.apple.com/ [22] RehabMan: https://github.com/rehabman [23] OS-X-Clover-Laptop-Config: https://github.com/RehabMan/OS-X-Clover-Laptop-Config [24] Laptop-DSDT-Patch: https://github.com/RehabMan/Laptop-DSDT-Patch [25] OS-X-USB-Inject-All: https://github.com/RehabMan/OS-X-USB-Inject-All [26] Acidanthera: https://github.com/acidanthera [27] OpenCorePkg: https://github.com/acidanthera/OpenCorePkg [28] lilu: https://github.com/acidanthera/Lilu [29] AirportBrcmFixup: https://github.com/acidanthera/AirportBrcmFixup [30] WhateverGreen: https://github.com/acidanthera/WhateverGreen [31] VirtualSMC: https://github.com/acidanthera/VirtualSMC [32] AppleALC: https://github.com/acidanthera/AppleALC [33] BrcmPatchRAM: https://github.com/acidanthera/BrcmPatchRAM [34] MaciASL: https://github.com/acidanthera/MaciASL [35] headkaze: https://www.insanelymac.com/forum/profile/1364628-headkaze/ [36] hackintool: https://github.com/headkaze/Hackintool [37] PinConfigurator: https://github.com/headkaze/PinConfigurator [38] BrcmPatchRAM: https://www.insanelymac.com/forum/topic/339175-brcmpatchram2-for-1015-catalina-broadcom-bluetooth-firmware-upload/ [39] CloverHackyColor: https://github.com/CloverHackyColor [40] CloverBootloader: https://github.com/CloverHackyColor/CloverBootloader [41] CloverThemes: https://github.com/CloverHackyColor/CloverThemes [42] P-little: https://github.com/daliansky/P-little [43] OC-little: https://github.com/daliansky/OC-little [44] chris1111: https://github.com/chris1111 [45] VoodooHDA: https://github.com/chris1111/VoodooHDA-2.9.2-Clover-V15 [46] Wireless USB Adapter Clover: https://github.com/chris1111/Wireless-USB-Adapter-Clover [47] zxystd: https://github.com/zxystd [48] itlwm: https://github.com/zxystd/itlwm [49] IntelBluetoothFirmware: https://github.com/zxystd/IntelBluetoothFirmware [50] lihaoyun6: https://github.com/lihaoyun6 [51] CPU-S: https://github.com/lihaoyun6/CPU-S [52] macOS-Displays-icon: https://github.com/lihaoyun6/macOS-Displays-icon [53] SidecarPatcher: https://github.com/lihaoyun6/SidecarPatcher [54] sukka: https://github.com/SukkaW [55] 从 Clover 到 OpenCore —— Clover 迁移 OpenCore 指南: https://blog.skk.moe/post/from-clover-to-opencore/ [56] xzhih: https://github.com/xzhih [57] one-key-hidpi: https://github.com/xzhih/one-key-hidpi [58] Bat.bat: https://github.com/williambj1 [59] 精解OpenCore: https://blog.daliansky.net/OpenCore-BootLoader.html [60] shuiyunxc: https://github.com/shuiyunxc [61] OpenCore配置错误、故障与解决办法: https://shuiyunxc.gitee.io/2020/04/06/Faults/index/ [62] athlonreg: https://github.com/athlonreg [63] OpenCore 0.5+ 部件补丁: https://blog.cloudops.ml/ocbook/ [64] Common-patches-for-hackintosh: https://github.com/athlonreg/Common-patches-for-hackintosh [65] github.com: github.com [66] 码云 gitee.io: gitee.io [67] 扣钉 coding.net: coding.net [68] Hervé: https://osxlatitude.com/profile/4953-hervé/ [69] Hervé: https://osxlatitude.com/profile/4953-hervé/ [70] nickhx: https://osxlatitude.com/profile/129953-nickhx/ [71] xjn819: https://blog.xjn819.com/ [72] 使用OpenCore引导黑苹果: https://blog.xjn819.com/?p=543 [73] 300系列主板正确使用AptioMemoryFix.efi的姿势(重写版): https://blog.xjn819.com/?p=317 [74] insanelymac.com: https://www.insanelymac.com/ [75] tonymacx86.com: https://www.tonymacx86.com/ [76] 远景论坛: http://bbs.pcbeta.com [77] applelife.ru: https://applelife.ru/ [78] olarila.com: https://www.olarila.com/ |
【本文地址】

