| 随身WiFi(棒子)折腾日记(不断更新完善...) | 您所在的位置:网站首页 › 随身wifi管理系统 › 随身WiFi(棒子)折腾日记(不断更新完善...) |
随身WiFi(棒子)折腾日记(不断更新完善...)
|
目录
随身WiFi(棒子)折腾日记(不断更新完善...)一、了解随身WiFi的版本情况二、确定需求剁手三、购买闭坑指南四、安装9008驱动五、系统备份1. MiKo备份2. 变砖拯救(利用之前的备份镜像)3. QPT 备份4. QCN(基带)备份
六、刷Debian系统1.资料下载2. fastboot刷机模式3. 刷机4. 刷官网Debian【自选】
七、刷OpenWrt系统1. 下载资源2. 刷机3. 连接4. 进入系统
八、进阶玩法(一)Debian系统FinalShell的安装和使用1. 1 FinalShell下载1.2 使用FinalShell进行连接
修改wifi名称和密码nmtui命令更改密码查看内存寿命查看Debian版本安装中文环境Debian更换软件源finalshell链接一直提示输入密码挂载U盘或者SD卡挂载失败
docker安装~~安装宝塔面板~~安装青龙
(二)OpenWrt系统1. 软路由和旁路由制作旁路由
(三)硬改(四)插卡
九、问题解决1. ADB interface
十、参考链接
随身WiFi(棒子)折腾日记(不断更新完善…)
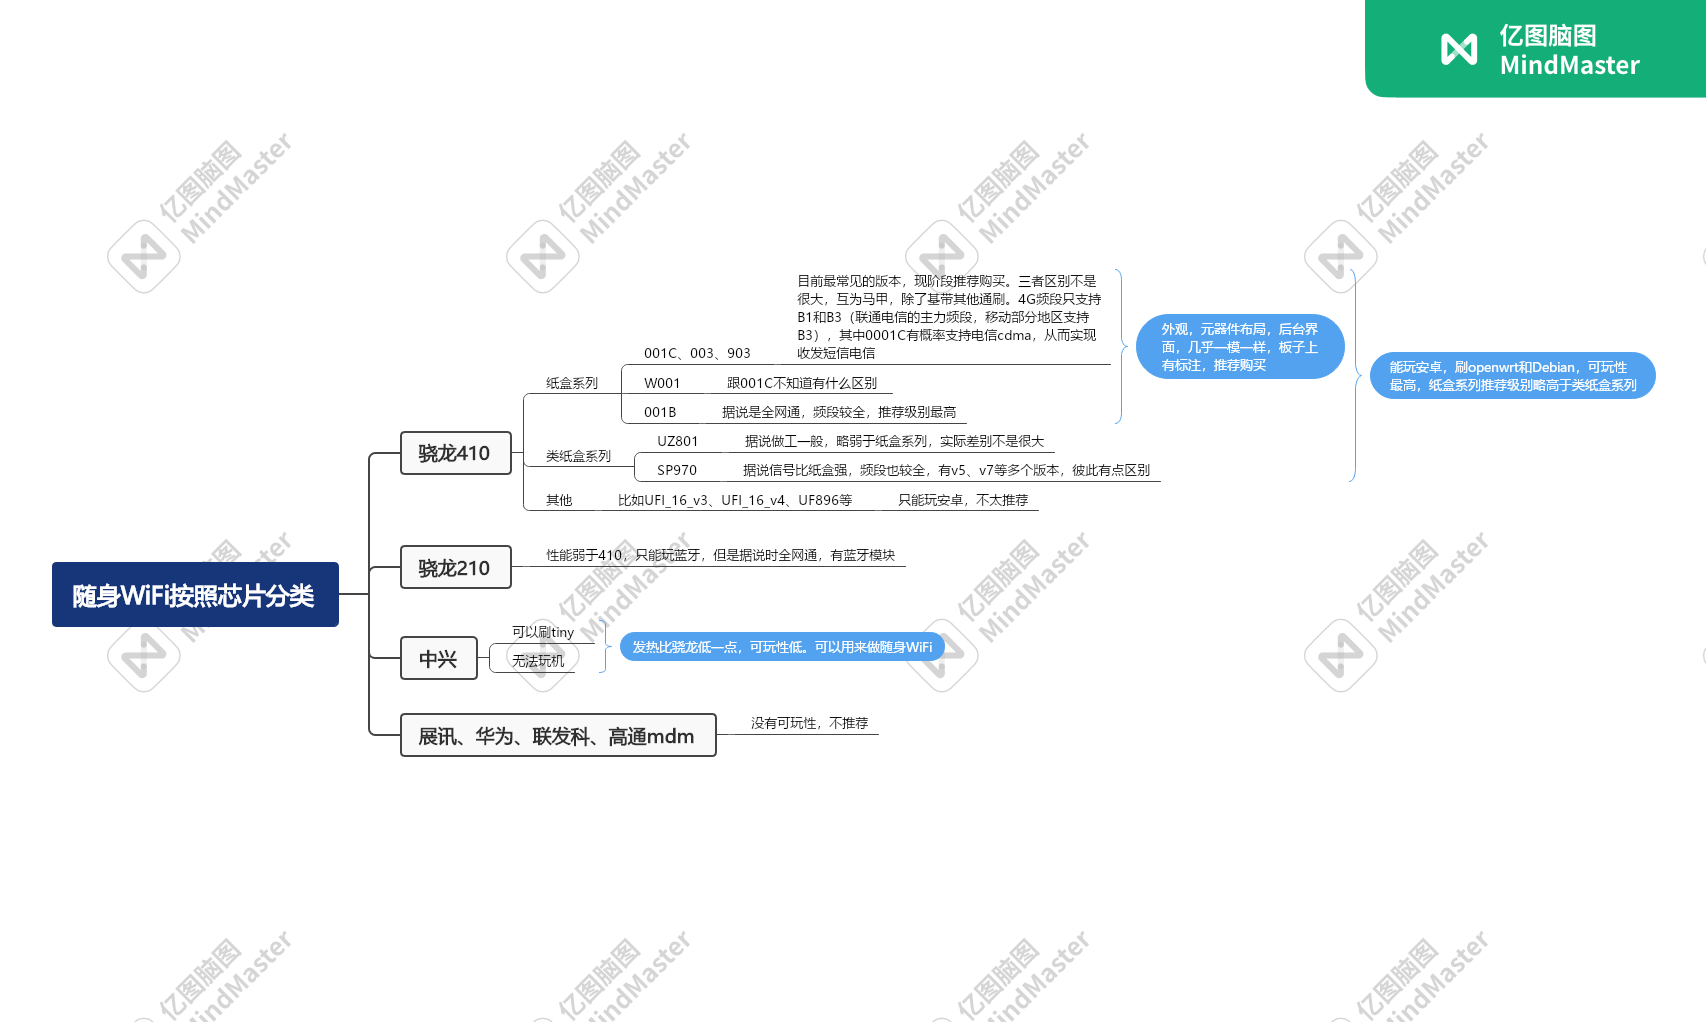
一、了解随身WiFi的版本情况
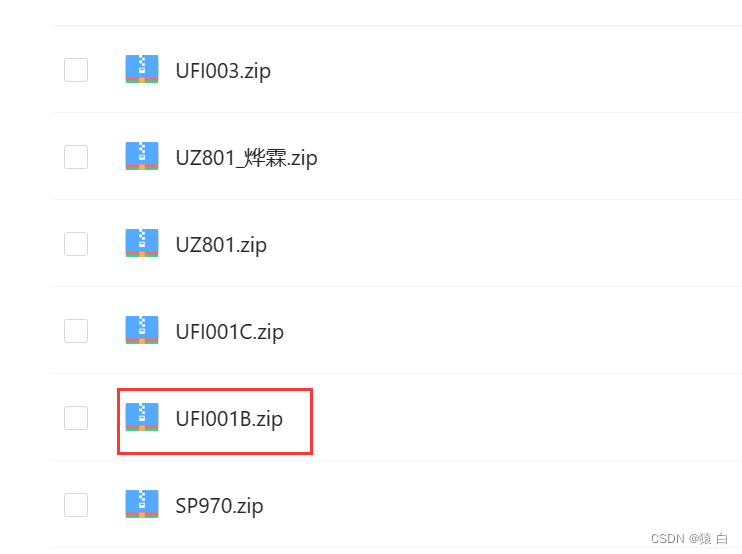
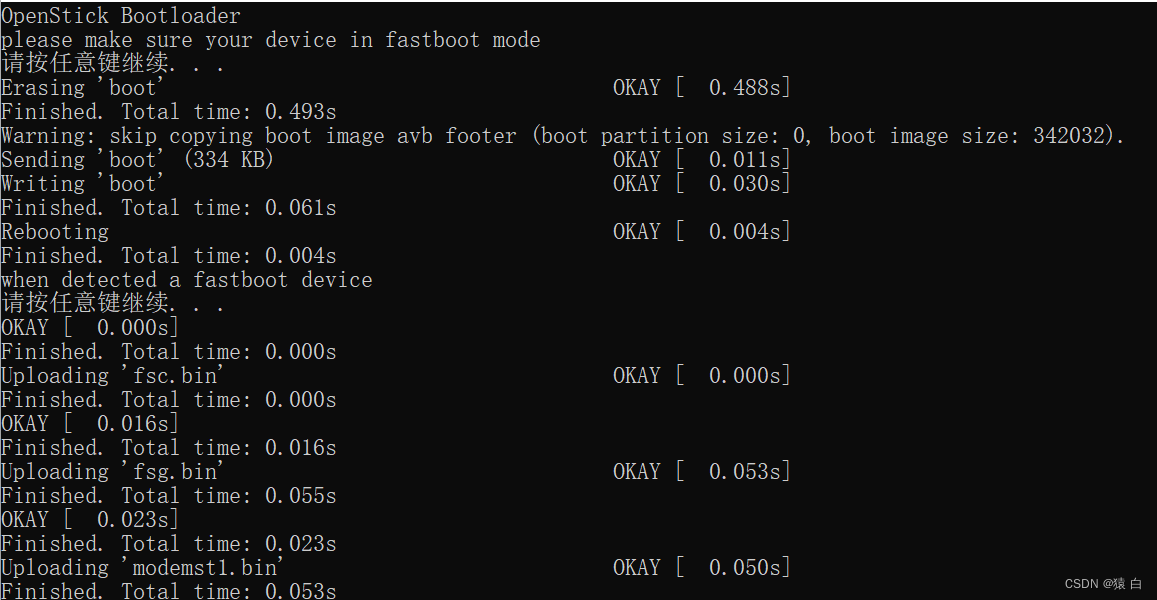
各大网购平台自行进行下单。大于十块钱不推荐入手哦【等活动再入手】。 三、购买闭坑指南随着时间的流逝,生厂厂家也在更新迭代,数据仅供参考。(没有针对商家【狗头保命】) 产品名称理由ZDX中芯微zxic,后台比较强大,破解难度大先机骁龙410,版本103s,群里大佬不推荐……欢迎大家来补充。 四、安装9008驱动UFI-Tools【123pan,密码5835】 UFI-Tools【蓝凑网,密码:gao】 按住重启键不放没然后插入电脑U盘接口,电脑打开设备管理器 软件下载:UFI-Tools 防止刷的过程中会变砖(刷死了,系统出错,不动了),就需要对原来的系统进行备份 1. MiKo备份最少做一个miko全量备份。 QUALCOMM MSM8916:高通410,可玩性最高; QUALCOMM MSM8909:高通210,玩法仅次于410; 检测完成之后对系统进行备份【镜像备份】。 如果之后的步骤变砖了,可以看这一步,没变砖请跳过 软件:Qualcomm Premium Tool 这个软件需要注册,注册的时候记得关闭电脑声音。 Qualcomm Premium Tool 备份出来的是所有分区的小镜像,也用于提取部分分区。 备份参考链接:参考 4. QCN(基带)备份软件:星海SVIIP 备份参考链接:参考 六、刷Debian系统 1.资料下载资料下载链接【后面用到啥下啥】: UFI-Tools 酷铵水遍(酷安) 环境包 Debian & OpenWrt 固件下载: 苏苏小亮亮(酷安) OpenStick-github 按照自己的主板信息下载对应的包并进行解压。 备份完资料之后,重新插拔随身wifi【不需要按住重启键】
Fastboot 模式是 Android 手机常用的刷机模式(线刷)。上述操作没有问题之后执行以下指令操作: adb reboot bootloader 3. 刷机解压文件中找到flash.bat Debian【github】 github加速下载网站 然后进入base文件夹,cmd下输入flash.bat 之后再进入debian文件夹,cmd输入flash.bat 七、刷OpenWrt系统 1. 下载资源资源下载看debian的下载。 2. 刷机方法同上,跟刷Debian系统一样 完成标志:
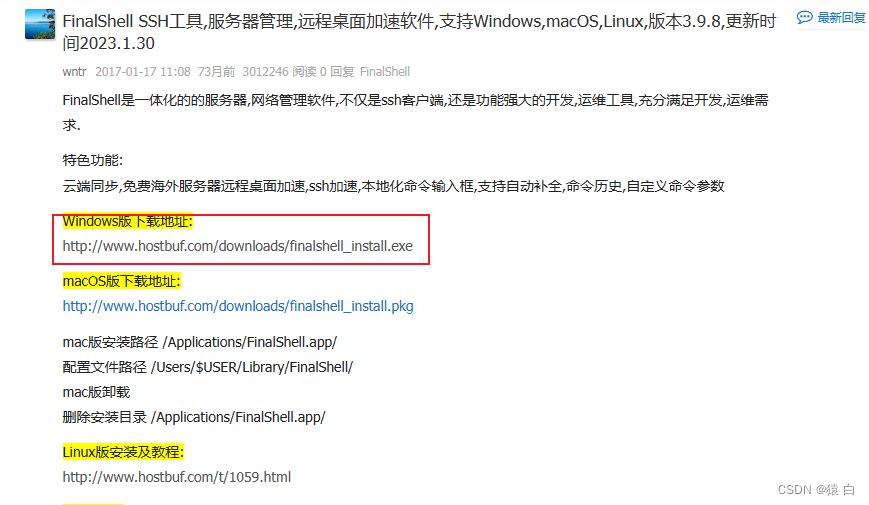
感谢你们的阅读,当你们读到这里的时候,说明前面已经安装好了对应的系统,接下来开始进入正题,开始真正的搞机!!! (一)Debian系统 FinalShell的安装和使用 1. 1 FinalShell下载FinalShell是一体化的的服务器,网络管理软件,不仅是ssh客户端,还是功能强大的开发,运维工具,充分满足开发,运维需求. FinalShell SSH(官网下载) 之后就可以打开这个软件进行直接连接。
在cmd命令下输入adb shell,然后进去之后输入以下命令: ifconfig可以查看IP地址,找到wan口的ip信息,方便FinalShell进行连接 IP地址:192.168.XX.XX 用户名:root 密码:1 端口:22 之后进行连接:
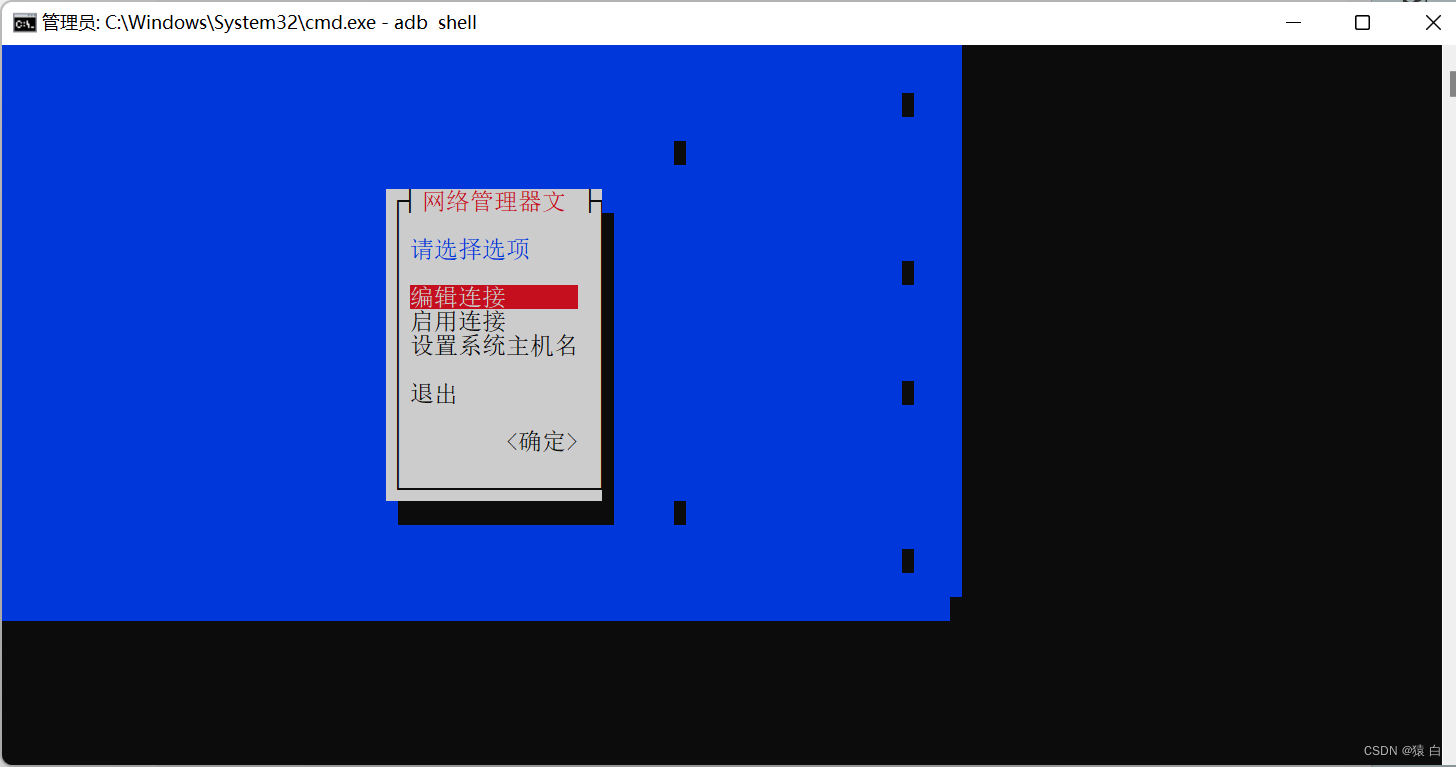
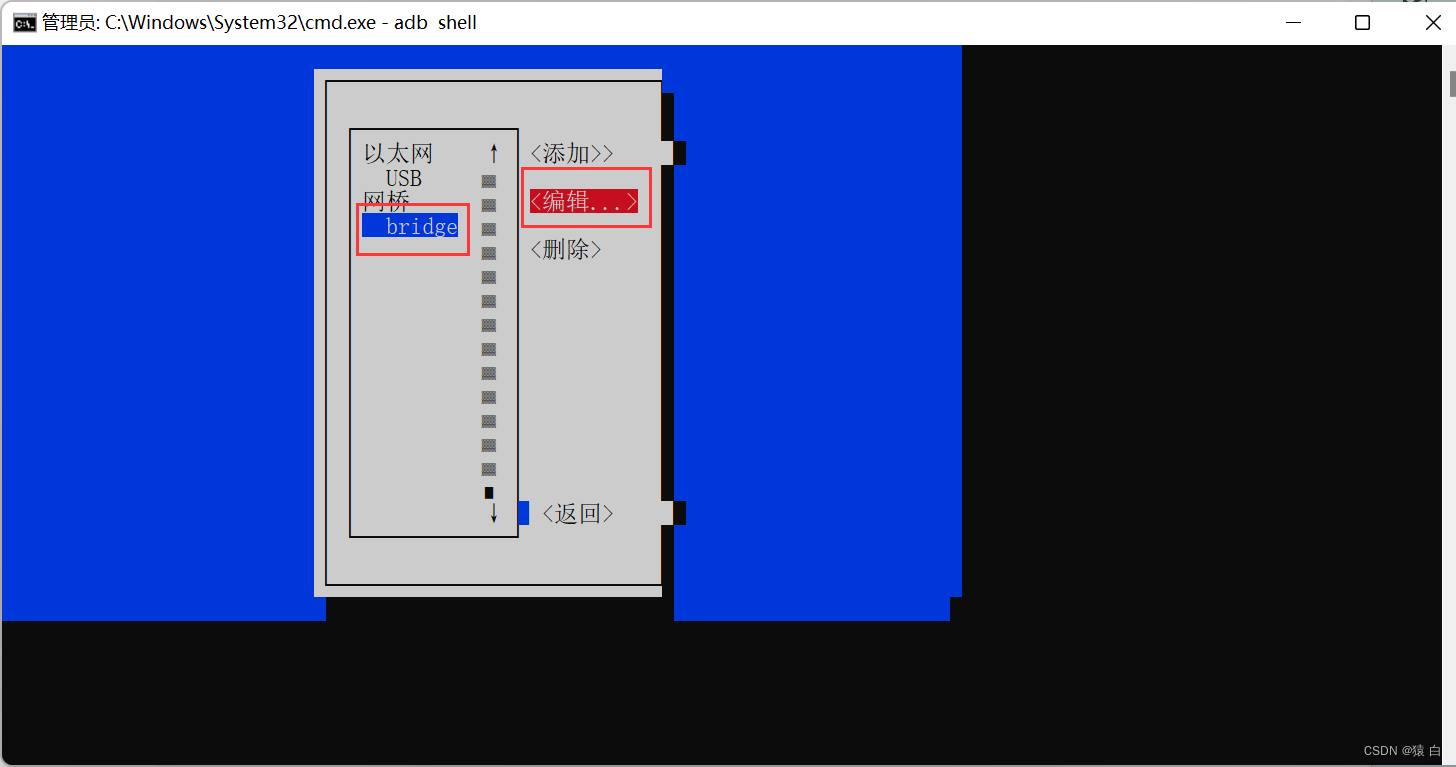
命令行输入 export TERM=linux # 只用输入一次,之后不用输入 nmtui
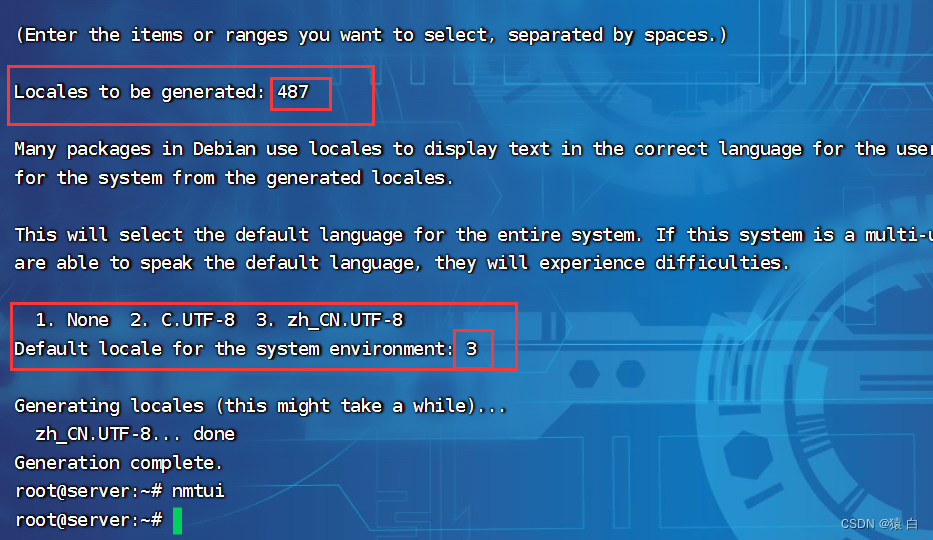
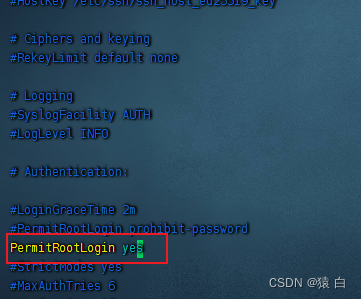
用户是root,密码默认是1,对密码进行修改 passwd root之后重新设置密码。 查看内存寿命debian/op的终端输入 cat /sys/class/mmc_host/mmc0/mmc0\:0001/life_time显示结果: 0X04 用了40%的寿命 0X08 用了80%的寿命 0X00 看不到寿命 查看Debian版本 cat /etc/issue cat /etc/debian_version 安装中文环境第一步,安装locales包 apt-get install locales第二步,配置包 dpkg-reconfigure locales之后回车,做选择 备份官方源: cp /etc/apt/sources.list /etc/apt/sources.list.bak修改源:root用户 sudo vim /etc/apt/sources.list进入之后输入:ggdG会清空内容 阿里云: deb https://mirrors.aliyun.com/debian/ bullseye main non-free contrib deb-src https://mirrors.aliyun.com/debian/ bullseye main non-free contrib deb https://mirrors.aliyun.com/debian-security/ bullseye-security main deb-src https://mirrors.aliyun.com/debian-security/ bullseye-security main deb https://mirrors.aliyun.com/debian/ bullseye-updates main non-free contrib deb-src https://mirrors.aliyun.com/debian/ bullseye-updates main non-free contrib deb https://mirrors.aliyun.com/debian/ bullseye-backports main non-free contrib deb-src https://mirrors.aliyun.com/debian/ bullseye-backports main non-free contrib腾讯云: deb https://mirrors.tencent.com/debian/ bullseye main non-free contrib deb-src https://mirrors.tencent.com/debian/ bullseye main non-free contrib deb https://mirrors.tencent.com/debian-security/ bullseye-security main deb-src https://mirrors.tencent.com/debian-security/ bullseye-security main deb https://mirrors.tencent.com/debian/ bullseye-updates main non-free contrib deb-src https://mirrors.tencent.com/debian/ bullseye-updates main non-free contrib deb https://mirrors.tencent.com/debian/ bullseye-backports main non-free contrib deb-src https://mirrors.tencent.com/debian/ bullseye-backports main non-free contrib网易云: deb https://mirrors.163.com/debian/ bullseye main non-free contrib deb-src https://mirrors.163.com/debian/ bullseye main non-free contrib deb https://mirrors.163.com/debian-security/ bullseye-security main deb-src https://mirrors.163.com/debian-security/ bullseye-security main deb https://mirrors.163.com/debian/ bullseye-updates main non-free contrib deb-src https://mirrors.163.com/debian/ bullseye-updates main non-free contrib deb https://mirrors.163.com/debian/ bullseye-backports main non-free contrib deb-src https://mirrors.163.com/debian/ bullseye-backports main non-free contrib华为镜像: deb https://mirrors.huaweicloud.com/debian/ bullseye main non-free contrib deb-src https://mirrors.huaweicloud.com/debian/ bullseye main non-free contrib deb https://mirrors.huaweicloud.com/debian-security/ bullseye-security main deb-src https://mirrors.huaweicloud.com/debian-security/ bullseye-security main deb https://mirrors.huaweicloud.com/debian/ bullseye-updates main non-free contrib deb-src https://mirrors.huaweicloud.com/debian/ bullseye-updates main non-free contrib deb https://mirrors.huaweicloud.com/debian/ bullseye-backports main non-free contrib deb-src https://mirrors.huaweicloud.com/debian/ bullseye-backports main non-free contrib清华大学: deb https://mirrors.tuna.tsinghua.edu.cn/debian/ bullseye main contrib non-free deb-src https://mirrors.tuna.tsinghua.edu.cn/debian/ bullseye main contrib non-free deb https://mirrors.tuna.tsinghua.edu.cn/debian/ bullseye-updates main contrib non-free deb-src https://mirrors.tuna.tsinghua.edu.cn/debian/ bullseye-updates main contrib non-free deb https://mirrors.tuna.tsinghua.edu.cn/debian/ bullseye-backports main contrib non-free deb-src https://mirrors.tuna.tsinghua.edu.cn/debian/ bullseye-backports main contrib non-free deb https://mirrors.tuna.tsinghua.edu.cn/debian-security bullseye-security main contrib non-free deb-src https://mirrors.tuna.tsinghua.edu.cn/debian-security bullseye-security main contrib non-free中科大: deb https://mirrors.ustc.edu.cn/debian/ bullseye main contrib non-free deb-src https://mirrors.ustc.edu.cn/debian/ bullseye main contrib non-free deb https://mirrors.ustc.edu.cn/debian/ bullseye-updates main contrib non-free deb-src https://mirrors.ustc.edu.cn/debian/ bullseye-updates main contrib non-free deb https://mirrors.ustc.edu.cn/debian/ bullseye-backports main contrib non-free deb-src https://mirrors.ustc.edu.cn/debian/ bullseye-backports main contrib non-free deb https://mirrors.ustc.edu.cn/debian-security/ bullseye-security main contrib non-free deb-src https://mirrors.ustc.edu.cn/debian-security/ bullseye-security main contrib non-free更新源: sudo apt-get update finalshell链接一直提示输入密码修改密码是没有用的 解决办法: 切换到root用户 su root更改规则: vim /etc/ssh/sshd_config如果没有装vim sudo apt-get update # 更新一下系统安装vim: sudo apt-get install vim修改方法:点击i,进入输入模式,输入完成后,点击Esc,点击:,输入wq【写入并保存退出】 最好挂载U盘之前格式化一下 mkfs.ext4 /dev/sda第一步查看有没有检测到U盘 lsblk第二步,切换到usb模式 echo host > /sys/kernel/debug/usb/ci_hdrc.0/role再次输入lsblk
第四步,reboot重启设备,再度输入lsblk是否检测到u盘 挂载语句:mount /dev/sda /mnt 第五步,每次重启都要重启挂载,因此,写一个脚本 脚本开机运行: vim /etc/rc.local
第六步,赋予权限: chmod -x mount.sh chmod +x /etc/rc.local第七步,重启 mount: /www: wrong fs type, bad option, bad superblock on /dev/sda, missing codepage or helper program, or other error. 教程 教程 解决问题:/etc/rc.local文件配置的开机启动项不生效 教程 解决:perl: warning: Please check that your locale settings 教程 docker安装使用root身份登录系统 apt-get update安装wget和curl工具 apt install curl wget修改安装docker系统的位置【空间大可以忽略】 教程 教程 安装docker系统 ```c curl -fsSL https://get.docker.com | bash -s docker --mirror Aliyun未完待续。。。 安装宝塔面板不推荐安装宝塔面板,内存占用大,4G随身wifi有点承受不住。 1panel官网(酷友推荐) 还没研究,有时间补上 安装青龙未完待续。。。 (二)OpenWrt系统 1. 软路由和旁路由资料来源自百度知道。 软路由和旁路由是两种常见的网络路由技术,它们的主要区别在于实现方式和功能不同。 软路由 软路由是指通过软件来实现路由器的功能,即在计算机或服务器上运行专门的软件来实现路由器的功能。软路由的优点是可以实现远程管理、自定义设置和灵活性高。缺点是对计算机硬件要求高,需要计算机性能较强的 CPU 和内存来支持,同时需要不断更新软件以适应不断变化的网络环境。旁路由 旁路由是指通过旁路 (Bypass) 来实现路由器的功能。旁路是指将网络流量从正常的路由路径中绕过,通过另外的路径传输。旁路由的优点是可以实现故障切换、负载均衡等功能,同时可以实现远程管理,缺点是对网络拓扑结构要求高,需要专门的设备或线路来实现旁路。总的来说,软路由和旁路由都是常见的网络路由技术,它们各自有优点和缺点,具体选择哪种技术要根据实际情况来考虑。 制作旁路由未完待续… (三)硬改随身wifi体积小,长时间高负荷运行会有很高的的热量,因此,散热就显得尤为重要。以下方案仅供参考: 硬改方式具体步骤方法散热片散热通过石墨烯贴片或者散热硅脂的方式来粘贴散热片可以达到一定的散热效果风扇散热需要一定的动手能力,从usb口取电,散热片上面增加5v风扇来进行散热。升级:增加开关来控制、增加温控常闭开关【温度高度一定度数就通电】来控制风扇增益天线基本上都在尾巴白色块那,自己购买增益天线进行安装…… (四)插卡插卡式作为随身wifi最基本的功能,有这部分需求的小伙伴先研究一下基带 九、问题解决 1. ADB interface
参考教程: 随身wifi - 备份篇 UFI 系列 4G WiFi 棒研究记录 我要玩WiFi棒子系列 我要玩WiFi棒子系列 颜七岁-嵌入式点灯大师 随身Wifi刷机破解折腾入门漫谈(燕子博客) 4g 随身 Wi-Fi 刷 openwrt 变成软路由(酱紫表) 随身wifi安装debian详细步骤(B站) 随身WiFi制作Linux服务器(CSDN) 随身WIFI安装Debian流程记录(CSDN) 随身WiFi刷Debian系统折腾指南(CSDN) 高通芯片开通adb(酷安) 群晖 NAS 安装 Openwrt 旁路由教程 安装青龙面板(CSDN) 安装青龙加京东脚本 小v博客 随身WiFi刷debian后开机自动挂载U盘 随身WiFi刷Debian后挂载U盘 debian脚本自启动 |
 来个全身照【拆机自备螺丝刀】:
  这是一个UFI001B版本,有卡槽【有的随身wifi没有卡槽,但是有焊点,动手能力强的兄弟可以自己焊接一个】
  这是一个UFI001C版本的板子,有卡槽。
  还是个2022年的库存货,上面的屏蔽板打开,我的是kingston(金士顿)的颗粒。
  【JAPAN,也不知道是什么颗粒】
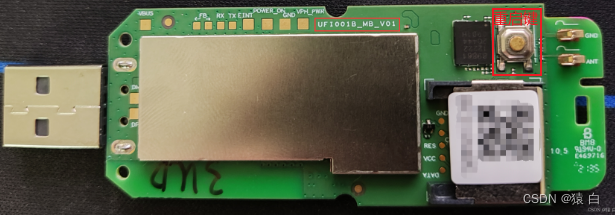
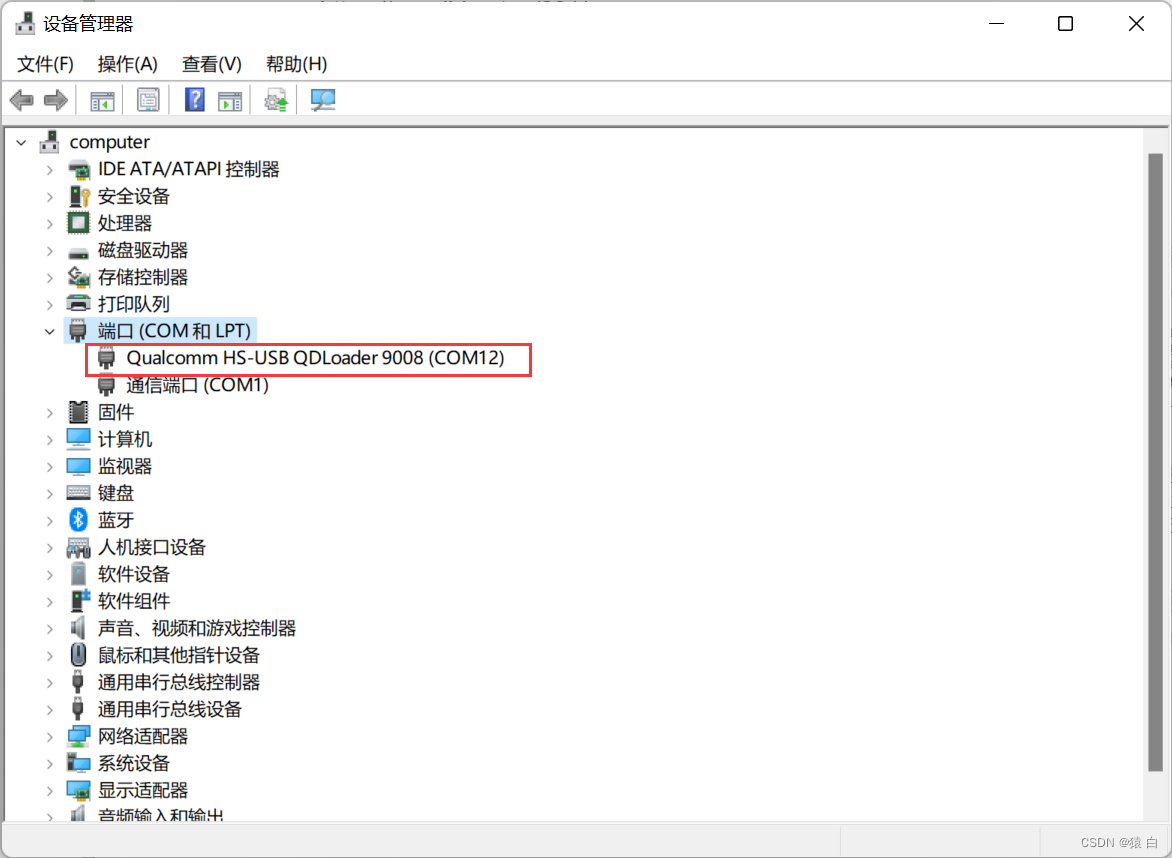 电脑显示9008端口才是正确的,只有进入9008才能刷机。
  如果显示其他的,可以重新插拔重复上述操作。
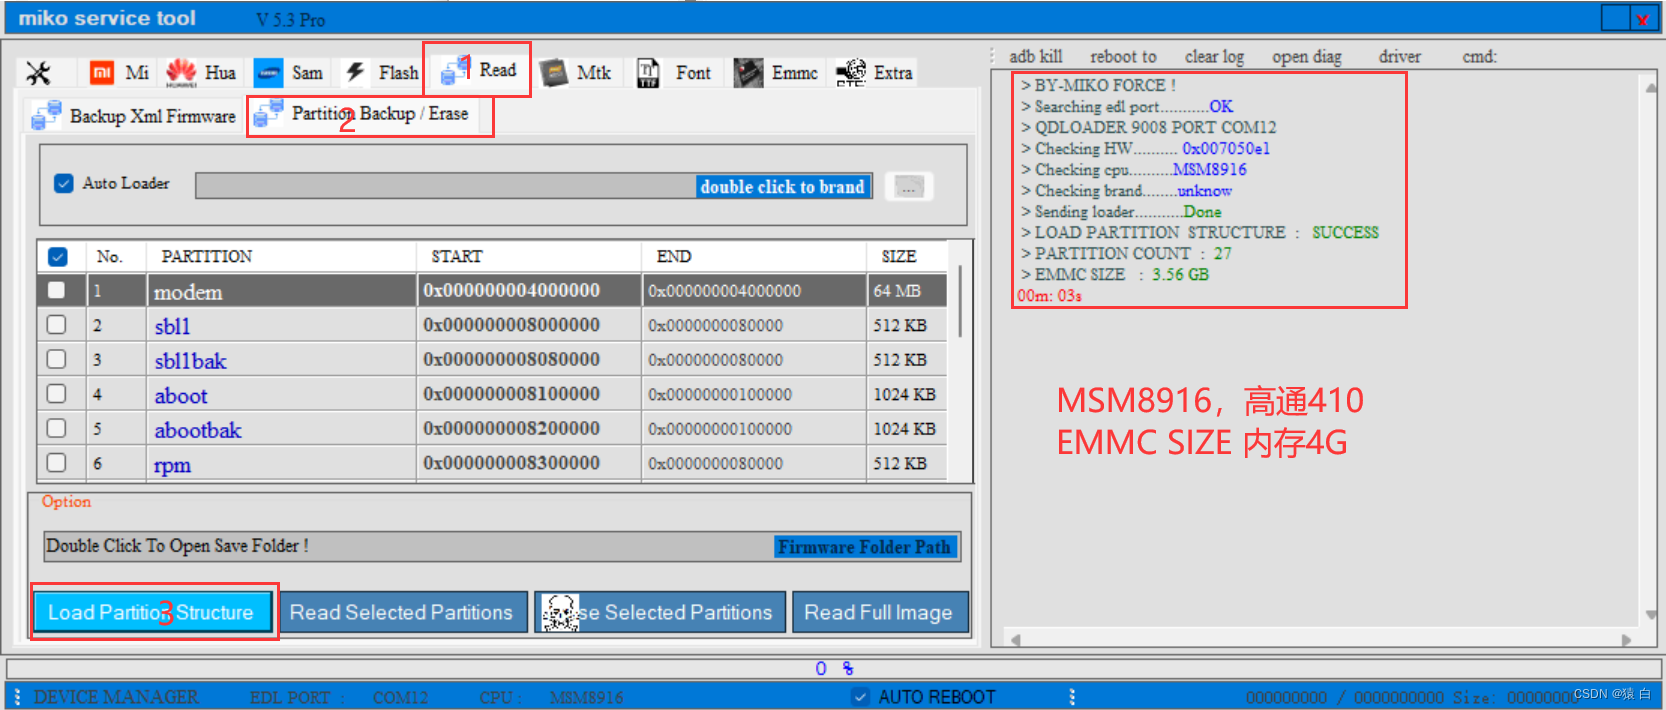 上述操作可以检测芯片信息和内存信息。上述是个4G内存的棒子【有人中奖8G】。
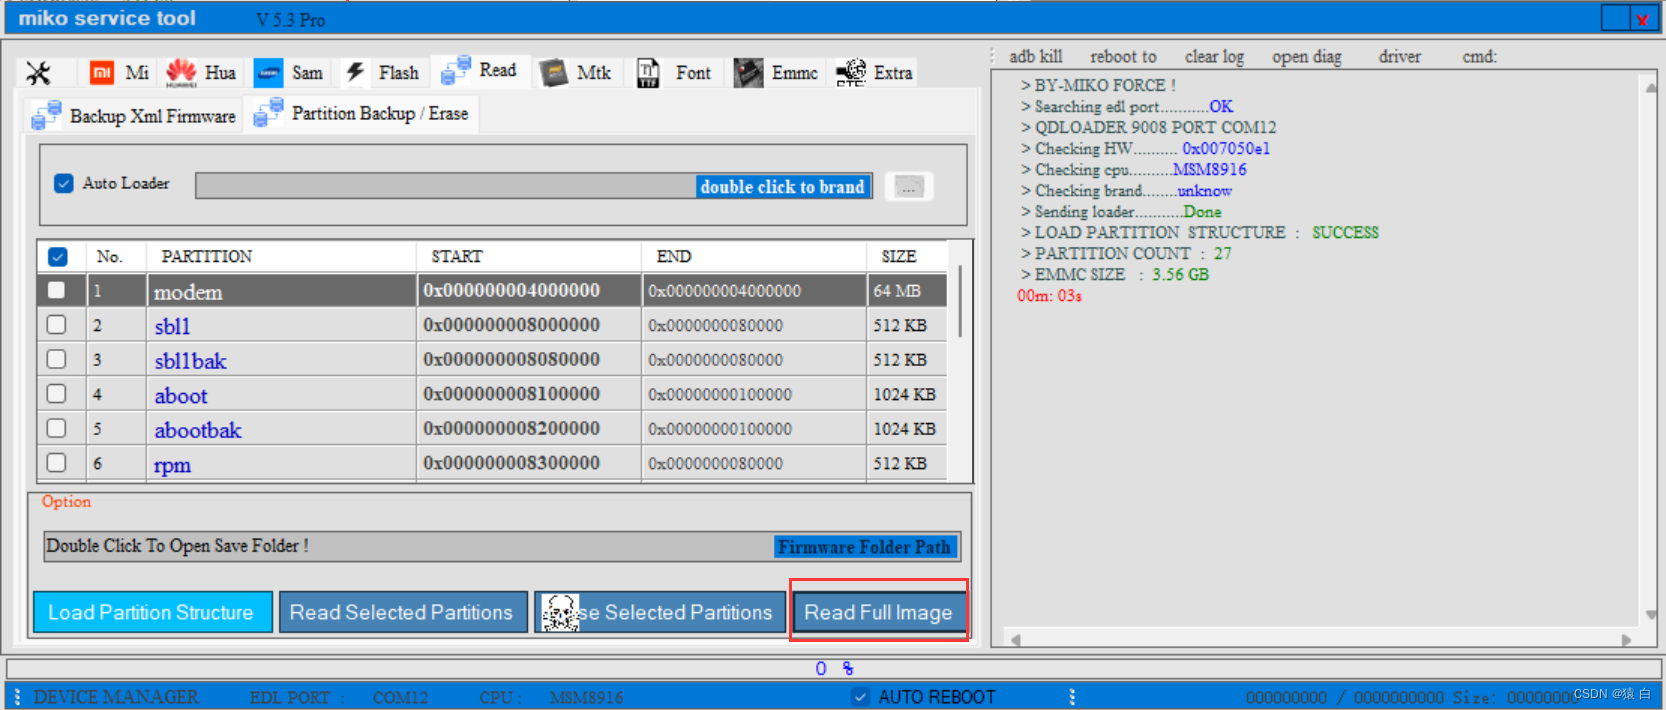 选择备份的地址,然后等待备份完成即可
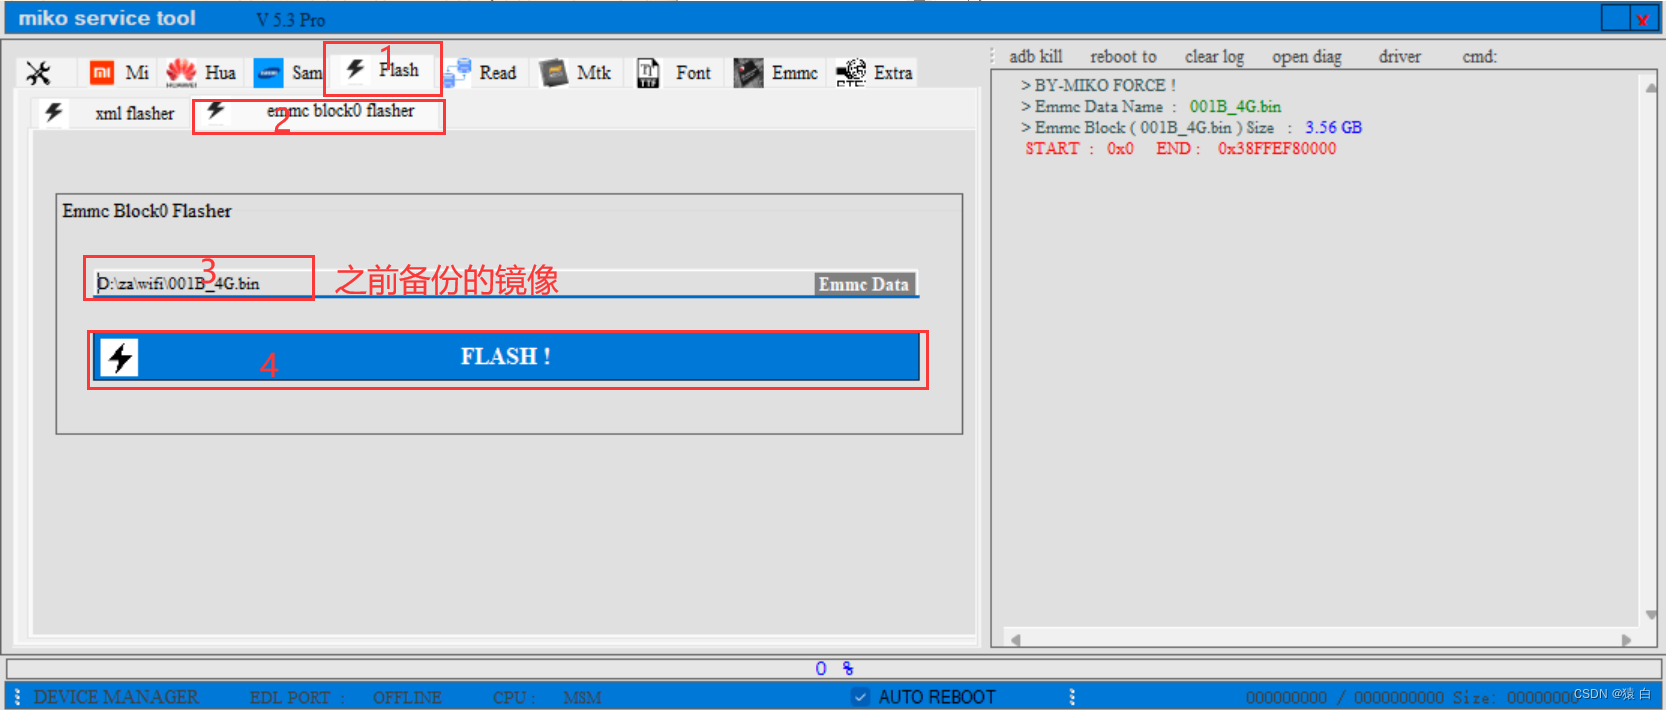
 进入下载解压好的包里面,在地址栏输入cmd,然后按回车。
  在命令行模式下输入以下命令:
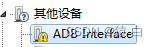
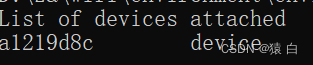 上图是正确的,如果设备清单中没有adb设备就重新插拔。
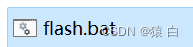
 按任意键继续,多按几次
 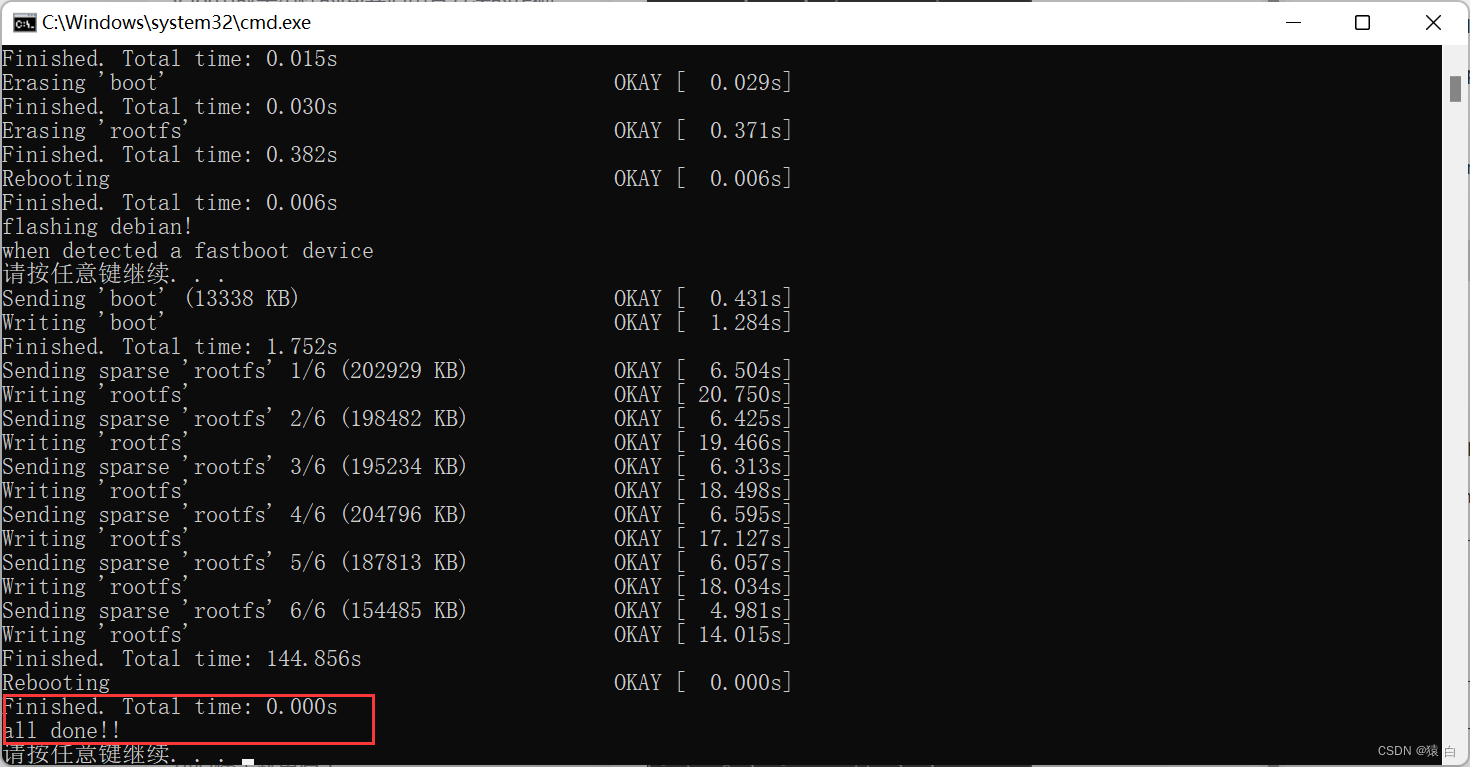 如果出现这个问题:
  方法一:等一会,重新插拔 方法二:卸载掉9008驱动,然后重新插拔
  进入这个界面是成功了。到这步已经刷入了Debian系统。
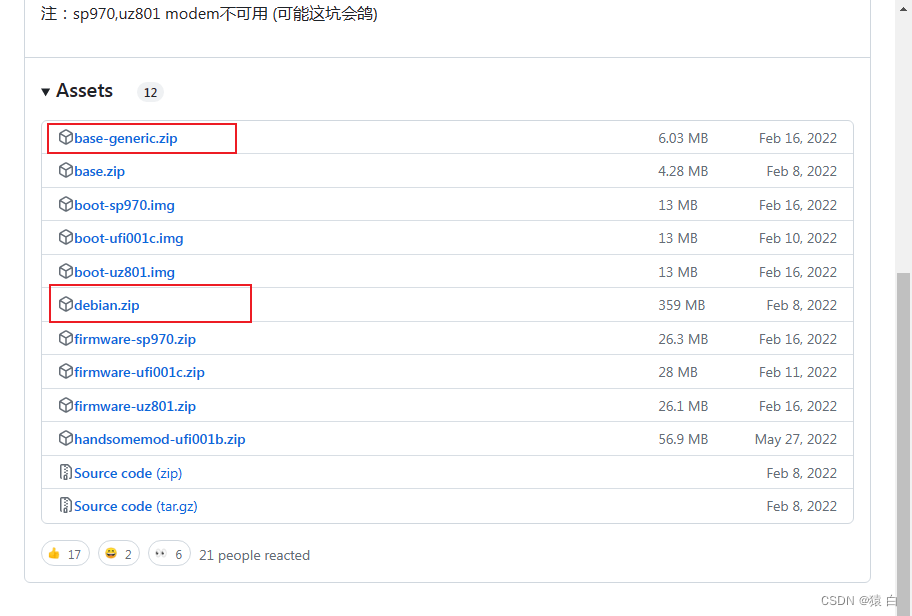 首先打开BootLoader模式
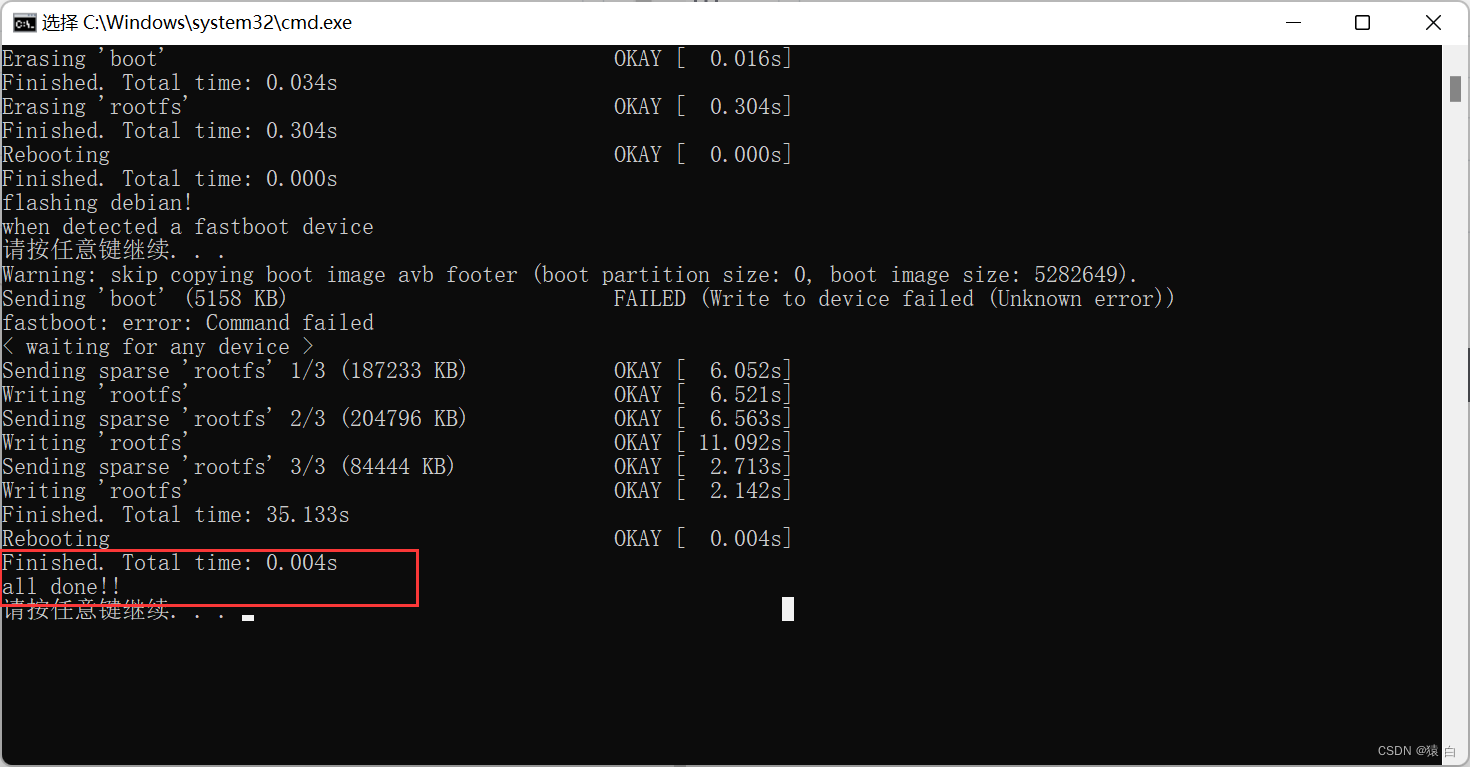

 网址:192.168.1.1
 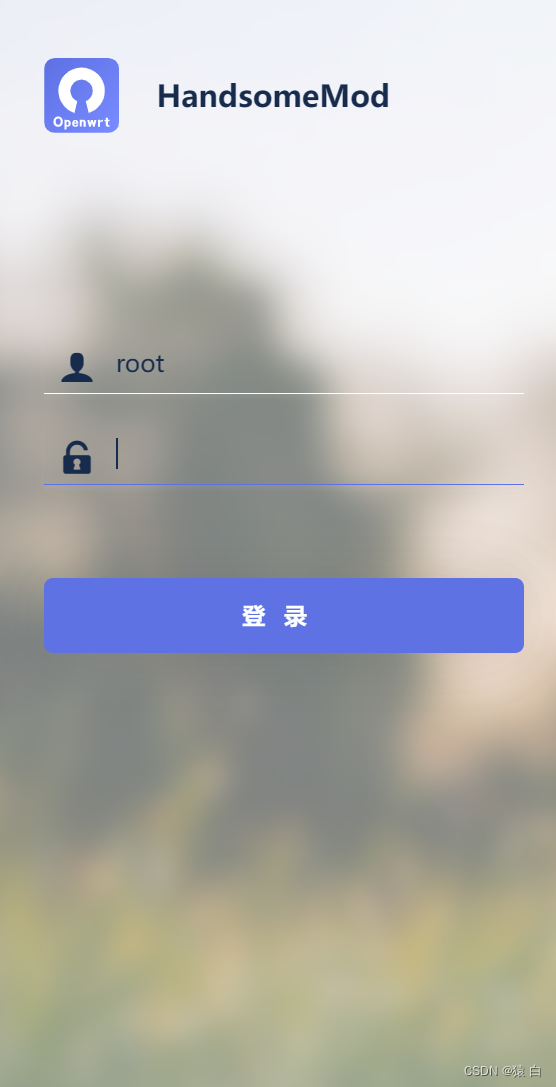 用户名是root,没有密码,直接点击登录
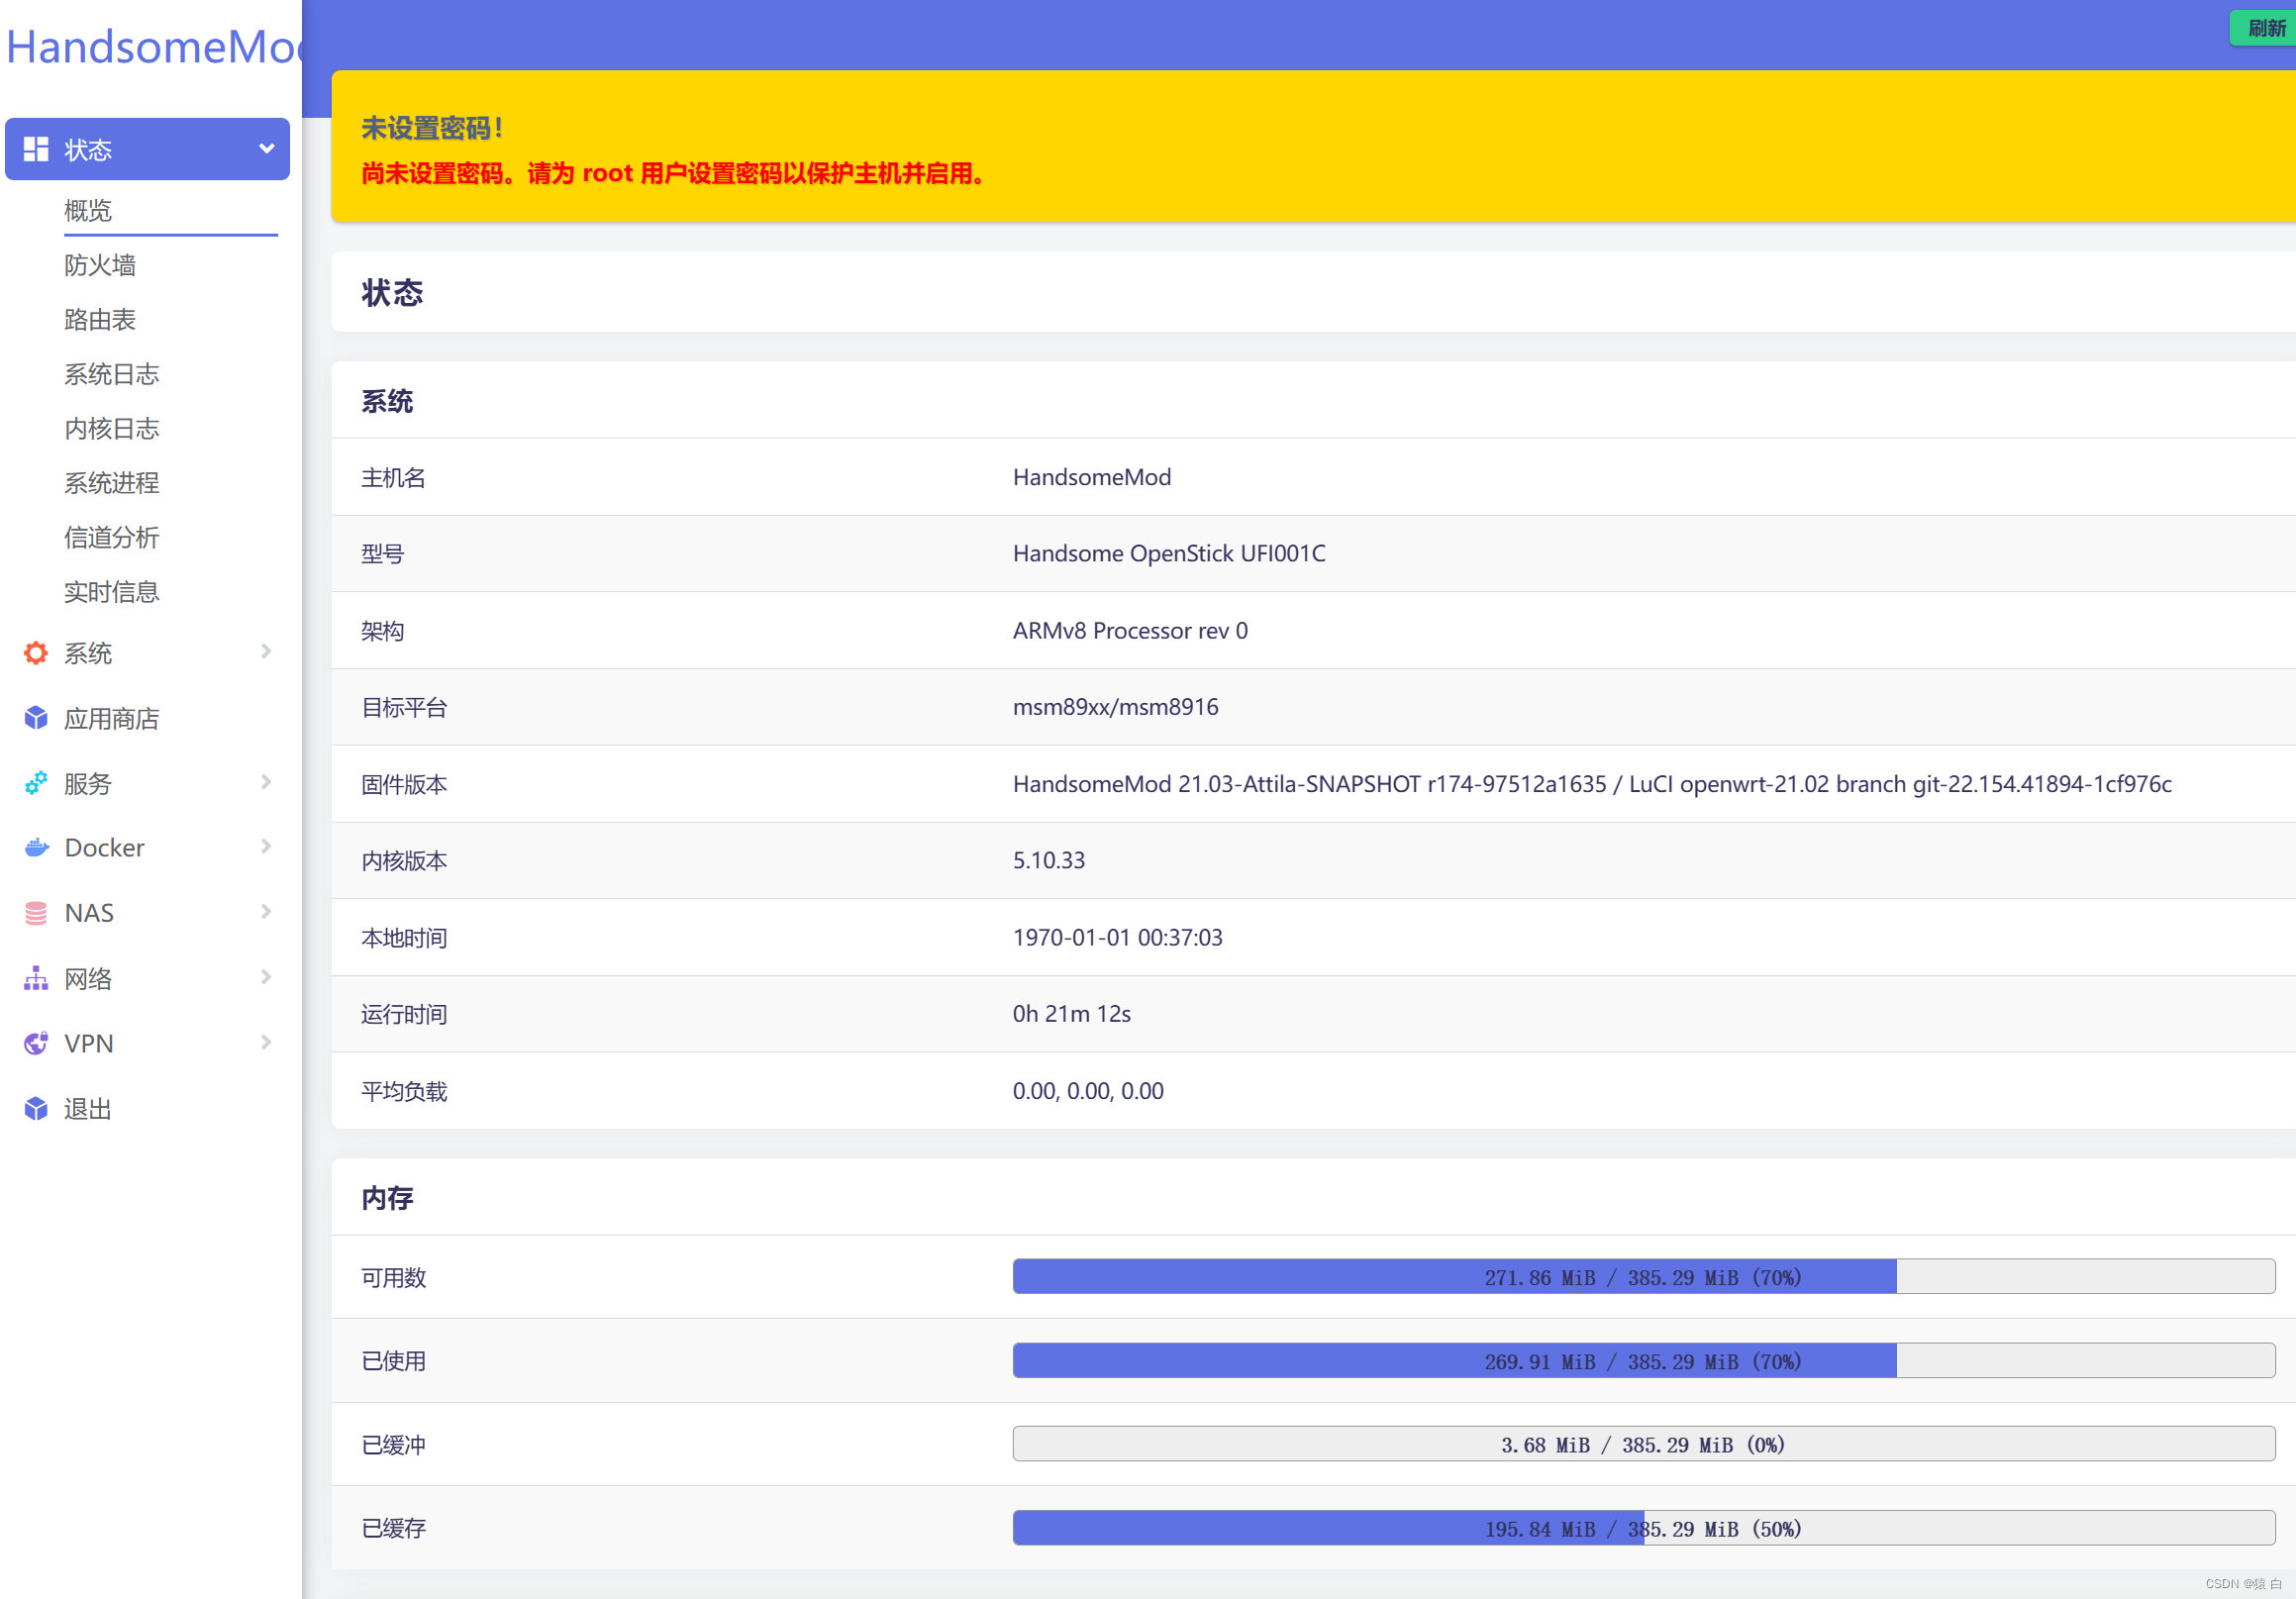
 安装过程:略
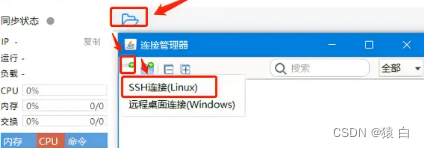 连接完成效果图:
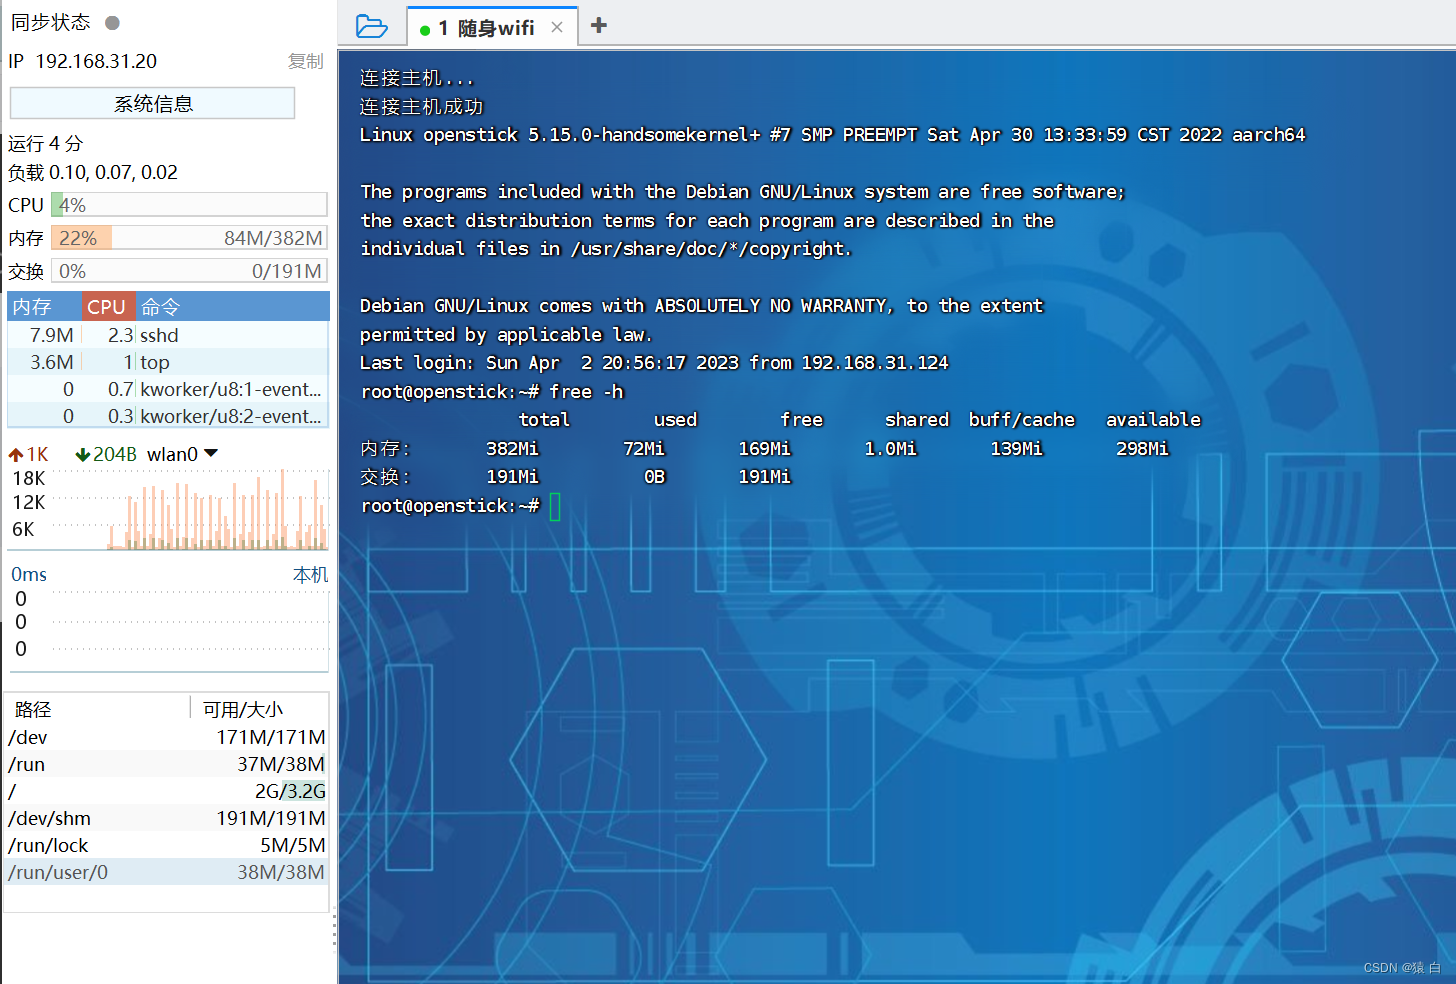
 然后删除wifi,下图是已经删掉的
 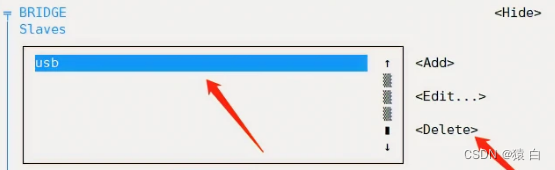 回退,按esc
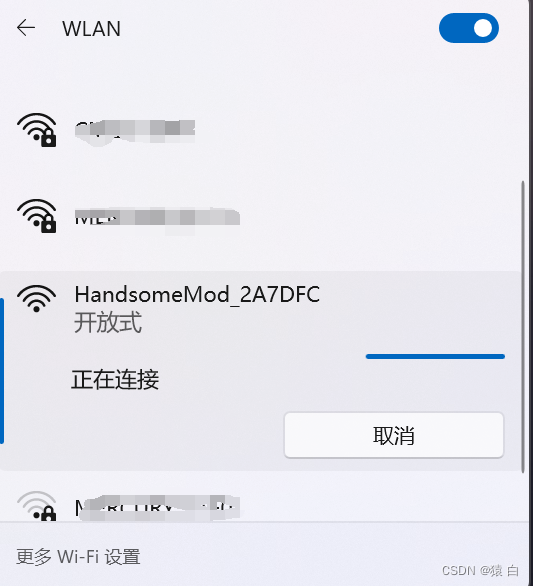
 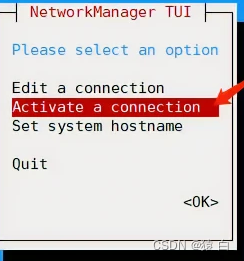 然后选择第二个wifi,进行自家wifi连接,输入自家wifi的密码,等待连接成功。
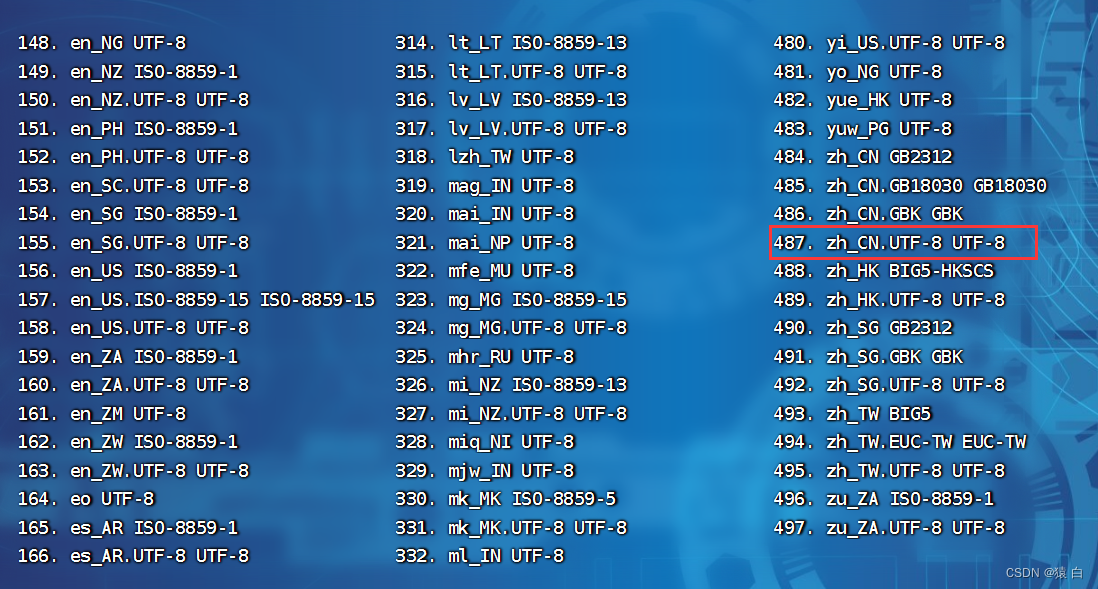
 重启服务,或者重新插拔
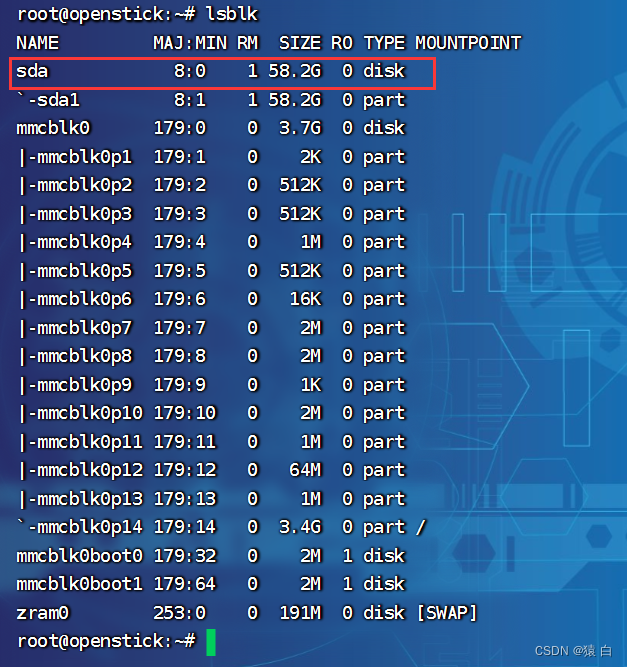 第三步,进行挂载
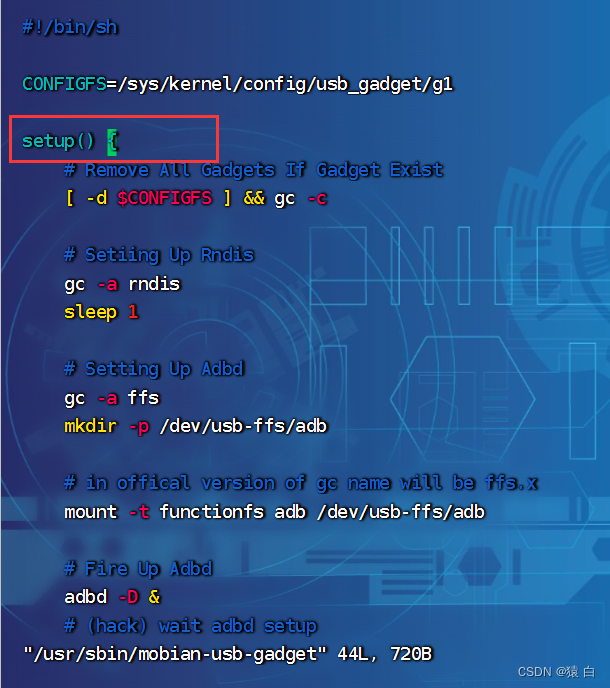 在setup{}里面添加语句: echo host > /sys/kernel/debug/usb/ci_hdrc.0/role
 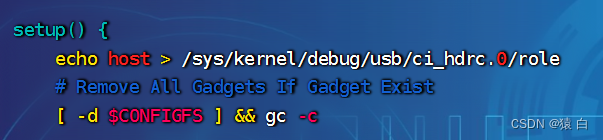 vim命令操作指导:教程
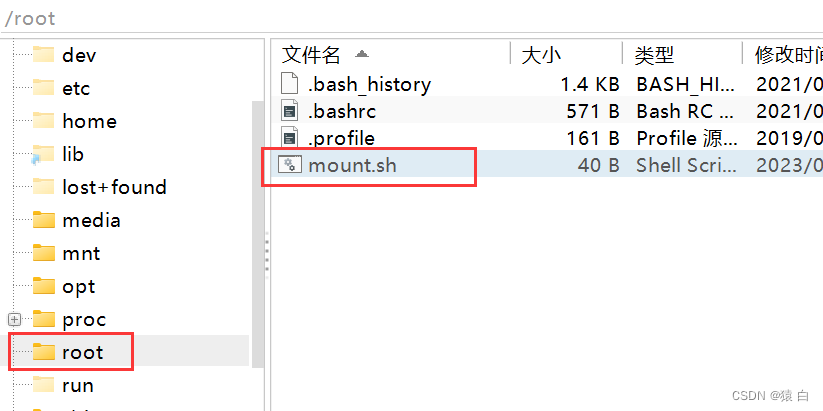 可以自定义位置 脚本内容: /www是我新建的文件夹
 输入上面命令。
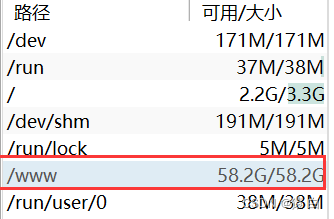
 ADB driver
【本文地址】