| RNN项目实战 | 您所在的位置:网站首页 › 输入预测怎么打开 › RNN项目实战 |
RNN项目实战
|
在本篇博客文章中,我们将使用pytorch搭建RNN模型来生成文本。 文本输入神经网络不像人类那样善于处理文本数据。因为绝大多数的NLP任务,文本数据都会先通过嵌入码(Embedding code),独热编码(One-hot encoding)等方式转为数字编码。在本篇文章中,我将使用one-hot编码标识我们的字符。因此,我将简要介绍一下它是什么。 与大多数机器学习或深度学习项目一样,数据预处理通常会占用项目大部分时间。 在稍后的示例中,我们将把文本数据预处理为简单的表示形式——字符级别的One-hot encoding。 这种编码形式基本上是给文本中的每个字符一个唯一的向量。 例如,如果我们的文本只包含单词“GOOD”,那么只有 3 个唯一字符,G,O,D,三个,因此我们的词汇量只有 3。我们将为每个唯一字符分配一个唯一向量,其中除了索引中的一项之外,所有项都为零。 这就是我们向模型表示每个字符的方式。 对于只有三个单词的one-hot,那么维度即为3;按序编码G,O,D,那么 G为1,展开one-hot就是[1,0,0], O为2, 就是[0,1,0], D为3,就是[0,0,1] 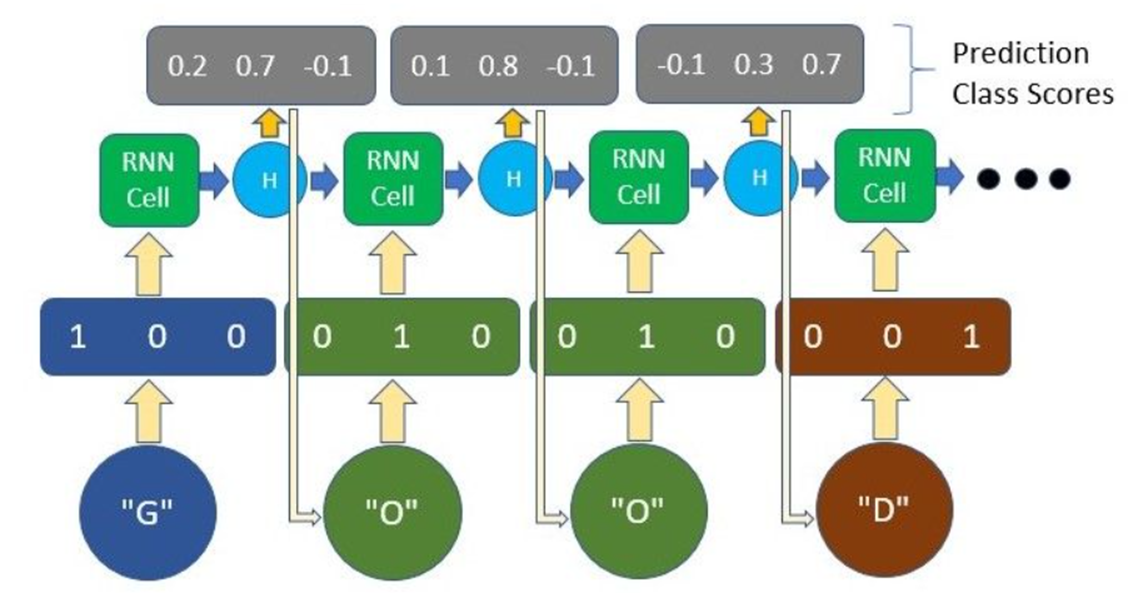 输入转换为一个one-hot 表示,输出为相应的类别得分
动手实例
输入转换为一个one-hot 表示,输出为相应的类别得分
动手实例
在这个实现中,我们将使用 PyTorch 框架,这是一个易于使用并被顶级研究人员广泛使用的深度学习平台。 我们将构建一个模型,该模型将根据传入的一个单词或几个字符来完成一个句子。 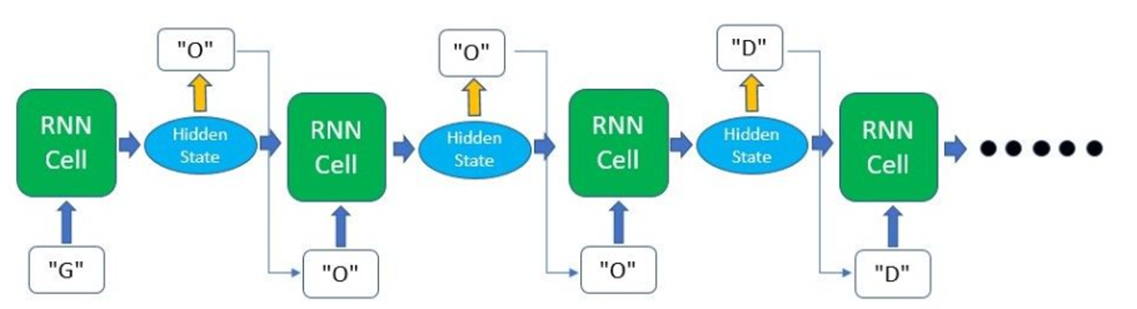 我们的模型将如何处理输入数据和产生输出
该模型将输入一个单词,并预测句子中的下一个字符是什么。 这个过程会不断重复,直到我们生成所需长度的句子。 为了保持简短和简单,我们不会使用任何大型或外部数据集。 相反,我们将只定义几个句子来看看模型如何从这些句子中学习。 此实现将采取的过程如下: 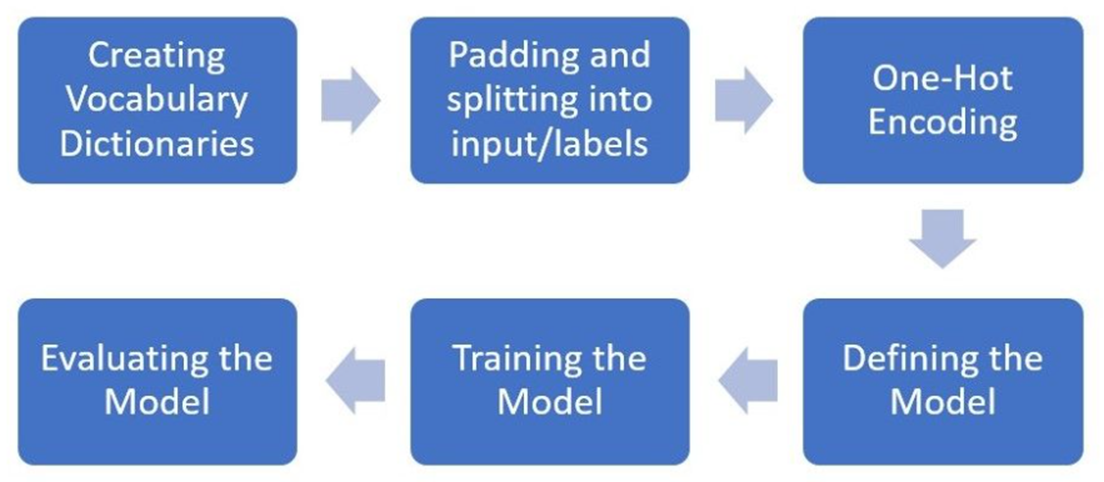 实施流程(Flow of the implementation)
代码流程
实施流程(Flow of the implementation)
代码流程
我们将首先导入主要的 PyTorch 包以及构建模型时将使用的 nn 包。 此外,我们将只使用 NumPy 来预处理我们的数据,因为 Torch 与 NumPy 配合得非常好。 import torch from torch import nn import numpy as np首先,我们将定义我们希望模型在输入第一个单词或前几个字符时输出的句子。 然后我们将从句子中的所有字符创建一个字典,并将它们映射到一个整数。 这将允许我们将输入字符转换为它们各自的整数(char2int),反之亦然(int2char)。 text = ['hey how are you','good i am fine','have a nice day'] # Join all the sentences together and extract the unique characters from the combined sentences chars = set(''.join(text)) # Creating a dictionary that maps integers to the characters int2char = dict(enumerate(chars)) # Creating another dictionary that maps characters to integers char2int = {char: ind for ind, char in int2char.items()}char2int 字典看起来像这样:它包含我们句子中出现的所有字母/符号,并将它们中的每一个映射到一个唯一的整数。结果如下所示(结果不唯一): {'f': 0, 'a': 1, 'h': 2, 'i': 3, 'u': 4, 'e': 5, 'm': 6, 'w': 7, 'y': 8, 'd': 9, 'c': 10, ' ': 11, 'r': 12, 'o': 13, 'n': 14, 'g': 15, 'v': 16}接下来,我们将填充(padding)输入句子以确保所有句子都是标准长度。 虽然 RNN 通常能够接收可变大小的输入,但我们通常希望分批输入训练数据以加快训练过程。 为了使用批次来训练我们的数据,我们需要确保输入数据中的每个序列大小相等。 因此,在大多数情况下,可以通过用 0 值填充太短的序列和修剪太长的序列来完成填充。 在我们的例子中,我们将找到最长序列的长度,并用空格填充其余句子以匹配该长度。 # Finding the length of the longest string in our data maxlen = len(max(text, key=len)) # Padding # A simple loop that loops through the list of sentences and adds a ' ' whitespace until the length of # the sentence matches the length of the longest sentence for i in range(len(text)): while len(text[i]) (Batch Size, Sequence Length, One-Hot Encoding Size) input_seq = one_hot_encode(input_seq, dict_size, seq_len, batch_size)到此我们完成了所有的数据预处理,可以将数据从NumPy数组转为PyTorch张量啦。 input_seq = torch.from_numpy(input_seq) target_seq = torch.Tensor(target_seq)接下来就是搭建模型的步骤,你可以在这一步使用全连接层,卷积层,RNN层,LSTM层等等。但是我在这里使用最最基础的nn.rnn来示例一个RNN是如何使用的。 在开始构建模型之前,让我们使用 PyTorch 中的内置功能来检查我们正在运行的设备(CPU 或 GPU)。 此实现不需要 GPU,因为训练非常简单。 但是,随着处理具有数百万个可训练参数的大型数据集和模型,使用 GPU 对加速训练非常重要。 # torch.cuda.is_available() checks and returns a Boolean True if a GPU is available, else it'll return False is_cuda = torch.cuda.is_available() # If we have a GPU available, we'll set our device to GPU. We'll use this device variable later in our code. if is_cuda: device = torch.device("cuda") print("GPU is available") else: device = torch.device("cpu") print("GPU not available, CPU used")要开始构建我们自己的神经网络模型,我们可以为所有神经网络模块定义一个继承 PyTorch 的基类(nn.module)的类。 这样做之后,我们可以开始在构造函数下定义一些变量以及模型的层。 对于这个模型,我们将只使用一层 RNN,然后是一个全连接层。 全连接层将负责将 RNN 输出转换为我们想要的输出形状。 我们还必须将 forward() 下的前向传递函数定义为类方法。 前向函数是按顺序执行的,因此我们必须先将输入和零初始化隐藏状态通过 RNN 层,然后再将 RNN 输出传递到全连接层。 请注意,我们使用的是在构造函数中定义的层。 我们必须定义的最后一个方法是我们之前调用的用于初始化hidden state的方法 - init_hidden()。 这基本上会在我们的隐藏状态的形状中创建一个零张量。 class Model(nn.Module): def __init__(self, input_size, output_size, hidden_dim, n_layers): super(Model, self).__init__() # Defining some parameters self.hidden_dim = hidden_dim self.n_layers = n_layers #Defining the layers # RNN Layer self.rnn = nn.RNN(input_size, hidden_dim, n_layers, batch_first=True) # Fully connected layer self.fc = nn.Linear(hidden_dim, output_size) def forward(self, x): batch_size = x.size(0) # Initializing hidden state for first input using method defined below hidden = self.init_hidden(batch_size) # Passing in the input and hidden state into the model and obtaining outputs out, hidden = self.rnn(x, hidden) # Reshaping the outputs such that it can be fit into the fully connected layer out = out.contiguous().view(-1, self.hidden_dim) out = self.fc(out) return out, hidden def init_hidden(self, batch_size): # This method generates the first hidden state of zeros which we'll use in the forward pass # We'll send the tensor holding the hidden state to the device we specified earlier as well hidden = torch.zeros(self.n_layers, batch_size, self.hidden_dim) return hidde在定义了上面的模型之后,我们必须用相关参数实例化模型并定义我们的超参数。 我们在下面定义的超参数是: n_epochs: 模型训练所有数据集的次数lr: learning rate学习率与其他神经网络类似,我们也必须定义优化器和损失函数。 我们将使用 CrossEntropyLoss,因为最终输出基本上是一个分类任务和常见的 Adam 优化器。 # Instantiate the model with hyperparameters model = Model(input_size=dict_size, output_size=dict_size, hidden_dim=12, n_layers=1) # We'll also set the model to the device that we defined earlier (default is CPU) model.to(device) # Define hyperparameters n_epochs = 100 lr=0.01 # Define Loss, Optimizer criterion = nn.CrossEntropyLoss() optimizer = torch.optim.Adam(model.parameters(), lr=lr)现在我们可以开始训练了! 由于我们只有几句话,所以这个训练过程非常快。 然而,随着我们的进步,更大的数据集和更深的模型意味着输入数据要大得多,并且我们必须计算的模型中的参数数量要多得多。 # Training Run for epoch in range(1, n_epochs + 1): optimizer.zero_grad() # Clears existing gradients from previous epoch input_seq.to(device) output, hidden = model(input_seq) loss = criterion(output, target_seq.view(-1).long()) loss.backward() # Does backpropagation and calculates gradients optimizer.step() # Updates the weights accordingly if epoch%10 == 0: print('Epoch: {}/{}.............'.format(epoch, n_epochs), end=' ') print("Loss: {:.4f}".format(loss.item())) [Out]: Epoch: 10/100............. Loss: 2.4176 Epoch: 20/100............. Loss: 2.1816 Epoch: 30/100............. Loss: 1.7952 Epoch: 40/100............. Loss: 1.3524 Epoch: 50/100............. Loss: 0.9671 Epoch: 60/100............. Loss: 0.6644 Epoch: 70/100............. Loss: 0.4499 Epoch: 80/100............. Loss: 0.3089 Epoch: 90/100............. Loss: 0.2222 Epoch: 100/100............. Loss: 0.1690现在让我们测试我们的模型,看看我们会得到什么样的输出。 作为第一步,我们将定义一些辅助函数来将我们的模型输出转换回文本。 # This function takes in the model and character as arguments and returns the next character prediction and hidden state def predict(model, character): # One-hot encoding our input to fit into the model character = np.array([[char2int[c] for c in character]]) character = one_hot_encode(character, dict_size, character.shape[1], 1) character = torch.from_numpy(character) character.to(device) out, hidden = model(character) prob = nn.functional.softmax(out[-1], dim=0).data # Taking the class with the highest probability score from the output char_ind = torch.max(prob, dim=0)[1].item() return int2char[char_ind], hidden # This function takes the desired output length and input characters as arguments, returning the produced sentence def sample(model, out_len, start='hey'): model.eval() # eval mode start = start.lower() # First off, run through the starting characters chars = [ch for ch in start] size = out_len - len(chars) # Now pass in the previous characters and get a new one for ii in range(size): char, h = predict(model, chars) chars.append(char) return ''.join(chars)让我们测试一下good sample(model, 15, 'good')正如我们所看到的,如果我们用“good”这个词输入到模型,该模型能够提出“good i am fine”这个句子。 完整代码CPU版本 # RNN_model.py import torch from torch import nn class Model(nn.Module): """ input_size (int):输入数据的特征大小,即每个时间步的输入向量的维度。 hidden_size (int):隐藏层的特征大小,即每个时间步的隐藏状态向量的维度。 num_layers (int,可选):RNN的层数,默认值为1。当层数大于1时,RNN会变为多层RNN。 nonlinearity (str,可选):指定激活函数,默认值为'tanh'。可选值有'tanh'和'relu'。 bias (bool,可选):如果设置为True,则在RNN中添加偏置项。默认值为True。 batch_first (bool,可选):如果设置为True,则输入数据的形状为(batch_size, seq_len, input_size)。否则,默认输入数据的形状为(seq_len, batch_size, input_size)。默认值为False。 dropout (float,可选):如果非零,则在除最后一层之外的每个RNN层之间添加dropout层,其丢弃概率为dropout。默认值为0。 bidirectional (bool,可选):如果设置为True,则使用双向RNN。默认值为False。 """ def __init__(self, input_size, output_size, hidden_dim, n_layers): super(Model, self).__init__() # Defining some parameters self.hidden_dim = hidden_dim # 隐藏状态 ht 的维度 self.n_layers = n_layers # 网络的层数 # Defining the layers # RNN Layer self.rnn = nn.RNN(input_size, hidden_dim, n_layers, batch_first=True) # Fully connected layer self.fc = nn.Linear(hidden_dim, output_size) def forward(self, x): batch_size = x.size(0) # Initializing hidden state for first input using method defined below hidden = self.init_hidden(batch_size) # Passing in the input and hidden state into the model and obtaining outputs out, hidden = self.rnn(x, hidden) # Reshaping the outputs such that it can be fit into the fully connected layer out = out.contiguous().view(-1, self.hidden_dim) out = self.fc(out) return out, hidden def init_hidden(self, batch_size): # This method generates the first hidden state of zeros which we'll use in the forward pass # We'll send the tensor holding the hidden state to the device we specified earlier as well hidden = torch.zeros(self.n_layers, batch_size, self.hidden_dim) return hidden # train.py import torch from torch import nn import numpy as np # 首先,我们将定义我们希望模型在输入第一个单词或前几个字符时输出的句子。 # 然后我们将从句子中的所有字符创建一个字典,并将它们映射到一个整数。 # 这将允许我们将输入字符转换为它们各自的整数(char2int),反之亦然(int2char)。 text = ['hey how are you', 'good i am fine', 'have a nice day'] # Join all the sentences together and extract the unique characters from the combined sentences # 将所有句子连接在一起,并从组合的句子中提取独特的字符。 chars = set(''.join(text)) # print(chars)# 输出 : {'y', 'o', ' ', 'd', 'f', 'n', 'm', 'i', 'w', 'r', 'u', 'v', 'h', 'c', 'g', 'e', 'a'} (注意:输出不定,但都包含了所有的字符) # Creating a dictionary that maps integers to the characters int2char = dict(enumerate(chars)) # print(int2char) # Creating another dictionary that maps characters to integers char2int = {char: ind for ind, char in int2char.items()} # char2int 字典看起来像这样:它包含我们句子中出现的所有字母/符号,并将它们中的每一个映射到一个唯一的整数。 # print(char2int) # ------------------------------------------------------------------------------------ # 接下来,我们将填充(padding)输入句子以确保所有句子都是标准长度。 # 虽然 RNN 通常能够接收可变大小的输入,但我们通常希望分批输入训练数据以加快训练过程。 # 为了使用批次(batch)来训练我们的数据,我们需要确保输入数据中的每个序列大小相等。 # 因此,在大多数情况下,可以通过用 0 值填充太短的序列和修剪太长的序列来完成填充。 # 在我们的例子中,我们将找到最长序列的长度,并用空格填充其余句子以匹配该长度。 # Finding the length of the longest string in our data maxlen = len(max(text, key=len)) # Padding # A simple loop that loops through the list of sentences and adds a ' ' whitespace until the length of # the sentence matches the length of the longest sentence for i in range(len(text)): while len(text[i]) (Batch Size, Sequence Length, One-Hot Encoding Size) input_seq = one_hot_encode(input_seq, dict_size, seq_len, batch_size) # 到此我们完成了所有的数据预处理,可以将数据从NumPy数组转为PyTorch张量啦 input_seq = torch.from_numpy(input_seq) target_seq = torch.Tensor(target_seq) # 接下来就是搭建模型的步骤,你可以在这一步使用全连接层,卷积层,RNN层,LSTM层等等。 # 但是我在这里使用最最基础的nn.rnn来示例一个RNN是如何使用的。 from RNN_model import Model """ # 在开始构建模型之前,让我们使用 PyTorch 中的内置功能来检查我们正在运行的设备(CPU 或 GPU)。 # 此实现不需要 GPU,因为训练非常简单。 # 但是,随着处理具有数百万个可训练参数的大型数据集和模型,使用 GPU 对加速训练非常重要。 # torch.cuda.is_available() checks and returns a Boolean True if a GPU is available, else it'll return False # is_cuda = torch.cuda.is_available() # If we have a GPU available, we'll set our device to GPU. We'll use this device variable later in our code. # if is_cuda: # device = torch.device("cuda") # print("GPU is available") # else: # device = torch.device("cpu") # print("GPU not available, CPU used") """ # 要开始构建我们自己的神经网络模型,我们可以为所有神经网络模块定义一个继承 PyTorch 的基类(nn.module)的类。 # 这样做之后,我们可以开始在构造函数下定义一些变量以及模型的层。 对于这个模型,我们将只使用一层 RNN,然后是一个全连接层。 全连接层将负责将 RNN 输出转换为我们想要的输出形状。 # 我们还必须将 forward() 下的前向传递函数定义为类方法。 前向函数是按顺序执行的,因此我们必须先将输入和零初始化隐藏状态通过 RNN 层,然后再将 RNN 输出传递到全连接层。 请注意,我们使用的是在构造函数中定义的层。 # 我们必须定义的最后一个方法是我们之前调用的用于初始化hidden state的方法 - init_hidden()。 这基本上会在我们的隐藏状态的形状中创建一个零张量。 # 在定义了上面的模型之后,我们必须用相关参数实例化模型并定义我们的超参数。 我们在下面定义的超参数是: # n_epochs: 模型训练所有数据集的次数 # lr: learning rate学习率 # 与其他神经网络类似,我们也必须定义优化器和损失函数。 我们将使用 CrossEntropyLoss,因为最终输出基本上是一个分类任务和常见的 Adam 优化器。 # Instantiate the model with hyperparameters model = Model(input_size=dict_size, output_size=dict_size, hidden_dim=12, n_layers=1) # We'll also set the model to the device that we defined earlier (default is CPU) # model.to(device) # Define hyperparameters n_epochs = 100 # 训练轮数 lr = 0.01 # 学习率 # Define Loss, Optimizer loss_fn = nn.CrossEntropyLoss() # 交叉熵损失函数 optimizer = torch.optim.Adam(model.parameters(), lr=lr) # 采用Adam作为优化器 # 现在我们可以开始训练了! # 由于我们只有几句话,所以这个训练过程非常快。 # 然而,随着我们的进步,更大的数据集和更深的模型意味着输入数据要大得多,并且我们必须计算的模型中的参数数量要多得多。 # Training Run for epoch in range(1, n_epochs + 1): optimizer.zero_grad() # Clears existing gradients from previous epoch # input_seq.to(device) # 使用GPU output, hidden = model(input_seq) loss = loss_fn(output, target_seq.view(-1).long()) loss.backward() # Does backpropagation and calculates gradients optimizer.step() # Updates the weights accordingly if epoch % 10 == 0: print('Epoch: {}/{}.............'.format(epoch, n_epochs), end=' ') print("Loss: {:.4f}".format(loss.item())) # test.py # 现在让我们测试我们的模型,看看我们会得到什么样的输出。 作为第一步,我们将定义一些辅助函数来将我们的模型输出转换回文本。 # This function takes in the model and character as arguments and returns the next character prediction and hidden state import numpy as np import torch from torch import device import torch.nn as nn from train import char2int, one_hot_encode, dict_size, int2char, model def predict(model, character): # One-hot encoding our input to fit into the model character = np.array([[char2int[c] for c in character]]) character = one_hot_encode(character, dict_size, character.shape[1], 1) character = torch.from_numpy(character) # character.to(device) out, hidden = model(character) prob = nn.functional.softmax(out[-1], dim=0).data # Taking the class with the highest probability score from the output char_ind = torch.max(prob, dim=0)[1].item() return int2char[char_ind], hidden # This function takes the desired output length and input characters as arguments, returning the produced sentence def sample(model, out_len, start='hey'): model.eval() # eval mode start = start.lower() # First off, run through the starting characters chars = [ch for ch in start] size = out_len - len(chars) # Now pass in the previous characters and get a new one for ii in range(size): char, h = predict(model, chars) chars.append(char) return ''.join(chars)验证 我们在测试文件中执行以下代码,并得到结果。 print(sample(model, 15, 'good')) # good i am fine print(sample(model, 15, 'h')) # have a nice day print(sample(model, 15, 'you')) # youd i am fine我们发现,为模型输入‘good’、‘h’后,预测的结果正确;而为模型输入‘you’后,其预测结果为youd i am fine,模型不知道该如何预测,预测结果不理想。 该模型的局限虽然这个模型绝对是一个过度简化的语言模型,但让我们回顾一下它的局限性以及为了训练更好的语言模型需要解决的问题。 局限一、过拟合 over-fitting 我们只为模型提供了 3 个训练句子,因此它基本上“记住”了这些句子的字符序列,从而返回了我们训练它的确切句子。 但是,如果在更大的数据集上训练一个类似的模型,并添加一些随机性,该模型将挑选出一般的句子结构和语言规则,并且能够生成自己独特的句子。 尽管如此,使用单个样本或批次运行模型可以作为对工作流程的健全性检查,确保您的数据类型全部正确,模型学习良好等。 局限二、处理未见过的字符 该模型目前只能处理它之前在训练数据集中看到的字符。 通常,如果训练数据集足够大,所有字母和符号等应该至少出现一次,从而出现在我们的词汇表中。 然而,有一种方法来处理从未见过的字符总是好的,例如将所有未知数分配给它自己的索引。 局限三、文本标识的方式 在这个实现中,我们使用 one-hot 编码来表示我们的字符。 虽然由于它的简单性,它可能适合此任务,但大多数时候它不应该用作实际或更复杂问题的解决方案。 这是因为: 对于大型数据集,计算成本太高one-hot向量中没有嵌入上下文/语义信息以及许多其他使此解决方案不太可行的缺点。 相反,大多数现代 NLP 解决方案依赖于词嵌入(word2vec、GloVe)或最近在 BERT、ELMo 和 ULMFit 中的独特上下文词表示。 这些方法允许模型根据出现在它之前的文本来学习单词的含义,并且在 BERT 等的情况下,也可以从出现在它之后的文本中学习。 |
【本文地址】