| 谷粒商城笔记+踩坑(3) | 您所在的位置:网站首页 › 表格怎么设置尺寸大小换成厘米 › 谷粒商城笔记+踩坑(3) |
谷粒商城笔记+踩坑(3)
|
目录 6、商品服务-三级分类 6.0、三级分类介绍 6.1、查询三级分类,递归树形结构 6.1.0、回顾stream流 6.1.1、数据库导入分类、需求,pms_category 6.1.2、修改CategoryController的list方法,树形结构查所有分类 6.1.3、CategoryEntity新增子分类属性 6.1.4、编写树形结构查分类的service方法listWithTree() 6.1.5、启动测试 6.2、人人后台管理三级分类 6.2.1、启动renren-fast、gateway、product、renren-fast-vue 6.2.2、renren-fast新增商品目录和分类维护菜单 6.2.3、前端路由规则 6.2.4、前端的请求基本路径设为网关路径 6.2.5、renren-fast注册到nacos,前端路由网关 6.3、解决跨域问题 6.3.1、跨域和同源策略 6.3.2、跨域的流程 6.3.3、解决办法1:使用nginx反向代理为同一域 6.3.4、解决方法2(采用): 配置当前请求允许跨域 6.3.5、用方法2新建配置类,解决跨域问题 6.4、前端树形展示三级分类数据 6.4.1、在网关中配置product路由 6.4.2、使用nacos抽取product模块配置 6.4.3、修改前端分类组件,category.vue 6.4.4、启动product测试 6.5、逻辑删除三级分类 6.5.1、前端,仅无子分类可删除,仅一二级分类可新增 6.5.2、前端,删除逻辑实现,抽取请求到代码片段 6.5.3、后端,逻辑删除@TableLogic 6.6、新增三级分类(仅前端) 6.7、修改分类内容 6.7.1、后端修改返回结果的键为"data" 6.7.2、前端,修改和新增共享表单窗口el-dialog、表单回显 6.8、修改分类层级关系,拖拽 6.8.1、前端,拖拽功能 6.8.2、前端,拖拽后的数据收集 6.8.3、前端,批量拖拽功能 6.8.4、后端实现拖拽功能 6.9、批量删除分类(仅前端) 6.10、前端分类组件category.vue最终代码 6、商品服务-三级分类 6.0、三级分类介绍
实现查询出所有分类和子分类,并且把它们以父子的结构组装起
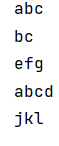
13_体验Stream流_哔哩哔哩_bilibili Java 8 Stream | 菜鸟教程 【黑马Java笔记+踩坑】java SE基础+进阶_vincewm的博客-CSDN博客 1.生成流:list.stream(); 2.中间流:filter()、map()、sorted() filter filter 方法用于通过设置的条件过滤出元素。 list.stream().filter(Lambda参数是list的每个元素,返回值是Boolean,为true时留下)以下代码片段使用 filter 方法过滤掉空字符串,打印非空字符串。 Listlist = Arrays.asList("abc", "", "bc", "efg", "abcd","", "jkl");//forEach终结后,原list不变,处理后的list遍历输出list.stream().filter(item -> !item.isEmpty()).forEach(System.out::println); map() 中间操作map()用法和filter类似。 list.stream().map(参数是Lambda,Lambda参数是list的每个元素,返回值是加工后的list元素)下面是小写转大写: Listlist = Arrays.asList("abc", "", "bc", "efg", "abcd","", "jkl");//collect收集后原list不变,处理后的list收集成返回值list=list.stream().map(item->item.toUpperCase()).collect(Collectors.toList());System.out.println(list);
sorted() list.stream().sorted(参数是Lambda,Lambda参数是list的两个元素,返回值>0是升序,返回值{if(item1.compareTo(item2)!=0) return item1.compareTo(item2);else return item1.length()-item2.length();}).collect(Collectors.toList());System.out.println(list);}输出:[, , abc, abcd, bc, efg, jkl] 3.终结流用于遍历:list.stream().filter().forEach(System.out::println) 4.收集流用于赋值给原list:list.stream().filter().collect(Collectors.otList()) 6.1.1、数据库导入分类、需求,pms_category
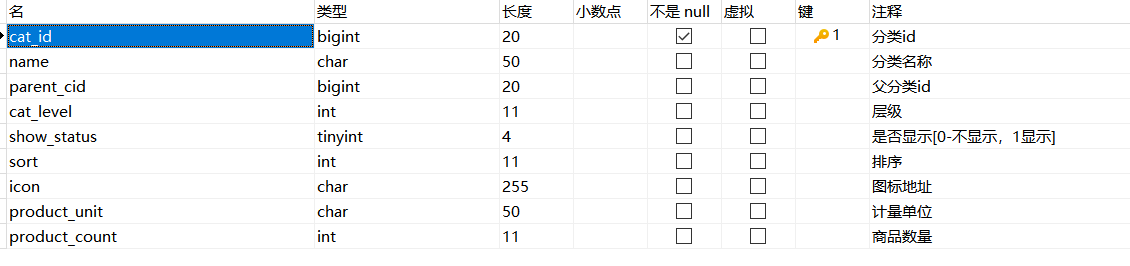
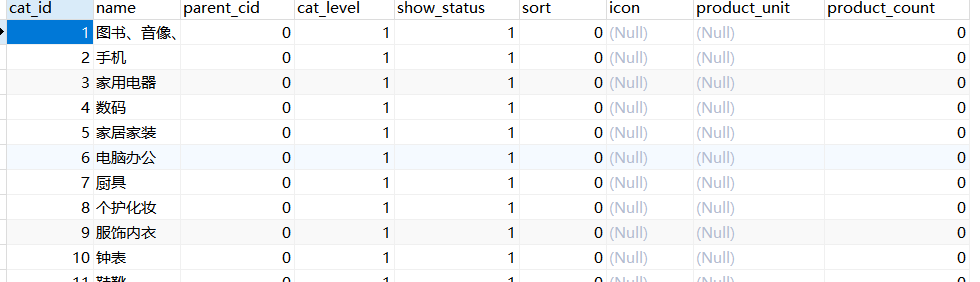
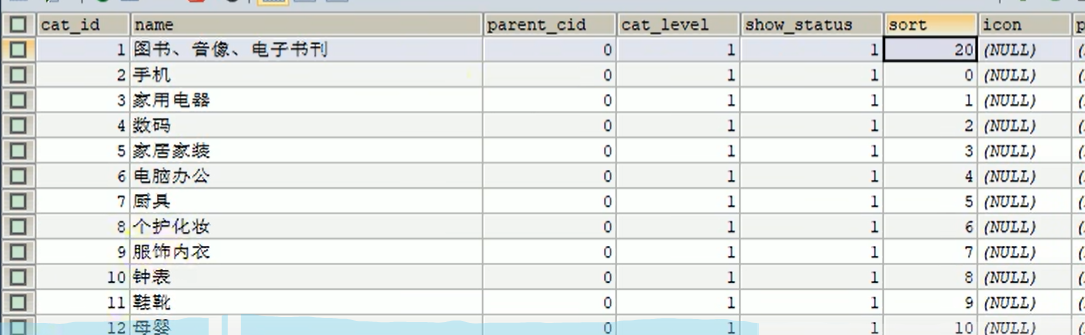
先把数据导入表pms_category,数据库文件D:\download\尚硅谷谷粒商城电商项目等1个文件\尚硅谷谷粒商城电商项目\资料源码\docs\代码\sql\pms_catelog.sql
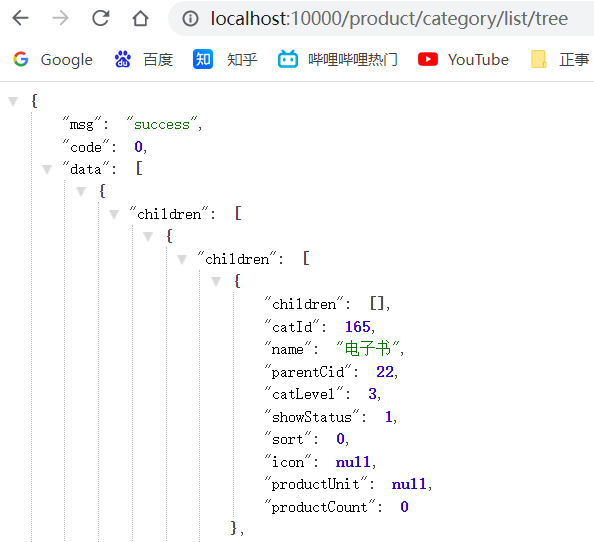
需求: /list/tree路径,get请求,R封装三级分类的响应数据,子分类名children,根据sort字段值排序。
categoryService接口新增方法listWithTree(),编写实现类: @Overridepublic List listWithTree() {//1、查出所有分类。baseMapper来自于继承的ServiceImpl类,跟CategoryDao一样用法List entities = baseMapper.selectList(null);//2、递归组装多级分类的树形结构。先过滤得到一级分类,再加工递归设置一级分类的子孙分类,再排序,再收集List level1Menus = entities.stream().filter(categoryEntity -> categoryEntity.getParentCid() == 0).map((menu)->{// 设置一级分类的子分类menu.setChildren(getChildren(menu, entities));return menu;}).sorted((menu1, menu2) -> {//排序,sort是实体类的排序属性,值越小优先级越高,要判断非空防止空指针异常return (menu1.getSort() == null ? 0 : menu1.getSort()) - (menu2.getSort() == null ? 0 : menu2.getSort());}).collect(Collectors.toList());return level1Menus;}//递归查找所有菜单的子菜单private List getChildren(CategoryEntity root, List all){List children = all.stream().filter(CategoryEntity -> CategoryEntity.getParentCid().equals(root.getCatId())).map(categoryEntity -> {//递归查找categoryEntity.setChildren(getChildren(categoryEntity, all));return categoryEntity;}).sorted((menu1, menu2) -> {return (menu1.getSort() == null ? 0 : menu1.getSort()) - (menu2.getSort() == null ? 0 : menu2.getSort());}).collect(Collectors.toList());return children;} 6.1.5、启动测试启动测试,打开控制台,重新发送请求,查看数据
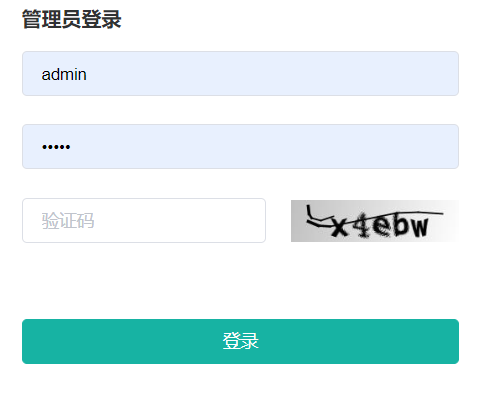
idea启动renren-fast、gateway、product,vscode启动renren-fast-vue npm run devhttp://localhost:8001/#/login
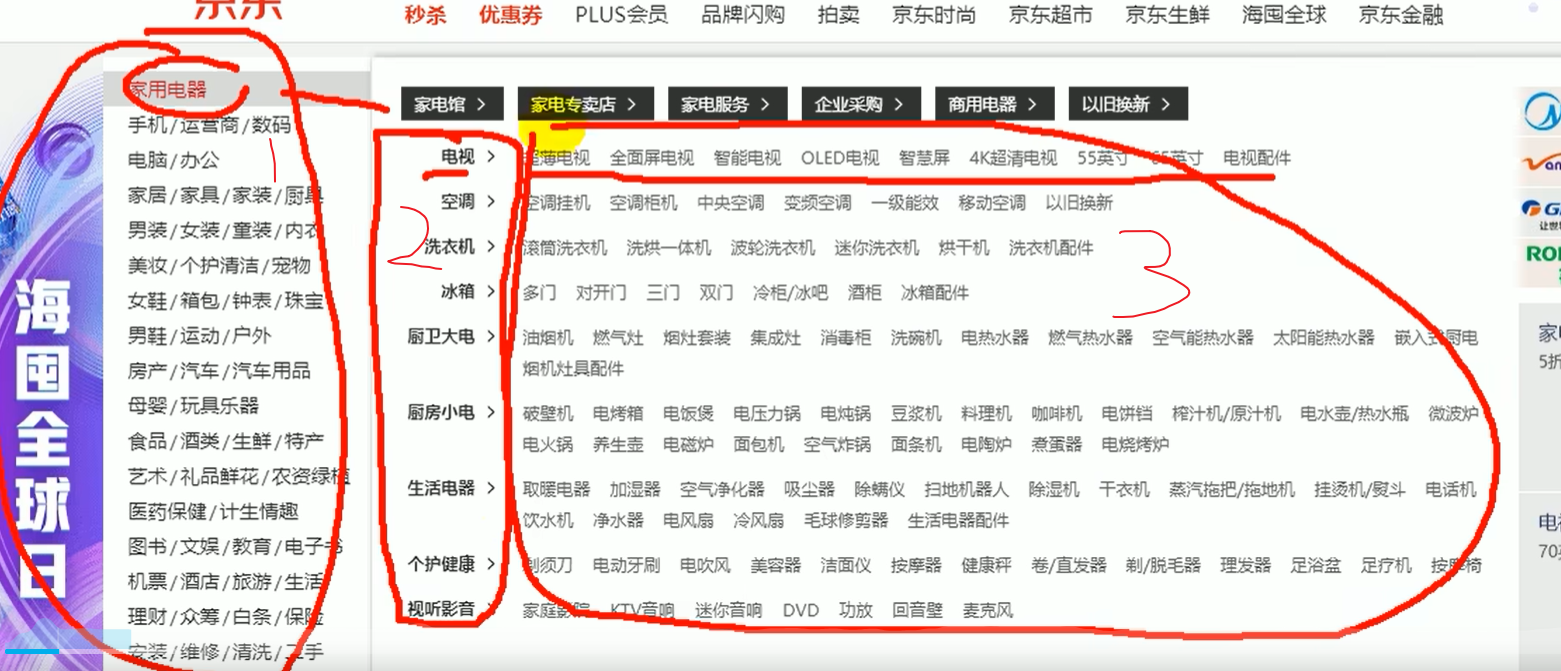
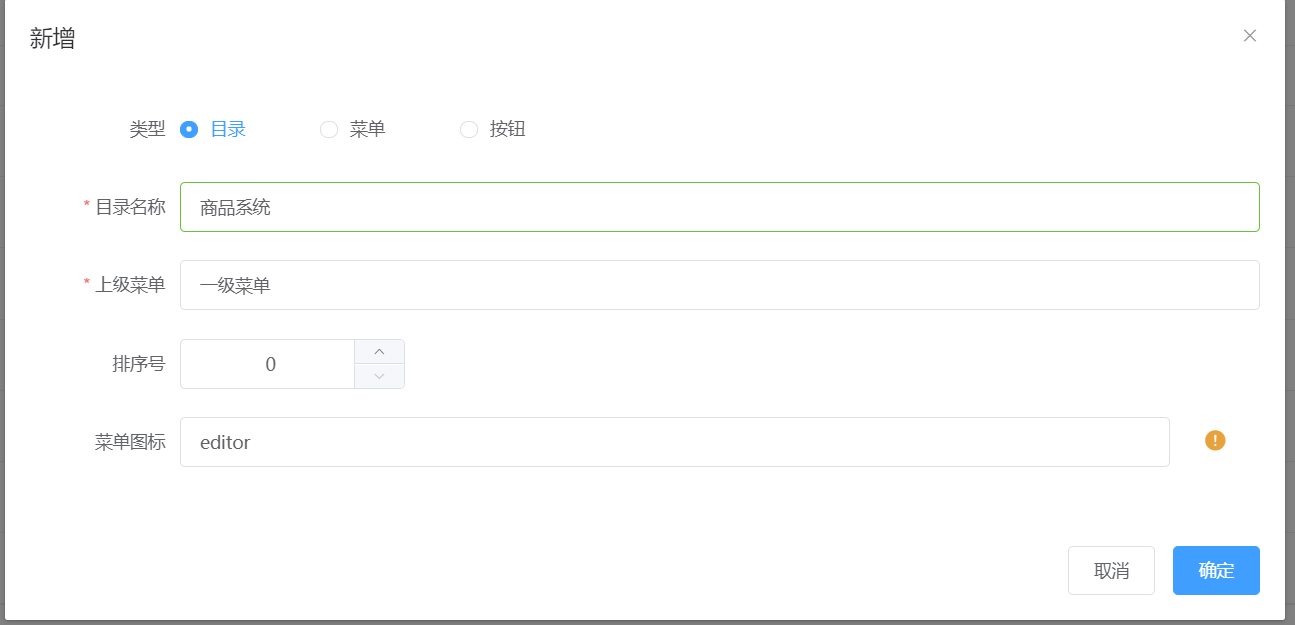
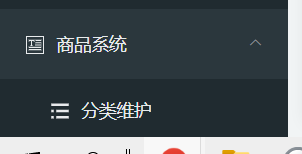
可以看到验证码就是后端启动成功。默认密码admin,admin 6.2.2、renren-fast新增商品目录和分类维护菜单登录进去,新增一级菜单商品系统
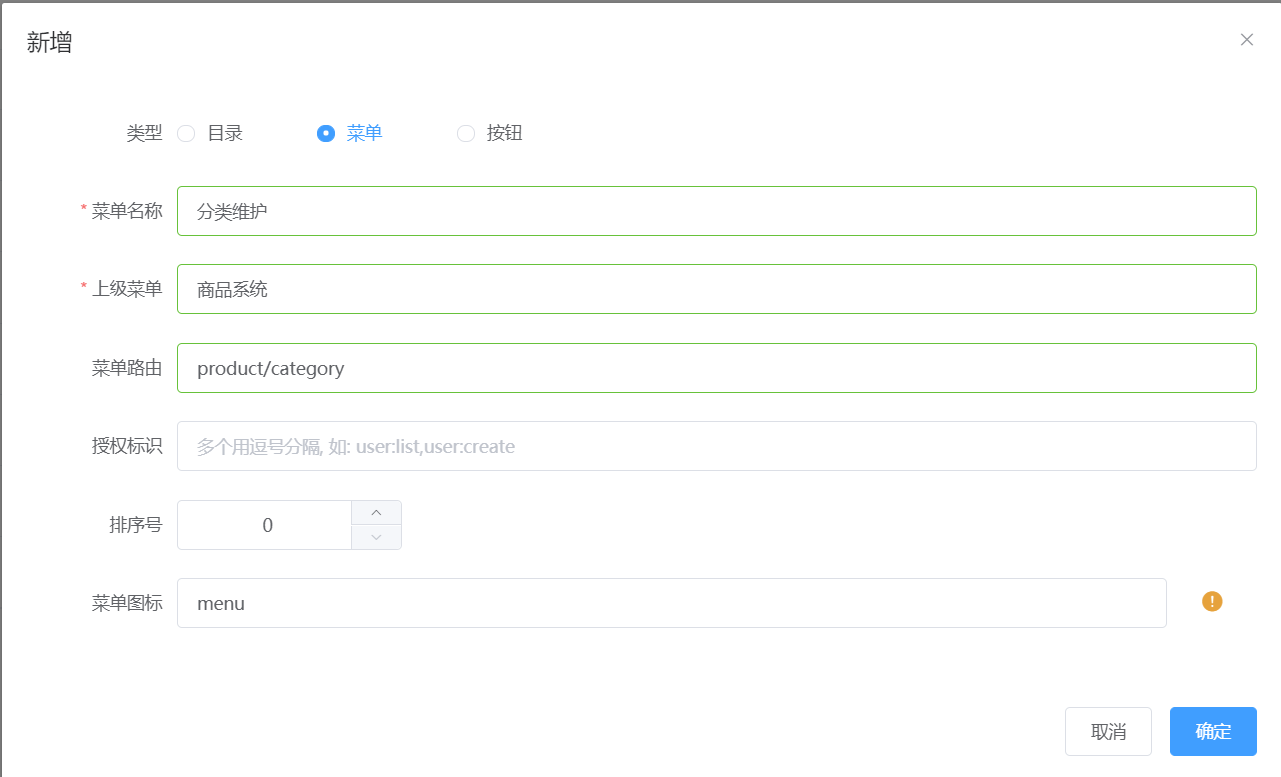
新增菜单分类维护,在商品系统下,路由为product/category
新增后刷新页面:
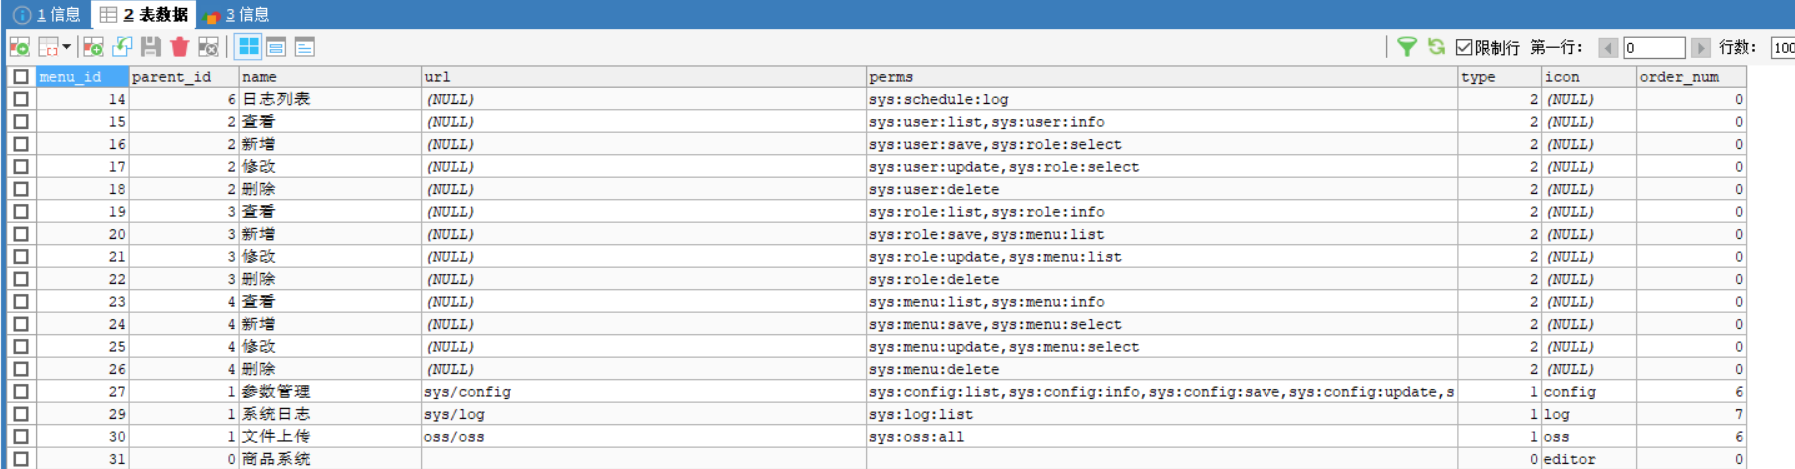
新增之后的菜单在都保存在数据库之中,查看gulimall_admin中的sys_menu表
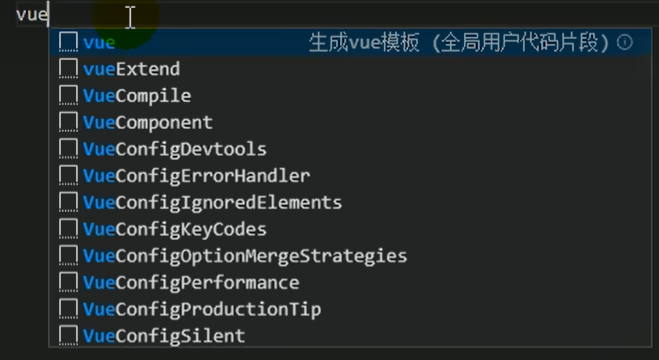
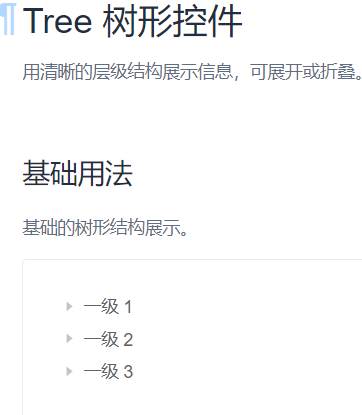
看不懂这节参考前面前端基础5.3.5、分析主页展示逻辑 需求:在左侧点击【商品系统-分类维护】,希望在此展示3级分类。可以看到 url是http://localhost:8001/#/product-category 填写的菜单路由是product/category 对应的视图是src/view/modules/product/category.vue 自定义product/category视图 所以如果我们要自定义product/category视图的话,就要创建src/views/mudules/product/category.vue 创建vue模板,然后去elementui看如何使用多级目录 输入vue加回车,可快速生成模板。 引入elementUI树形控件: Element - The world's most popular Vue UI framework
启动测试
发现请求端口问题: 发现,他是给8080端口发的请求,而我们的商品服务在10000端口。我们以后还会同时发向更多的端口,所以需要配置网关,前端只向网关发送请求,然后由网关自己路由到相应端口。 6.2.4、前端的请求基本路径设为网关路径修改static/config/index.js /*** 开发环境*/ ;(function () {window.SITE_CONFIG = {};// api接口请求地址window.SITE_CONFIG['baseUrl'] = 'http://localhost:88/api';// cdn地址 = 域名 + 版本号window.SITE_CONFIG['domain'] = './'; // 域名window.SITE_CONFIG['version'] = ''; // 版本号(年月日时分)window.SITE_CONFIG['cdnUrl'] = window.SITE_CONFIG.domain + window.SITE_CONFIG.version; })();刷新,发现验证码出不来。 验证码请求路径问题: 分析原因:前端给网关发验证码请求,但是验证码请求在renren-fast服务里,所以要想使验证码好使,需要把renren-fast服务注册到服务中心,并且由网关进行路由
renren-fast引入common模块的依赖 com.vince.gulimallgulimall-common0.0.1-SNAPSHOT这里common模块引入了nacos注册配置依赖: com.alibaba.cloudspring-cloud-starter-alibaba-nacos-discoverycom.alibaba.cloudspring-cloud-starter-alibaba-nacos-config修改配置文件application.yml,起名、配置nacos地址 spring:application:name: renren-fastcloud:nacos:discovery:server-addr: 127.0.0.1:8848引导类开启服务注册功能 @EnableDiscoveryClient重启renren-fast、注册成功
坑点:如果springboot和SpringCloud和SpringCloudAlibaba版本不兼容,就会报错 2021-03-11 12:38:15.512 ERROR 16912 --- [ main] o.s.boot.SpringApplication : Application run failedorg.springframework.beans.factory.BeanCreationException: Error creating bean with name 'configurationPropertiesBeans' defined in class path resource [org/springframework/cloud/autoconfigure/ConfigurationPropertiesRebinderAutoConfiguration.class]: Post-processing of merged bean definition failed; nested exception is java.lang.IllegalStateException: Failed to introspect Class [org.springframework.cloud.context.properties.ConfigurationPropertiesBeans] from ClassLoader [sun.misc.Launcher$AppClassLoader@18b4aac2]我的版本是boot 2.7.4,cloud2021.0.4,alibaba2021.0.1.0 最新版本兼容问题请看官网,我这里是22年9月时的兼容信息: Release TrainBoot Version2021.0.x aka Jubilee2.6.x, 2.7.x (Starting with 2021.0.3)2020.0.x aka Ilford2.4.x, 2.5.x (Starting with 2020.0.3)Hoxton2.2.x, 2.3.x (Starting with SR5)Greenwich2.1.xFinchley2.0.xEdgware1.5.xDalston1.5.xSpring Cloud Alibaba VersionSpring Cloud VersionSpring Boot Version2021.0.4.0*Spring Cloud 2021.0.42.6.112021.0.1.0Spring Cloud 2021.0.12.6.32021.1Spring Cloud 2020.0.12.4.2配置网关yml,新增路由 http://localhost:88/api/captcha.jpg 转发--> http://renren-fast:8080/renren-fast/captcha.jpg spring:cloud:nacos:discovery:server-addr: 127.0.0.1:8848gateway:routes: # 路由id,自定义,只要唯一即可- id: admin_route # uri路由的目标地址。lb就是负载均衡,后面跟服务名称。uri: lb://renren-fast#断言工厂的Path,请求路径必须符合指定规则predicates:- Path=/api/** # 把所有api开头的请求都转发给renren-fast#局部过滤器。回顾默认过滤器default-filters是与routes同级filters: #路径重写。逗号左边是原路径,右边是重写后的路径- RewritePath=/api/(?.*),/renren-fast/$\{segment}# 默认规则, 请求过来:http://localhost:88/api/captcha.jpg 转发--> http://renren-fast:8080/renren-fast/captcha.jpg测试访问,出现跨域问题 6.3、解决跨域问题 6.3.1、跨域和同源策略点击登录后报错:
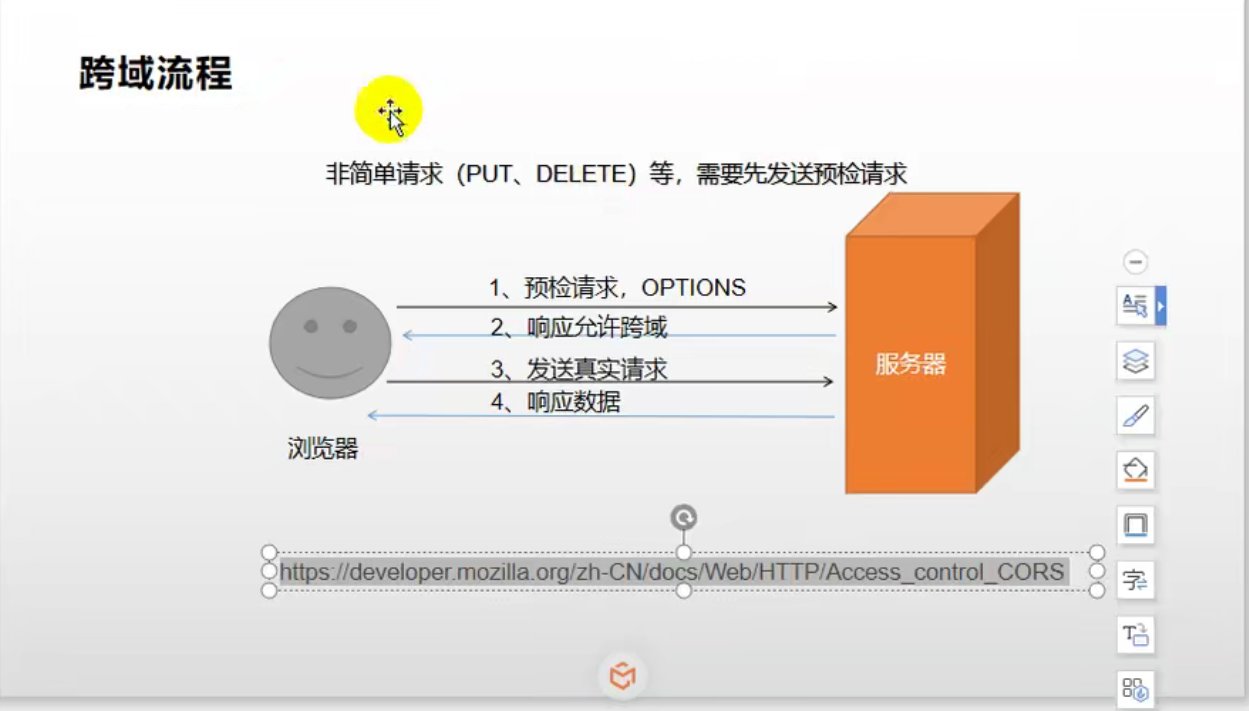
跨域:指的是浏览器不能执行其他网站的脚本,它是由浏览器的同源策略造成的,是浏览器对javascript施加的安全限制。 同源策略:是指协议,域名,端口都要相同,其中有一个不同都会产生跨域问题 URL说明是否允许通信http://www.a.com/a.js http://www.a.com/b.js同一域名下允许http://www.a.com/lab/a.js http://www.a.com/script/b.js同一域名下不同文件夹允许http://www.a.com:8000/a.js http://www.a.com/b.js同一域名,不同端口不允许http://www.a.com/a.js https://www.a.com/b.js同一域名,不同协议不允许http://www.a.com/a.js http://70.32.92.74/b.js域名和域名对应ip不允许http://www.a.com/a.js http://script.a.com/b.js主域相同,子域不同不允许http://www.a.com/a.js http://a.com/b.js同一域名,不同二级域名(同上)不允许(cookie这种情况下也不允许访问http://www.cnblogs.com/a.js http://www.a.com/b.js不同域名不允许 6.3.2、跨域的流程跨域请求的实现是通过预检请求实现的,先发送一个OPSTIONS探路,收到响应允许跨域后再发送真实请求
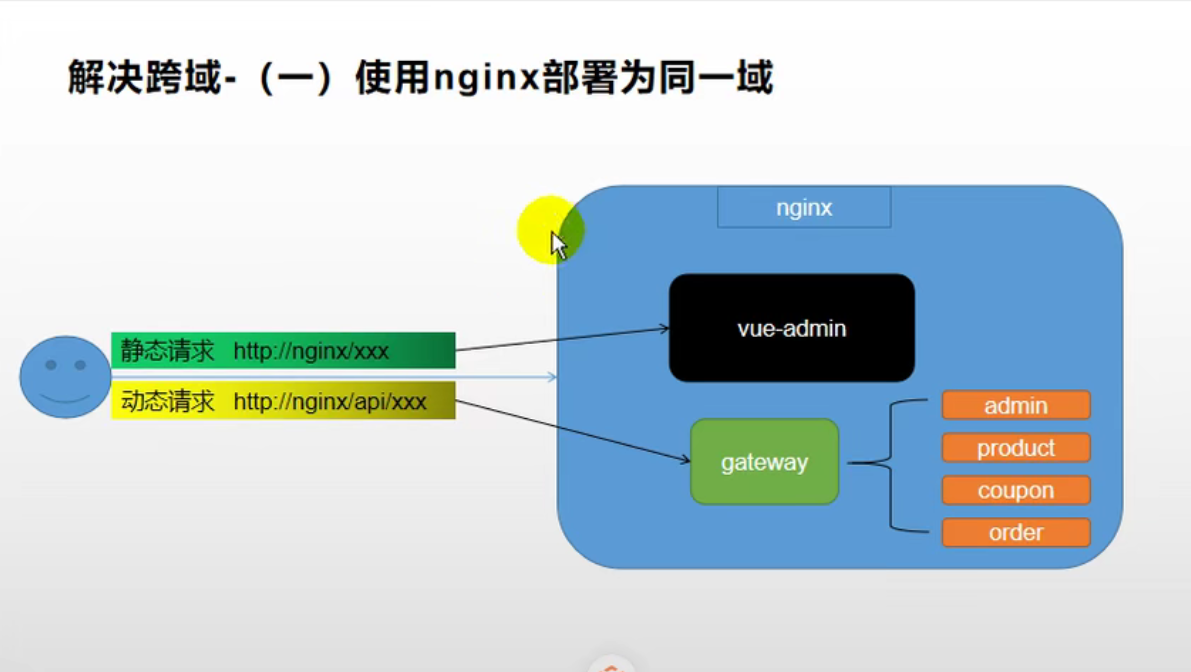
使用Nginx反向代理,不同地址、端口都被同一个域名反向代理了,这就是统一域了。这种方法在开发时没法用,所以不采用。
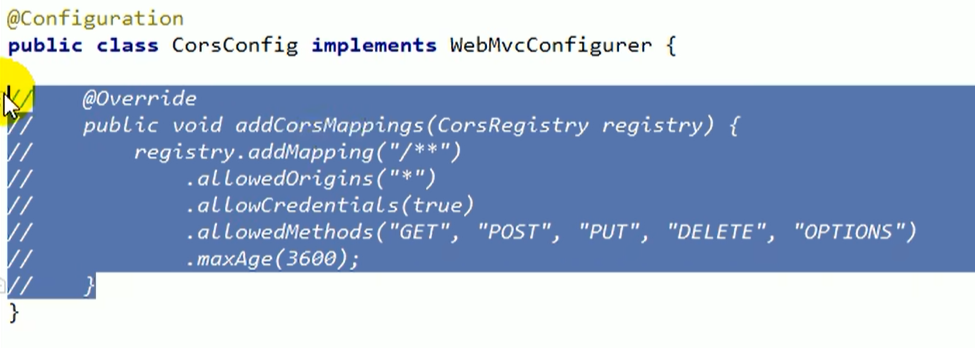
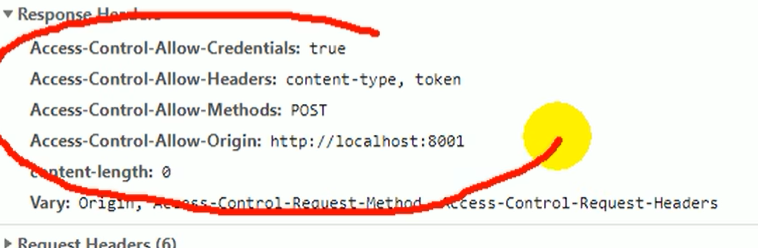
CORS:CORS 是一个 W3C 标准,全称是“跨域资源共享”(Cross-origin resource sharing)。它允许浏览器向跨域的服务器,发出XMLHttpRequest请求,从而克服了 AJAX 只能同源使用的限制。 Access-Control-Allow-Origin : 支持哪些来源的请求跨域Access-Control-Allow-Method : 支持那些方法跨域Access-Control-Allow-Credentials :跨域请求默认不包含cookie,设置为true可以包含cookieAccess-Control-Expose-Headers : 跨域请求暴露的字段 CORS请求时,XMLHttpRequest对象的getResponseHeader()方法只能拿到6个基本字段: Cache-Control、Content-Language、Content-Type、Expires、Last-Modified、Pragma 如果想拿到其他字段,就必须在Access-Control-Expose-Headers里面指定。Access-Control-Max-Age :表明该响应的有效时间为多少秒。在有效时间内,浏览器无须为同一请求再次发起预检请求。请注意,浏览器自身维护了一个最大有效时间,如果该首部字段的值超过了最大有效时间,将失效。 6.3.5、用方法2新建配置类,解决跨域问题配置filter,每个请求来了以后,返回给浏览器之前都添加上那些字段 在gulimall-gateway的gulimall.gateway.config包下中新建配置类 //这个包别导错了,有一个很像的。 import org.springframework.web.cors.reactive.UrlBasedCorsConfigurationSource; @Configuration public class GulimallCorsConfiguration{@Beanpublic CorsWebFilter corsWebFilter(){UrlBasedCorsConfigurationSource source = new UrlBasedCorsConfigurationSource();CorsConfiguration corsConfiguration= new CorsConfiguration();//1、配置跨域// 允许跨域的请求头corsConfiguration.addAllowedHeader("*");// 允许跨域的请求方式corsConfiguration.addAllowedMethod("*");// 允许跨域的请求来源corsConfiguration.addAllowedOriginPattern("*");//corsConfiguration.addAllowedOrigin("*");//这句会报错,具体看后文// 是否允许携带cookie跨域corsConfiguration.setAllowCredentials(true);// 任意url都要进行跨域配置,两个*号就是可以匹配包含0到多个/的路径source.registerCorsConfiguration("/**",corsConfiguration);return new CorsWebFilter(source);} }坑点:包别导错:
注释掉renren-fast中的跨域,不然会有一些重复的规则导致跨域失败: io.renren/config/CorsConfig
成功解决跨域问题,登录到后台管理界面
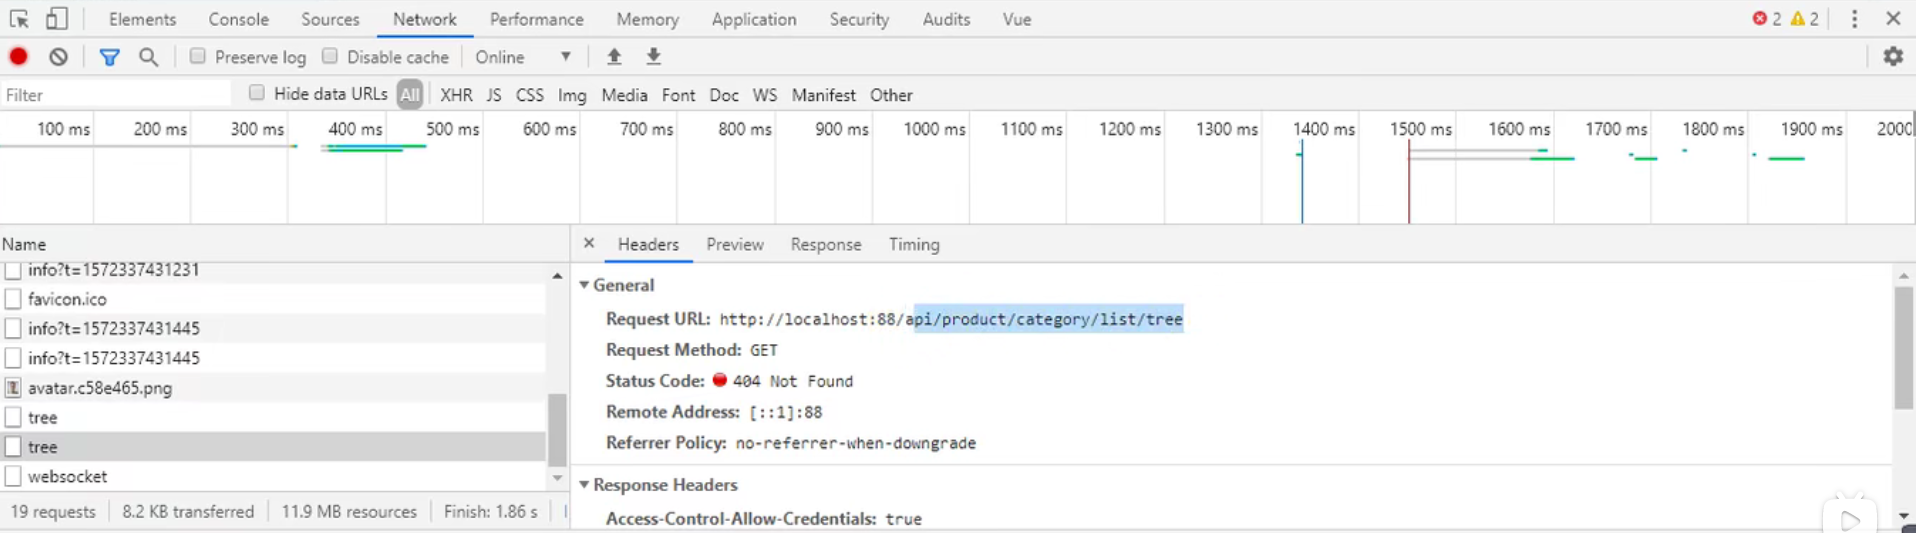
坑点: 报错:When allowCredentials is true, allowedOrigins cannot contain the special value "*" since that cannot be set on the "Access-Control-Allow-Origin" response header. To allow credentials to a set of origins, list them explicitly or consider using "allowedOriginPatterns" instead. 分析:当allowCredentials为真时,allowedorigin不能包含特殊值"*",因为不能在"访问-控制-起源“响应头中设置该值。 解决: 修改 corsConfiguration.addAllowedOrigin("*");允许跨域的请求来源为 corsConfiguration.addAllowedOrigin("http://localhost:8001");或者: corsConfiguration.addAllowedOriginPattern("*"); 6.4、前端树形展示三级分类数据 6.4.1、在网关中配置product路由查询不到数据,需要在网关配置product路径的请求路由:
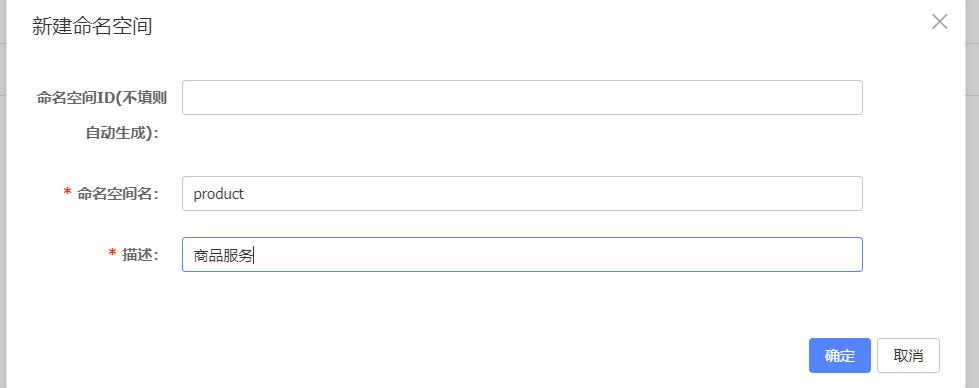
配置路由 # 精确的路由要放在/api的admin_route上面- id: product_routeuri: lb://gulimall-productpredicates:- Path=/api/product/**filters:- RewritePath=/api/(?.*),/$\{segment}坑点: 精确的路由要放到上面,高优先级服务名不能有下划线,否则会报错: 目前gateway的yml: server:port: 88 spring:cloud:nacos:discovery:server-addr: 127.0.0.1:8848gateway:routes:# 商品,路径路由- id: product_routeuri: lb://gulimall-productpredicates:- Path=/api/product/**filters:- RewritePath=/api/(?.*),/$\{segment}# 人人管理,路径路由。路由id,自定义,只要唯一即可- id: admin_route# uri路由的目标地址。lb就是负载均衡,后面跟服务名称。uri: lb://renren-fast#断言工厂的Path,请求路径必须符合指定规则,才能进行转发predicates:- Path=/api/** # 把所有api开头的请求都转发给renren-fast#局部过滤器。回顾默认过滤器default-filters是与routes同级filters:- RewritePath=/api/(?.*),/renren-fast/$\{segment}# 默认规则, 请求过来:http://localhost:88/api/captcha.jpg 转发--> http://renren-fast:8080/api/captcha.jpg# 但是真正的路径是http://renren-fast:8080/renren-fast/captcha.jpg# 所以使用路径重写把/api/* 改变成 /renren-fast/*application:name: gulimall-gateway 6.4.2、使用nacos抽取product模块配置新建product的nacos命名空间
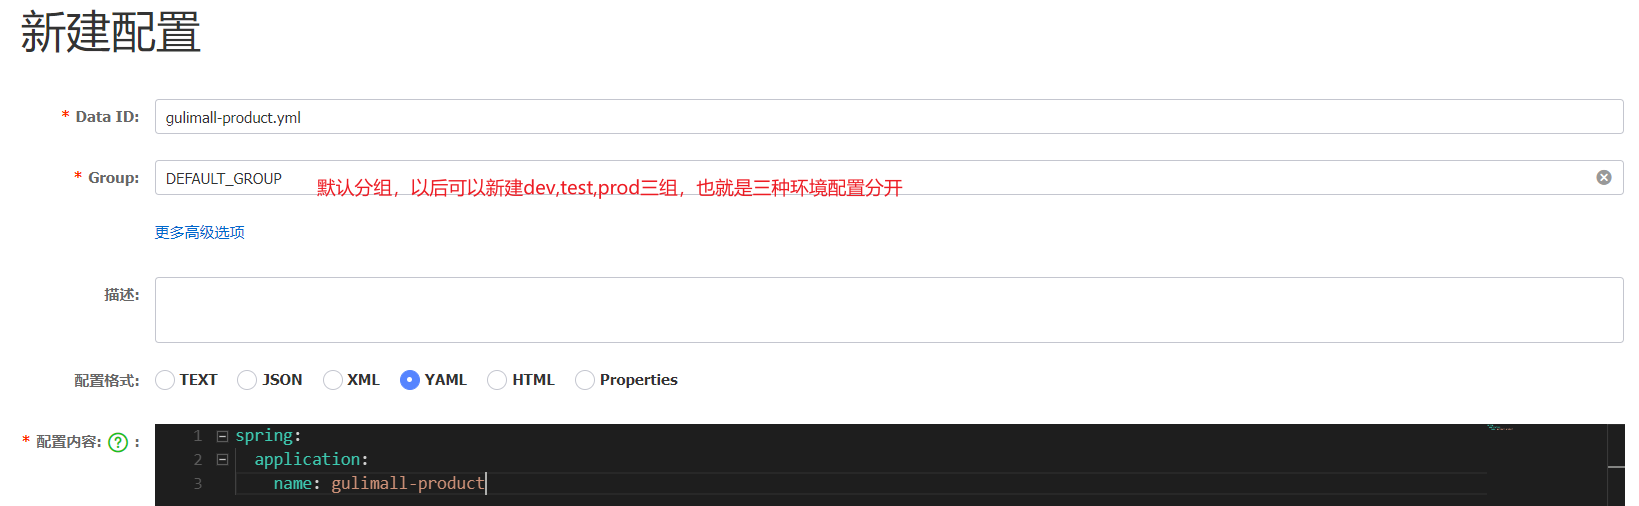
在product命名空间下下新建配置 :
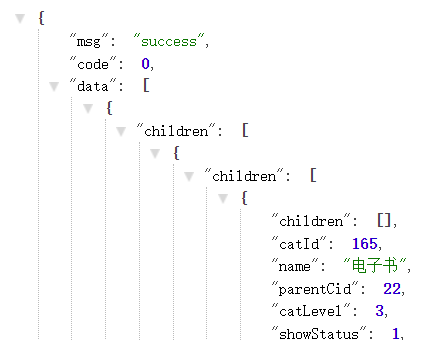
在bootstrap.yml配置 spring:application:name: gulimall-productcloud:nacos:config:server-addr: 127.0.0.1:8848file-extension: yamlnamespace: 改成刚创建的命名空间id然后配置application.yml中的nacos地址, 在启动类注解@EnableDiscoveryClient,这个之前配置过,检查一下你配置了没有。 6.4.3、修改前端分类组件,category.vue发现返回的是一个对象,对象.data.data才是我们要的数据。 src/views/mudules/product/category.vue
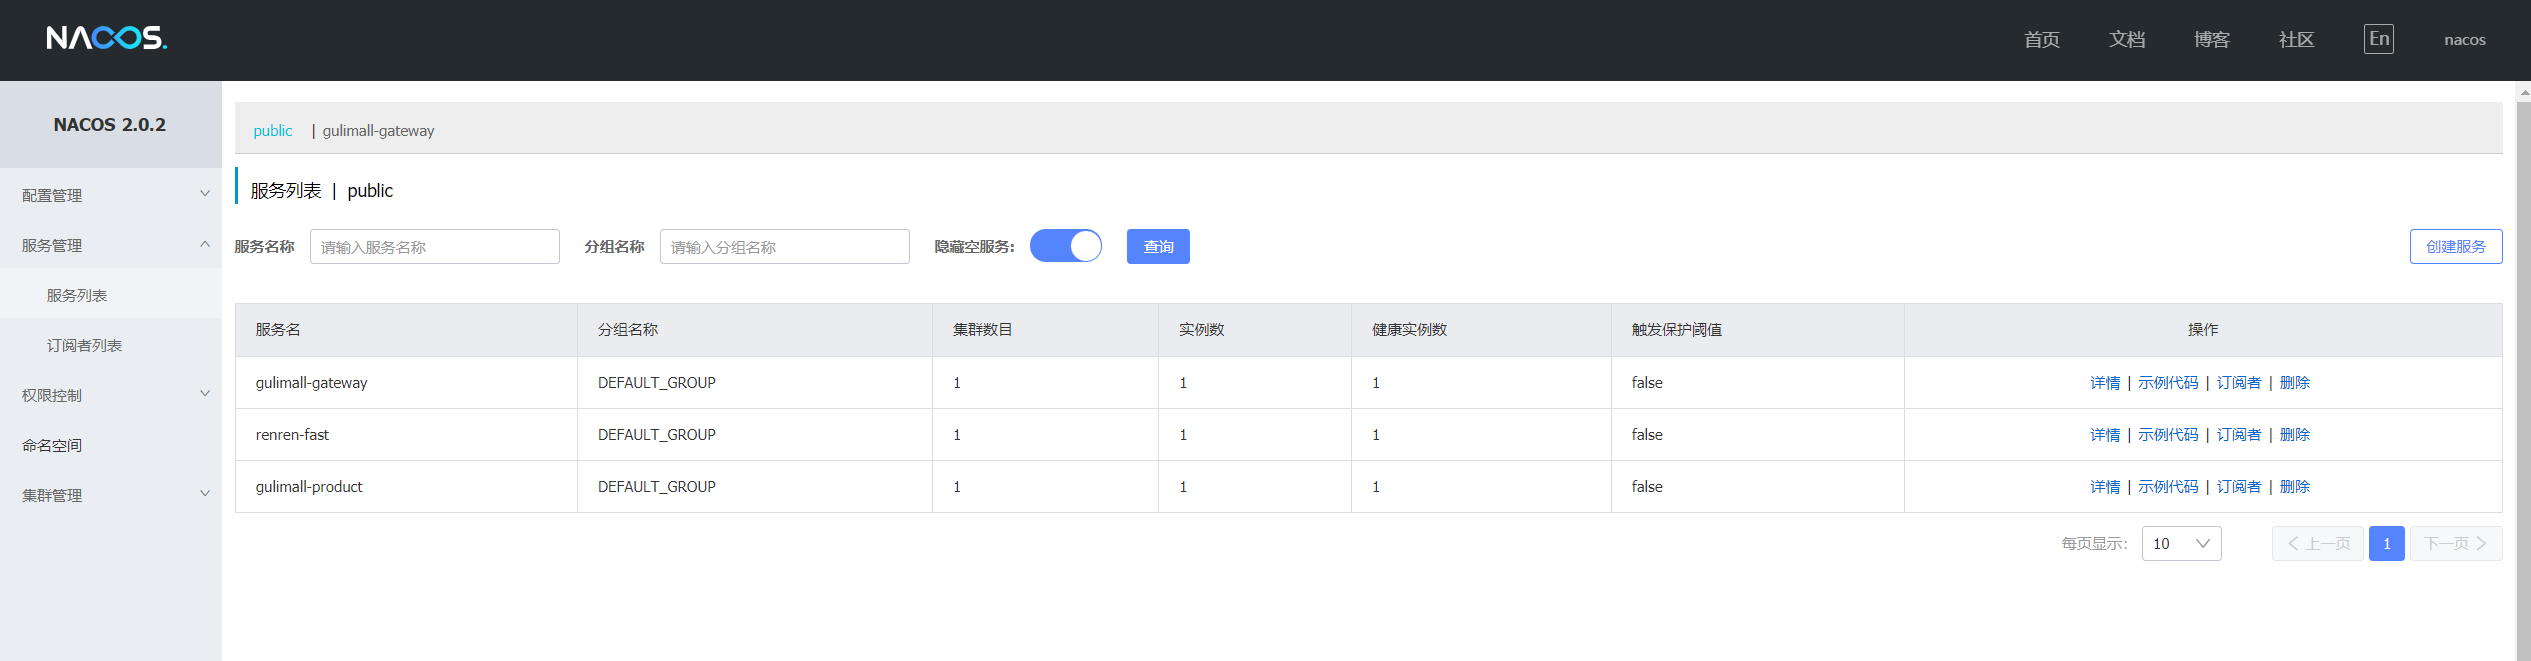
启动product模块,访问http://localhost:10000/product/category/list/tree
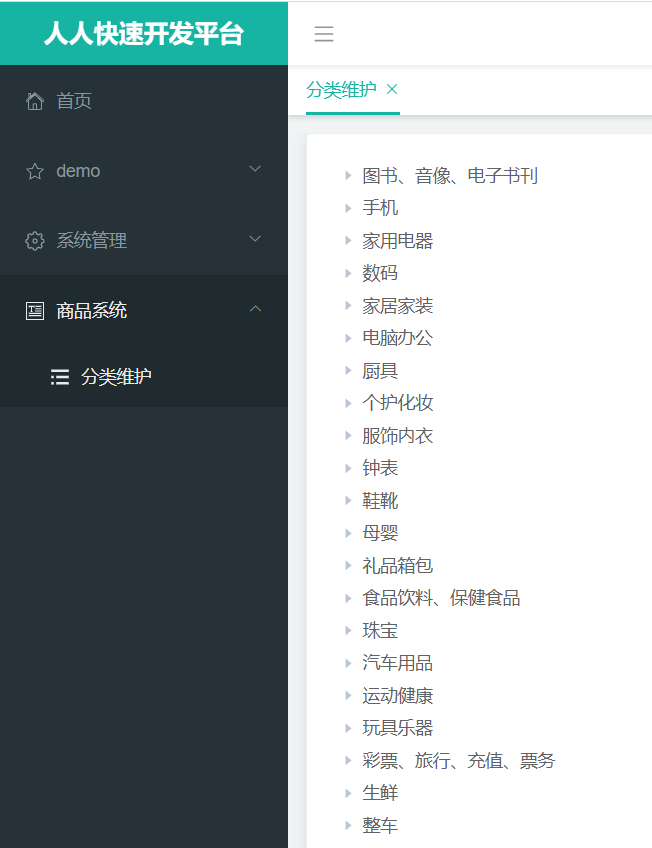
启动renren-fast后台管理模块,访问http://localhost:8001/#/product-category
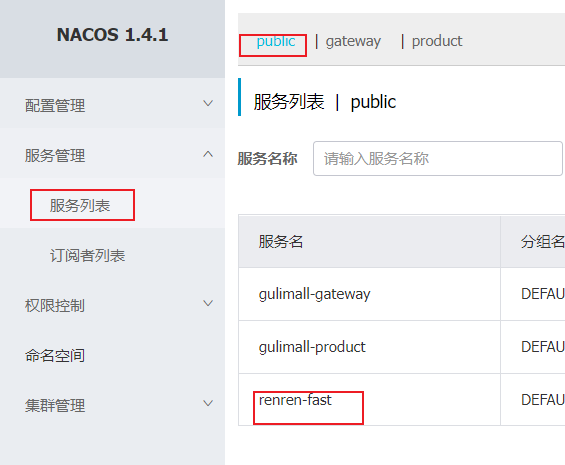
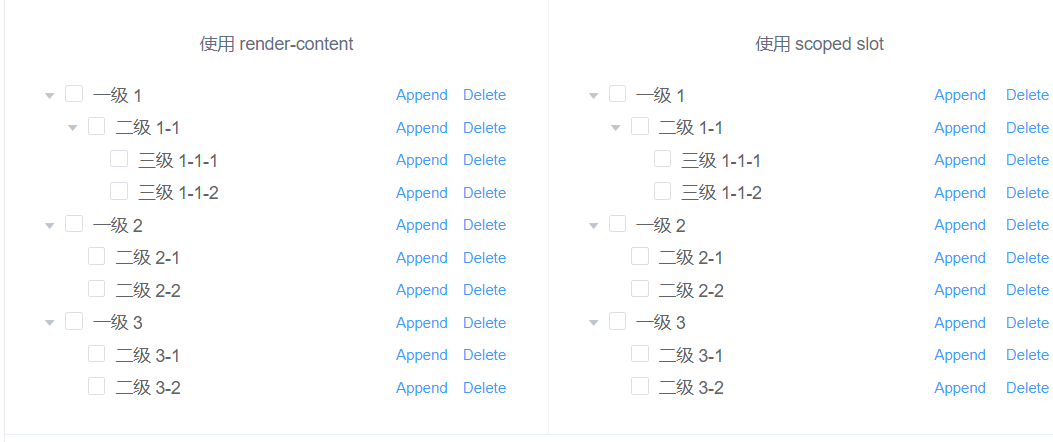
nacos也已经注册: 准备: elementUI选择tree树形控件的自定义节点内容,复制粘贴两个按钮到自己category.vue的标签下Element - The world's most popular Vue UI framework
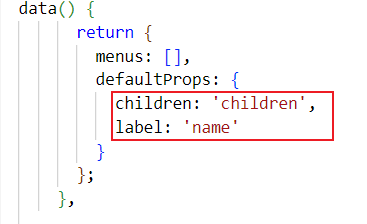
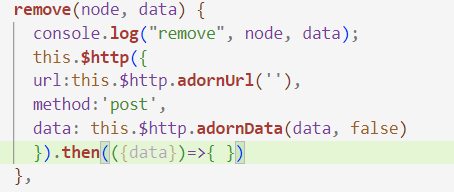
分析步骤: 在每一个菜单后面添加append, delete点击按钮时,不进行菜单的打开合并,仅点击箭头时展示子分类:expand-on-click-node="false"当没有子菜单时,才可以显示delete按钮。当为一级、二级菜单时,才显示append按钮。使用v-if添加多选框show-checkbox设置node-key=""标识每一个节点的不同 {{ node.label }}AppendDelete //这里可以导入其他文件(比如:组件,工具js,第三方插件js,json文件,图片文件等等) //例如:import 《组件名称》 from '《组件路径》';export default {//import引入的组件需要注入到对象中才能使用components: {},data() {return {menus: [],defaultProps: {children: "children", //子节点label: "name", //name属性作为标签的值,展示出来},};},methods: {handleNodeClick(data) {},getMenus() {this.$http({url: this.$http.adornUrl("/product/category/list/tree"),method: "get",}).then(({ data }) => {console.log("成功了获取到菜单数据....", data.data);this.menus = data.data;});},append(data) {console.log("append", data);},remove(node, data) {console.log("remove", node, data);},},//监听属性 类似于data概念computed: {},//监控data中的数据变化watch: {},//生命周期 - 创建完成(可以访问当前this实例)created() {this.getMenus();},//生命周期 - 挂载完成(可以访问DOM元素)mounted() {},beforeCreate() {}, //生命周期 - 创建之前beforeMount() {}, //生命周期 - 挂载之前beforeUpdate() {}, //生命周期 - 更新之前updated() {}, //生命周期 - 更新之后beforeDestroy() {}, //生命周期 - 销毁之前destroyed() {}, //生命周期 - 销毁完成activated() {}, //如果页面有keep-alive缓存功能,这个函数会触发 }; 6.5.2、前端,删除逻辑实现,抽取请求到代码片段抽取请求代码块到代码片段: 新增两个代码块,发送get请求和post请求。 文件->首选项->用户片段->新建全局代码片段,文件名vue.code-snippets(snippets译为代码片段,片段) {// Place your 全局 snippets here. Each snippet is defined under a snippet name and has a scope, prefix, body and // description. Add comma separated ids of the languages where the snippet is applicable in the scope field. If scope // is left empty or omitted, the snippet gets applied to all languages. The prefix is what is // used to trigger the snippet and the body will be expanded and inserted. Possible variables are: // $1, $2 for tab stops, $0 for the final cursor position, and ${1:label}, ${2:another} for placeholders. // Placeholders with the same ids are connected.// Example:// "Print to console": {// "scope": "javascript,typescript",// "prefix": "log",// "body": [// "console.log('$1');",// "$2"// ],// "description": "Log output to console"// }"http-get请求": {"prefix": "httpget","body":["this.\\$http({","url: this.\\$http.adornUrl(''),","method:'get',","params:this.\\$http.adornParams({})","}).then(({data})=>{","})"],"description":"httpGET请求"},"http-post请求":{"prefix":"httppost","body":["this.\\$http({","url:this.\\$http.adornUrl(''),","method:'post',","data: this.\\$http.adornData(data, false)","}).then(({data})=>{ })"],"description":"httpPOST请求"}}保存。 使用代码片段: 在category.vue的remove方法里输入httppost回车即可:
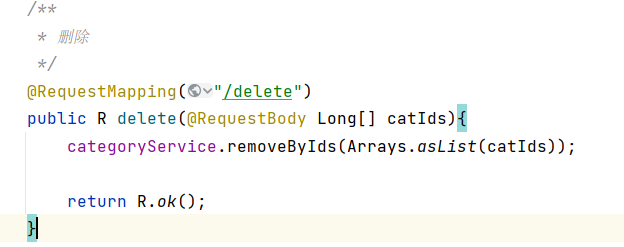
然后根据下面的删除逻辑进行操作: 删除逻辑: 编写前端remove方法,实现向后端发送请求点击delete弹出提示框,是否删除这个节点: elementui中MessageBox 弹框中的确认消息添加到删除之前删除成功后有消息提示: elementui中Message 消息提示删除后刷新页面后,分类应该保持之前展开状态: el-tree组件的default-expanded-keys属性,默认展开。 每次删除之后,把删除菜单的父菜单的id值赋给默认展开值即可。 //在中设置默认展开属性,绑定给expandedKey :default-expanded-keys="expandedKey"//data中添加属性,删除后给它赋值父节点id,令树形控件刷新后展开 expandedKey: [],//完整的remove方法remove(node, data) {var ids = [data.catId];this.$confirm(`是否删除【${data.name}】菜单?`, "提示", {confirmButtonText: "确定",cancelButtonText: "取消",type: "warning",}).then(() => {this.$http({url: this.$http.adornUrl("/product/category/delete"),method: "post",data: this.$http.adornData(ids, false),}).then(({ data }) => {this.$message({message: "菜单删除成功",type: "success",});//刷新出新的菜单this.getMenus();//设置需要默认展开的菜单。删除后给它赋值父节点id,令树形控件刷新后展开this.expandedKey = [node.parent.data.catId]});}).catch(() => {});}, 6.5.3、后端,逻辑删除@TableLogic查看controller,发现参数@RequestBody注解,请求体里面的数据,只有post请求才有请求体。 mybatisplus逻辑删除步骤: 逻辑删除 | MyBatis-Plus 方法一(mp3.3.0版本后,不推荐怕忘):配置yml,全局 mybatis-plus:global-config:db-config:logic-delete-field: isDelete # 全局逻辑删除的实体字段名(since 3.3.0,配置本项后可以忽略不配置实体类注解@TableLogic)logic-delete-value: 1 # 逻辑已删除值(默认为 1)。logic-not-delete-value: 0 # 逻辑未删除值(默认为 0)方法二(mp所有版本,推荐): 实体类成员变量加上@TableLogic(value = "0", delval = "1")注解 注意:本项目使用的是category表的show_status字段,逻辑删除值正好相反,状态为1表示未删除,状态为0表示删除。 CategoryEntity注解逻辑删除: /*** 是否显示[0-不显示,1显示]*/@TableLogic(value = "1",delval = "0")private Integer showStatus;service和controller不用改,使用mybatisplus生成的即可。 重启项目,用postman发请求: ### 6.Send POST request with json body POST http://localhost:88/api/product/category/delete Content-Type: application/json[1431]测试成功
前端删除也是成功的:
可以打印日志,在配置文件中修改日志级别 logging:level:com.xmh.guliamll.product: debug删除后恢复数据:sql语句 UPDATE pms_category SET show_status=1; 6.6、新增三级分类(仅前端)后端已完成,用mybatisplus自动生成的新增即可。 实现步骤: 1、elementui中Dialog 对话框 一个会话的属性为:visible.sync=“dialogVisible”导出的data中"dialogVisible = false"点击确认或者取消后的逻辑都是@click=“dialogVisible = false” 关闭会话2、点击append,弹出对话框,输入分类名称 3、点击确定,发送post请求: 新建方法addCategory发送post请求到后端; 因为要把数据添加到数据库,所以在前端数据中按照数据库的格式声明一个category属性。点击append时,计算category属性,点击确定时发送post请求。 对话框组件el-dialog: 对话框标签el-dialog放在el-tree标签上下都是可以的,主要是visible.sync属性控制对话框的显示和隐藏。 取 消确 定js代码: 注意:category属性用来接收输入框的参数,需要赋值默认属性,包括父id,层级(这两项el-tree增函数实参data里就有)、展示状态为1,排序值是0 //1data中新增数据 //按照数据库格式声明的数据。注意category属性用来接收输入框的参数,需要赋值默认属性,包括父id,层级、展示状态为1,排序值是0categroy: { name: "", parentCid: 0, catLevel: 0, showStatus: 1, sort: 0 }, //判断是否显示对话框dialogVisible: false,//修改append方法,新增addCategory方法 //点击append后,计算category属性,显示对话框append(data) {console.log("append", data);this.dialogVisible = true;this.categroy.parentCid = data.catId;this.categroy.catLevel = data.catLevel * 1 + 1;},//点击确定后,发送post请求 //成功后显示添加成功,展开刚才的菜单addCategory() {console.log("提交的数据", this.categroy);this.$http({url: this.$http.adornUrl("/product/category/save"),method: "post",data: this.$http.adornData(this.categroy, false),}).then(({ data }) => {this.$message({message: "添加成功",type: "success",});//刷新出新的菜单this.getMenus();//设置需要默认展开的菜单this.expandedKey = [this.categroy.parentCid];this.dialogVisible = false;}); 6.7、修改分类内容 6.7.1、后端修改返回结果的键为"data"product模块的CategoryController
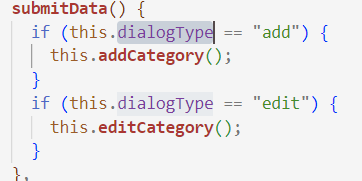
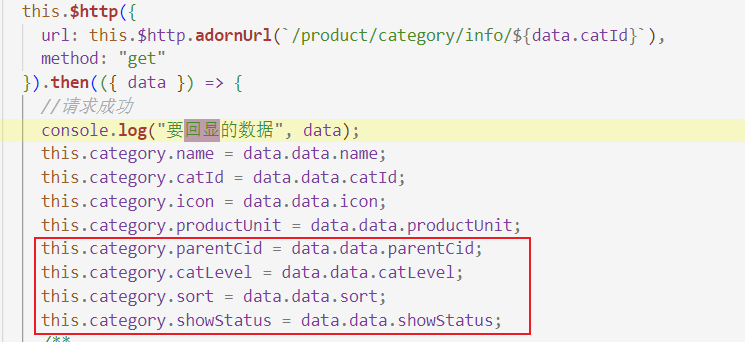
后端已完成,用mybatisplus自动生成的新增即可。 实现修改名称,图标,计量单位。 1、新增Edit按钮:复制之前的append 2、查看controller,发现updata方法是由id进行更新的,所以data中的category中新增catId 3、增加、修改的时候也修改图标和计量单位,所以data的category新增inco,productUnit 4、新建edit方法,用来绑定Edit按钮。新建editCategory方法,用来绑定对话框的确定按钮。 5、复用对话框: data数据中新增属性dialogType,用来区分提交时是新增还是编辑。
6、修改回显必须发请求,而非直接从实参中获取。防止多个人同时操作,对话框中的回显的信息应该是由数据库中读出来的:点击Edit按钮,发送httpget请求。(看好返回的数据) 7、编辑editCategory方法: controller之中的更新是动态更新,根据id,发回去什么值修改什么值,所以把要修改的数据发回后端就好。成功之后发送提示消息,展开刚才的菜单。8、编辑之后,再点击添加,发现会回显刚才编辑的信息。所以在append方法中重置回显的信息。 坑点: 修改回显必须发请求,而非直接从实参中获取因为新增修改共享表单对话框,所以还要修改添加方法,第一步初始化数据,这样data里定义category时也不用初始化了:
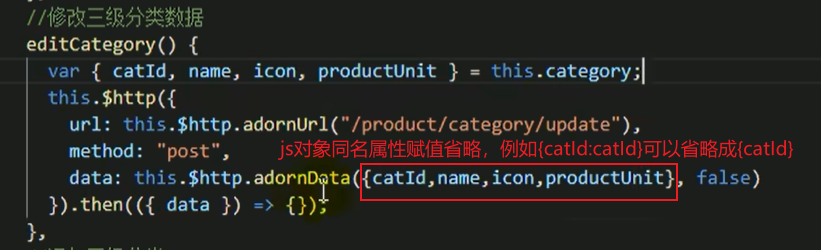
方法一:局部更新,只解构出表单里的属性封装成对象,再提交。
方法二:全量更新,回显时,把其他数据库字段也赋值:
代码+注释: Edit取 消确 定 //data, 新增了title、dialogType。 categroy中新增了inco、productUnit、catIddata() {return {title: "",dialogType: "",categroy: {name: "",parentCid: 0,catLevel: 0,showStatus: 1,sort: 0,inco: "",productUnit: "",catId: null,},dialogVisible: false,menus: [],expandedKey: [],defaultProps: {children: "children", //子节点label: "name", //name属性作为标签的值,展示出来},};//方法//绑定对话框的确定按钮,根据dialogType判断调用哪个函数submitData() {if (this.dialogType == "add") {this.addCategory();}if (this.dialogType == "edit") {this.editCategory();}},//绑定Edit按钮,设置dialogType、title,从后台读取数据,展示到对话框内edit(data) {this.dialogType = "edit";this.title = "修改菜单";this.dialogVisible = true;this.$http({url: this.$http.adornUrl(`/product/category/info/${data.catId}`),method: "get",}).then(({ data }) => {console.log(data);this.categroy.catId = data.data.catId;this.categroy.name = data.data.name;this.categroy.inco = data.data.inco;this.categroy.productUnit = data.data.productUnit;});},//绑定对话框的确定按钮,向后台发送更新请求,传过去想要修改的字段editCategory() {var { catId, name, inco, productUnit } = this.categroy;this.$http({url: this.$http.adornUrl("/product/category/update"),method: "post",data: this.$http.adornData({ catId, name, inco, productUnit }, false),}).then(({ data }) => {this.$message({message: "修改成功",type: "success",});//刷新出新的菜单this.getMenus();//设置需要默认展开的菜单this.expandedKey = [this.categroy.parentCid];this.dialogVisible = false;});},//点击append按钮,清空编辑之后的回显数据append(data) {this.dialogType = "add";this.title = "添加菜单";console.log("append", data);this.dialogVisible = true;this.categroy.parentCid = data.catId;this.categroy.catLevel = data.catLevel * 1 + 1;this.categroy.name = "",this.categroy.inco = "",this.categroy.productUnit = ""}, 6.8、修改分类层级关系,拖拽 6.8.1、前端,拖拽功能Element - The world's most popular Vue UI framework 在中加入属性draggable表示节点可拖拽。 在中加入属性:allow-drop="allowDrop",拖拽时判定目标节点能否被放置。 allowDrop有三个参数draggingNode表示拖拽的节点,dropNode表示拖拽到哪个节点,type表示拖拽的类型’prev’、‘inner’ 和 ‘next’,表示拖拽到目标节点之前、里面、之后。 注意:函数实现判断,拖拽后必须保持数型的三层结构。 节点的深度 = 最深深度 - 当前深度 + 1当拖拽节点拖拽到目标节点的内部,要满足: 拖拽节点的深度 + 目标节点的深度 批量保存 //data中新增数据pCid:[], //批量保存过后要展开的菜单iddraggable: false, //绑定拖拽开关是否打开//修改了一些方法,修复bug,修改过的方法都贴在下面了//点击批量保存按钮,发送请求batchSave() {this.$http({url: this.$http.adornUrl("/product/category/update/sort"),method: "post",data: this.$http.adornData(this.updateNodes, false),}).then(({ data }) => {this.$message({message: "菜单顺序修改成功",type: "success",});//刷新出新的菜单this.getMenus();//设置需要默认展开的菜单this.expandedKey = this.pCid;});this.updateNodes = [];},//handleDrop(draggingNode, dropNode, dropType, ev) {console.log("handleDrop: ", draggingNode, dropNode, dropType);//1、当前节点最新父节点的idlet pCid = 0;let sibings = null;if (dropType == "before" || dropType == "after") {pCid =dropNode.parent.data.catId == undefined? 0: dropNode.parent.data.catId;sibings = dropNode.parent.childNodes;} else {pCid = dropNode.data.catId;sibings = dropNode.childNodes;}//2、当前拖拽节点的最新顺序for (let i = 0; i < sibings.length; i++) {if (sibings[i].data.catId == draggingNode.data.catId) {//如果遍历的是当前正在拖拽的节点let catLevel = draggingNode.level;if (sibings[i].level != draggingNode.level) {//当前节点的层级发生变化catLevel = sibings[i].level;//修改他子节点的层级this.updateChildNodeLevel(sibings[i]);}this.updateNodes.push({catId: sibings[i].data.catId,sort: i,parentCid: pCid,catLevel: catLevel,});} else {this.updateNodes.push({ catId: sibings[i].data.catId, sort: i });}}this.pCid.push(pCid);console.log(this.pCid)//3、当前拖拽节点的最新层级//console.log("updateNodes", this.updateNodes)//拖拽之后重新置1this.maxLevel = 1;},// 修改拖拽判断逻辑allowDrop(draggingNode, dropNode, type) {console.log("allowDrag:", draggingNode, dropNode, type);this.maxLevel = draggingNode.level;//节点的最大深度this.countNodeLevel(draggingNode);console.log("maxLevel:", this.maxLevel);//当前节点的深度let deep = Math.abs(this.maxLevel - draggingNode.level) + 1;console.log("level",deep);if (type == "inner") {return deep + dropNode.level this.maxLevel) {this.maxLevel = node.childNodes[i].level;}this.countNodeLevel(node.childNodes[i]);}}}, 6.8.4、后端实现拖拽功能思路: 在后端编写批量修改的方法update/sort前端发送post请求,把要修改的数据发送过来提示信息,展开拖拽节点的父节点CategoryController批量修改 //批量修改,参数要传数组,不能传list@RequestMapping("/update/sort")public R updateSort(@RequestBody CategoryEntity[] category){categoryService.updateBatchById(Arrays.asList(category));return R.ok();}测试批量修改:
批量删除 后端已完成,用mybatisplus自动生成的新增即可。
|


【本文地址】