OpenCV透视变换 您所在的位置:网站首页 相机俯视图投影 OpenCV透视变换

OpenCV透视变换

2024-05-30 09:59| 来源: 网络整理| 查看: 265

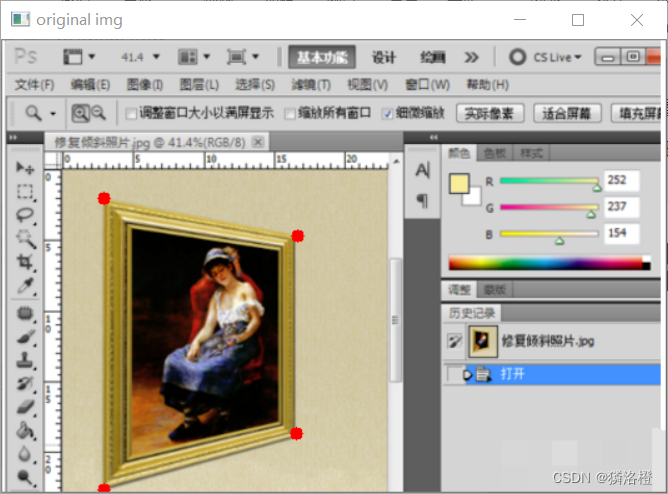
目录

一、获取需要变换的图像中一个区域的四个点位置

二、利用getPerspectiveTransform函数获取透视转换矩阵

三、利用warpPerspective函数获取处理好的鸟瞰图像

标记四个点的原图

处理后的鸟瞰图

完整代码

一、获取需要变换的图像中一个区域的四个点位置

Tip:顺序是左上,右上,左下和右下的四个坐标点位置

二、利用getPerspectiveTransform函数获取透视转换矩阵

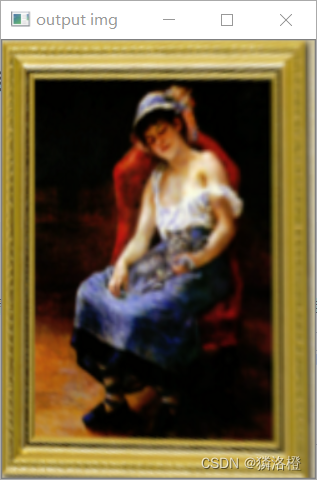
Tips:

getPerspectiveTransform(src,dst):src是原图像的四点坐标(左上,右上,左下和右下)dst是转换后的图像的四点坐标(一一对应) matrix = cv2.getPerspectiveTransform(pts1,pts2) 三、利用warpPerspective函数获取处理好的鸟瞰图像

Tips:

Outimg = cv2.warpPerspective(src,matrix,(width,height))

src:原图像matrix:原图像到鸟瞰图像的透视变换矩阵(widht,height):处理后的图像的宽度和高度 imgOutput = cv2.warpPerspective(img,matrix,(width,height)) 标记四个点的原图

处理后的鸟瞰图

完整代码 import numpy as np import cv2 img = cv2.imread('./test.png') width,height=250,350 pts1 = np.float32([[81,126],[236,156],[81,359],[235,314]]) pts2 = np.float32([[0,0],[width,0],[0,height],[width,height]]) matrix = cv2.getPerspectiveTransform(pts1,pts2) imgOutput = cv2.warpPerspective(img,matrix,(width,height)) for x in range(0,4): cv2.circle(img,(pts1[x][0],pts1[x][1]),5,(0,0,255),cv2.FILLED) cv2.imshow('original img',img) cv2.imshow('output img',imgOutput) cv2.waitKey(0)


【本文地址】

公司简介

联系我们

今日新闻

    推荐新闻

    专题文章
      CopyRight 2018-2019 实验室设备网 版权所有