| 如何用echarts画一个好看的饼图 | 您所在的位置:网站首页 › 画一个吊车怎么画好看 › 如何用echarts画一个好看的饼图 |
如何用echarts画一个好看的饼图
|
前言
最近有个需求,需要绘制一个饼图,为此我根据这次需求来整理了一下关于 echarts 饼图绘制的一些知识点,在这次需求中我需要用到的属性我会详细讲解,其他的属性我会粗略地说一下(并加入其他博主的文章的跳转),综合案例在后续博客中更新。 注意: 有些属性只有新版示例中才有,老版本的无法生效,如:borderRadius 。 目录 前言1. 先用echarts画一个饼图2. 分析一下饼图的结构及其属性值2.2 legend属性详解 2.4 label2.5 tooltip2.6 series 3. formatter 语法4. 补充:绘制一个折线图 1. 先用echarts画一个饼图直接在官网找一个最基础的饼图案例: option = { title: { text: 'Referer of a Website', subtext: 'Fake Data', left: 'center' }, tooltip: { trigger: 'item' }, legend: { orient: 'vertical', left: 'left' }, series: [ { name: 'Access From', type: 'pie', radius: '50%', data: [ { value: 1048, name: 'Search Engine' }, { value: 735, name: 'Direct' }, { value: 580, name: 'Email' }, { value: 484, name: 'Union Ads' }, { value: 300, name: 'Video Ads' } ], emphasis: { itemStyle: { shadowBlur: 10, shadowOffsetX: 0, shadowColor: 'rgba(0, 0, 0, 0.5)' } } } ] };然后你就得到了一个这样的最基础的饼图: 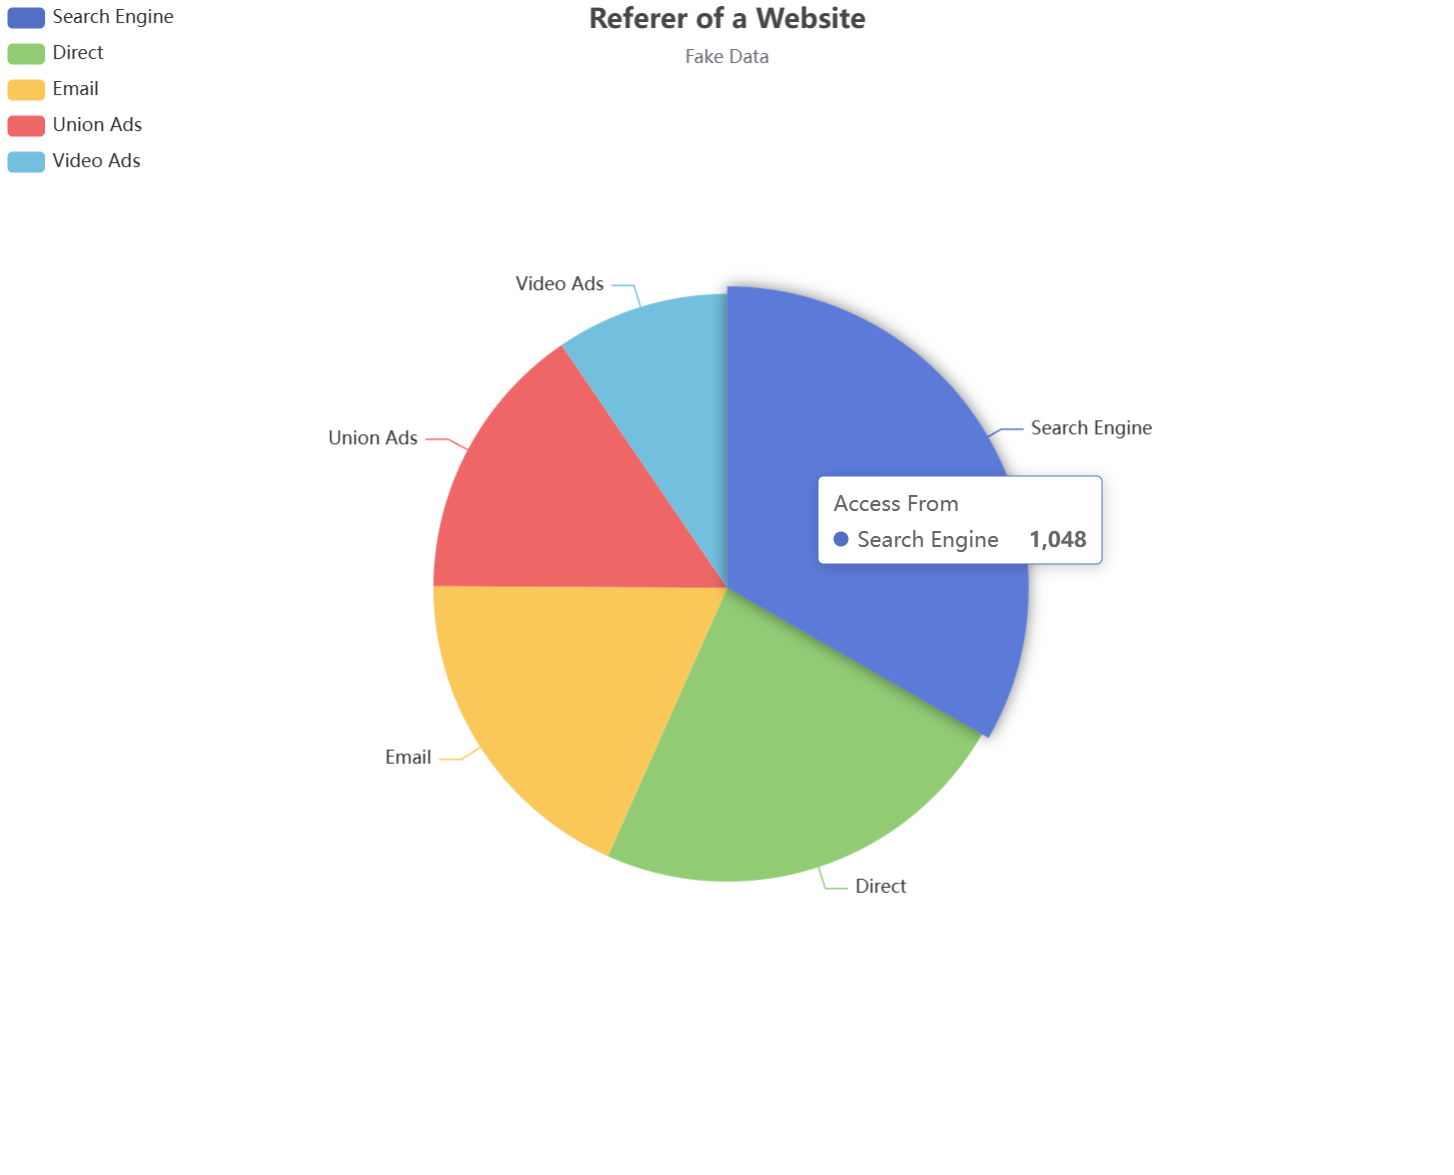 2. 分析一下饼图的结构及其属性值
接下来我们就可以来分析一下这个饼图的构造了,这样我们后续才好优化,其主要结构如下图: 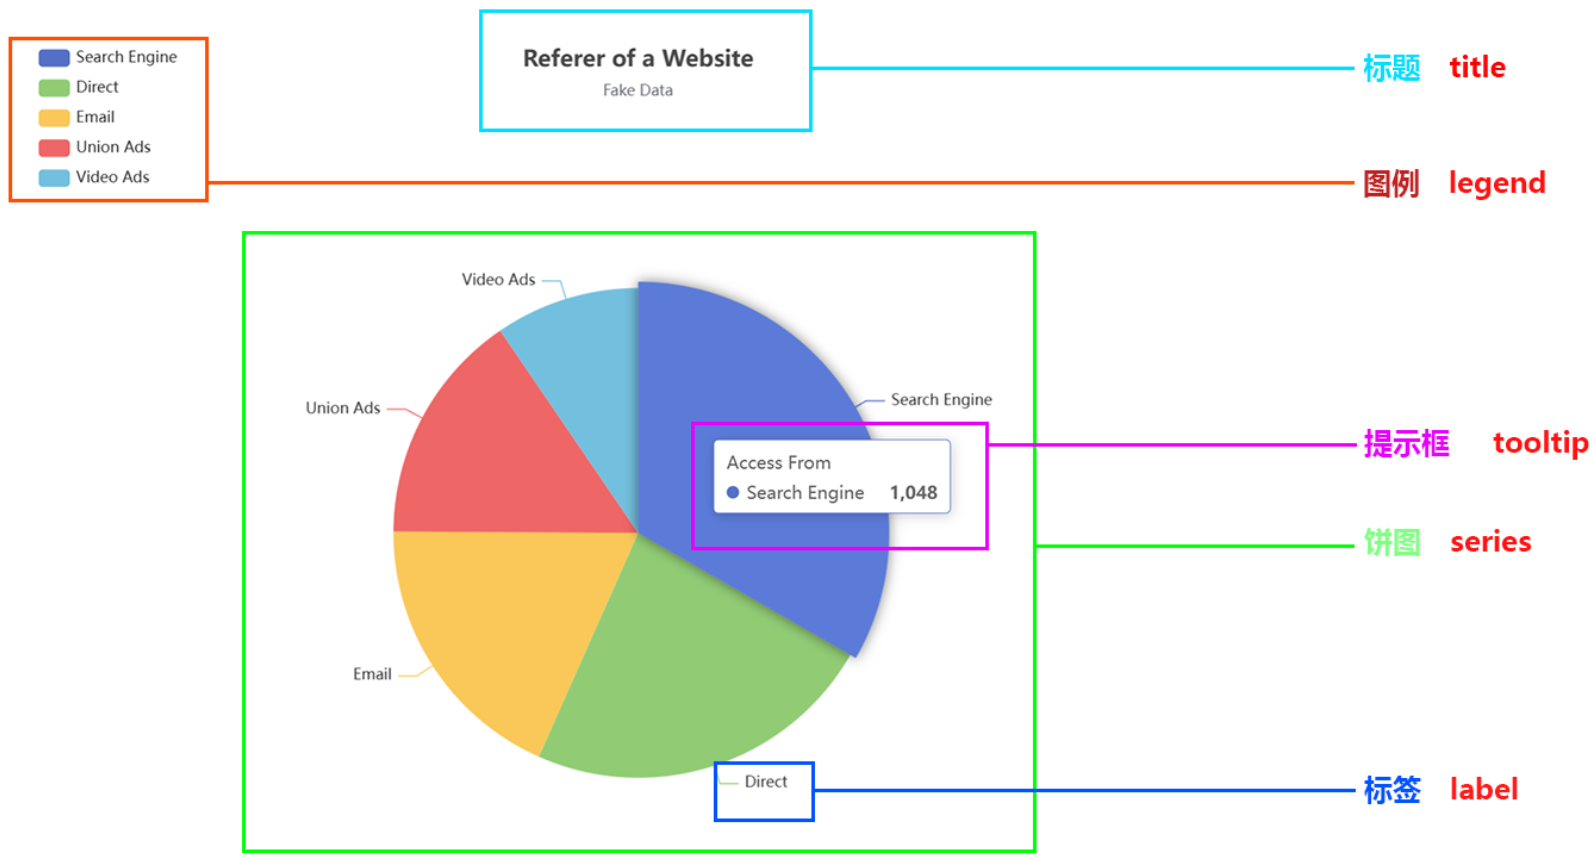
那么就根据上图来说明一下饼图的属性值了,从最简单的 title 开始: 2.1 titletitle show 是否显示标题,默认为truetext 主标题subtext 副标题x 水平位置,可选值 left、right、centery 垂直位置,可选值 top、center、bottom注意: 还可以用 left、right、top、bottom 四个属性来精确设置 title 的位置,效果可参考 position 中的 left、right、top、bottom 。 backgroundColor 标题背景色borderWidth 标题边框线宽borderColor 标题边框颜色 必须先设置了 backgroundColor ,border 属性才会生效paddingitemGap 主副标题纵向间隔,只能填数字textStyle 主标题文本样式 fontFamilyfontSizefontStylefontWeightcolorlineHeighttextBorderColor 字体描边颜色textBorderWidth 字体描边宽度,只填数字textShadowColor 阴影颜色textShadowBlur 阴影长度textShadowOffsetX 阴影水平偏移textShadowOffsetY 阴影垂直偏移 subtextStyle 副标题文本样式 主标题与副标题的样式属性都一样,就不多做赘述案例  title: {
text: '一个饼图',
subtext: '不断优化中',
x: 'center',
y: 'top',
itemGap: 13,
textStyle: {
fontFamily: "华文隶书",
fontSize: 28,
fontStyle: "italic",
textBorderColor: "#01deff",
textBorderWidth: 2,
textShadowColor: "#d7f8fc",
textShadowBlur: 3,
textShadowOffsetX: 5,
textShadowOffsetY: 5
},
subtextStyle: {
fontSize: 18,
fontFamily: "华文隶书",
fontStyle: "italic",
textBorderColor: "#01deff",
textBorderWidth: 2,
}
},
2.2 legend
属性详解
title: {
text: '一个饼图',
subtext: '不断优化中',
x: 'center',
y: 'top',
itemGap: 13,
textStyle: {
fontFamily: "华文隶书",
fontSize: 28,
fontStyle: "italic",
textBorderColor: "#01deff",
textBorderWidth: 2,
textShadowColor: "#d7f8fc",
textShadowBlur: 3,
textShadowOffsetX: 5,
textShadowOffsetY: 5
},
subtextStyle: {
fontSize: 18,
fontFamily: "华文隶书",
fontStyle: "italic",
textBorderColor: "#01deff",
textBorderWidth: 2,
}
},
2.2 legend
属性详解
这个就是左边那几个标识了,其由两部分组成,如下: 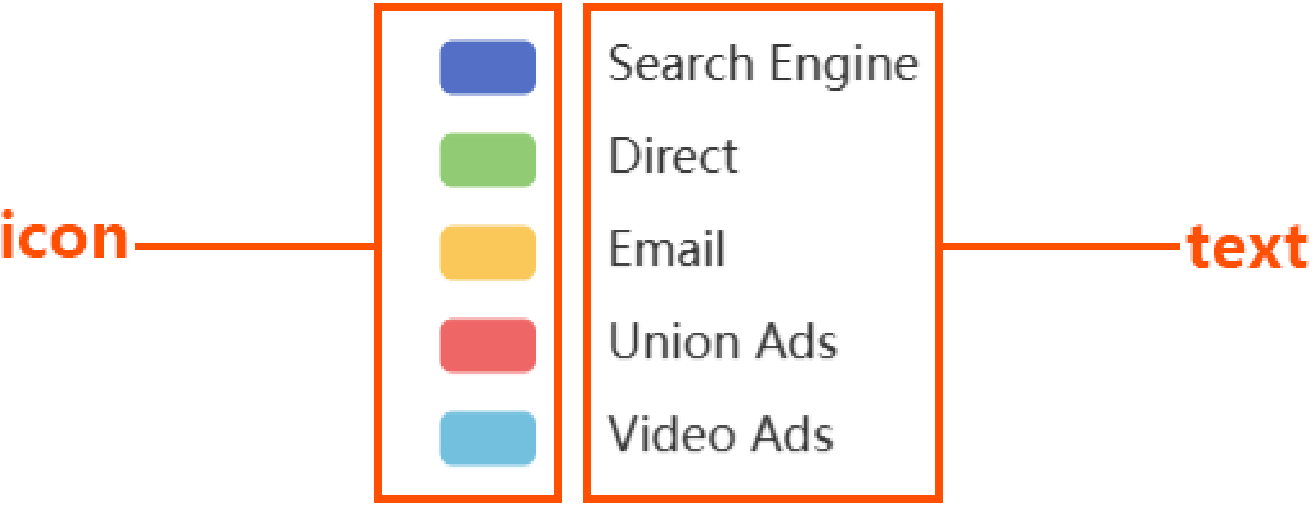
legend orient 图例的排列,vertical 垂直、horizontal 水平x 水平位置,水平位置,可选值 left、right、centery 垂直位置,可选值 top、center、bottom注意: 还可以用 left、right、top、bottom 四个属性来精确设置 title 的位置,效果可参考 position 中的 left、right、top、bottom 。 backgroundColor 背景颜色borderColor 边框颜色borderWidth 边框宽度paddingitemGap 图例之间的间距,只填数字icon 图标类型: circle 圆形rect 矩形roundRect 圆角矩形(默认)triangle 三角形diamond 菱形pin 地图标记图标arrow 箭头none 无图标 itemHeight 控制 icon 高度itemWidth 控制 icon 宽度align 调整 icon 相对于文本的位置(left——icon在文本左边、right、auto)textStyle 设置文本样式,参考 title 章节的文本样式selected 指定不显示在饼图中的数据案例 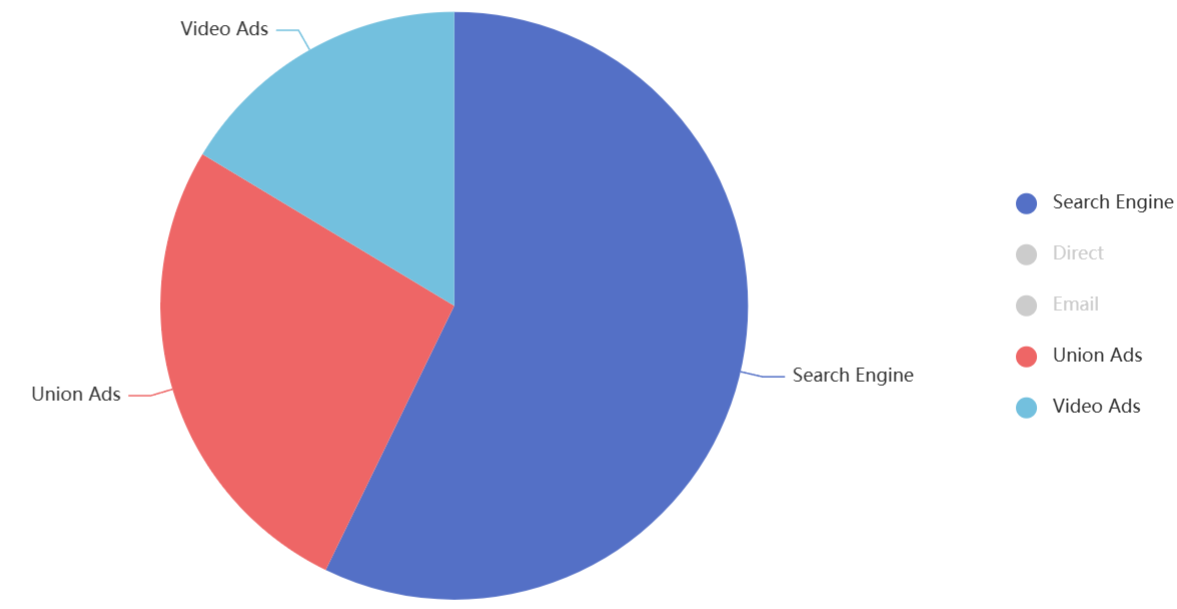 legend: {
orient: 'vertical',
// left: 33,
x: 'right',
y: 'center',
itemGap: 20,
icon: 'circle',
align: 'left',
selected: {
'Direct': false,
'Email': false
}
},
legend 中的 formatter
legend: {
orient: 'vertical',
// left: 33,
x: 'right',
y: 'center',
itemGap: 20,
icon: 'circle',
align: 'left',
selected: {
'Direct': false,
'Email': false
}
},
legend 中的 formatter
formatter 可以自定义每个图例的文本内容,可用在 tooltip、legend、label 中,不过一般是用在 legend 中。 现在我有一个需求,我要让 legend 的文本的后面都加上一个 ○,如下: 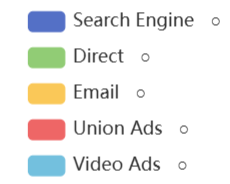 // name 对应的是 series.data 中的 name 属性
formatter: function (name) {
return name + ' ○';
}
// name 对应的是 series.data 中的 name 属性
formatter: function (name) {
return name + ' ○';
}
更详细的使用请见后续的综合案例。 2.4 labellabel show 是否显示,默认为 truebackgroundColor 背景颜色borderColor 边框颜色borderWidth 边框宽度borderRadius 边框圆角padding 内边距…因为这次需求中不需要管 label 长啥样,我直接 show: false 了,也就没去研究了,其余的属性可以见以下两篇博客: https://www.hangge.com/blog/cache/detail_3130.html https://blog.csdn.net/qq_38718629/article/details/126892957 2.5 tooltiptooltip show 是否显示,默认 truetrigger 触发类型 item 数据项图形触发,主要在散点图,饼图等无类目轴的图表中使用axis 坐标轴触发,主要在柱状图,折线图等会使用类目轴的图表中使用none 不触发 axisPointer 轴指针属性,trigger: ‘axis’ 时使用,这里不做赘述showContent 是否显示提示框浮层,默认 truealwaysShowContent 是否永远显示提示框内容,默认(false)情况下在移出可触发提示框区域后一定时间后隐藏triggerOn 提示框触发的条件 mousemove 鼠标悬浮时触发(默认)click 鼠标点击时触发mousemove|click 移动或点击时触发none 无法触发 confine 是否将 tooltip 框限制在图表的区域内,默认 falsebackgroundColor 背景色paddingtextStyle 设置文本样式,参考 title 章节的文本样式borderWidth 边框宽度borderColor 边框颜色使用默认的边框样式,它会根据饼图颜色来绘制边框 formatter 见 legend 中的 formatter 2.6 series这个是可操作属性最多的组成部分了,其属性值也是最多的。 series name tooltip 的标题文字type 图标类型,如:pie、category、lineroseType 将普通饼图转换成南丁格尔图 radius 扇区圆心角展现数据的百分比,半径展现数据的大小area 扇区圆心角的半径展现数据的大小(从大到小顺时针渲染)none 普通饼图(默认) radius 饼图大小,可用 px、%注意: 如果只有一个属性值,则是实心饼图,属性值为饼图大小如果有两个属性值,如:['60%', '70%'],第一个值表示内圈大小,第二个表示外圈大小 center 饼图圆心所在位置,可用 px、%,如:['40%', '50%']avoidLabelOverlap 是否避免标签重叠,默认为 falsecolor 饼图扇叶颜色,与 data 中的数据匹配data 饼图渲染数据emphasis 当鼠标悬浮时,饼图扇叶的变化 focus 在高亮图形时,是否淡出其它数据的图形已达到聚焦的效果 none 不淡出其它图形(默认)self 只聚焦(不淡出)当前高亮的数据的图形series series blurScope 在开启 focus 的时候,可以通过 blurScope 配置淡出的范围 coordinateSystem 淡出范围为坐标系(默认)series 淡出范围为系列global 淡出范围为全局 itemStyle 饼图扇叶样式 shadowColor 阴影颜色shadowBlur 阴影长度shadowOffsetX 阴影水平偏移shadowOffsetY 阴影垂直偏移borderRadius 边框圆角borderColor 边框颜色borderWidth 边框宽度注意: 可以在 emphasis 设置 itemStyle 案例 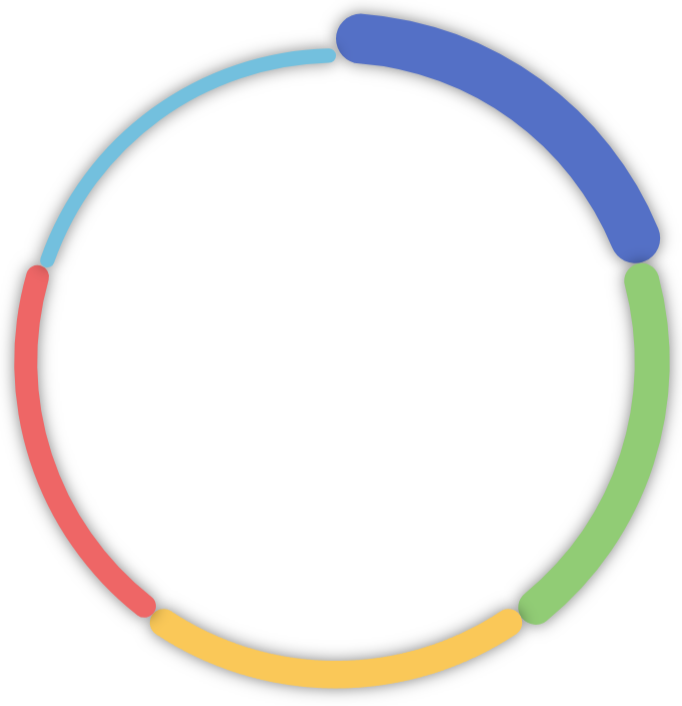 series: [
{
name: 'Access From',
type: 'pie',
radius: ['60%', '70%'],
center: ['50%', '50%'],
roseType: 'area',
data: [
{ value: 1048, name: 'Search Engine' },
{ value: 735, name: 'Direct' },
{ value: 580, name: 'Email' },
{ value: 484, name: 'Union Ads' },
{ value: 300, name: 'Video Ads' }
],
label: {
show: false
},
itemStyle: {
borderRadius: '10%',
shadowBlur: 10,
shadowOffsetX: 0,
shadowColor: 'rgba(0, 0, 0, 0.5)'
},
}
]
3. formatter 语法
series: [
{
name: 'Access From',
type: 'pie',
radius: ['60%', '70%'],
center: ['50%', '50%'],
roseType: 'area',
data: [
{ value: 1048, name: 'Search Engine' },
{ value: 735, name: 'Direct' },
{ value: 580, name: 'Email' },
{ value: 484, name: 'Union Ads' },
{ value: 300, name: 'Video Ads' }
],
label: {
show: false
},
itemStyle: {
borderRadius: '10%',
shadowBlur: 10,
shadowOffsetX: 0,
shadowColor: 'rgba(0, 0, 0, 0.5)'
},
}
]
3. formatter 语法
看这篇文章:https://blog.csdn.net/qq_39442804/article/details/78202256 写得巨好 4. 补充:绘制一个折线图效果图: lineData数据结构: { "data": [ { "date": "2024-04-28", "channels": [ { "amount": 0, "name": "微信小程序(自费)", "count": 0 }, { "amount": 0, "name": "窗口", "count": 0 }, { "amount": 0.42, "name": "自助机", "count": 6 } ] }, { "date": "2024-04-29", "channels": [ { "amount": 14, "name": "微信小程序(自费)", "count": 5 }, { "amount": 2.07, "name": "窗口", "count": 7 }, { "amount": 0, "name": "自助机", "count": 0 } ] } ] }代码: import * as echarts from 'echarts' export default { name: 'TransactionTrendCurve', props: ['lineData'], data () { return { seriesData: [], dates: [], chartInstance: null, colors: ['#1e90ff', '#32cd32', '#ff4500', '#9400d3', '#ff8c00', '#800080', '#adff2f', '#ff69b4', '#8a2be2', '#a52a2a'], } }, watch: { lineData: { handler (newValue) { this.initChart(newValue) }, immediate: true, }, }, mounted () { this.initChart() }, beforeDestroy () { if (this.chartInstance) { this.chartInstance.dispose() } }, methods: { initChart (newValue) { let lineData = {} if (newValue) { lineData = newValue } else { lineData = this.lineData } this.dates = [] this.seriesData = [] lineData.data.forEach(day => { this.dates.push(day.date) day.channels.forEach(channel => { let foundSeries = this.seriesData.find(s => s.name === channel.name) if (!foundSeries) { this.seriesData.push({ name: channel.name, type: 'line', data: [], yAxisIndex: 0, // 添加y轴索引 }) foundSeries = this.seriesData[this.seriesData.length - 1] } foundSeries.data.push(channel.amount) }) }) this.chartInstance = this.$echarts.init(this.$refs.chartContainer) this.updateChart() }, updateChart () { const option = { xAxis: { type: 'category', data: this.dates, min: 0, axisTick: { show: false, }, }, yAxis: [ { name: '金额(元)', type: 'value', } ], legend: { data: this.seriesData.map(s => s.name), orient: 'horizontal', bottom: 0, icon: 'circle', itemHeight: 8, }, grid: { left: 0, right: 0, bottom: '10%', containLabel: true, }, tooltip: { trigger: 'axis', }, series: this.assignColorsToSeries(), } this.chartInstance.setOption(option, true) }, assignColorsToSeries () { return this.seriesData.map((data, index) => ({ ...data, type: 'line', smooth: true, lineStyle: { color: this.colors[index % this.colors.length], }, data: data.data, })) }, }, } |

【本文地址】