| 单网口安装PVE+iKuai | 您所在的位置:网站首页 › 爱快安装win10教程 › 单网口安装PVE+iKuai |
单网口安装PVE+iKuai
|
问题:一台高性能PC,pc板载单网卡,网络环境ip与mac绑定 需求:需要在这台pc直接安装pve,虚拟多台电脑,同时供多人访问 解决思路:pve上安装ikuai,物理网卡硬件直通给pve,通过ikuai管理虚拟机的ip和端口映射 硬件:需要准备 1个USB无线网卡
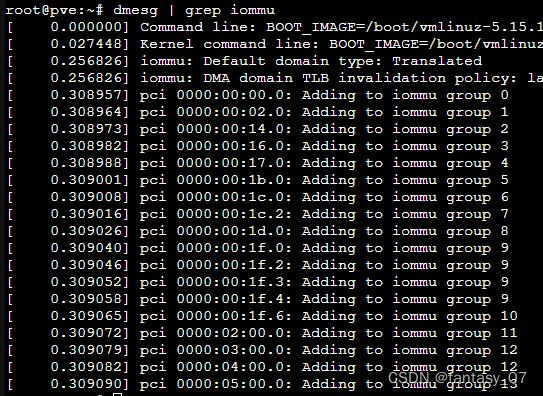
VT-x CPU Configuration —> Intel Virtualization Technology VT-d Advanced\System Agent(SA) Configuration b、在shell中输入以下命令 1、编辑 /etc/default/grub nano /etc/default/grub 2、修改 GRUB_CMDLINE_LINUX_DEFAULT GRUB_CMDLINE_LINUX_DEFAULT="quiet intel_iommu=on iommu=pt" #Intel CPU 用户 GRUB_CMDLINE_LINUX_DEFAULT="quiet amd_iommu=on iommu=pt" #AMD CPU 用户 3、更新 grub update-grub 4、编辑 /etc/modules,加载相应的内核模块 nano /etc/modules vfio vfio_iommu_type1 vfio_pci vfio_virqfd 5、更新内核参数 update-initramfs -k all -u 6、重启PVE reboot验证是否直通成功,有下图的显示,则直通成功 dmesg | grep iommu
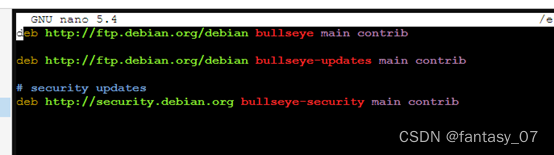
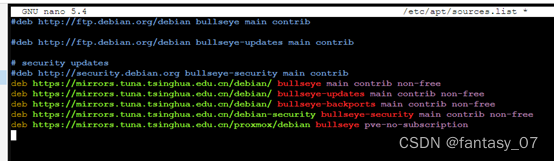
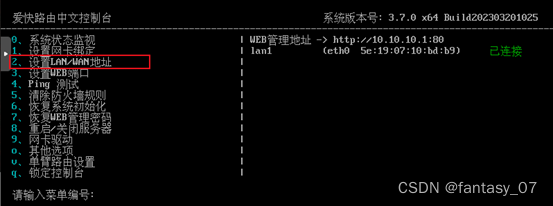
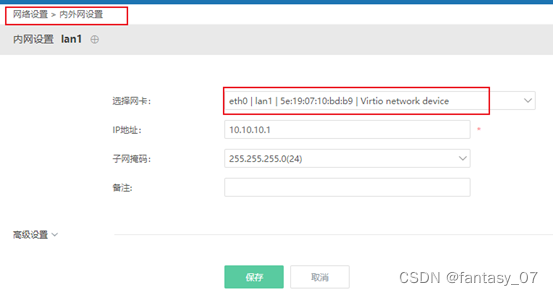
PVE 本身也有自己的软件源,但是都是收费的。我们需要将其删除,不然在软件安装时会提示一些 401 的认证错误 rm -rf /etc/apt/sources.list.d/pve-enterprise.list 2、修改软件源以防错误操作,我们先将文件进行备份 cp /etc/apt/sources.list /etc/apt/sources.list.bak编辑默认软件源文件 nano /etc/apt/sources.list我们将默认的连接前面加上 # 号进行注释,或者删除这些连接 添加国内软件源 #清华源 deb https://mirrors.tuna.tsinghua.edu.cn/debian/ bullseye main contrib non-free deb https://mirrors.tuna.tsinghua.edu.cn/debian/ bullseye-updates main contrib non-free deb https://mirrors.tuna.tsinghua.edu.cn/debian/ bullseye-backports main contrib non-free deb https://mirrors.tuna.tsinghua.edu.cn/debian-security bullseye-security main contrib non-free deb https://mirrors.tuna.tsinghua.edu.cn/proxmox/debian bullseye pve-no-subscription #中科大源 deb https://mirrors.ustc.edu.cn/debian/ bullseye main contrib non-free deb https://mirrors.ustc.edu.cn/debian/ bullseye-updates main contrib non-free deb https://mirrors.ustc.edu.cn/debian/ bullseye-backports main contrib non-free deb https://mirrors.ustc.edu.cn/debian-security bullseye-security main contrib deb https://mirrors.ustc.edu.cn/proxmox/debian bullseye pve-no-subscription选择以上其中一个粘贴到 /etc/apt/sources.list 文件中 就像下面这样 粘贴完成后按 ctrl + x 会提示是否保存,我们输入(不区分大小写) y 进行保存 更新 apt-get update可以看到就已经是使用的我们修改过后的软件源了 附2:PVE去除订阅窗口需要修改文件路径为:/usr/share/javascript/proxmox-widget-toolkit/proxmoxlib.js 修改之前请做好文件备份,防止误操作造成不可预知的错误。 a.定位到文件夹 cd /usr/share/javascript/proxmox-widget-toolkitb.备份文件 cp proxmoxlib.js proxmoxlib.js.bakc.编辑文件 nano proxmoxlib.js 解决方法1搜索关键词:data.status ctrl+w 将: if (res === null || res === undefined || !res || res .data.status.toLowerCase() !== 'active') {修改为 if (false) { 解决方法2搜索关键词:Ext.Msg.show 将: Ext.Msg.show({修改为: Ext.Msg.noshow({文件修改后保存上传,执行 systemctl restart pveproxy 命令,重启网页服务 systemctl restart pveproxy如未生效,尝试清理 二、安装iKuai 1、下载iso镜像 2、虚拟机设置 CPU:2个核心 内存:4G 硬盘:SATA 4G(先不用直通网卡) 3、挂载ISO镜像到cd驱动器,启动安装 4、 修改lan地址为10.10.10.1
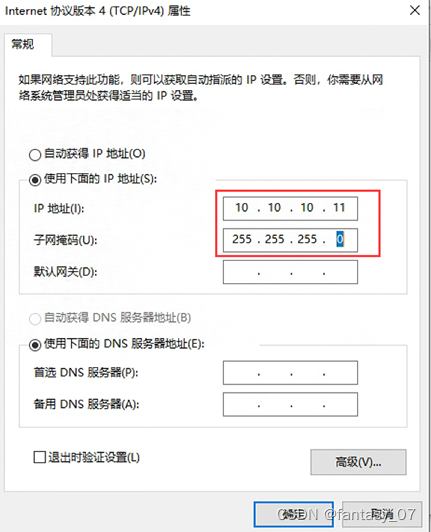
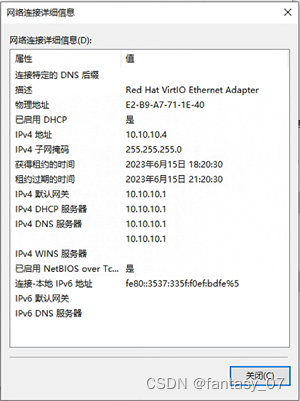
(过程略) 2、通过VNC访问,安装virtio驱动 3、win10设置网卡为手动获取ip,设置为10.10.10.x网段
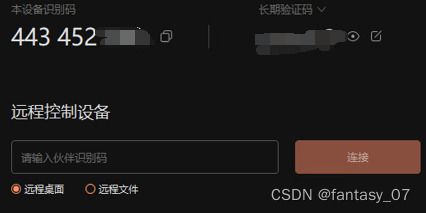
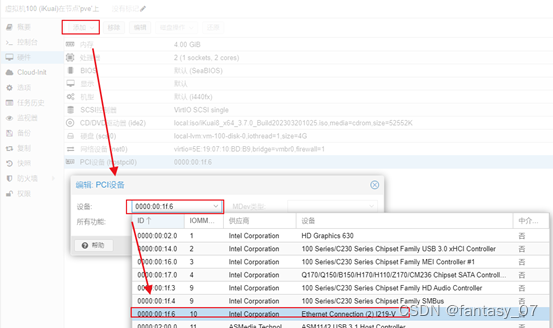
切换直通后,服务器网口不可用,需要usb网卡连接wifi,保证win10可以外部远程连接 1、插入USB无线网卡,直通给win10
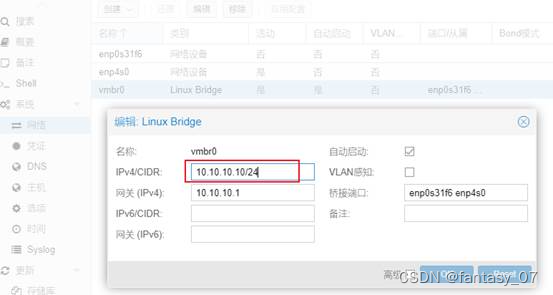
(更改后就不能通过外部网络访问pve后台,只能通过无线网络向日葵访问,谨慎!) a.网络为桥接模式,默认,不用改 b.PVE网络设置,地址改为10.10.10.10
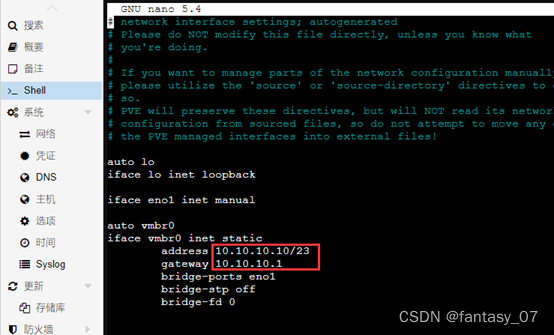
ctrl+x 退出,Y 保存,enter 返回shell (若无法访问pve后台,启用有线网卡)  解决思路:关闭虚拟机,不要虚拟机在pve系统重启后自动启动,pve重新启动成功后,到管理界面删除网卡直通 把pve这台服务器,插上显示器,键盘,用管理员账户进入 1、查看虚拟机 qm list输出 VMID NAME STATUS MEM(MB) BOOTDISK(GB) PID 100 DS918 running 4096 0.12 9660这里主要是 100 即虚拟机id 2、关闭虚拟机 qm stop 100 3、关闭虚拟机自动启动 qm set 100 -onboot 0 4、重启服务器 reboot重启完成后,浏览器进入pve管理界面,把虚拟机直通的网卡删除。 |


【本文地址】