| 智能机器人实验 | 您所在的位置:网站首页 › 机器人图片大全画画简单 › 智能机器人实验 |
智能机器人实验
|
实验器材
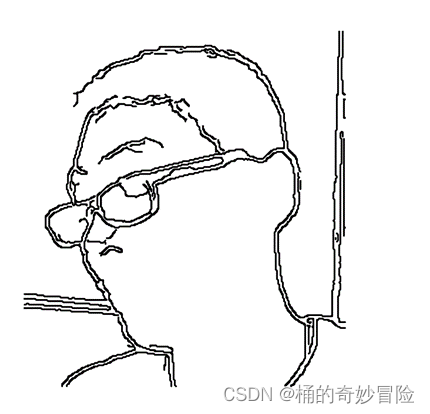
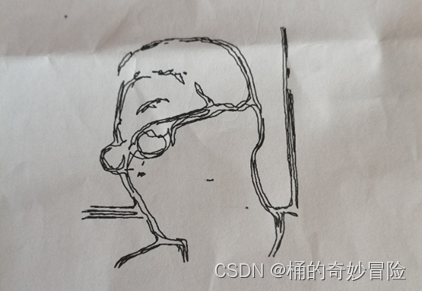
Dobot机械臂+笔+小型摄像头+电脑软件+白纸 项目描述创意来源:前段时间有个团队实现了通过手机拍照将照片传到机器中,机器实现画图。于是想着通过Dobot机械臂实现同样甚至更好的功能。 在实验指导书上看到,Dobot机械臂能够简单的进行写字,就联想到能够用它来画画,由摄像头实时拍摄对象,同时对显示的图像进行卡通化与素描化,展示较好的效果,最后输出图像到机械臂上,让机械臂作图。 实现功能: 1、通过python opencv包调用摄像头,实现摄像头的图像实现 2、对于每一帧的视频图像进行卡通化与素描化处理 3、通过键盘控制摄像头进行拍照并将照片保存 4、编写程序将图片从jpg格式转成svg(矢量图)格式,将转化出的矢量图导入dobot模块,控制机械臂绘图。
1、图片卡通化算法: def cartoon(image): gray = cv2.cvtColor(image, cv2.COLOR_BGR2GRAY) gray = cv2.medianBlur(gray, 7) edges = cv2.adaptiveThreshold(gray, 255, cv2.ADAPTIVE_THRESH_MEAN_C, cv2.THRESH_BINARY, 9, 10) color = cv2.bilateralFilter(image, 12, 250, 250) cartoon = cv2.bitwise_and(color, color, mask=edges) return cartoon2、图片素描化算法: def sumiao(image): cartoon_image1, cartoon_image2 = cv2.pencilSketch(image, sigma_s=60, sigma_r=0.15, shade_factor=0.05) return cartoon_image13、图片格式转化算法: def bitmap_to_contour_svg(input_bitmap_path: str, output_svg_path: str): img = cv2.imread(input_bitmap_path) dump_rings_from_image(img, output_path=output_svg_path) remove_matplotlib_background(output_svg_path)4、拍摄及主程序: if cap.isOpened() is True: # 检查摄像头是否正常启动 while (True): # 获取摄像头拍摄到的画面 ret, frame = cap.read() img = frame cartoon1=cartoon(img) sumiao1=sumiao(img) stylish1=stylish(img) # 实时展示效果画面 # cv2.imshow('frame1', frame) cv2.imshow('frame2',stylish1) cv2.imshow('frame', sumiao1) # 每5毫秒监听一次键盘动作 if cv2.waitKey(5) & 0xFF == ord('p'): cv2.imwrite('pic_%d.jpg'%i,stylish1) i += 1 bmp_to_svg.bitmap_to_contour_svg(input_bitmap_path="pic_0.jpg", output_svg_path="pictuce_0.svg") if cv2.waitKey(5) & 0xFF == ord('q'): break # 最后,关闭所有窗口 cap.release() cv2.destroyAllWindows() else: print('cap is not opened!') 呈现效果
bmp_to_svg.py文件 from typing import Iterable, List, Tuple, Union import cv2 import matplotlib.pyplot as plt import numpy as np from xml.dom import minidom as md from queue import Queue import warnings def look_shape(a: Iterable) -> Tuple: # for debug return np.array(a).shape def length_within_points(a: Iterable, empty_value: Union[int, float] = 0) -> int: """ a simple instance: array : [empty_value, empty_value, empty_value, 1, empty_value, 0, 1, 2, empty_value] Then length_within_points(array) will return index diff between 1 and 2, which is 5 """ a = list(a) l_pivot, r_pivot = -1, -2 for index, (l_val, r_val) in enumerate(zip(a[::1], a[::-1])): if l_val != empty_value and l_pivot == -1: l_pivot = index if r_val != empty_value and r_pivot == -2: r_pivot = len(a) - index return r_pivot - l_pivot + 1 def dump_rings_from_image(image: np.ndarray, output_path: str, plot_dict: dict = {"color": "k", "linewidth": 2.0}, default_height: float = 8) -> List[np.ndarray]: # regular operation, no more explainations blur = cv2.GaussianBlur(image, (3, 3), 0) gray = cv2.cvtColor(blur, cv2.COLOR_BGR2GRAY) edge = cv2.Canny(gray, 50, 150) # get ratio between width and height to adjust the final output valid_width = length_within_points(edge.sum(axis=0)) valid_height = length_within_points(edge.sum(axis=1)) true_ratio = valid_width / valid_height # get contour of the edge image contour_tuple = cv2.findContours(edge, mode=cv2.RETR_TREE, method=cv2.CHAIN_APPROX_NONE) contours = contour_tuple[0] rings = [np.array(c).reshape([-1, 2]) for c in contours] # adjust coordinate system to the image coordinate system max_x, max_y, min_x, min_y = 0, 0, 0, 0 for ring in rings: max_x = max(max_x, ring.max(axis=0)[0]) max_y = max(max_y, ring.max(axis=0)[1]) min_x = max(min_x, ring.min(axis=0)[0]) min_y = max(min_y, ring.min(axis=0)[1]) # adjust ratio plt.figure(figsize=[default_height * true_ratio, default_height]) # plot to the matplotlib for _, ring in enumerate(rings): close_ring = np.vstack((ring, ring[0])) xx = close_ring[..., 0] yy = max_y - close_ring[..., 1] plt.plot(xx, yy, **plot_dict) plt.axis("off") plt.savefig(output_path) def remove_matplotlib_background(svg_file: str, bg_node_name: str = "patch_1") -> None: dom_tree: md.Document = md.parse(svg_file) svg_node = None # select the svg tag for node in dom_tree.childNodes: if node.nodeName == "svg": svg_node: md.Element = node if svg_node is None: raise ValueError("not find a svg node in {}".format(svg_file)) # bfs svg node to find the background node q = Queue() q.put(svg_node) target_node = None # we will remove the target node while not q.empty(): cur: md.Node = q.get() if cur.hasChildNodes(): for node in cur.childNodes: q.put(node) if hasattr(cur, "getAttribute"): # this is the id of the background node if cur.getAttribute("id") == bg_node_name: target_node = cur if target_node is None: warnings.warn("background node is not found, please ensure whether bg_node_name is correct") else: # remove and write target_node.parentNode.removeChild(target_node) with open(svg_file, "w", encoding="utf-8") as fp: dom_tree.writexml( writer=fp, indent="\t" ) def bitmap_to_contour_svg(input_bitmap_path: str, output_svg_path: str): img = cv2.imread(input_bitmap_path) dump_rings_from_image(img, output_path=output_svg_path) remove_matplotlib_background(output_svg_path) if __name__ == '__main__': bitmap_to_contour_svg( input_bitmap_path="pic_1_0.jpg", output_svg_path="5.svg" ) |


【本文地址】
公司简介
联系我们