| 【开源】用ESP32制作一个桌面天气预报站 | 您所在的位置:网站首页 › 手机桌面天气怎么设置本地的天气和时间 › 【开源】用ESP32制作一个桌面天气预报站 |
【开源】用ESP32制作一个桌面天气预报站
|
九月一到,就有了秋意,秋意在一个多雾的黎明溜来,到了炎热的下午便不见踪影。它踮起脚尖掠过树顶,染红几片叶子,然后乘着一簇飞掠过山谷离开。秋天已悄悄到来,背上你的行囊,叫上你的小伙伴一起去外面看看缤纷的世界。这不我养的小青蛙已经出去旅行了,它总是会给我发一些它在旅游时候的照片,不过最近在外好像有了艳遇。给大家看看它寄回来的照片。
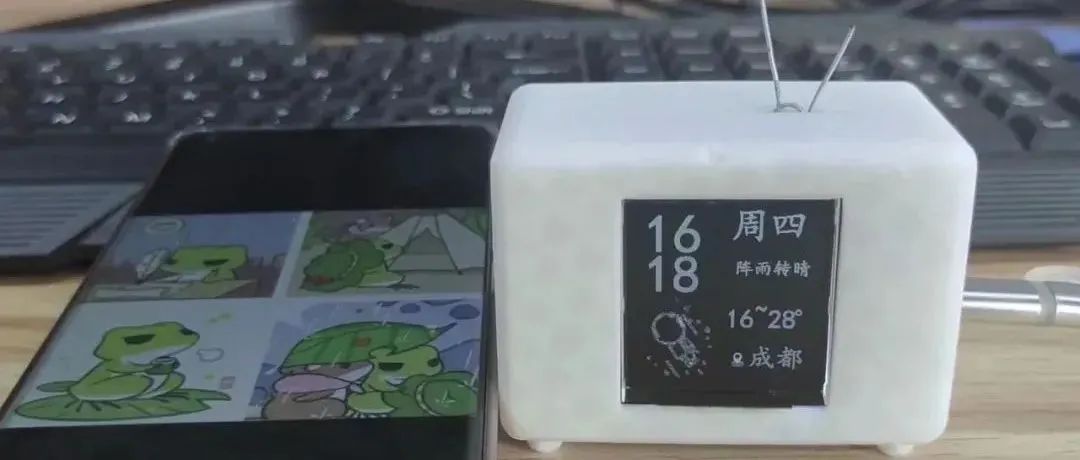
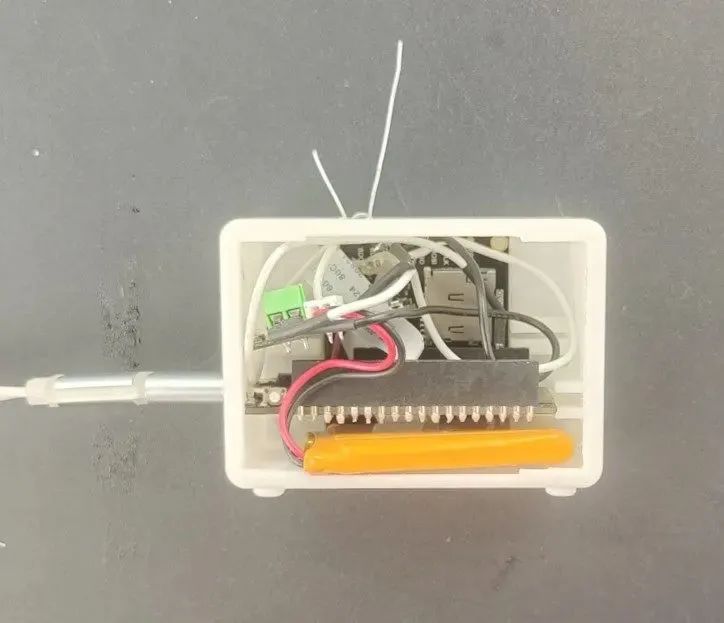
我每当我看到我这里天气的变好或变差的时候,我都会去看看我的蛙儿子在哪里旅行。 气象站功能:接受当地时间及当地天气,显示在屏幕上; 使用ESP32-E的电容触摸引脚,切换屏幕显示内容,显示青蛙旅行图片。 一、准备材料 1、硬件材料ESP32-E主板 3.7v电池 3.7V电池充电器 TFT显示屏
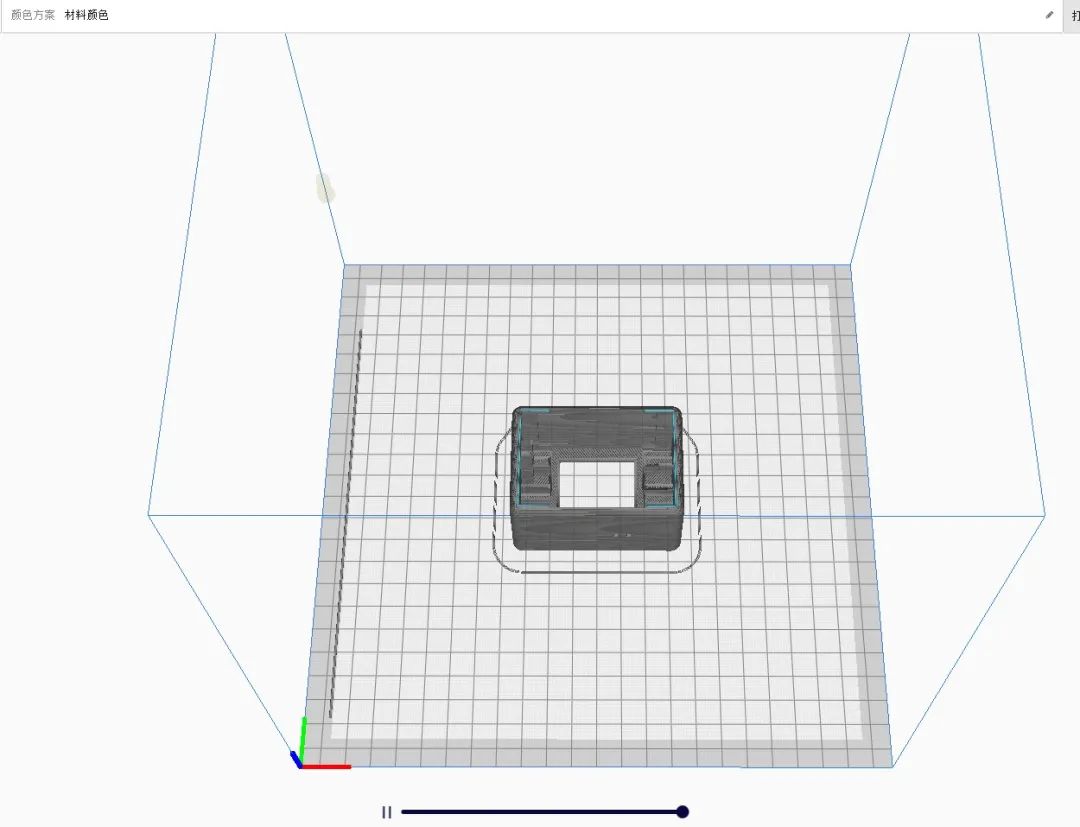
获取图纸链接[1]
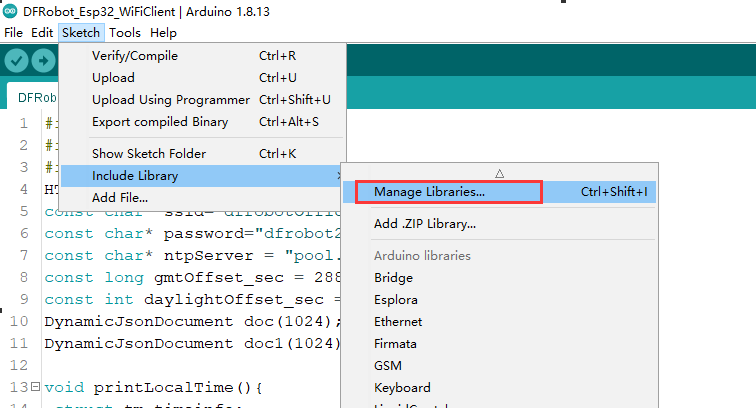
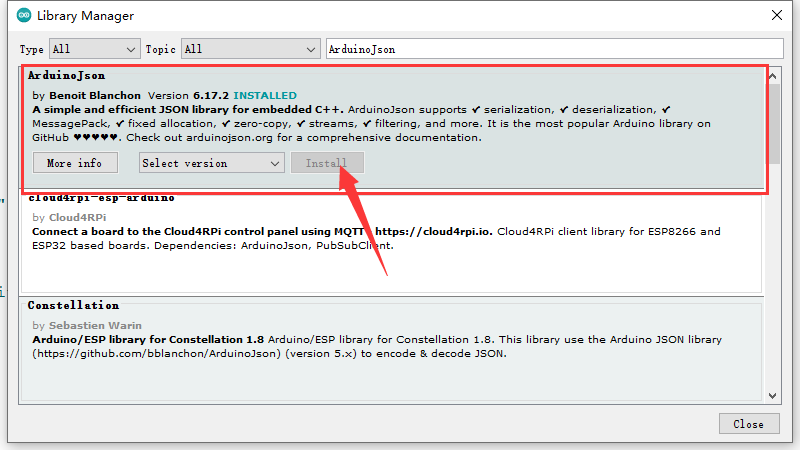
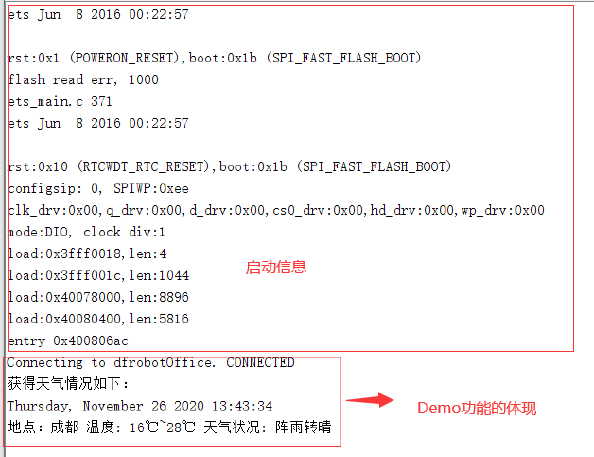
关于如何下载本次使用的库文件,DFRobot_GDL库文件[2] 关于如何使用Firebeetle Board-ESP32-E[3] 关于如何下载库文件[4] 三、使用esp32获取网络天气及时间ESP32同时支持STA以及AP模式的WiFi连接。 STA 模式:ESP32模块通过路由器连接互联网,手机或电脑通过互联网实现对设备的远程控制。 AP 模式:ESP32模块作为热点,实现手机或电脑直接与模块通信,实现局域网无线控制。 STA+AP 模式:两种模式的共存模式,即可以通过互联网控制可实现无缝切换,方便操作。 #include #include #include HTTPClient http; const char* ssid="dfrobotOffice"; const char* password="dfrobot2011"; const char* ntpServer = "pool.ntp.org"; const long gmtOffset_sec = 28800; const int daylightOffset_sec = 0; DynamicJsonDocument doc(1024); DynamicJsonDocument doc1(1024); void printLocalTime(){ struct tm timeinfo; if(!getLocalTime(&timeinfo)){ Serial.println("Failed to obtian time"); return ; } Serial.println(&timeinfo,"%A, %B %d %Y %H:%M:%S"); } void printLocalWeather(){ http.begin("http://www.weather.com.cn/data/cityinfo/101270101.html"); int httpCode = http.GET(); if(httpCode == HTTP_CODE_OK){ String pageData = http .getString(); //Serial.println(pageData); deserializeJson(doc,pageData); JsonObject obj = doc.as(); String weatherInfo = obj["weatherinfo"]; deserializeJson(doc1,weatherInfo); JsonObject obj1 = doc1.as(); String city = obj1["city"]; String temp1 = obj1["temp1"]; String temp2 = obj1["temp2"]; String weather = obj1["weather"]; String cityInfo ="地点:"+ city; String tempInfo =" 温度: " + temp1 + "~" + temp2; String cityWeatherinfo = " 天气状况: " + weather; Serial.println("获得天气情况如下:"); printLocalTime(); Serial.print(cityInfo); Serial.print(tempInfo); Serial.println(cityWeatherinfo); }else{ Serial.println("GET ERR"); } http.end(); } void setup() { Serial.begin(115200); Serial.printf("Connecting to %s",ssid); WiFi.begin(ssid,password); while(WiFi.status()!=WL_CONNECTED){ delay(500); Serial.print("."); } Serial.println(" CONNECTED"); configTime(gmtOffset_sec, daylightOffset_sec, ntpServer); // printLocalWeather(); } void loop() { if(WiFi.status() == WL_CONNECTED){ printLocalWeather(); }else{ Serial.println("WiFi Disconnect"); } } 说明:本Demo实现了通过WiFi功能获取网络时间以及通过访问国家气象局提供的http://www.weather.com.cn/datalcityinfo/101010100.html来获取天气情况,本接口中“101010100"为城市代码。 注意:该例程需要下载ArduinoJson库,下载方式如下图:
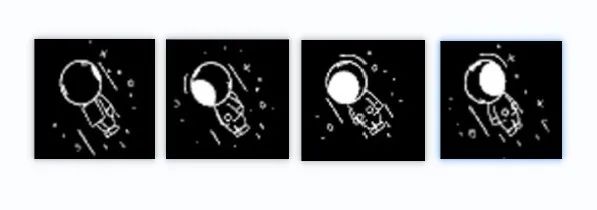
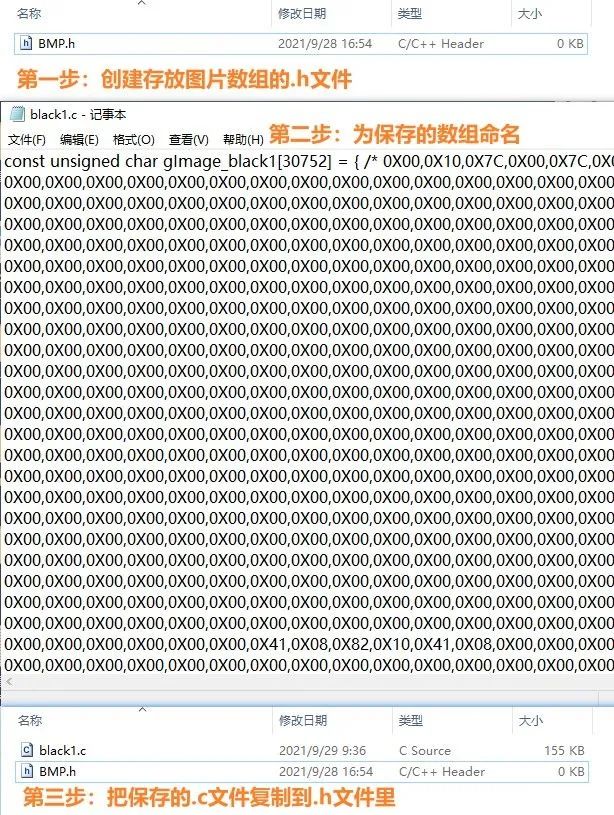
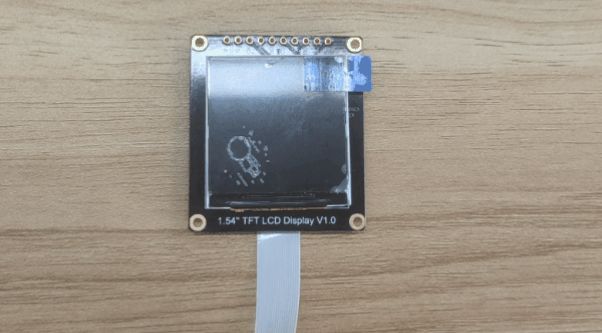
其实是从动态图里面截取下来的4张图片 通过每100毫秒切换一张图片,达到旋转太空人的形态。
#include #include "BMP.h" #define TFT_DC D2 #define TFT_CS D6 #define TFT_RST D3 #define PICNUMBER 6 DFRobot_ST7789_240x240_HW_SPI screen(/*dc=*/TFT_DC,/*cs=*/TFT_CS,/*rst=*/TFT_RST); void setup() { screen.begin(); } void loop() { screen.drawPIC(/*x=*/0,/*y=*/124,/*w=*/124,/*h=*/124,/*bitmap gImage_Bitmap=*/( uint8_t*)gImage_black1); delay(100); screen.drawPIC(/*x=*/0,/*y=*/124,/*w=*/124,/*h=*/124,/*bitmap gImage_Bitmap=*/( uint8_t*)gImage_black2); delay(100); screen.drawPIC(/*x=*/0,/*y=*/124,/*w=*/124,/*h=*/124,/*bitmap gImage_Bitmap=*/( uint8_t*)gImage_black3); delay(100); screen.drawPIC(/*x=*/0,/*y=*/124,/*w=*/124,/*h=*/124,/*bitmap gImage_Bitmap=*/( uint8_t*)gImage_black4); delay(100); screen.drawPIC(/*x=*/0,/*y=*/124,/*w=*/124,/*h=*/124,/*bitmap gImage_Bitmap=*/( uint8_t*)gImage_black5); } 4.5 图片动态展示
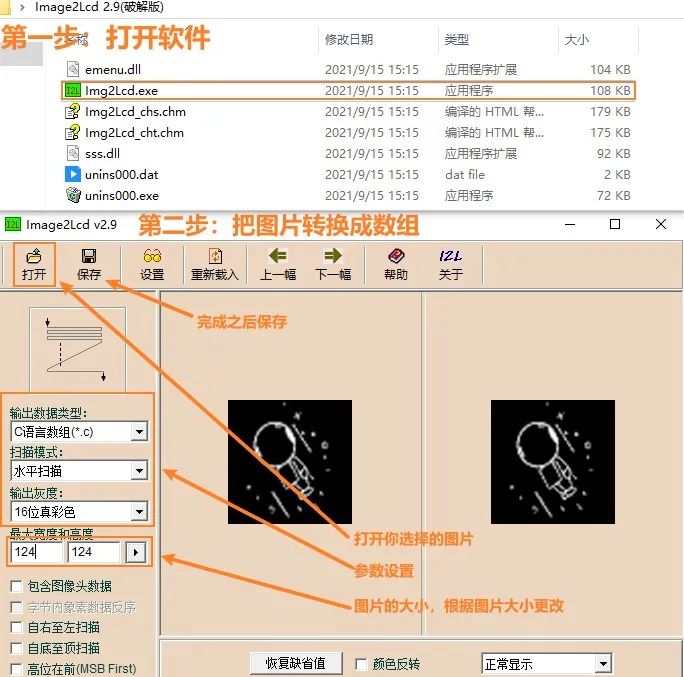
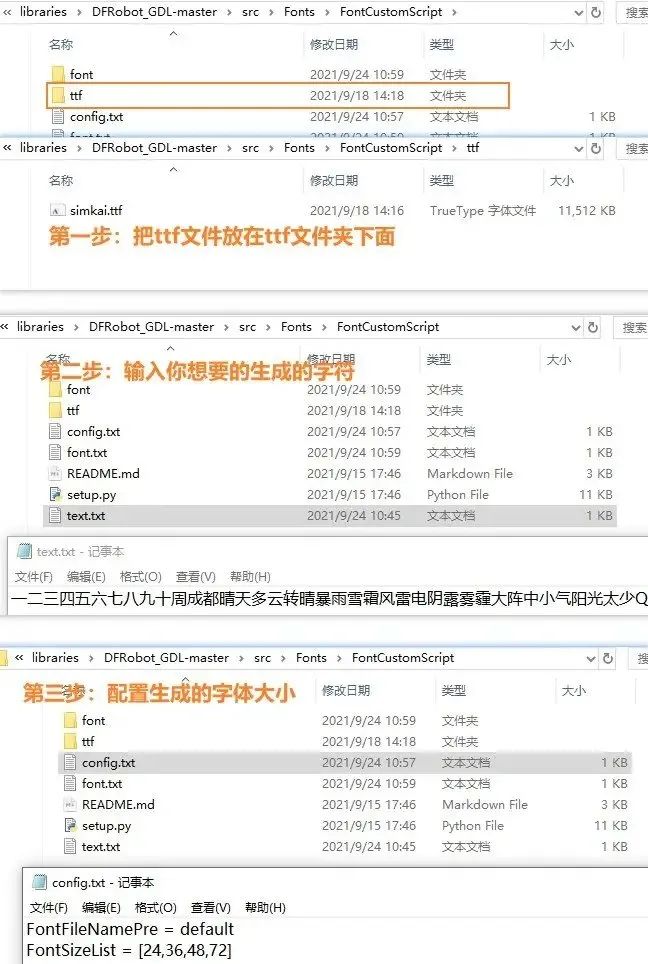
在使用setup.py脚本生成自定义字体之前,需要做如下准备: 登录网址https://www.python.org/downloads/,下载python3.6及以上版本; 安装完毕后,需要用下列命令安装python第三方依赖包: pip3 install numpy pip install freetype-py pip install chardet 5.2 生成自定义字体把ttf文件放在库文件的对应ttf文件夹下,这里我提供了一个ttf文件,供大家使用。链接获取[5]: 将TTF字体文件存放在ttf文件夹里,例如:SIMKAI.TTF(简体字 楷体) 在text.txt文件中输入你想生成的字符,例如:你好,世界! 打开config.txt文件,配置生成字体文件的名字前缀和字体大小
运行setup.py脚本,会在font文件夹生成一系列后缀名为.h的字体文件,并弹出一个font.txt的文本,再进行以下步骤,即可在屏上显示:你好,世界! 将font文件夹里的文件复制到DFRobot_GDL\src\Fonts\Fonts目录下; 将弹出的font.txt的内容粘贴到DFRobot_GDL\src\Fonts\DFRobot_Font.h文件中; 打开Arduino IDE,构造屏对象,如tft,调用tft.setFont(&SIMKAIFont48pt); 调用tft.println("你好,世界!"),此时即可在屏上显示"你好,世界!"
#include #include #include #include #include "BMP.h" HTTPClient http; const char* ssid="dfrobotOffice"; const char* password="dfrobot2011"; const char* ntpServer = "pool.ntp.org"; const long gmtOffset_sec = 28800; const int daylightOffset_sec = 0; DynamicJsonDocument doc(1024); DynamicJsonDocument doc1(1024); #define TFT_DC D2 #define TFT_CS D6 #define TFT_RST D3 #define PICNUMBER 6 String weekDays[]={"周天", "周一", "周二","周三", "周四", "周五", "周六"}; DFRobot_ST7789_240x240_HW_SPI screen(/*dc=*/TFT_DC,/*cs=*/TFT_CS,/*rst=*/TFT_RST); void setup() { Serial.begin(115200); screen.begin(); Serial.printf("Connecting to %s",ssid); WiFi.begin(ssid,password); while(WiFi.status()!=WL_CONNECTED){ delay(500); Serial.print("."); } Serial.println(" CONNECTED"); configTime(gmtOffset_sec, daylightOffset_sec, ntpServer); screen.fillScreen(COLOR_RGB565_BLACK); } void printLocalWeather(){ http.begin("http://www.weather.com.cn/data/cityinfo/101270101.html"); int httpCode = http.GET(); if(httpCode == HTTP_CODE_OK){ String pageData = http .getString(); //Serial.println(pageData); deserializeJson(doc,pageData); JsonObject obj = doc.as(); String weatherInfo = obj["weatherinfo"]; deserializeJson(doc1,weatherInfo); JsonObject obj1 = doc1.as(); String city = obj1["city"]; String temp1 = obj1["temp1"]; String temp2 = obj1["temp2"]; String weather = obj1["weather"]; String cityInfo = city; String tempInfo =temp1 + "~" + temp2; String cityWeatherinfo =weather; Serial.println("获得天气情况如下:"); Serial.print(cityInfo); Serial.print(tempInfo); Serial.println(cityWeatherinfo);
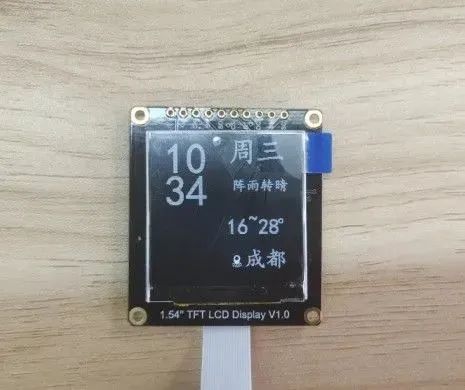
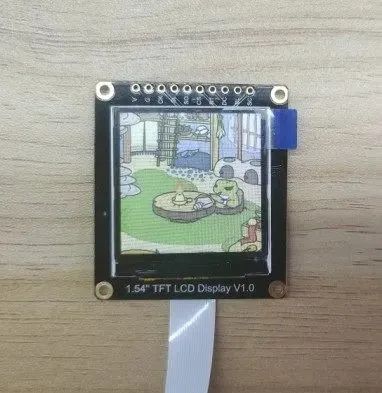
struct tm timeinfo; if(!getLocalTime(&timeinfo)){ Serial.println("Failed to obtian time"); return ; } Serial.println(&timeinfo, "%F %R %u"); // 格式化输出 //显示天气及时间信息 screen.setFont(&simkaiFont72pt );//Set the font to FreeMono12pt7b screen.setCursor(/*x=*/15,/*y=*/0); screen.println(&timeinfo,"%H"); screen.setCursor(/*x=*/15,/*y=*/55); screen.println(&timeinfo,"%M"); screen.setFont(&simkaiFont72pt );//Set the font to FreeMono12pt7b screen.setCursor(/*x=*/0,/*y=*/0); screen.setTextColor(COLOR_RGB565_LGRAY); screen.setTextWrap(true); screen.setFont(&simkaiFont48pt );//Set the font to FreeMono12pt7b screen.setCursor(/*x=*/124,/*y=*/0); screen.println(weekDays[timeinfo.tm_wday]); screen.setFont(&simkaiFont24pt );//设置字体大小 为24像素点大小 screen.setCursor(/*x=*/130,/*y=*/70); //设置显示光标 screen.println(cityWeatherinfo);//屏幕显示天气状况,如多云转晴类字样 screen.drawPIC(/*x=*/125,/*y=*/200,/*w=*/24,/*h=*/24,/*bitmap gImage_Bitmap=*/( uint8_t*)gImage_black6);//屏幕显示位置图标 screen.setFont(&simkaiFont36pt );//设置字体大小 为36像素点大小 screen.setCursor(/*x=*/120,/*y=*/135);//设置显示光标 screen.println(tempInfo);//屏幕显示温度信息 screen.setCursor(/*x=*/204,/*y=*/135); screen.println("°");//显示温度的符号 screen.setCursor(/*x=*/150,/*y=*/190); screen.println(cityInfo);//屏幕显示你所在城市的位置信息 }else{ Serial.println("GET ERR"); } http.end(); } void loop() { if(WiFi.status() == WL_CONNECTED){ printLocalWeather(); }else{ Serial.println("WiFi Disconnect"); } } 5.5 显示效果
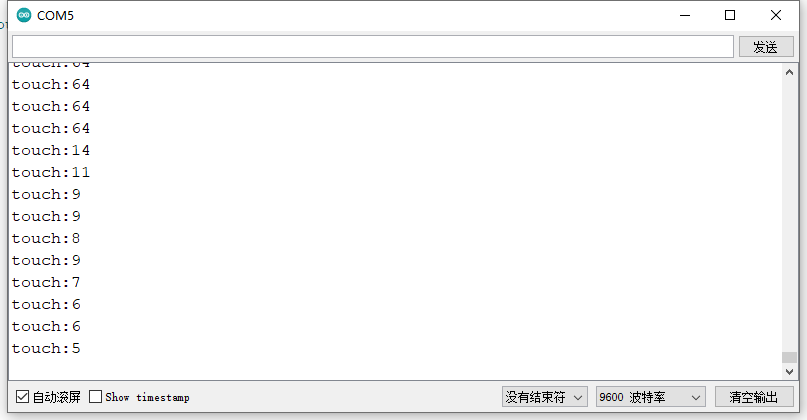
ESP32提供了电容触摸传感器的功能, 共有T0,T2~T9 共 9个touch传感器可用.分别对应引脚4、2、15、13、12、14、27、33、32. 无需设置PinMode,touchRead()返回值为0~255. 触摸强度越大,返回值越小。烧录此例程,将使用4/D12引脚作为触摸按键,并通过串口监视器返回触摸值。 void setup() { Serial.begin(9600); } void loop() { Serial.printf("touch:%d\n",touchRead(4)); } 结果
#include #include "BMP.h" #define TFT_DC D2 #define TFT_CS D6 #define TFT_RST D3 #define PICNUMBER 6 uint8_t randNumber; DFRobot_ST7789_240x240_HW_SPI screen(/*dc=*/TFT_DC,/*cs=*/TFT_CS,/*rst=*/TFT_RST); uint8_t printfrog(uint8_t number){ switch(number){ case 0: screen.drawPIC(/*x=*/0,/*y=*/0,/*w=*/240,/*h=*/240,/*bitmap gImage_Bitmap=*/( uint8_t*)gImage_qingwa1);//显示的随机图片 delay(2000); break; case 1: screen.drawPIC(/*x=*/0,/*y=*/0,/*w=*/240,/*h=*/240,/*bitmap gImage_Bitmap=*/( uint8_t*)gImage_qingwa2); delay(2000); break; case 2: screen.drawPIC(/*x=*/0,/*y=*/0,/*w=*/240,/*h=*/240,/*bitmap gImage_Bitmap=*/( uint8_t*)gImage_qingwa3); delay(2000); break; case 3: screen.drawPIC(/*x=*/0,/*y=*/0,/*w=*/240,/*h=*/240,/*bitmap gImage_Bitmap=*/( uint8_t*)gImage_qingwa4); delay(2000); break; case 4: screen.drawPIC(/*x=*/0,/*y=*/0,/*w=*/240,/*h=*/240,/*bitmap gImage_Bitmap=*/( uint8_t*)gImage_qingwa5); delay(2000); break; case 5: screen.drawPIC(/*x=*/0,/*y=*/0,/*w=*/240,/*h=*/240,/*bitmap gImage_Bitmap=*/( uint8_t*)gImage_qingwa6); delay(2000); break; } } void setup() { Serial.begin(115200); screen.begin(); } void loop() { if(touchRead(4) Serial.println("没有摸到"); } } 6.4 随机触摸显示图片效果展示
从这次的小应用中我学会了很多东西,比如在tft屏幕上显示图片、动态图、中文。如何抓取天气信息,如何把抓取到的信息显示到tft屏幕上。 所以去旅行吧,不理会繁杂的琐事,自由自在地,去体验一个城市,一段故事,留下一片欢笑。 原文链接:https://mc.dfrobot.com.cn/thread-311127-1-1.html 项目作者: 创客达闻西 首发于DF创客社区 开源项目,转载请务必注明项目出处与原作者信息 参考资料[1] 图纸链接: https://mc.dfrobot.com.cn/forum.php?mod=attachment&aid=MTMzNjgyfGE2NzAxYmY2YzNkOTc5MDk0MTJmNjkyOTNmOWIxNzJhfDE2MzM5MzQwNTM%3D&request=yes&_f=.rar [2] DFRobot_GDL库文件: https://codeload.github.com/DFRobot/DFRobot_GDL/zip/master [3] 使用Firebeetle Board-ESP32-E: https://wiki.dfrobot.com.cn/_SKU_DFR0654_FireBeetle_Board_ESP32_E [4] 下载库文件: https://mc.dfrobot.com.cn/thread-1854-1-1.html [5] ttf文件: https://mc.dfrobot.com.cn/forum.php?mod=attachment&aid=MTMzMzIzfGQ5NDRmNTVhNjk5MGVlYzI4NjExNTk5ZDZmMjc3YjFlfDE2MzM5MzQwNTM%3D&request=yes&_f=.rar |


【本文地址】