| uni | 您所在的位置:网站首页 › 手机怎么做海报背景 › uni |
uni
|
效果图 拿到当前设备宽度用来做整个canvas的单位适配。这里根据要求高度是不变的,因为高度适配的话不同设备下最后生成的canvas 图片会被压缩。 2.渐变背景 let _this = this // 生成画布 const ctx = uni.createCanvasContext('myCanvas') // 绘制背景 const bcg = ctx.createLinearGradient(0, 0, 0, _this.heights) bcg.addColorStop(0.4, '#D9EBE6') bcg.addColorStop(1, '#fff') _this.ctxRectangle(ctx, 0, 0, (_this.widths), (_this.heights), 0, bcg) //画一个矩形也就是整个海报的背景 ctxRectangle(ctx, x, y, width, height, r, gnt) { ctx.beginPath() //开始绘制 ctx.save() //保存状态 ctx.moveTo(x + r, y) ctx.lineTo(x + width - r, y) ctx.arc(x + width - r, y + r, r, Math.PI * 1.5, Math.PI * 2) ctx.lineTo(x + width, y + height - r) ctx.arc(x + width - r, y + height - r, r, 0, Math.PI * 0.5) ctx.lineTo(x + r, y + height) ctx.arc(x + r, y + height - r, r, Math.PI * 0.5, Math.PI) ctx.lineTo(x, y + r) ctx.arc(x + r, y + r, r, Math.PI, Math.PI * 1.5) ctx.fillStyle = gnt ctx.fill() //对当前路径中的内容进行填充 ctx.closePath() }, 3.圆形头像 //绘制头像 _this.ctxCircular(ctx, _this.myObj.headImg, (40 / _this.ratio), (100 / _this.ratio), (160 / _this.ratio), (160 / _this.ratio), 80 / _this.ratio, 1) //画一个带圆角矩形 //ctx 创建的canvas img填充的图片路径 x轴距离 y轴距离 width宽度 height高度 r圆角大小 shadow是否增加阴影 ctxCircular(ctx, img, x, y, width, height, r, shadow) { ctx.beginPath() //开始绘制 ctx.save() //保存(canvas)状态 ctx.moveTo(x + r, y) ctx.lineTo(x + width - r, y) ctx.arc(x + width - r, y + r, r, Math.PI * 1.5, Math.PI * 2) ctx.lineTo(x + width, y + height - r) ctx.arc(x + width - r, y + height - r, r, 0, Math.PI * 0.5) ctx.lineTo(x + r, y + height) ctx.arc(x + r, y + height - r, r, Math.PI * 0.5, Math.PI) ctx.lineTo(x, y + r) ctx.arc(x + r, y + r, r, Math.PI, Math.PI * 1.5) if (shadow == 1) { ctx.shadowBlur = 20; // 阴影模糊程度 ctx.shadowColor = '#fff'; // 阴影颜色 } ctx.fill() //对当前路径中的内容进行填充 ctx.clip() //从原始画布中剪切任意形状和尺寸 ctx.closePath() //关闭一个路径 ctx.drawImage(img, x, y, width, height); ctx.restore() //恢复(canvas)状态 },增加了阴影的效果 到这里绘图就结束了最后借助 uni.canvasToTempFilePath()把当前画布指定区域的内容导出生成指定大小的图片,并返回文件路径,也就是我们 data定义的imgs。 8.2 点击保存图片 saveImage() { uni.saveImageToPhotosAlbum({ filePath: this.imgs, success: function() { uni.showToast({ icon: 'none', position: 'bottom', title: "已保存到系统相册", }) }, fail: function(error) { uni.showModal({ title: '提示', content: '若点击不授权,将无法使用保存图片功能', cancelText: '不授权', cancelColor: '#999', confirmText: '授权', confirmColor: '#f94218', success(res) { console.log(res) if (res.confirm) { // 选择弹框内授权 uni.openSetting({ success(res) { console.log(res.authSetting) } }) } else if (res.cancel) { // 选择弹框内 不授权 console.log('用户点击不授权') } } }) } }) }, 8.3 长按保存图片如果要实现这个功能需要用到image带的longtap方法,也就是 长按事件。还需要一个值来隐藏显示image这里用的data里面的 isshow,然后监听imgs是否为空打开弹窗。 //点击下面按钮下载到相册 请长按下载到相册 知道了 回到首页 watch: { imgs(newlue) { if (newlue) { this.isshow = false this.$refs.popup.open() } } }, //关闭弹窗 closer() { this.$refs.popup.close() }, 全部代码需要注意点canvas的绘制时不能直接使用网络路径图片,需要使用 uni.getImageInfo 返回图片本地路径再使用。本页面使用了uni-popup组件,自己的项目记得引入。 请长按下载图片 知道了 回到首页 export default { data() { return { isshow: true, myObj: { headImg: 'https://img.cncentre.cn/bf29eabe47edba2e6ae7249d76759247.png', name: '张三', //微信昵称 introduce: '我叫张三今年18岁', introduction: '计算UI设计稿和你手机的屏幕宽度比例(例如UI设计稿是750宽度 你手机是3', bgImg: 'https://img.cncentre.cn/bf29eabe47edba2e6ae7249d76759247.png', //背景图 rwmImg: 'https://img.cncentre.cn/bf29eabe47edba2e6ae7249d76759247.png', smText: '二维码介绍' //个性签名 }, canvasWidth: 375, //画布宽度 canvasHeight: 800, //画布高度 ratio: 0, //计算UI设计稿和你手机的屏幕宽度比例(例如UI设计稿是750宽度 你手机是350宽度 比例就是2 那么你画布画图时候 所有的尺寸大小、宽高、位置、定位左右上下都需要除以 / 比例2 ) widths: '', heights: '', imgs: '' } }, watch: { imgs(newlue) { if (newlue) { this.isshow = false this.$refs.popup.open() } } }, onLoad() { let that = this uni.getSystemInfo({ success: res => { console.log(res); // res.screenWidth 设备宽度 that.canvasWidth = res.screenWidth + 'px' that.widths = res.screenWidth that.ratio = 750 / res.screenWidth that.canvasHeight = (that.widths / 375) * 800 + 'px' that.heights = (that.widths / 375) * 800 } }) uni.showLoading({ title: '海报生成中...' }); that.downImgUrl() }, methods: { downImgUrl() { let that = this uni.getImageInfo({ src: that.myObj.headImg, success: function(res) { that.myObj.headImg = res.path uni.getImageInfo({ src: that.myObj.bgImg, success: function(res) { that.myObj.bgImg = res.path uni.getImageInfo({ src: that.myObj.rwmImg, success: function(res) { that.myObj.rwmImg = res.path that.drawPageImg() } }); } }); } }); }, closer() { this.$refs.popup.close() }, goindex() { uni.reLaunch({ url: '/pages/index/index' }) }, saveImage() { uni.saveImageToPhotosAlbum({ filePath: this.imgs, success: function() { uni.showToast({ icon: 'none', position: 'bottom', title: "已保存到系统相册", }) }, fail: function(error) { uni.showModal({ title: '提示', content: '若点击不授权,将无法使用保存图片功能', cancelText: '不授权', cancelColor: '#999', confirmText: '授权', confirmColor: '#f94218', success(res) { console.log(res) if (res.confirm) { // 选择弹框内授权 uni.openSetting({ success(res) { console.log(res.authSetting) } }) } else if (res.cancel) { // 选择弹框内 不授权 console.log('用户点击不授权') } } }) } }) }, //画一个带圆角矩形 ctxCircular(ctx, img, x, y, width, height, r, shadow) { ctx.beginPath() //开始绘制 ctx.save() //保存(canvas)状态 ctx.moveTo(x + r, y) ctx.lineTo(x + width - r, y) ctx.arc(x + width - r, y + r, r, Math.PI * 1.5, Math.PI * 2) ctx.lineTo(x + width, y + height - r) ctx.arc(x + width - r, y + height - r, r, 0, Math.PI * 0.5) ctx.lineTo(x + r, y + height) ctx.arc(x + r, y + height - r, r, Math.PI * 0.5, Math.PI) ctx.lineTo(x, y + r) ctx.arc(x + r, y + r, r, Math.PI, Math.PI * 1.5) if (shadow == 1) { ctx.shadowBlur = 20; // 模糊效果程度的 ctx.shadowColor = 'red'; // 阴影颜色 } ctx.fill() //对当前路径中的内容进行填充 ctx.clip() //从原始画布中剪切任意形状和尺寸 ctx.closePath() //关闭一个路径 ctx.drawImage(img, x, y, width, height); ctx.restore() //恢复(canvas)状态 }, //画一个矩形也就是整个海报的背景 ctxRectangle(ctx, x, y, width, height, r, gnt) { ctx.beginPath() ctx.save() //保存状态 ctx.moveTo(x + r, y) ctx.lineTo(x + width - r, y) ctx.arc(x + width - r, y + r, r, Math.PI * 1.5, Math.PI * 2) ctx.lineTo(x + width, y + height - r) ctx.arc(x + width - r, y + height - r, r, 0, Math.PI * 0.5) ctx.lineTo(x + r, y + height) ctx.arc(x + r, y + height - r, r, Math.PI * 0.5, Math.PI) ctx.lineTo(x, y + r) ctx.arc(x + r, y + r, r, Math.PI, Math.PI * 1.5) ctx.fillStyle = gnt ctx.fill() //对当前路径中的内容进行填充 ctx.closePath() //关闭一个路径 }, ctxText(ctx, textFont, textAlign, textFillStyle, textName, x, y) { ctx.beginPath() ctx.save() //保存状态 //字体 ctx.font = textFont, //字体样式 ctx.textAlign = textAlign //字体颜色 ctx.fillStyle = textFillStyle //填充字体 ctx.fillText(textName, x, y) }, ctxTextWrap(ctx, text, x, y, w) { //自动换行介绍 var temp = "" var row = [] let gxqm = '' if (text) { gxqm = text } else { gxqm = '未设置个性签名' } let gexingqianming = gxqm.split("") for (var a = 0; a } else { row.push(temp) temp = "" } temp += gexingqianming[a] } row.push(temp) ctx.font = "13px arail" ctx.textAlign = 'left'; ctx.fillStyle = "#000000" for (var b = 0; b let _this = this // 生成画布 const ctx = uni.createCanvasContext('myCanvas') // 绘制背景 const bcg = ctx.createLinearGradient(0, 0, 0, _this.heights) bcg.addColorStop(0.4, '#D9EBE6') bcg.addColorStop(1, '#fff') _this.ctxRectangle(ctx, 0, 0, (_this.widths), (_this.heights), 0, bcg) //名字 _this.ctxText(ctx, 'normal bold 18px Arial,PingFang SC', 'left', '#00663A', _this.myObj.name, 220 / _this.ratio, 128 / _this.ratio) //名称 _this.ctxText(ctx, '13px Arial,PingFang SC', 'left', '#242424', _this.myObj.introduce, 220 / _this.ratio, 170 / _this.ratio) //介绍 _this.ctxTextWrap(ctx, _this.myObj.introduction, 220 / _this.ratio, 170 / _this.ratio, 460 / _this.ratio) // // 背景图 ctx.drawImage(_this.myObj.bgImg, //图像资源 (48 / _this.ratio),//图像的左上角在目标canvas上 X 轴的位置 (290 / _this.ratio),//图像的左上角在目标canvas上 Y 轴的位置 (654 / _this.ratio),//在目标画布上绘制图像的宽度 (1064 / _this.ratio)//在目标画布上绘制图像的高度 ) _this.ctxText(ctx, '13px Arial,PingFang SC', 'center', '#242424', _this.myObj.smText, 375 / _this.ratio, 1562 / _this.ratio) // // 绘制头像 _this.ctxCircular(ctx, _this.myObj.headImg, (40 / _this.ratio), (100 / _this.ratio), (160 / _this.ratio), ( 160 / _this.ratio), 80 / _this.ratio) //矩形二维码 _this.ctxCircular(ctx, _this.myObj.rwmImg, (305 / _this.ratio), (1382 / _this.ratio), (140 / _this.ratio), (140 / _this.ratio), 6) // 渲染画布 ctx.draw(false, (() => { setTimeout(() => { uni.canvasToTempFilePath({ canvasId: 'myCanvas', destWidth: _this.canvasWidth * 2, //展示图片尺寸=画布尺寸1*像素比2 destHeight: _this.canvasHeight * 2, quality: 1, fileType: 'jpg', success: (res) => { uni.hideLoading() console.log('通过画布绘制出的图片--保存的就是这个图', res.tempFilePath) _this.imgs = res.tempFilePath // _this.$refs.popup.open() }, fail: function(error) { uni.hideLoading() uni.showToast({ icon: 'none', position: 'bottom', title: "绘制图片失败", // res.tempFilePath }) } }, _this) }, 100) })()) }, } } .pop1 { background-color: #fff; width: 520rpx; padding: 68rpx 120rpx; box-sizing: border-box; border-radius: 20rpx; background: linear-gradient(#E6F5EB 45%, #FEFFFE 100%); .tit { font-size: 32rpx; color: #000000; margin: 20px 0px; } .btns { font-size: 32rpx; color: #fff; background-color: #00663A; border-radius: 14rpx; padding: 14rpx 30rpx; margin-top: 40rpx; text-align: center; } } |
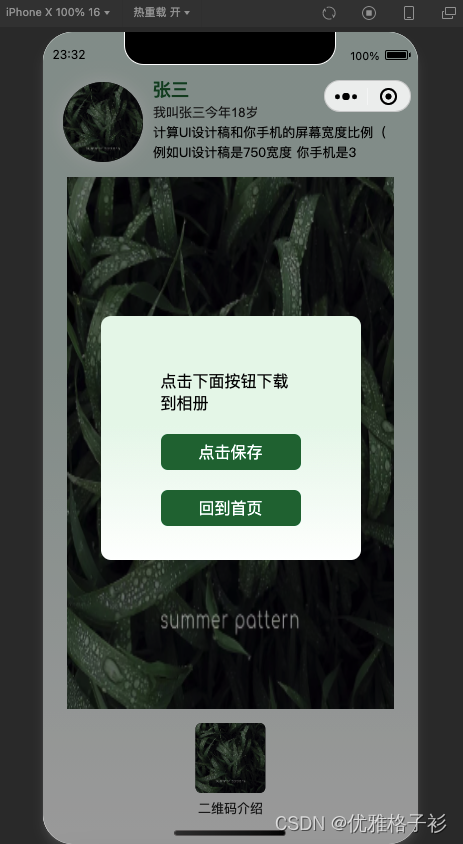 分析案例图都有哪些元素 1.渐变背景 2.圆形头像 3.文字 4.文字超出换行 5.图片居中 6.文字居中 7.单位适配 8.弹窗保存图片。因为一个个绘制图形太麻烦所以这里都采用了方法封装。 canvas api介绍 最后有全部代码,复制即用。 data数据
【本文地址】
公司简介
联系我们