| unity模拟太阳系(粒子系统版太阳) | 您所在的位置:网站首页 › 我要看八大行星的视频教程 › unity模拟太阳系(粒子系统版太阳) |
unity模拟太阳系(粒子系统版太阳)
|
本工程为模拟太阳系 环境为Unity2018.4.14 实现了太阳系八大行星绕太阳的公转和自传 和其他模拟太阳系的u3d模型不同的是,太阳用了粒子系统来实现,我使用了3个粒子系统特效外加一个红色球体来实现太阳。 为了美观和形象我还设置了各个行星的拖尾。
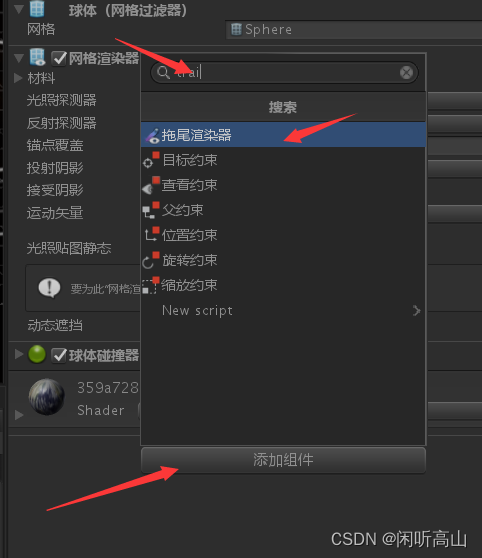
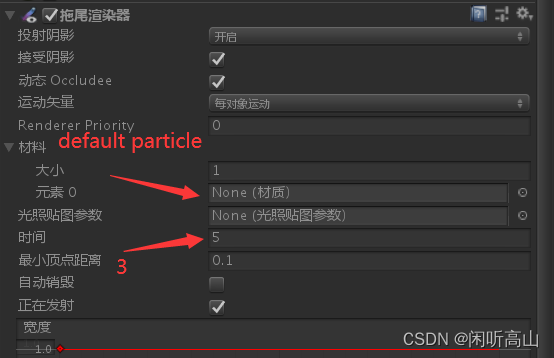
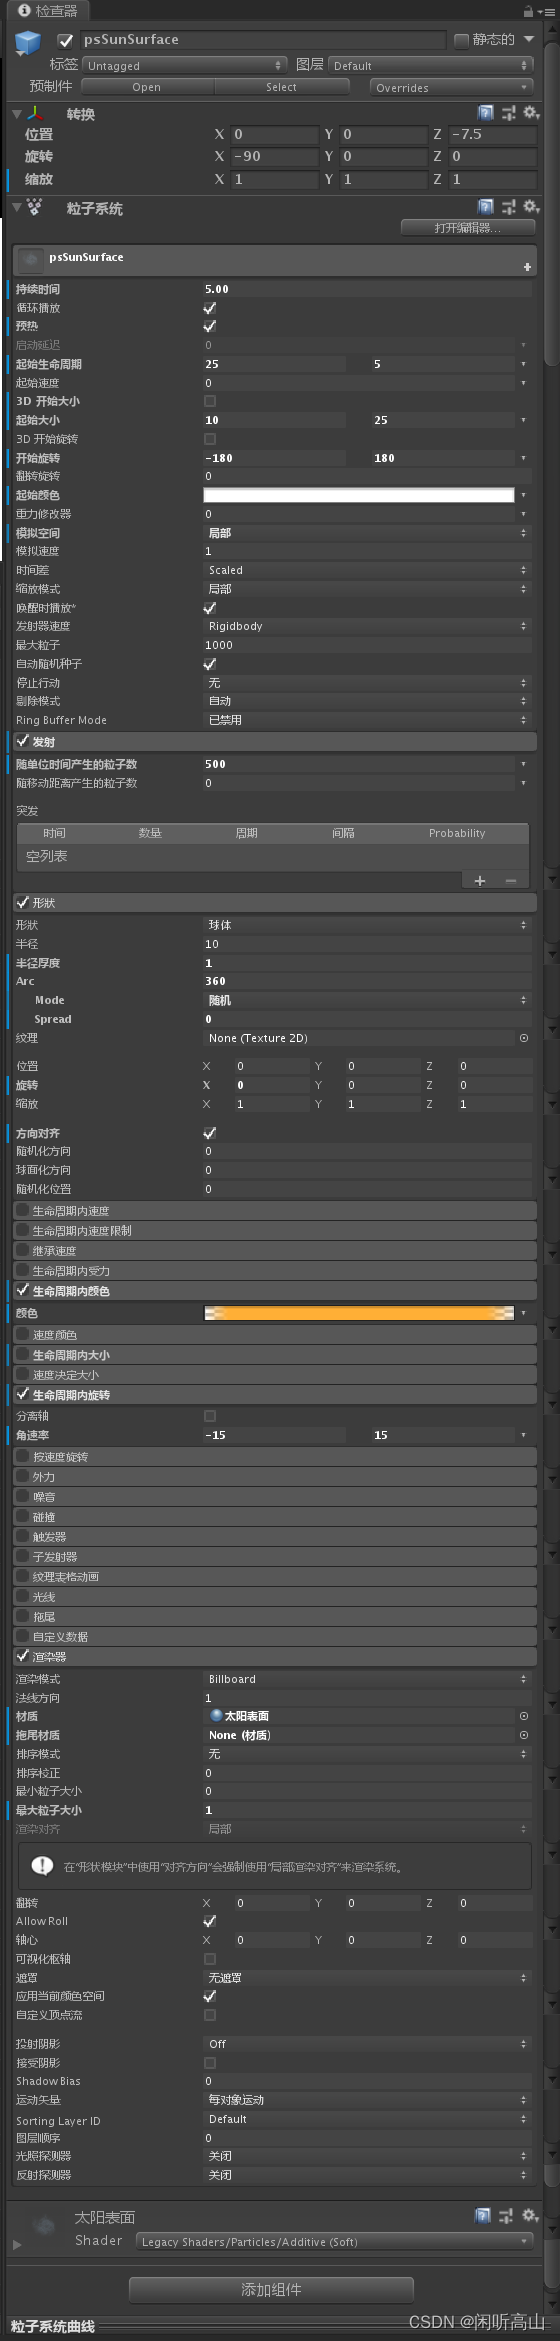
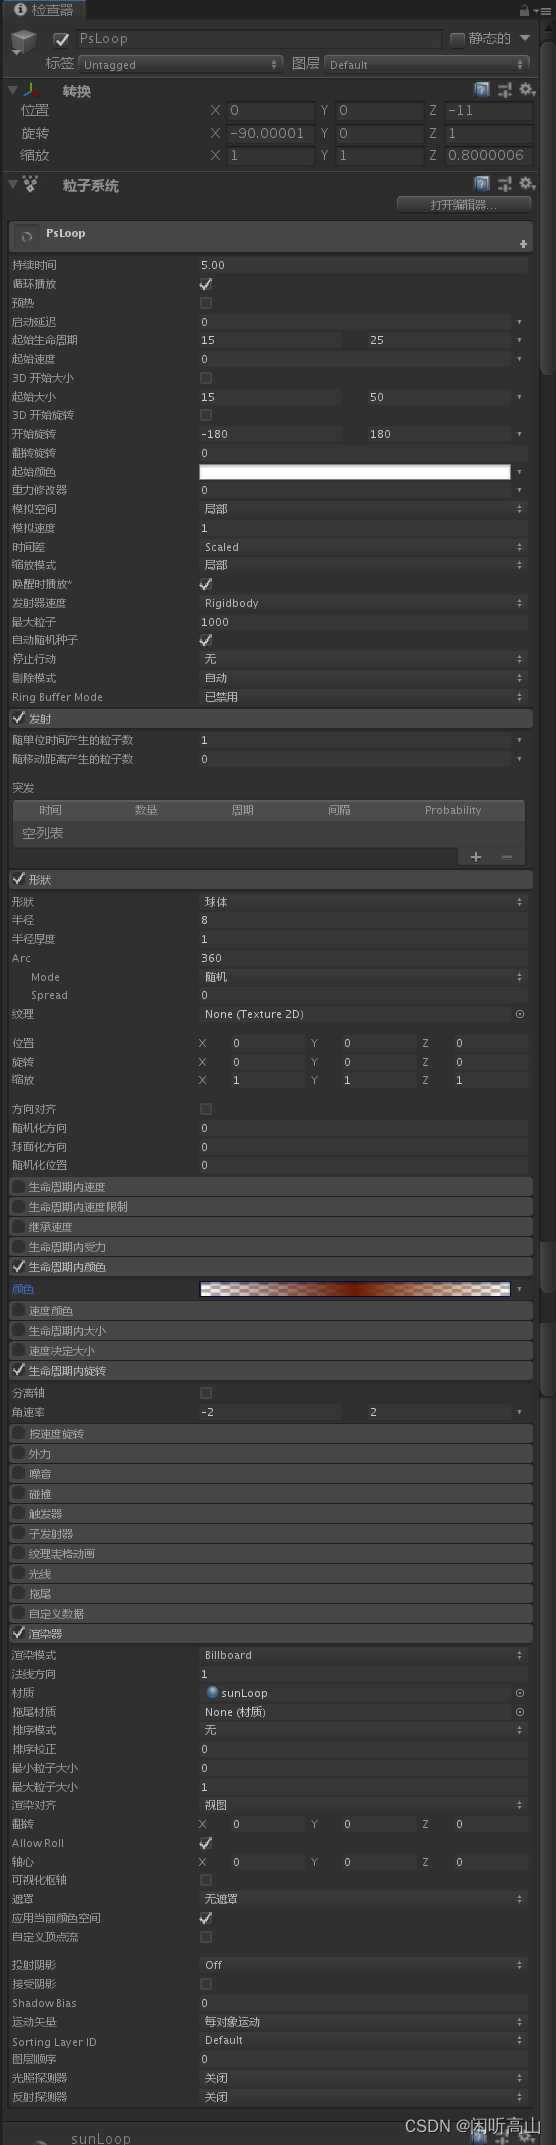
在层级(hierarchy)目录新建球体,排布好位置,将纹理移动到八大行星上,行星的设置就完成了。 新建一个空物体,挂上脚本rotateArround,点击物体,在检查器窗口设置好太阳和八大行星,运行脚本就可以实现行星的公转和自传。(脚本和纹理素材在末尾) 粒子特效主体是psSunSurface,也是太阳的主体,主要思路是形状设为球体,发射速度变为0,再设置粒子起始生命周期和粒子起始大小,再做些补充。(3个粒子特效具体设置见视频或文章末尾) 新建一个材质sunSurface,材质shader设置为 Legacy Shaders/Particles/Additive(soft) sunSurface材质的Particle Texture图片选择smoke 然后粒子特效psSunSurface渲染器的Texture选择sunSurface材质 PsCorona,这个特效是给太阳表面增添一点红光,设置思路同上,具体参数不同。渲染器材质一样,也可新建一个材质做调整。 PsLoop,这个特效是太阳外围的风暴状红光。设置思路同上,具体参数不同。 新建一个材质sunLoop,材质shader设置为 Legacy Shaders/Particles/Additive sunSurface材质的Particle Texture图片选择sun_texture1 然后粒子特效psSunSurface渲染器的Texture选择sunLoop材质 给太阳增添具体的轮廓,需要在psSunSurface粒子系统中心处加一个红色球体 (RGB:(209, 35, 0)) 缩放x:20,y:20,z:20 想把背景调暗可设置灯光 设置灯光之前在层级窗口新建一个点光源,放在太阳位置,范围调大,我设置为300 设置灯光:把Directional Light之旋转的x轴调低到比-20小 rotateArround脚本 using System.Collections; using System.Collections.Generic; using UnityEngine; public class moverotate : MonoBehaviour { public GameObject Sun;//太阳 public GameObject Mercury;//水星 public GameObject Venus;//金星 public GameObject Earth;//地球 public GameObject Mars;//火星 public GameObject Jupiters;//木星 public GameObject Saturn;//土星 public GameObject Uranus;//天王星 public GameObject Neptune;//海王星 public float Sun_RotationSpeed; public float Mercury_RotationSpeed; public float Venus_RotationSpeed; public float Earth_RotationSpeed; public float Mars_RotationSpeed; public float Jupiters_RotationSpeed; public float Saturn_RotationSpeed; public float Uranus_RotationSpeed; public float Neptune_RotationSpeed; //定义自转速度 void Start () { } void Update () { Mercury.transform.RotateAround(Sun.transform.position, Sun.transform.up, 2.35f); Venus.transform.RotateAround(Sun.transform.position, Sun.transform.up, 1.75f); Earth.transform.RotateAround(Sun.transform.position, Sun.transform.up, 1.5f); Mars.transform.RotateAround(Sun.transform.position, Sun.transform.up, 1.2f); Jupiters.transform.RotateAround(Sun.transform.position, Sun.transform.up, 0.65f); Saturn.transform.RotateAround(Sun.transform.position, Sun.transform.up, 0.23f); Uranus.transform.RotateAround(Sun.transform.position, Sun.transform.up, 0.34f); Neptune.transform.RotateAround(Sun.transform.position, Sun.transform.up, 0.27f); //实现绕太阳自转 Sun.transform.Rotate(Vector3.down * Sun_RotationSpeed, Space.World); Mercury.transform.Rotate(Vector3.down * Mercury_RotationSpeed, Space.World); Venus.transform.Rotate(Vector3.down * Venus_RotationSpeed, Space.World); Earth.transform.Rotate(Vector3.down * Earth_RotationSpeed, Space.World); Mars.transform.Rotate(Vector3.down * Mars_RotationSpeed, Space.World); Jupiters.transform.Rotate(Vector3.down * Jupiters_RotationSpeed, Space.World); Saturn.transform.Rotate(Vector3.down * Saturn_RotationSpeed, Space.World); Uranus.transform.Rotate(Vector3.down * Uranus_RotationSpeed, Space.World); Neptune.transform.Rotate(Vector3.down * Neptune_RotationSpeed, Space.World); //实现自转 } }给行星设置拖尾 选择行星,在检查器界面添加组件 搜索trail 材料元素设置为Default-particle 时间设置为3 其余行星复制一遍拖尾渲染器就行 ==================================================================== 资源 粒子系统制作太阳视频教程 https://www.bilibili.com/video/BV1YT4y1E7DS/?spm_id_from=333.999.0.0&vd_source=1f2c95f726ceaa5c86643a5817ac8d44 行星纹理材质来源 教你如何用Three.js创造一个三维太阳系前端开发博客 https://blog.csdn.net/lgno2/article/details/119431693?spm=1001.2014.3001.5506 ==================================================================== 粒子纹理素材 smoke 粒子特效设置 psSunSurface
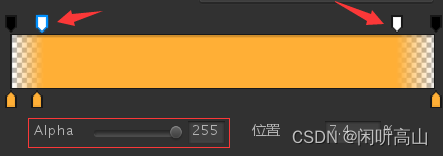
生命周期内颜色,在上面新设置两个标签条,透明的Alpha调整为255,实现生命周期边缘透明效果 PsCorona PsLoop
额外的添头 月球绕地球旋转脚本 //直接挂载到月球上 using System.Collections; using System.Collections.Generic; using UnityEngine; public class MoonRotate : MonoBehaviour { //转动速度 public float speed = 1; //转动的位置 public float progress = 0; //中心点 public Transform center; //半径 public float radius; float dis(Transform center) //计算半径 { float dis = (this.transform.position - center.position).magnitude; return dis; } void star() { radius = dis(center); } void Update() { progress += Time.deltaTime * speed; if (progress>=360) { progress -= 360; } float x1 = center.position.x + radius * Mathf.Cos(progress); float y1 = this.transform.position.y; float z1 = center.position.z + radius * Mathf.Sin(progress); this.transform.position = new Vector3(x1, y1, z1); } } |


 sun_texture 1
 生命周期RGB为(255,175,54)
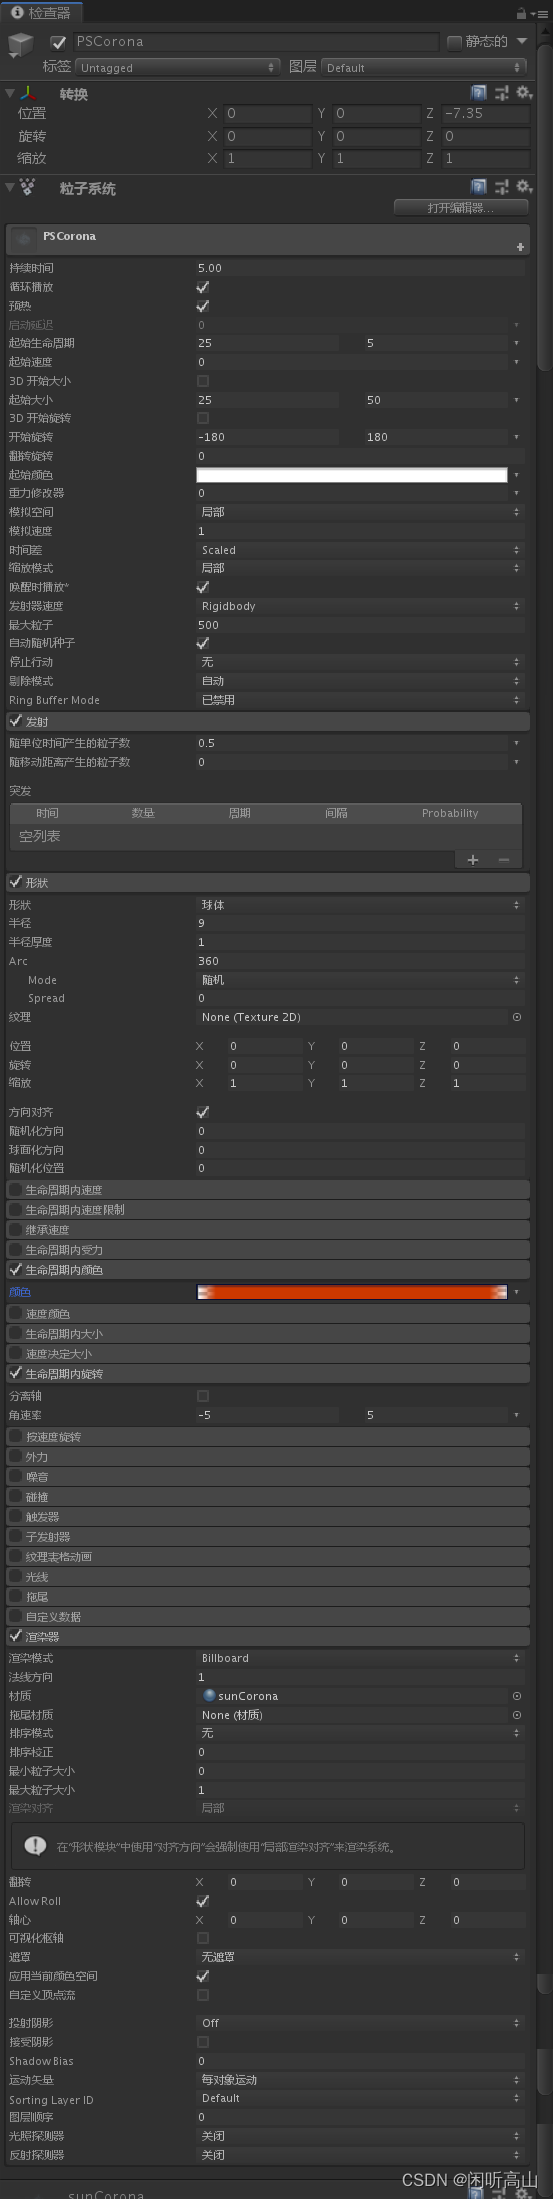 生命周期内颜色
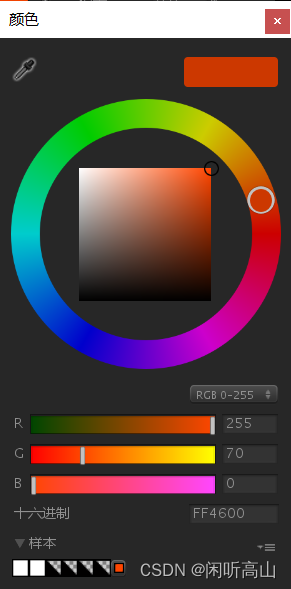
 生命周期内颜色
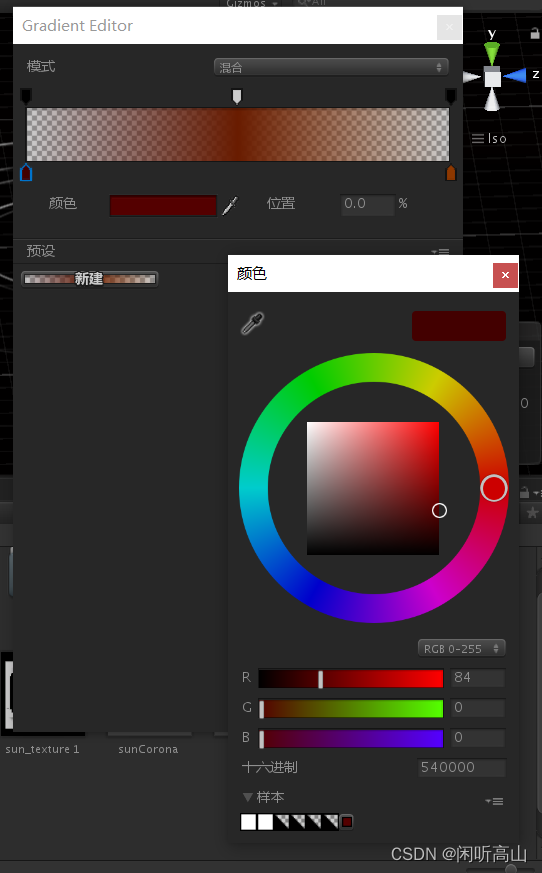
【本文地址】