| OpenCV快速入门:目标检测 | 您所在的位置:网站首页 › 形状轮廓无轮廓在哪 › OpenCV快速入门:目标检测 |
OpenCV快速入门:目标检测
|
文章目录
前言一、轮廓检测1.1 图像轮廓的概念1.2 轮廓检测算法简介1.3 轮廓检测基本步骤1.4 轮廓检测函数说明1.4.1 轮廓发现1.4.2 轮廓面积1.4.3 轮廓周长1.4.4 轮廓外接多边形1.4.5 点到轮廓距离1.4.6 凸包检测
1.5 轮廓检测代码实现
二、轮廓的距2.1 几何距2.2 中心距2.3 Hu距2.4 代码实现
三、点集拟合3.1 最小包围三角形3.2 最小包围圆形
四、二维码检测4.1 qrcode库的使用4.2 二维码检测实战4.2.1 读取图像4.2.2 二值化处理4.2.3 均值滤波处理4.2.4 寻找轮廓4.2.5 确定三个“回”字形的位置4.2.6 确定三个“回”字中心点的顺序内积的原理内积的公式内积在确定三个点顺序中的应用
4.2.7 仿射变换4.2.8 使用qrcode库对二维码进行解码4.2.9 完整代码
总结
前言
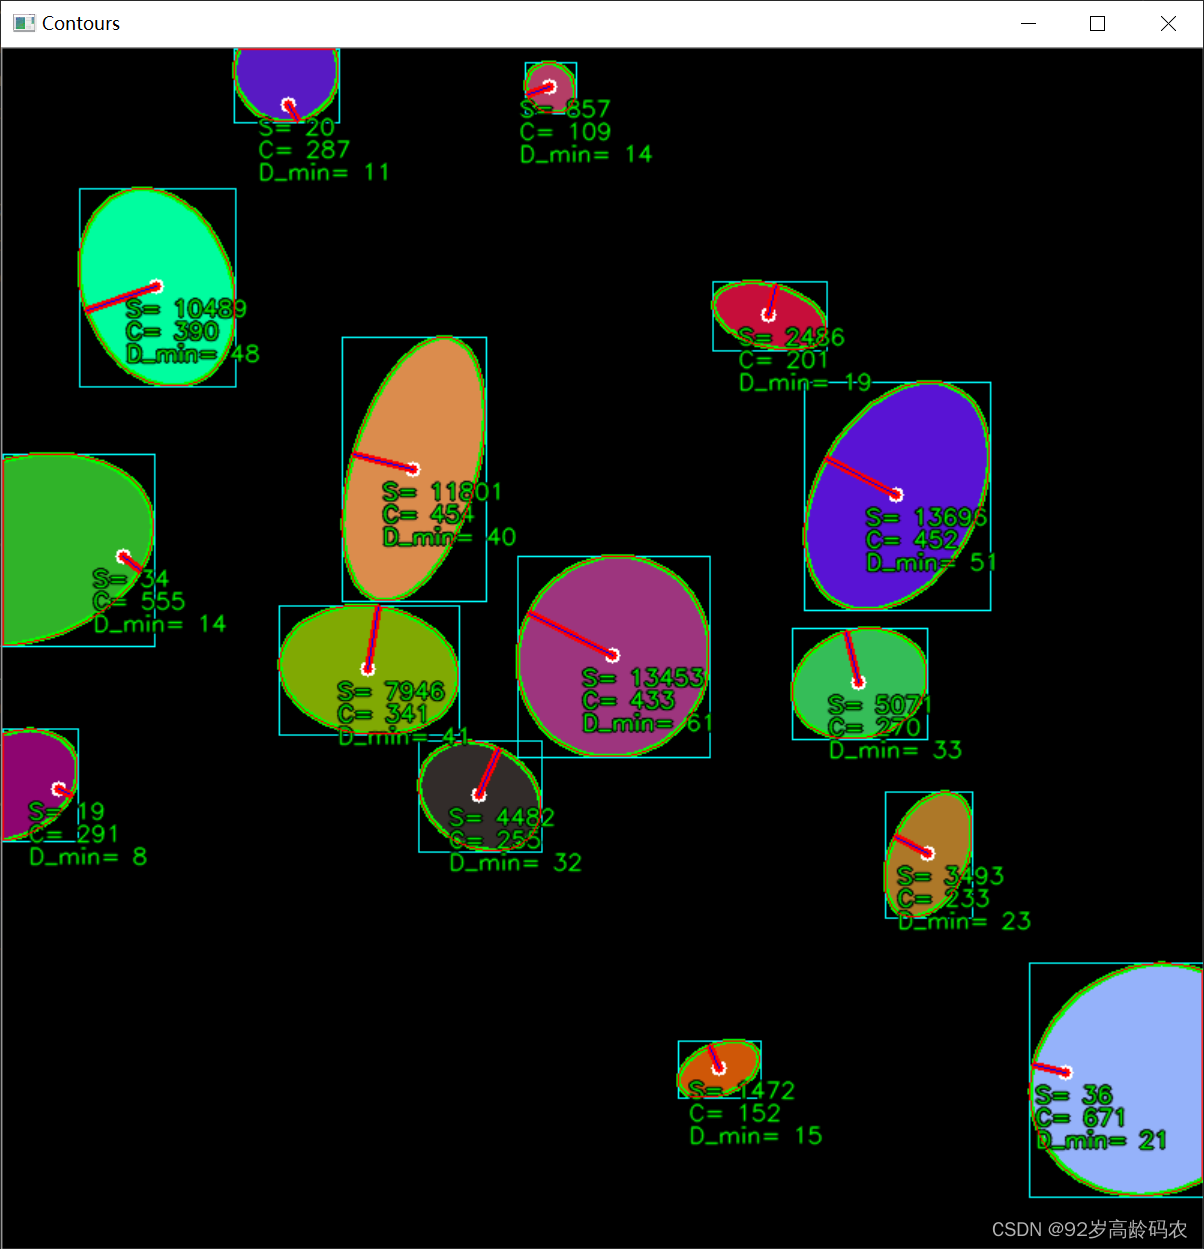
在当今数字化时代,计算机视觉的崛起使得目标检测成为科技领域中的一项关键技术。本文将带您快速入门OpenCV中的目标检测,深入探讨轮廓检测、轮廓的距、点集拟合以及二维码检测等核心概念。 OpenCV,作为一种强大的开源计算机视觉库,为开发者提供了丰富的工具和算法,使得目标检测不再是高门槛的技术难题。在本文中,我们将逐步了解目标检测中的关键步骤,从轮廓检测到轮廓的距,再到点集拟合和二维码检测。 图像轮廓是由一系列连续的边界点组成的曲线,表示了图像中目标的形状和结构。这些边界点连接在一起,形成了目标的外部轮廓。在计算机视觉中,理解和提取图像轮廓是进行目标检测和形状分析的基础。 1.2 轮廓检测算法简介轮廓检测的算法旨在识别图像中的显著变化,即目标与背景之间的边界。常用的算法包括Sobel、Canny等边缘检测算法,它们通过检测图像中的梯度变化来确定轮廓位置。 1.3 轮廓检测基本步骤在OpenCV中,轮廓检测主要使用findContours函数。该函数接受输入图像,并返回轮廓的列表。通过设定合适的阈值,可以在图像中找到目标的轮廓。接着,可以使用drawContours函数将轮廓绘制在原始图像上,使得我们能够直观地观察到目标的形状。 以下是轮廓检测的基本步骤: 读取图像并将其转换为灰度图像。使用合适的边缘检测算法(如Canny)找到图像的边缘。应用阈值,将边缘图像转换为二值图像。使用findContours函数找到图像中的轮廓。绘制轮廓,以便可视化或进一步的分析。通过深入学习轮廓检测,我们为后续的目标检测过程奠定了坚实的基础。这一章节将帮助读者理解轮廓检测的核心原理以及在OpenCV中的具体实现方法。 1.4 轮廓检测函数说明在进行轮廓检测时,我们不仅仅关注轮廓的发现,还要深入了解轮廓的一些重要属性。下面我们将通过Python和OpenCV代码演示如何实现轮廓检测及其相关操作。 1.4.1 轮廓发现在计算机视觉和图像处理中,轮廓是表示图像中对象边界的一种重要方式。OpenCV库提供了 findContours 函数,用于在灰度图像中查找对象的轮廓。 下面是一个简单的代码示例,演示如何使用OpenCV发现轮廓: # 转换为灰度图 gray = cv2.cvtColor(image, cv2.COLOR_BGR2GRAY) # 使用Canny边缘检测 edges = cv2.Canny(gray, 50, 150) # 查找轮廓 _, contours, _ = cv2.findContours(edges, cv2.RETR_EXTERNAL, cv2.CHAIN_APPROX_SIMPLE) # 在原图上绘制轮廓 cv2.drawContours(image, contours, -1, (0, 255, 0), 2)findContours 函数基本信息 def findContours(image, mode, method, contours=None, hierarchy=None, offset=None)参数解释 image: 输入的二值图像,通常为一个8位单通道图像(灰度图像),非零像素被视为1,零像素保持为0。可以使用其他OpenCV函数(例如 compare、inRange、threshold、adaptiveThreshold、Canny 等)将灰度图像或彩色图像转换为二值图像。如果mode参数等于RETR_CCOMP或RETR_FLOODFILL,则输入也可以是一个32位整数标签图像(CV_32SC1)。 mode: 轮廓检索模式,控制轮廓的层次关系。有几种模式可选,常见的有 RETR_EXTERNAL(只检测最外面的轮廓)、RETR_LIST(检测所有的轮廓,不建立层次关系)、RETR_CCOMP(检测所有轮廓,但只保留两个层次的轮廓信息)和 RETR_TREE(检测所有轮廓,保留完整的层次信息)。 method: 轮廓逼近方法,控制轮廓的表示精度。有几种方法可选,常见的有 CHAIN_APPROX_SIMPLE(压缩水平、垂直和对角方向的轮廓,只保留其端点)、CHAIN_APPROX_TC89_L1 和 CHAIN_APPROX_TC89_KCOS。 contours: 输出参数,用于存储检测到的轮廓。每个轮廓以一组点的形式存储,例如 std::vector。 hierarchy: 输出参数,可选,用于存储图像拓扑结构的信息。对于每个轮廓,hierarchy 中的一个元素是一个包含四个整数的数组,分别表示在同一层次上的下一个轮廓、上一个轮廓、第一个子轮廓和父轮廓的索引。如果某个轮廓在相应的方向上没有下一个、上一个、子轮廓或父轮廓,则对应的索引将为负数。 offset: 可选参数,是一个偏移量,用于将每个轮廓点进行偏移。这在从图像ROI提取轮廓后,需要在整个图像上进行分析时很有用。 findContours 函数的主要作用是在给定的二值图像中查找对象的轮廓。它使用Suzuki算法进行轮廓检测,并返回检测到的轮廓,以及可选的图像拓扑结构信息。轮廓是用一组点表示的,这些点描述了对象的边界。这个函数在形状分析、对象检测和识别等领域中非常有用。在检测到轮廓后,你可以进一步进行轮廓的绘制、分析、过滤或者在原图像上进行标记等操作。 1.4.2 轮廓面积轮廓面积在图像处理中具有广泛的应用。通过计算对象的轮廓面积,我们可以进行目标识别、大小过滤和形状分析。例如,在目标检测中,我们可以通过设定一定的面积阈值来排除过小或过大的轮廓,从而过滤掉不感兴趣的区域。 在OpenCV中,我们可以使用cv2.contourArea(contour)函数来计算轮廓的面积,其中contour是轮廓的点集。 下面是一个简单的代码示例,演示如何使用OpenCV计算轮廓的面积: # 转换为灰度图 gray = cv2.cvtColor(image, cv2.COLOR_BGR2GRAY) # 进行阈值处理 _, thresh = cv2.threshold(gray, 127, 255, cv2.THRESH_BINARY) # 寻找轮廓 contours, _ = cv2.findContours(thresh, cv2.RETR_EXTERNAL, cv2.CHAIN_APPROX_SIMPLE) # 计算每个轮廓的面积并输出 for contour in contours: area = cv2.contourArea(contour) print(f"Contour Area: {area} pixels")contourArea函数是OpenCV中用于计算轮廓面积的函数。以下是该函数的参数和功能的简要说明: def contourArea(contour, oriented=None)参数: contour: 输入参数,表示轮廓的点集,通常是一个包含2D点(轮廓顶点)的向量。oriented: 可选参数,表示是否计算有向面积。如果设置为True,函数将返回一个带有方向的面积值,具体取决于轮廓的方向(顺时针或逆时针)。默认值为False,即返回面积的绝对值。功能: 该函数计算轮廓的面积,使用的是Green公式。返回的面积值可能与使用drawContours或fillPoly绘制轮廓时得到的非零像素数不同。这是因为Green公式计算的是理论上的面积,而绘制轮廓时计算的是像素的数量。注意,对于具有自交点的轮廓,该函数可能给出错误的结果。 1.4.3 轮廓周长轮廓周长是形状描述的一个重要特征,特别在目标检测和边缘检测中经常被用到。通过计算周长,我们可以获取有关轮廓的详细信息,例如对象的形状复杂程度。这对于区分不同形状的目标或者进行形状分析非常有帮助。 轮廓周长是指轮廓的闭合曲线的长度。在OpenCV中,我们可以使用cv2.arcLength(curve, closed)函数来计算轮廓的周长,其中curve是轮廓的点集,而closed是一个标志,指示轮廓是否闭合。 下面是一个简单的代码示例,演示如何使用OpenCV计算轮廓的周长: # 计算每个轮廓的周长并输出 for contour in contours: perimeter = cv2.arcLength(contour, True) print(f"Contour Perimeter: {perimeter}")arcLength函数是OpenCV中用于计算轮廓周长的函数。以下是该函数的参数和功能的简要说明: def arcLength(curve, closed)参数: curve: 输入参数,表示轮廓的点集,通常是一个包含2D点(轮廓顶点)的向量。closed: 标志参数,指示轮廓是否闭合。如果轮廓是封闭的,则为True;否则为False。功能: 该函数计算轮廓的周长或者曲线的长度。如果closed参数为True,函数将计算封闭轮廓的周长;如果为False,则计算曲线的长度。 1.4.4 轮廓外接多边形轮廓外接多边形提供了一种简单但有效的方式来描述和表示目标的形状。这种方法对于快速计算目标的边界框以及后续的目标跟踪和分析非常有用。通过绘制外接矩形,我们可以更直观地了解目标的位置和大小。 轮廓外接多边形是指能够完全包围轮廓的最小矩形,通常是一个矩形框。在OpenCV中,我们可以使用cv2.boundingRect(points)函数来计算轮廓的外接矩形,其中points是轮廓的点集。 下面是一个简单的代码示例,演示如何使用OpenCV计算轮廓的外接矩形并在图像上绘制矩形: # 外接矩形 for contour in contours: x, y, w, h = cv2.boundingRect(contour) cv2.rectangle(image, (x, y), (x+w, y+h), (0, 255, 0), 2)boundingRect函数是OpenCV中用于计算轮廓外接多边形的函数。以下是该函数的参数和功能的简要说明: def boundingRect(points)参数: points: 输入参数,表示轮廓的点集,通常是一个包含2D点(轮廓顶点)的向量。功能: 该函数计算并返回指定点集的最小外接矩形,即能够完全包围点集的矩形框。 1.4.5 点到轮廓距离点到轮廓的距离是进行形状分析和目标识别的关键步骤之一。通过计算点到轮廓的距离,我们可以判断一个点是否属于某个目标,以及该点相对于目标的具体位置。这对于许多应用场景,如手势识别、物体定位等都是至关重要的。 点到轮廓的距离是指一个给定点到轮廓的最短距离,这可以帮助我们确定点相对于轮廓的位置关系,是在轮廓内部、外部还是在轮廓上。 下面是一个简单的代码示例,演示如何使用OpenCV的pointPolygonTest函数计算点到轮廓的最短距离: # 计算点到轮廓的最短距离 point = (100, 100) for contour in contours: distance = cv2.pointPolygonTest(contour, point, True) print(f'Distance from point to contour: {distance}')pointPolygonTest函数是OpenCV中用于计算点到轮廓距离的函数。以下是该函数的参数和功能的简要说明: def pointPolygonTest(contour, pt, measureDist)参数: contour: 输入参数,表示轮廓的点集,通常是一个包含2D点(轮廓顶点)的向量,可以存储在std::vector或Mat中。pt: 输入参数,表示测试点的坐标。measureDist: 输入参数,表示是否测量点到轮廓的距离。如果为True,函数返回点到轮廓的有向距离;如果为False,函数仅检查点相对于轮廓的位置关系,返回+1、-1或0。功能: 该函数用于执行点在轮廓内的测试。返回正值表示点在轮廓内部,负值表示点在轮廓外部,零值表示点在轮廓上或与轮廓上的顶点重合。当measureDist为True时,返回值为点到最近轮廓边缘的有向距离。 1.4.6 凸包检测凸包检测在图像处理和计算机视觉中广泛应用,特别是在目标检测和形状分析中。通过计算凸包,我们可以更好地理解目标的整体形状,从而帮助进行目标识别和分析。 凸包检测是寻找一个点集的最小凸多边形的过程。在OpenCV中,我们可以使用cv2.convexHull(points)函数来计算给定点集的凸包。 下面是一个简单的代码示例,演示如何使用OpenCV的convexHull函数进行凸包检测并在图像上绘制凸包: # 凸包检测 for contour in contours: hull = cv2.convexHull(contour) cv2.drawContours(image, [hull], 0, (0, 0, 255), 2)convexHull函数是OpenCV中用于凸包检测的函数。以下是该函数的参数和功能的简要说明: def convexHull(points, hull=None, clockwise=None, returnPoints=None)参数: points: 输入参数,表示点集的2D坐标,通常是一个包含2D点的向量,可以存储在std::vector或Mat中。hull: 输出参数,表示凸包的点集或索引。可以是一个整数向量,表示凸包点在原始点集中的索引;也可以是一个包含凸包点的向量,表示凸包的实际坐标点。clockwise: 可选参数,表示凸包的方向。如果为True,表示凸包的方向是顺时针的;如果为False,表示凸包的方向是逆时针的。returnPoints: 可选参数,操作标志。如果为True,函数返回凸包的实际坐标点;如果为False,函数返回凸包点在原始点集中的索引。功能: 该函数用于找到给定点集的凸包。函数返回凸包的点集或索引,取决于returnPoints参数的设置。可以选择指定凸包的方向是顺时针还是逆时针。 1.5 轮廓检测代码实现首先,我们创建一个空白的图像,然后定义了两个函数,一个用于绘制随机椭圆,另一个用于检查新椭圆是否与已存在的椭圆重叠。 # 创建一个空白的图像 width, height = 800, 800 image = np.zeros((height, width, 3), dtype=np.uint8) # 定义绘制椭圆的函数 def draw_random_ellipse(img): # 生成随机椭圆的参数 # ... # 定义检查椭圆是否重叠的函数 def check_overlap(new_ellipse, existing_ellipses): # ...接下来,通过调用draw_random_ellipse函数生成一组不重叠的椭圆,并将它们绘制在图像上。 # 生成不重叠的椭圆 num_ellipses = 15 ellipses = [] for _ in range(num_ellipses): while True: new_ellipse = ( (random.randint(0, width - 1), random.randint(0, height - 1)), (random.randint(10, 100), random.randint(10, 100)), random.randint(0, 360), (random.randint(0, 255), random.randint(0, 255), random.randint(0, 255)) ) if not check_overlap(new_ellipse, ellipses): ellipses.append(new_ellipse) break # 绘制不重叠的椭圆 for ellipse in ellipses: cv2.ellipse(image, ellipse[0], ellipse[1], ellipse[2], 0, 360, ellipse[3], -1)然后,我们定义了两个参数字典,用于设置绘制文本的共享参数。 # 共享的参数 shared_params = { "fontFace": cv2.FONT_HERSHEY_SIMPLEX, "fontScale": 0.5, "thickness": 2, "color": (0, 0, 0), "lineType": cv2.LINE_AA, } shared_params2 = { "fontFace": cv2.FONT_HERSHEY_SIMPLEX, "fontScale": 0.5, "thickness": 1, "color": (0, 255, 0), "lineType": cv2.LINE_AA, }接下来,将图像转换为灰度图,并使用Canny边缘检测。 # 转换为灰度图 gray = cv2.cvtColor(image, cv2.COLOR_BGR2GRAY) # 使用Canny边缘检测 edges = cv2.Canny(gray, 10, 150)通过调用cv2.findContours函数,找到图像中的轮廓。 # 查找轮廓 _, contours, _ = cv2.findContours(edges, cv2.RETR_EXTERNAL, cv2.CHAIN_APPROX_SIMPLE)然后,对每个轮廓进行一系列操作,包括计算轮廓面积、周长、中心位置,绘制外接矩形和最短距离的线段。 # 在原图上绘制轮廓并输出面积和周长信息 for contour in contours: # 计算轮廓面积和周长 area = int(cv2.contourArea(contour)) perimeter = int(cv2.arcLength(contour, True)) moments = cv2.moments(contour) # ...最后,对每个轮廓进行凸包检测,并在图像上绘制凸包。 # 凸包检测 hull = cv2.convexHull(contour) cv2.drawContours(image, [hull], 0, (0, 0, 255), 1)最终,显示包含轮廓信息的图像。 下面是完整的代码内容: import cv2 import numpy as np import random # 创建一个空白的图像 width, height = 800, 800 image = np.zeros((height, width, 3), dtype=np.uint8) # 定义绘制椭圆的函数 def draw_random_ellipse(img): # 生成随机椭圆的参数 center = (random.randint(0, width - 1), random.randint(0, height - 1)) axes = (random.randint(10, 100), random.randint(10, 100)) angle = random.randint(0, 360) color = (random.randint(0, 255), random.randint(0, 255), random.randint(0, 255)) # 绘制椭圆 cv2.ellipse(img, center, axes, angle, 0, 360, color, -1) # 定义检查椭圆是否重叠的函数 def check_overlap(new_ellipse, existing_ellipses): for existing_ellipse in existing_ellipses: # 获取椭圆的掩码 new_mask = np.zeros_like(image, dtype=np.uint8) existing_mask = np.zeros_like(image, dtype=np.uint8) cv2.ellipse(new_mask, new_ellipse[0], new_ellipse[1], new_ellipse[2], 0, 360, (255, 255, 255), -1) cv2.ellipse(existing_mask, existing_ellipse[0], existing_ellipse[1], existing_ellipse[2], 0, 360, (255, 255, 255), -1) # 检查是否有重叠的部分 overlap = cv2.bitwise_and(new_mask, existing_mask) if np.sum(overlap) > 0: return True return False # 生成不重叠的椭圆 num_ellipses = 15 ellipses = [] for _ in range(num_ellipses): while True: new_ellipse = ( (random.randint(0, width - 1), random.randint(0, height - 1)), (random.randint(10, 100), random.randint(10, 100)), random.randint(0, 360), (random.randint(0, 255), random.randint(0, 255), random.randint(0, 255)) ) if not check_overlap(new_ellipse, ellipses): ellipses.append(new_ellipse) break # 绘制不重叠的椭圆 for ellipse in ellipses: cv2.ellipse(image, ellipse[0], ellipse[1], ellipse[2], 0, 360, ellipse[3], -1) # 共享的参数 shared_params = { "fontFace": cv2.FONT_HERSHEY_SIMPLEX, "fontScale": 0.5, "thickness": 2, "color": (0, 0, 0), "lineType": cv2.LINE_AA, } shared_params2 = { "fontFace": cv2.FONT_HERSHEY_SIMPLEX, "fontScale": 0.5, "thickness": 1, "color": (0, 255, 0), "lineType": cv2.LINE_AA, } # 转换为灰度图 gray = cv2.cvtColor(image, cv2.COLOR_BGR2GRAY) # 使用Canny边缘检测 edges = cv2.Canny(gray, 10, 150) # 查找轮廓 _, contours, _ = cv2.findContours(edges, cv2.RETR_EXTERNAL, cv2.CHAIN_APPROX_SIMPLE) # 在原图上绘制轮廓 cv2.drawContours(image, contours, -1, (0, 255, 0), 2) # 在原图上绘制轮廓并输出面积和周长信息 for contour in contours: # 计算轮廓面积 area = int(cv2.contourArea(contour)) # 计算轮廓周长 perimeter = int(cv2.arcLength(contour, True)) moments = cv2.moments(contour) # 检查 moments['m00'](轮廓的面积) 是否为零 if moments['m00'] != 0: # 计算轮廓的中心位置 cx = int(moments['m10'] / moments['m00']) cy = int(moments['m01'] / moments['m00']) # 在中心位置绘制一个点 cv2.circle(image, (cx, cy), 5, (255, 255, 255), -1) cv2.circle(image, (cx, cy), 3, (0, 0, 255), -1) # 外接矩形 x, y, w, h = cv2.boundingRect(contour) cv2.rectangle(image, (x, y), (x + w, y + h), (255, 255, 0), 1) # 提取每个点的坐标,将contour转换为二维数组 contour_2d = contour[:, 0, :] # 计算每个点到目标点的距离的平方和 distances = np.sum((contour_2d - np.array([cx, cy])) ** 2, axis=1) # 找到最小值的索引 closest_point_index = np.argmin(distances) closest_point = contour[closest_point_index][0] # 在图中画出这个最短距离的线段 cv2.line(image, (cx, cy), (int(closest_point[0]), int(closest_point[1])), (0, 0, 255), 3) cv2.line(image, (cx, cy), (int(closest_point[0]), int(closest_point[1])), (255, 0, 0), 1) # 输出计算结果 cv2.putText(image, f"S= {area}", (max(int(cx - 20), 0), cy + 20), **shared_params) cv2.putText(image, f"C= {perimeter}", (max(int(cx - 20), 0), cy + 35), **shared_params) cv2.putText(image, f"S= {area}", (max(int(cx - 20), 0), cy + 20), **shared_params2) cv2.putText(image, f"C= {perimeter}", (max(int(cx - 20), 0), cy + 35), **shared_params2) # 计算每个中心点到轮廓的最短距离 dist = abs(int(cv2.pointPolygonTest(contour, (cx, cy), True))) cv2.putText(image, f"D_min= {dist}", (max(int(cx - 20), 0), cy + 50), **shared_params) cv2.putText(image, f"D_min= {dist}", (max(int(cx - 20), 0), cy + 50), **shared_params2) # 凸包检测 hull = cv2.convexHull(contour) cv2.drawContours(image, [hull], 0, (0, 0, 255), 1) # 显示结果 cv2.imshow('Contours', image) cv2.waitKey(0) cv2.destroyAllWindows()
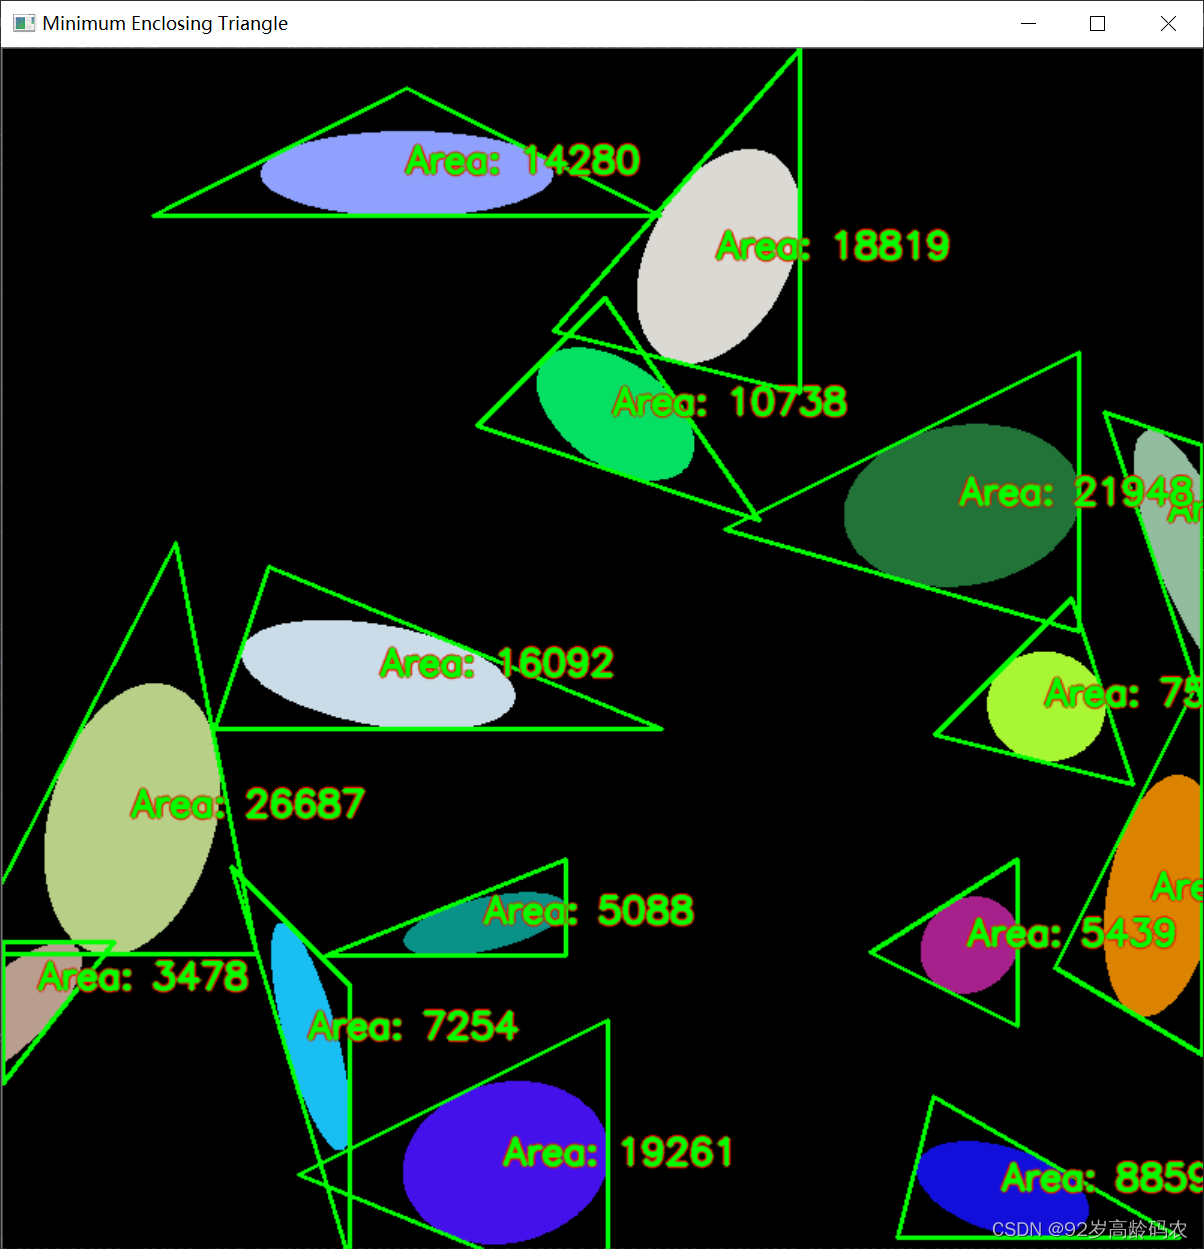
在目标检测中,轮廓不仅仅是一个形状的抽象表示,还包含了有关形状的重要信息,其中之一就是轮廓的距。距是用于描述轮廓形状和结构的一种度量,它可以分为几何距、中心距和Hu距。 2.1 几何距几何距是通过计算轮廓到某个点的距离的方式来度量轮廓的形状。常见的几何距包括轮廓的面积、周长等,它们提供了关于轮廓整体尺寸的信息。 以下是几何距的一些常见计算公式: 轮廓面积(Area): 轮廓包围的区域的面积。Area = ∫ ∫ D 1 d x d y \text{Area} = \int\int_D 1 \,dx\,dy Area=∫∫D1dxdy 其中 D D D 是轮廓包围的区域。 轮廓周长(Perimeter): 轮廓的周长,即轮廓上所有点到一个参考点的距离之和。Perimeter = ∮ C d s \text{Perimeter} = \oint_C ds Perimeter=∮Cds 其中 C C C 是轮廓的曲线, d s ds ds 是轮廓上一点到下一点的弧长元素。 这些几何距的计算提供了有关轮廓形状和结构的基本信息,是轮廓分析中的重要工具。在使用OpenCV进行轮廓分析时,可以利用cv2.contourArea()和cv2.arcLength()函数分别计算轮廓的面积和周长。 2.2 中心距中心距是通过计算轮廓中心到轮廓上所有点的距离来度量轮廓形状的一种距离。中心距包括一阶中心距、二阶中心距等,它们对于形状的平移和旋转具有不变性。以下是中心距的一些常见计算公式: 一阶中心距(m_10 和 m_01): 描述形状的平移。m 10 = ∫ ∫ D x d x d y m_{10} = \int\int_D x \,dx\,dy m10=∫∫Dxdxdy m 01 = ∫ ∫ D y d x d y m_{01} = \int\int_D y \,dx\,dy m01=∫∫Dydxdy 其中 D D D 是轮廓包围的区域, x x x 和 y y y 是图像坐标。 二阶中心距(m_20、m_02 和 m_11): 描述形状的旋转。m 20 = ∫ ∫ D ( x − x ˉ ) 2 d x d y m_{20} = \int\int_D (x - \bar{x})^2 \,dx\,dy m20=∫∫D(x−xˉ)2dxdy m 02 = ∫ ∫ D ( y − y ˉ ) 2 d x d y m_{02} = \int\int_D (y - \bar{y})^2 \,dx\,dy m02=∫∫D(y−yˉ)2dxdy m 11 = ∫ ∫ D ( x − x ˉ ) ( y − y ˉ ) d x d y m_{11} = \int\int_D (x - \bar{x})(y - \bar{y}) \,dx\,dy m11=∫∫D(x−xˉ)(y−yˉ)dxdy 其中 x ˉ \bar{x} xˉ 和 y ˉ \bar{y} yˉ 是轮廓的质心坐标。 在OpenCV中,可以使用cv2.moments()函数计算轮廓的矩,进而得到一阶中心距和二阶中心距。给定一个轮廓,该函数返回一个字典,其中包含轮廓的一些矩的信息,如质心、面积等。 这个函数的语法如下: moments = cv2.moments(contour)其中,contour是输入的轮廓,而moments是包含轮廓矩信息的字典。 返回的字典包含以下键值对: 'm00': 轮廓的面积。'm10', 'm01': 分别是x和y方向上的一阶矩。'm20', 'm02', 'm11': 分别是x和y方向上的二阶矩和xy方向上的一阶矩。'm30', 'm03', 'm21', 'm12': 分别是x和y方向上的三阶矩,xy方向上的二阶矩和一阶矩。'mu20', 'mu02', 'mu11': 中心矩,是二阶矩关于质心的矩。'mu30', 'mu03', 'mu21', 'mu12': 中心矩,是三阶矩关于质心的矩。'nu20', 'nu02', 'nu11': 归一化中心矩,是中心矩除以面积的二阶矩。'nu30', 'nu03', 'nu21', 'nu12': 归一化中心矩,是中心矩除以面积的三阶矩。 2.3 Hu距Hu距是一种通过中心距来构建的轮廓描述符,具有平移、旋转和缩放不变性。Hu距是一组七个独立的距离,通过对中心距的组合计算而得。以下是Hu距的计算公式: Hu距 1-7: Hu1 = η 20 + η 02 Hu2 = ( η 20 − η 02 ) 2 + 4 η 11 2 Hu3 = ( η 30 − 3 η 12 ) 2 + ( 3 η 21 − η 03 ) 2 Hu4 = ( η 30 + η 12 ) 2 + ( η 21 + η 03 ) 2 Hu5 = ( η 30 − 3 η 12 ) ( η 30 + η 12 ) [ ( η 30 + η 12 ) 2 − 3 ( η 21 + η 03 ) 2 ] Hu6 = ( η 20 − η 02 ) [ ( η 30 + η 12 ) 2 − ( η 21 + η 03 ) 2 ] + 4 η 11 ( η 30 + η 12 ) ( η 21 + η 03 ) Hu7 = ( 3 η 21 − η 03 ) ( η 30 + η 12 ) [ ( η 30 + η 12 ) 2 − 3 ( η 21 + η 03 ) 2 ] − ( η 30 − 3 η 12 ) ( η 21 + η 03 ) [ 3 ( η 30 + η 12 ) 2 − ( η 21 + η 03 ) 2 ] \begin{split} & \text{Hu1} = \eta_{20} + \eta_{02} \\ & \text{Hu2} = (\eta_{20} - \eta_{02})^2 + 4\eta_{11}^2 \\ & \text{Hu3} = (\eta_{30} - 3\eta_{12})^2 + (3\eta_{21} - \eta_{03})^2 \\ & \text{Hu4} = (\eta_{30} + \eta_{12})^2 + (\eta_{21} + \eta_{03})^2 \\ & \text{Hu5} = (\eta_{30} - 3\eta_{12})(\eta_{30} + \eta_{12})[(\eta_{30} + \eta_{12})^2 - 3(\eta_{21} + \eta_{03})^2] \\ & \text{Hu6} = (\eta_{20} - \eta_{02})[(\eta_{30} + \eta_{12})^2 - (\eta_{21} + \eta_{03})^2] + 4\eta_{11}(\eta_{30} + \eta_{12})(\eta_{21} + \eta_{03}) \\ & \text{Hu7} = (3\eta_{21} - \eta_{03})(\eta_{30} + \eta_{12})[(\eta_{30} + \eta_{12})^2 - 3(\eta_{21} + \eta_{03})^2] - (\eta_{30} - 3\eta_{12})(\eta_{21} + \eta_{03})[3(\eta_{30} + \eta_{12})^2 - (\eta_{21} + \eta_{03})^2] \\ \end{split} Hu1=η20+η02Hu2=(η20−η02)2+4η112Hu3=(η30−3η12)2+(3η21−η03)2Hu4=(η30+η12)2+(η21+η03)2Hu5=(η30−3η12)(η30+η12)[(η30+η12)2−3(η21+η03)2]Hu6=(η20−η02)[(η30+η12)2−(η21+η03)2]+4η11(η30+η12)(η21+η03)Hu7=(3η21−η03)(η30+η12)[(η30+η12)2−3(η21+η03)2]−(η30−3η12)(η21+η03)[3(η30+η12)2−(η21+η03)2] 其中 η p q \eta_{pq} ηpq 是归一化中心距,计算公式如下: η p q = μ p q μ 00 1 + p + q 2 \eta_{pq} = \frac{\mu_{pq}}{\mu_{00}^{1+\frac{p+q}{2}}} ηpq=μ001+2p+qμpq 其中 μ p q \mu_{pq} μpq 是轮廓的中心距。 这七个Hu距对于图像的平移、旋转和缩放具有不变性,是图像识别和匹配中常用的特征描述符。在OpenCV中,可以使用cv2.HuMoments()函数计算Hu距。 2.4 代码实现下面是使用OpenCV实现轮廓的距的代码示例: import cv2 import numpy as np import random # 创建一个空白的图像 width, height = 800, 800 image = np.zeros((height, width, 3), dtype=np.uint8) # 定义绘制椭圆的函数 def draw_random_ellipse(img): # 生成随机椭圆的参数 center = (random.randint(0, width - 1), random.randint(0, height - 1)) axes = (random.randint(10, 100), random.randint(10, 100)) angle = random.randint(0, 360) color = (random.randint(0, 255), random.randint(0, 255), random.randint(0, 255)) # 绘制椭圆 cv2.ellipse(img, center, axes, angle, 0, 360, color, -1) # 定义检查椭圆是否重叠的函数 def check_overlap(new_ellipse, existing_ellipses): for existing_ellipse in existing_ellipses: # 获取椭圆的掩码 new_mask = np.zeros_like(image, dtype=np.uint8) existing_mask = np.zeros_like(image, dtype=np.uint8) cv2.ellipse(new_mask, new_ellipse[0], new_ellipse[1], new_ellipse[2], 0, 360, (255, 255, 255), -1) cv2.ellipse(existing_mask, existing_ellipse[0], existing_ellipse[1], existing_ellipse[2], 0, 360, (255, 255, 255), -1) # 检查是否有重叠的部分 overlap = cv2.bitwise_and(new_mask, existing_mask) if np.sum(overlap) > 0: return True return False # 生成不重叠的椭圆 num_ellipses = 5 ellipses = [] for _ in range(num_ellipses): while True: new_ellipse = ( (random.randint(0, width - 1), random.randint(0, height - 1)), (random.randint(10, 100), random.randint(10, 100)), random.randint(0, 360), (random.randint(0, 255), random.randint(0, 255), random.randint(0, 255)) ) if not check_overlap(new_ellipse, ellipses): ellipses.append(new_ellipse) break # 绘制不重叠的椭圆 for ellipse in ellipses: cv2.ellipse(image, ellipse[0], ellipse[1], ellipse[2], 0, 360, ellipse[3], -1) # 转换为灰度图 gray = cv2.cvtColor(image, cv2.COLOR_BGR2GRAY) # 使用Canny边缘检测 edges = cv2.Canny(gray, 50, 150) # 查找轮廓 _, contours, _ = cv2.findContours(edges, cv2.RETR_EXTERNAL, cv2.CHAIN_APPROX_SIMPLE) # 假设contours是你的轮廓列表 for contour in contours: # 计算轮廓的面积和周长 area = cv2.contourArea(contour) perimeter = cv2.arcLength(contour, True) print(f'轮廓面积: {area}, 周长: {perimeter}') # 计算轮廓的中心位置 moments = cv2.moments(contour) cx = int(moments['m10'] / moments['m00']) cy = int(moments['m01'] / moments['m00']) print(f'中心位置: ({cx}, {cy})') # 计算二阶中心距 mu = cv2.moments(contour) nu20 = mu['nu20'] nu02 = mu['nu02'] nu11 = mu['nu11'] print(f'二阶中心距: nu20={nu20}, nu02={nu02}, nu11={nu11}') # 计算Hu距 hu_moments = cv2.HuMoments(mu) print(f'Hu距: \n {hu_moments}')这段代码演示了如何计算轮廓的面积、周长以及中心位置,并且计算了二阶中心距和Hu距。通过这些距离的计算,我们可以更全面地了解轮廓的形状特征,为目标检测提供更多信息。 三、点集拟合在目标检测中,点集拟合是一项重要的任务,它通过数学模型来逼近一组离散的点,从而更好地理解和描述目标的形状。在OpenCV中,我们通常使用最小包围三角形、最小包围圆形等方法进行点集拟合。 3.1 最小包围三角形最小包围三角形是将一组点拟合为一个最小的包围三角形,该三角形能够包含所有的离散点。 import cv2 import numpy as np import random # 创建一个空白的图像 width, height = 800, 800 image = np.zeros((height, width, 3), dtype=np.uint8) # 定义绘制椭圆的函数 def draw_random_ellipse(img): # 生成随机椭圆的参数 center = (random.randint(0, width - 1), random.randint(0, height - 1)) axes = (random.randint(10, 100), random.randint(10, 100)) angle = random.randint(0, 360) color = (random.randint(0, 255), random.randint(0, 255), random.randint(0, 255)) # 绘制椭圆 cv2.ellipse(img, center, axes, angle, 0, 360, color, -1) # 定义检查椭圆是否重叠的函数 def check_overlap(new_ellipse, existing_ellipses): for existing_ellipse in existing_ellipses: # 获取椭圆的掩码 new_mask = np.zeros_like(image, dtype=np.uint8) existing_mask = np.zeros_like(image, dtype=np.uint8) cv2.ellipse(new_mask, new_ellipse[0], new_ellipse[1], new_ellipse[2], 0, 360, (255, 255, 255), -1) cv2.ellipse(existing_mask, existing_ellipse[0], existing_ellipse[1], existing_ellipse[2], 0, 360, (255, 255, 255), -1) # 检查是否有重叠的部分 overlap = cv2.bitwise_and(new_mask, existing_mask) if np.sum(overlap) > 0: return True return False # 生成不重叠的椭圆 num_ellipses = 15 ellipses = [] for _ in range(num_ellipses): while True: new_ellipse = ( (random.randint(0, width - 1), random.randint(0, height - 1)), (random.randint(10, 100), random.randint(10, 100)), random.randint(0, 360), (random.randint(0, 255), random.randint(0, 255), random.randint(0, 255)) ) if not check_overlap(new_ellipse, ellipses): ellipses.append(new_ellipse) break # 绘制不重叠的椭圆 for ellipse in ellipses: cv2.ellipse(image, ellipse[0], ellipse[1], ellipse[2], 0, 360, ellipse[3], -1) # 转换为灰度图 gray = cv2.cvtColor(image, cv2.COLOR_BGR2GRAY) # 使用Canny边缘检测 edges = cv2.Canny(gray, 10, 150) # 查找轮廓 _, contours, _ = cv2.findContours(edges, cv2.RETR_EXTERNAL, cv2.CHAIN_APPROX_SIMPLE) # 在原图上绘制轮廓并输出面积和周长信息 for contour in contours: # 寻找最小包围三角形 retval, triangle = cv2.minEnclosingTriangle(contour) # 绘制最小包围三角形 cv2.polylines(image, [np.int32(triangle)], isClosed=True, color=(0, 255, 0), thickness=2) # 计算最小包围三角形的中心坐标 center = np.mean(triangle, axis=0, dtype=np.int32) # 将 retval 的值显示在三角形的中心 font = cv2.FONT_HERSHEY_SIMPLEX cv2.putText(image, f"Area: {int(retval)}", tuple(center[0]), font, 0.8, (0, 0, 255), 3, cv2.LINE_AA) cv2.putText(image, f"Area: {int(retval)}", tuple(center[0]), font, 0.8, (0, 255, 0), 2, cv2.LINE_AA) # 显示结果 cv2.imshow('Contours', image) cv2.waitKey(0) cv2.destroyAllWindows()
最小包围圆形是将一组点拟合为一个最小的包围圆形,该圆形能够包含所有的离散点。 import cv2 import numpy as np import random # 创建一个空白的图像 width, height = 800, 800 image = np.zeros((height, width, 3), dtype=np.uint8) # 定义绘制椭圆的函数 def draw_random_ellipse(img): # 生成随机椭圆的参数 center = (random.randint(0, width - 1), random.randint(0, height - 1)) axes = (random.randint(10, 100), random.randint(10, 100)) angle = random.randint(0, 360) color = (random.randint(0, 255), random.randint(0, 255), random.randint(0, 255)) # 绘制椭圆 cv2.ellipse(img, center, axes, angle, 0, 360, color, -1) # 定义检查椭圆是否重叠的函数 def check_overlap(new_ellipse, existing_ellipses): for existing_ellipse in existing_ellipses: # 获取椭圆的掩码 new_mask = np.zeros_like(image, dtype=np.uint8) existing_mask = np.zeros_like(image, dtype=np.uint8) cv2.ellipse(new_mask, new_ellipse[0], new_ellipse[1], new_ellipse[2], 0, 360, (255, 255, 255), -1) cv2.ellipse(existing_mask, existing_ellipse[0], existing_ellipse[1], existing_ellipse[2], 0, 360, (255, 255, 255), -1) # 检查是否有重叠的部分 overlap = cv2.bitwise_and(new_mask, existing_mask) if np.sum(overlap) > 0: return True return False # 生成不重叠的椭圆 num_ellipses = 15 ellipses = [] for _ in range(num_ellipses): while True: new_ellipse = ( (random.randint(0, width - 1), random.randint(0, height - 1)), (random.randint(10, 100), random.randint(10, 100)), random.randint(0, 360), (random.randint(0, 255), random.randint(0, 255), random.randint(0, 255)) ) if not check_overlap(new_ellipse, ellipses): ellipses.append(new_ellipse) break # 绘制不重叠的椭圆 for ellipse in ellipses: cv2.ellipse(image, ellipse[0], ellipse[1], ellipse[2], 0, 360, ellipse[3], -1) # 转换为灰度图 gray = cv2.cvtColor(image, cv2.COLOR_BGR2GRAY) # 使用Canny边缘检测 edges = cv2.Canny(gray, 10, 150) # 查找轮廓 _, contours, _ = cv2.findContours(edges, cv2.RETR_EXTERNAL, cv2.CHAIN_APPROX_SIMPLE) # 在原图上绘制轮廓并输出面积和周长信息 for contour in contours: # 寻找最小包围三角形 (x, y), radius = cv2.minEnclosingCircle(contour) # 绘制一个圆 cv2.circle(image, (int(x), int(y)), int(radius), (255, 255, 255), 2) # 显示结果 cv2.imshow('Minimum Enclosing Circle', image) cv2.waitKey(0) cv2.destroyAllWindows()
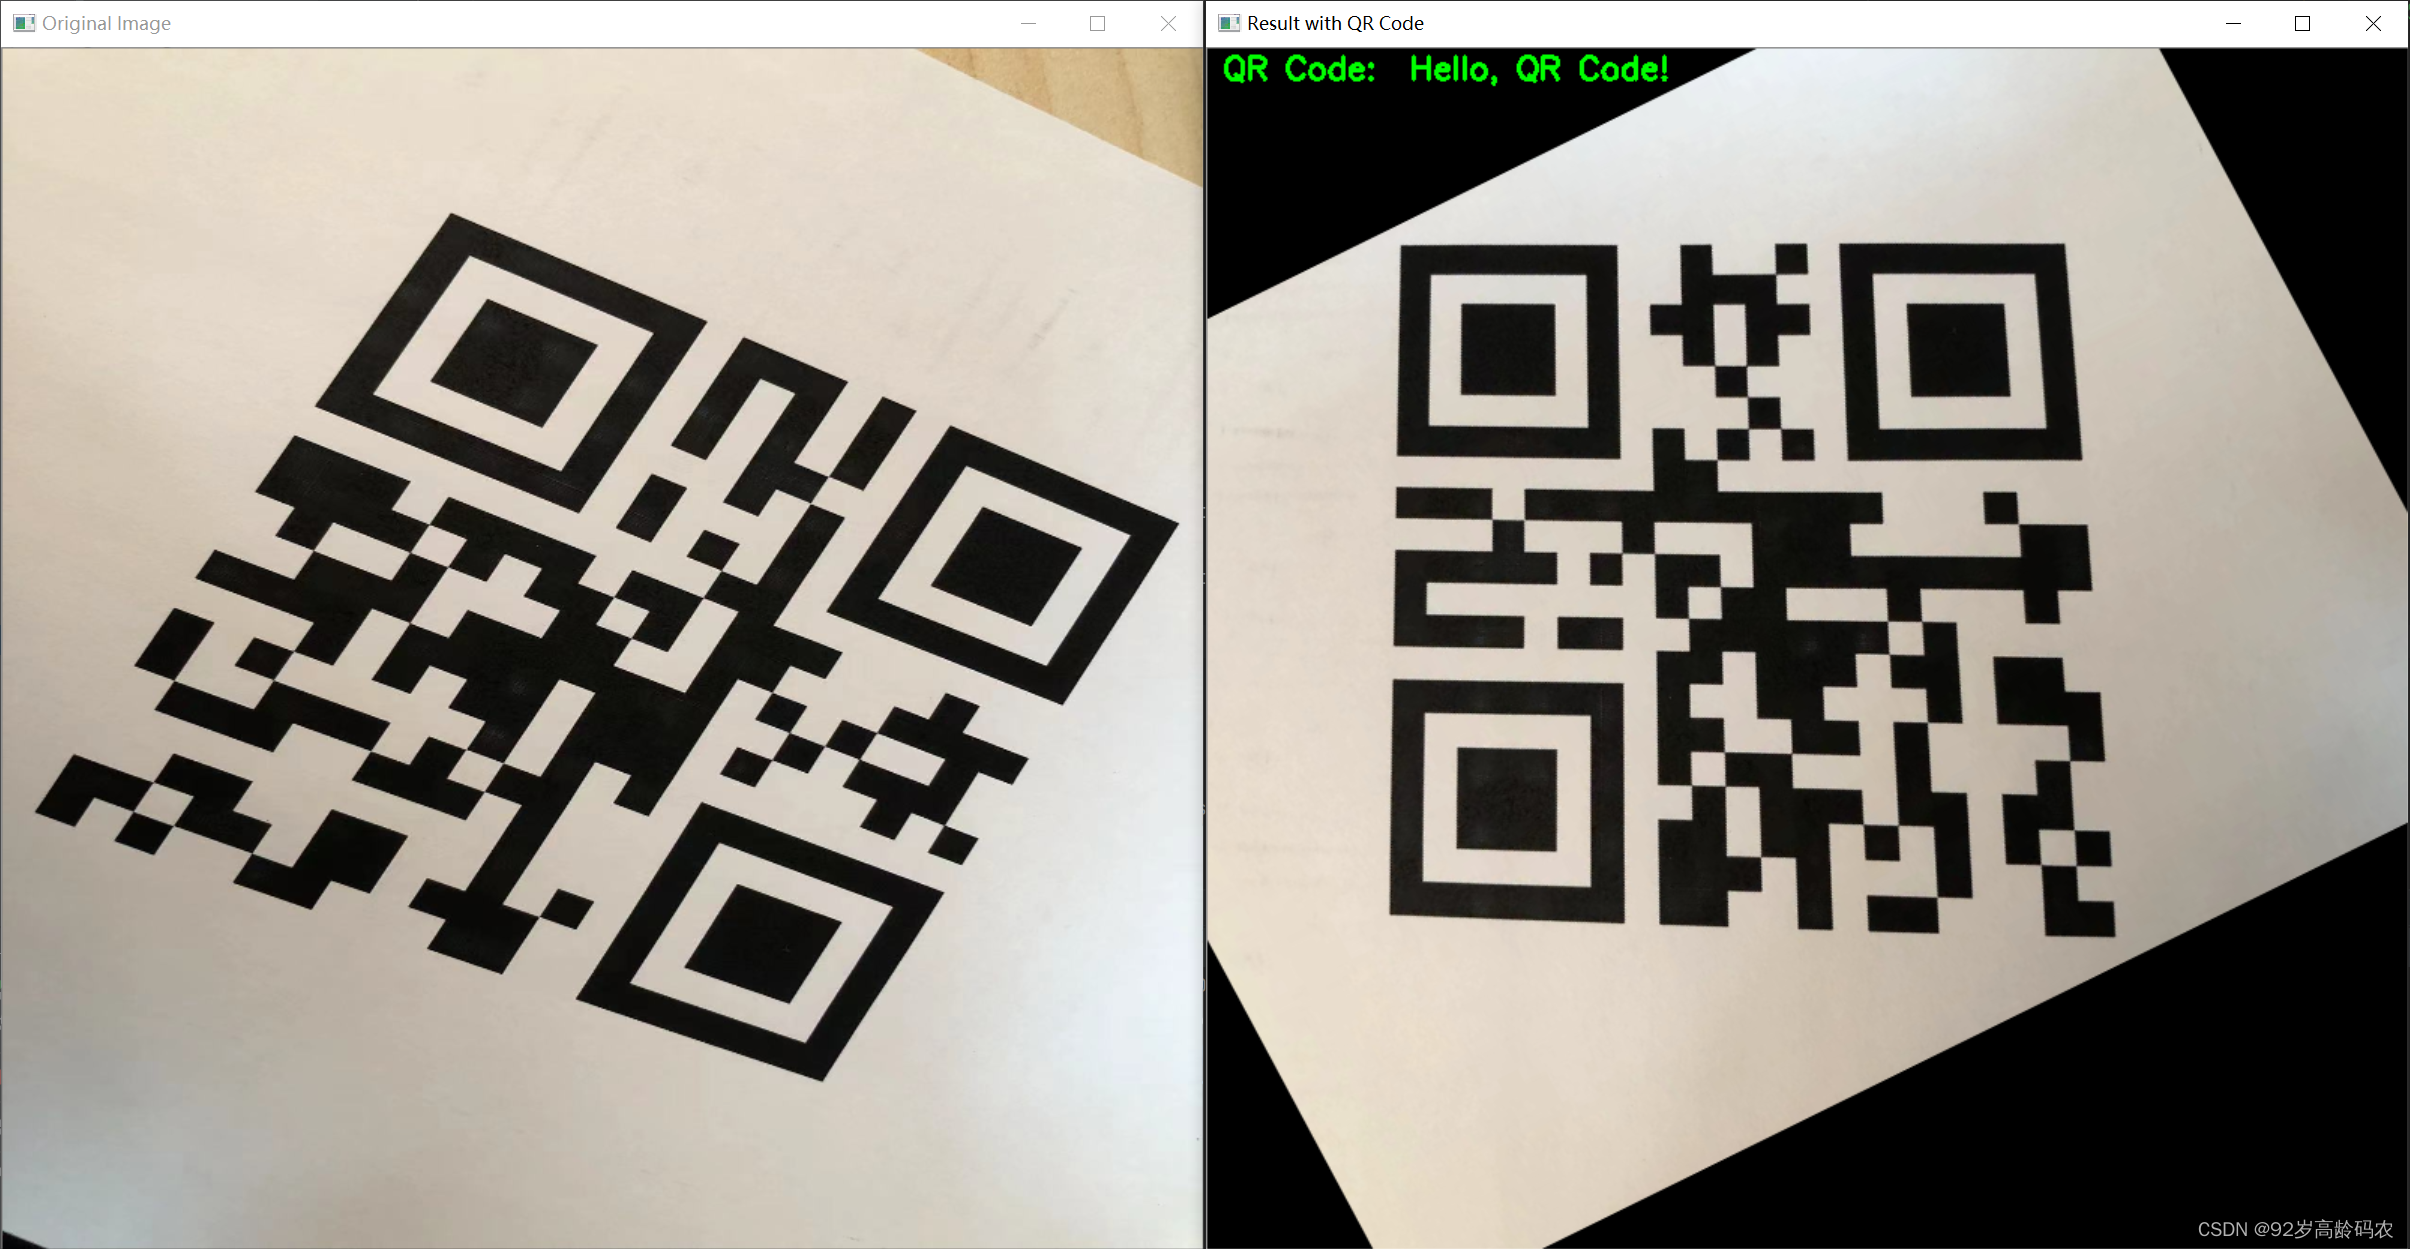
我们使用qrcode库生成并解码二维码 首先,检查两个库 pip install --upgrade opencv-python==3.4.4.19 pip install qrcode[pil]qrcode库的使用方式,这里不做深入探讨,但是需要注意的是:生成的二维码是PIL(Python Imaging Library)图像对象。在后续的代码中,我们需要将PIL图像转换为OpenCV图像。 其次,使用cv2.QRCodeDetector()进行解码,这是OpenCV的二维码解码器。在解码过程中,获取了二维码的信息、顶点坐标和直线形式的二维码。确保理解这些输出的含义,以便根据需要进行处理。 codeinfo, points, straight_qrcode = qr_detector.detectAndDecode(img_read) import cv2 import qrcode import numpy as np # 获取OpenCV版本信息 cv_version = cv2.__version__ # 将版本字符串转换为数字列表 version_numbers = [int(num) for num in cv_version.split('.')] # 检查版本是否小于3.4.4 if version_numbers x_b and y_a > y_b and x_a + w_a y_c and x_b + w_b side_c: max_side_pt = pt1 angle_point = pt1 other_points = [pt2, pt3] elif side_b > side_a and side_b > side_c: max_side_pt = pt2 angle_point = pt2 other_points = [pt1, pt3] else: max_side_pt = pt3 angle_point = pt3 other_points = [pt1, pt2]接着,我们找到三角形中最长的边对应的点,并确定三角形的顶点和其他两个点。 # 计算三个点的向量 vector1 = np.array(other_points[0]) - np.array(angle_point) vector2 = np.array(other_points[1]) - np.array(angle_point)然后,我们计算三个点的向量。 # 计算内积 inner_product = np.dot(vector1, vector2)接下来,我们计算这两个向量的内积。 # 根据内积的正负来确定点的顺序 if inner_product > 0: src_points = np.float32([angle_point, other_points[0], other_points[1]]) else: src_points = np.float32([angle_point, other_points[1], other_points[0]])然后,根据内积的正负确定三个点的顺序。 内积的原理内积,也称为点积或数量积,是线性代数中的一种运算,用于衡量两个向量之间的相似度。在上述代码中,通过计算两个向量的内积,我们可以确定三个点的顺序。下面我们来深入了解内积的原理和公式,以及为什么内积能够帮助确定三个点的顺序。 内积的原理基于余弦定理。余弦定理表达了两个向量之间的夹角与它们的内积之间的关系。具体而言,对于两个向量 a \mathbf{a} a 和 b \mathbf{b} b,它们之间的夹角 θ \theta θ 可以通过以下公式计算: cos ( θ ) = a ⋅ b ∥ a ∥ ⋅ ∥ b ∥ \cos(\theta) = \frac{\mathbf{a} \cdot \mathbf{b}}{\|\mathbf{a}\| \cdot \|\mathbf{b}\|} cos(θ)=∥a∥⋅∥b∥a⋅b 其中, ⋅ \cdot ⋅ 表示内积, ∥ a ∥ \|\mathbf{a}\| ∥a∥ 和 ∥ b ∥ \|\mathbf{b}\| ∥b∥ 分别表示向量 a \mathbf{a} a 和 b \mathbf{b} b 的模。 内积的公式内积的计算公式为: a ⋅ b = a 1 ⋅ b 1 + a 2 ⋅ b 2 + … + a n ⋅ b n \mathbf{a} \cdot \mathbf{b} = a_1 \cdot b_1 + a_2 \cdot b_2 + \ldots + a_n \cdot b_n a⋅b=a1⋅b1+a2⋅b2+…+an⋅bn 其中, a = [ a 1 , a 2 , … , a n ] \mathbf{a} = [a_1, a_2, \ldots, a_n] a=[a1,a2,…,an] 和 b = [ b 1 , b 2 , … , b n ] \mathbf{b} = [b_1, b_2, \ldots, b_n] b=[b1,b2,…,bn] 是两个 n 维向量。 内积在确定三个点顺序中的应用在上述代码中,我们通过计算两个向量的内积,实际上是在比较它们的方向是否一致。考虑三个点 P 1 , P 2 , P 3 P_1, P_2, P_3 P1,P2,P3,我们可以将它们看作两个向量: P 1 P 2 → = v 1 \overrightarrow{P_1P_2} = \mathbf{v_1} P1P2 =v1 和 P 1 P 3 → = v 2 \overrightarrow{P_1P_3} = \mathbf{v_2} P1P3 =v2。 如果 v 1 ⋅ v 2 > 0 \mathbf{v_1} \cdot \mathbf{v_2} > 0 v1⋅v2>0,则说明两个向量的方向大致一致,这时我们选择 P 3 P_3 P3 作为顶点;如果 v 1 ⋅ v 2 < 0 \mathbf{v_1} \cdot \mathbf{v_2} < 0 v1⋅v2 x_b and y_a > y_b and x_a + w_a y_c and x_b + w_b side_c: angle_point = pt1 other_points = [pt2, pt3] elif side_b > side_a and side_b > side_c: angle_point = pt2 other_points = [pt1, pt3] else: angle_point = pt3 other_points = [pt1, pt2] return angle_point, other_points def determine_points_order(angle_point, other_points): # 计算三个点的向量 vector1 = np.array(other_points[0]) - np.array(angle_point) vector2 = np.array(other_points[1]) - np.array(angle_point) # 计算内积 inner_product = np.dot(vector1, vector2) # 根据内积的正负来确定点的顺序 if inner_product > 0: src_points = np.float32([angle_point, other_points[0], other_points[1]]) else: src_points = np.float32([angle_point, other_points[1], other_points[0]]) return src_points def perform_affine_transform(img, src_points, dst_points): # 计算仿射变换矩阵 affine_matrix = cv2.getAffineTransform(src_points, dst_points) # 进行仿射变换 rst = cv2.warpAffine(img, affine_matrix, (800, 800)) return rst def detect_and_decode_qr_code(result): # 使用cv2.QRCodeDetector()进行解码 qr_detector = cv2.QRCodeDetector() result_gray = cv2.cvtColor(result, cv2.COLOR_BGR2GRAY) _, result_bin = cv2.threshold(result_gray, 127, 255, cv2.THRESH_BINARY) # 解码 codeinfo, _, _ = qr_detector.detectAndDecode(result_bin) print("QR Code: %s" % codeinfo) # 添加文字 cv2.putText(result, "QR Code: " + str(codeinfo), (10, 20), cv2.FONT_HERSHEY_SIMPLEX, 0.7, (0, 255, 0), 2) return result if __name__ == "__main__": # 图像预处理 img_resize, img_bin, image_blur = preprocess_image('QRPhoto.jpg') # 寻找轮廓并绘制中心点 selected_center = find_contours_and_center(img_resize.copy(),img_bin) # 计算三角形的顶点 angle_point, other_points = calculate_triangle_points(selected_center) # 确定顶点的顺序 src_points = determine_points_order(angle_point, other_points) # 定义仿射变换的目标点 dst_points = np.float32([[200, 200], [500, 200], [200, 500]]) # 进行仿射变换 result = perform_affine_transform(img_resize, src_points, dst_points) # 检测并解码QR码 result_with_qr = detect_and_decode_qr_code(result) # 显示结果 cv2.imshow('Original Image', img_resize) cv2.imshow('Result with QR Code', result_with_qr) cv2.waitKey(0) cv2.destroyAllWindows() 运行结果1: 上面代码还无法应对更加严峻的畸变挑战,有待后续的研究和优化。 总结首先,我们简单介绍了图像轮廓的概念,以及常用的轮廓检测算法。 接着,我们了解了轮廓检测函数,包括轮廓发现、轮廓面积、轮廓周长等功能的使用说明。代码实现部分提供了实际的操作指南,使其能够在实际项目中灵活运用所学知识。 然后,我们学习了轮廓的距,包括几何距、中心距和Hu距等,文章提供了更深层次的图像特征描述方法。 最后,通过点集拟合和二维码检测两个具体案例,我们展示了如何在实际应用中灵活运用轮廓检测技术,更好地理解其实际应用场景。 |
【本文地址】


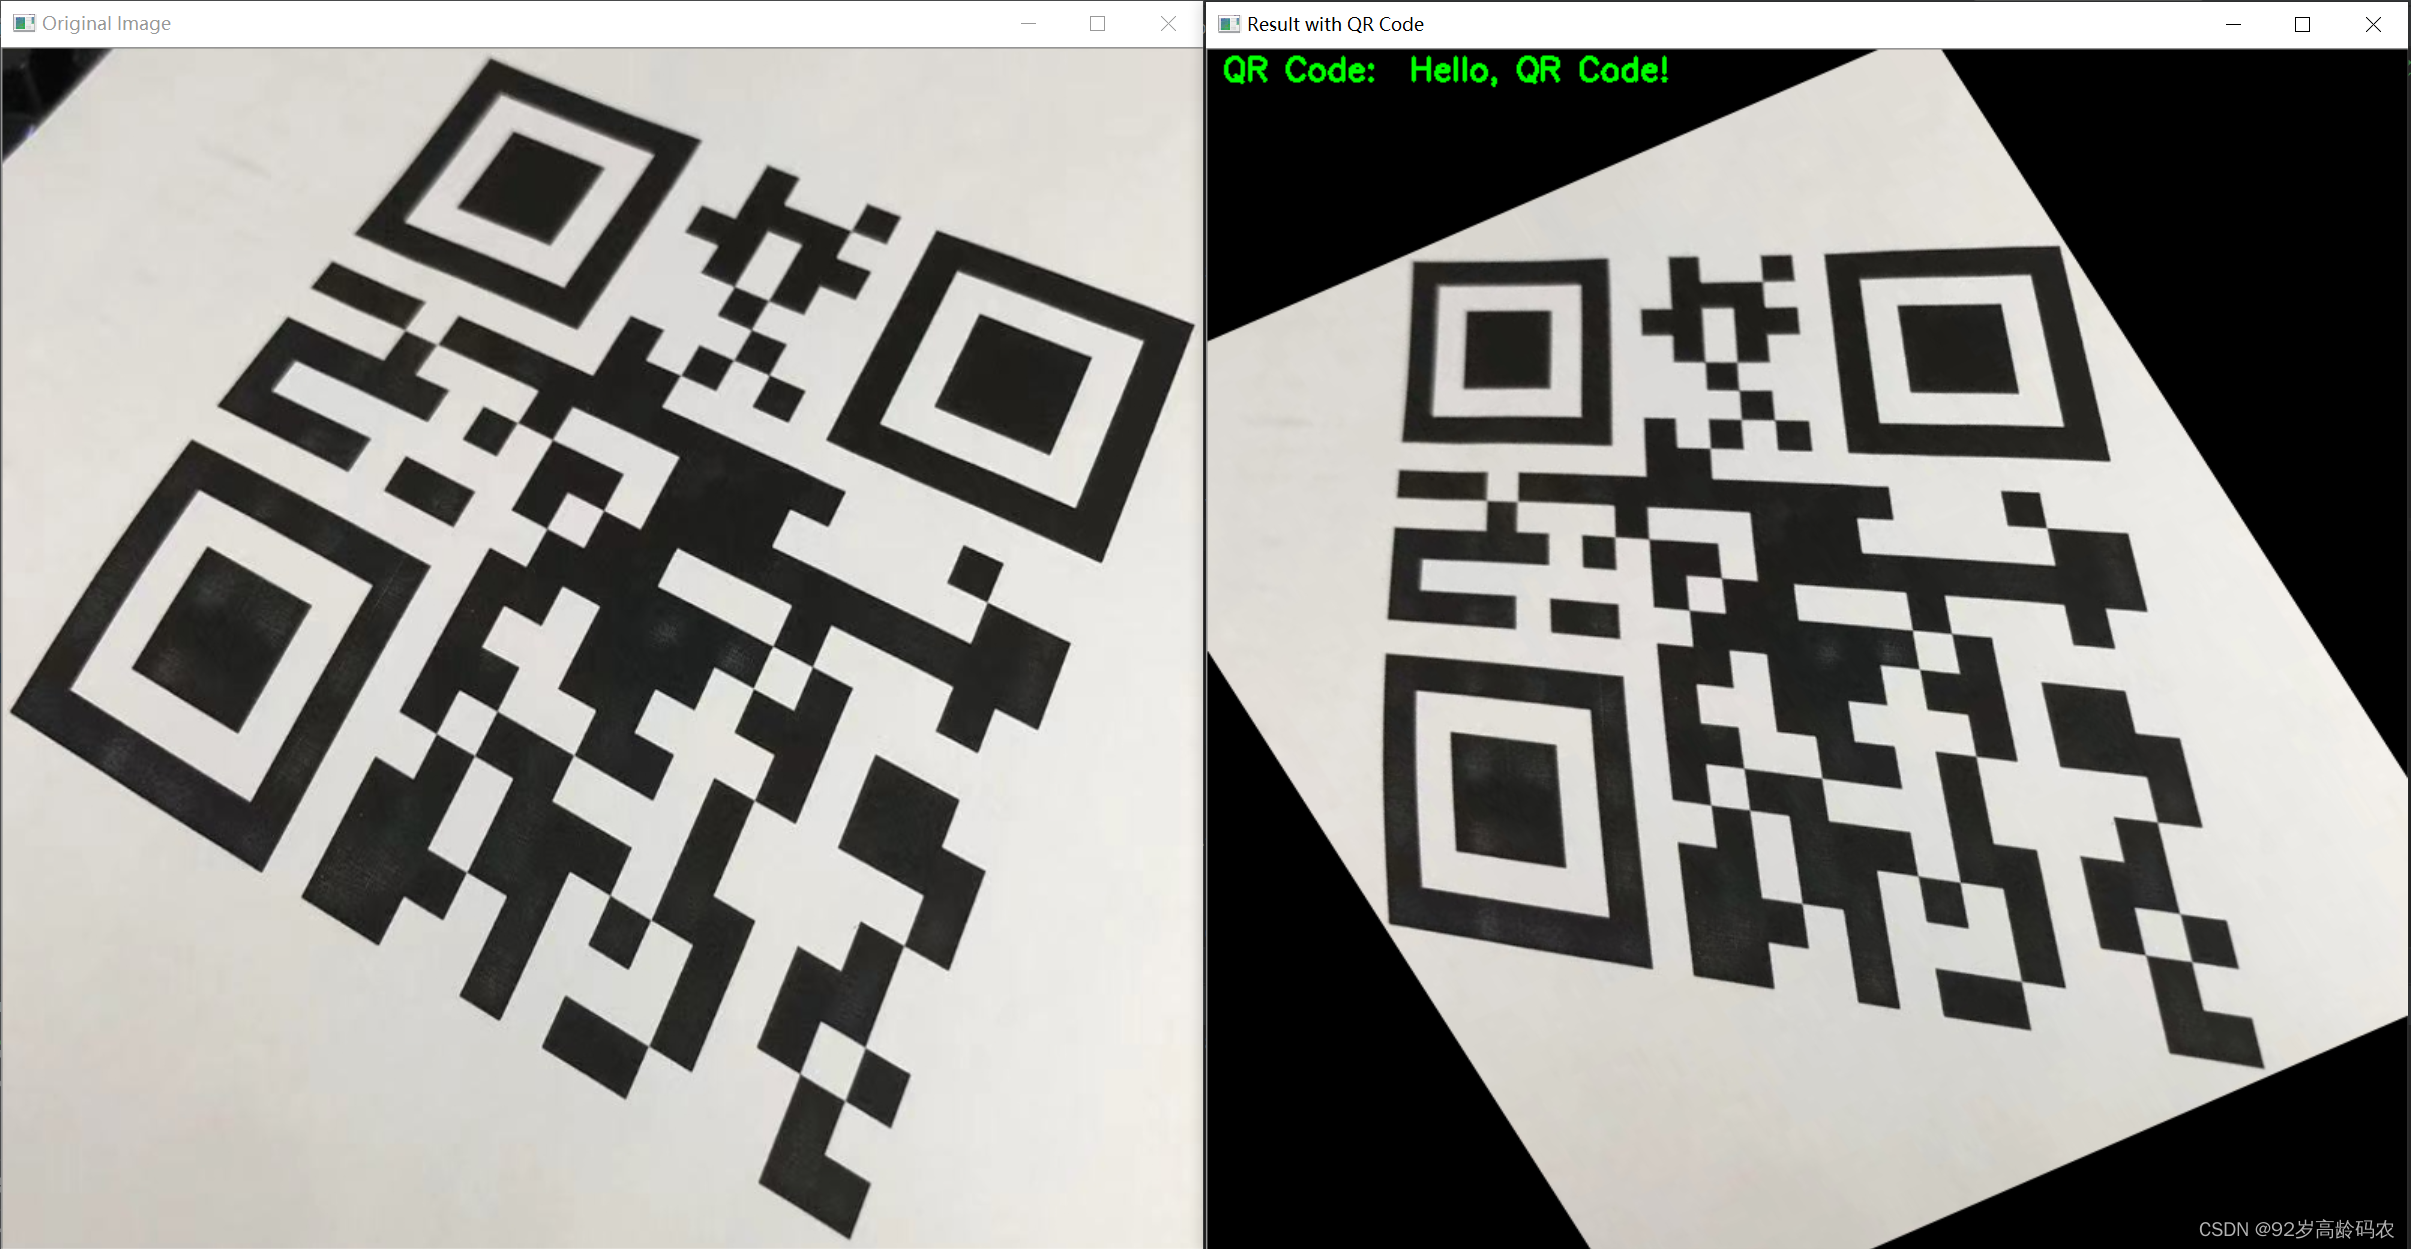
 运行结果2: