| OTA差分升级 | 您所在的位置:网站首页 › 差分升级算法 › OTA差分升级 |
OTA差分升级
|
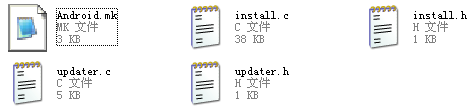
从网上转载,如有不正确的地方,请各位拿砖: 升级包的制作 1.整包的制作 升级包有整包与差分包之分。顾名思义,所谓整包即包含整个system分区中的数据文件;而差分包则仅包含两个版本之间改动的部分。利用整包升级好比对电脑进行重作系统,格式分系统分区,并将新系统数据写入分区;而利用差分包升级不会格式化system分区,只是对其中部分存储段的内容进行重写。除升级包之外,制作过程中还会涉及到另一种zip包,代码中称之为target-files zipfile,我称之为差分资源包。首先阐述下整包的制作过程。 系统经过整编后,执行make otapackage命令,即可完成整包的制作,而此命令可分为两个阶段进行。首先执行./build/core/Makefile中的代码: [plain] view plaincopy # ----------------------------------------------------------------- # OTA update package name := $(TARGET_PRODUCT) ifeq ($(TARGET_BUILD_TYPE),debug) name := $(name)_debug endif name := $(name)-ota-$(FILE_NAME_TAG) INTERNAL_OTA_PACKAGE_TARGET := $(PRODUCT_OUT)/$(name).zip $(INTERNAL_OTA_PACKAGE_TARGET): KEY_CERT_PAIR := $(DEFAULT_KEY_CERT_PAIR) $(INTERNAL_OTA_PACKAGE_TARGET): $(BUILT_TARGET_FILES_PACKAGE) $(OTATOOLS) @echo "Package OTA: $@" $(hide) ./build/tools/releasetools/ota_from_target_files -v \ -n \ -p $(HOST_OUT) \ -k $(KEY_CERT_PAIR) \ $(ota_extra_flag) \ $(BUILT_TARGET_FILES_PACKAGE) $@ .PHONY: otapackage otapackage: $(INTERNAL_OTA_PACKAGE_TARGET) # -----------------------------------------------------------------# ----------------------------------------------------------------- # OTA update package name := $(TARGET_PRODUCT) ifeq ($(TARGET_BUILD_TYPE),debug) name := $(name)_debug endif name := $(name)-ota-$(FILE_NAME_TAG) INTERNAL_OTA_PACKAGE_TARGET := $(PRODUCT_OUT)/$(name).zip $(INTERNAL_OTA_PACKAGE_TARGET): KEY_CERT_PAIR := $(DEFAULT_KEY_CERT_PAIR) $(INTERNAL_OTA_PACKAGE_TARGET): $(BUILT_TARGET_FILES_PACKAGE) $(OTATOOLS) @echo "Package OTA: $@" $(hide) ./build/tools/releasetools/ota_from_target_files -v \ -n \ -p $(HOST_OUT) \ -k $(KEY_CERT_PAIR) \ $(ota_extra_flag) \ $(BUILT_TARGET_FILES_PACKAGE) $@ .PHONY: otapackage otapackage: $(INTERNAL_OTA_PACKAGE_TARGET) # ----------------------------------------------------------------- 代码段1 make otapackage目标代码 这段代码作用在于将系统资源(包括system、recovery、boot等目录)重新打包,生成差分资源包(即target-files zipfile,下文将统一使用“差分资源包”这一概念)。我们可以看下差分资源包中的文件结构,如下: 图2 target-files zipfile目录结构 其中,OTA目录值得关注,因为在此目录下存在着一个至关重要的文件:OTA/bin/updater(后文会有详述)。生成的差分资源包被传递给./build/tools/releasetools/ ota_from_target_files执行第二阶段的操作:制作升级包。 图3 ./build/tools/releasetools目录下的文件 图3是./build/tools/releasetools目录下所包含的文件,这组文件是Google提供的用来制作升级包的代码工具,核心文件为:ota_from_target_files和img_from_target_files。其中,前者用来制作recovery模式下的升级包;后者则用来制作fastboot下的升级包(fastboot貌似是一种更底层的刷机操作,未过多研究,不再详述)。其他文件则是为此二者提供服务的,比如,common.py中包含有制作升级包所需操作的代码;edify_generator.py则用于生成recovery模式下升级的脚本文件:.zip/ META-INF/com/google/android/updater-script。 文件ota_from_target_files是本文所关注的重点,其中定义了两个主要的方法:WriteFullOTAPackage和WriteIncrementalOTAPackage。前者用于生成整包,后者用来生成差分包。接着上文,当Makefile调用ota_from_target_files,并将差分资源包传递进来时,会执行WriteFullOTAPackage。此方法完成的工作包括:(1)将system目录,boot.img等文件添加到整包中;(2)生成升级包中的脚本文件:.zip/META-INF/com/google/android/updater-script;(3)将上文提到的可执行文件:OTA/bin/ updater添加到升级包中:META-INF/com/google/android/updater-script。摘取部分代码片段如下: [python] view plaincopy script.FormatPartition("/system") script. FormatPartition ("/system") script.UnpackPackageDir("recovery", "/system") script.UnpackPackageDir("system", "/system") (symlinks, retouch_files) = CopySystemFiles(input_zip, output_zip) script.MakeSymlinks(symlinks) if OPTIONS.aslr_mode: script.RetouchBinaries(retouch_files) else: script.UndoRetouchBinaries(retouch_files)script.FormatPartition("/system") script. FormatPartition ("/system") script.UnpackPackageDir("recovery", "/system") script.UnpackPackageDir("system", "/system") (symlinks, retouch_files) = CopySystemFiles(input_zip, output_zip) script.MakeSymlinks(symlinks) if OPTIONS.aslr_mode: script.RetouchBinaries(retouch_files) else: script.UndoRetouchBinaries(retouch_files) 代码2 WriteFullOTAPackage代码片段 其中的script为edify_generator对象,其FormatPartition、UnpackPackageDir等方法分别是向脚本文件update-script中写入格式化分区、解压包等指令。 [python] view plaincopy def AddToZip(self, input_zip, output_zip, input_path=None): """Write the accumulated script to the output_zip file. input_zip is used as the source for the 'updater' binary needed to run script. If input_path is not None, it will be used as a local path for the binary instead of input_zip.""" self.UnmountAll() common.ZipWriteStr(output_zip, "META-INF/com/google/android/updater-script", "\n".join(self.script) + "\n") if input_path is None: data = input_zip.read("OTA/bin/updater") else: data = open(os.path.join(input_path, "updater")).read() common.ZipWriteStr(output_zip, "META-INF/com/google/android/update-binary", data, perms=0755)def AddToZip(self, input_zip, output_zip, input_path=None): """Write the accumulated script to the output_zip file. input_zip is used as the source for the 'updater' binary needed to run script. If input_path is not None, it will be used as a local path for the binary instead of input_zip.""" self.UnmountAll() common.ZipWriteStr(output_zip, "META-INF/com/google/android/updater-script", "\n".join(self.script) + "\n") if input_path is None: data = input_zip.read("OTA/bin/updater") else: data = open(os.path.join(input_path, "updater")).read() common.ZipWriteStr(output_zip, "META-INF/com/google/android/update-binary", data, perms=0755) 代码段3 edify_generator中的AddToZip方法 WriteFullOTAPackage执行的最后会调用此方法。将资源差分包中OTA/bin/updater文件copy到升级包中META-INF/com/google/android/update-binary。此文件是OTA升级的关键,其将在recovery模式下被执行,用来将代码段2中生成的指令转换为相应的函数去执行,从而完成对系统数据的重写。 2.差分包的制作 生成差分包调用的是文件./build/tools/releasetools/ota_from_target_files中的WriteIncrementalOTA方法,调用时需要将两个版本的差分资源包作为参数传进来,形如: ./build/tools/releasetools/ota_from_target_files –n –i ota_v1.zip ota_v2.zip update.zip 其中,参数n表示忽略时间戳;i表示生成增量包(即差分包);ota_v1.zip与ota_v2.zip分别代表前后两个版本的差分资源包;而update.zip则表示最终生成的差分包。 WriteIncrementalOTA函数会计算输入的两个差分资源包中版本的差异,并将其写入到差分包中;同时,将updater及生成脚本文件udpate-script添加到升级包中。 三 问题二:将升级包写入系统存储区 制作完升级包后,之后便是将其写入到相应存储区中,这部分工作是在recovery模式下完成的。之前的几篇笔记亦有描述,recovery模式下通过创建一个新的进程读取并执行脚本文件META-INF/com/google/android/updater-script。见如下代码: [cpp] view plaincopy const char** args = (const char**)malloc(sizeof(char*) * 5); args[0] = binary; args[1] = EXPAND(RECOVERY_API_VERSION); // defined in Android.mk char* temp = (char*)malloc(10); sprintf(temp, "%d", pipefd[1]); args[2] = temp; args[3] = (char*)path; args[4] = NULL; pid_t pid = fork(); if (pid == 0) { close(pipefd[0]); execv(binary, (char* const*)args); _exit(-1); } close(pipefd[1]);const char** args = (const char**)malloc(sizeof(char*) * 5); args[0] = binary; args[1] = EXPAND(RECOVERY_API_VERSION); // defined in Android.mk char* temp = (char*)malloc(10); sprintf(temp, "%d", pipefd[1]); args[2] = temp; args[3] = (char*)path; args[4] = NULL; pid_t pid = fork(); if (pid == 0) { close(pipefd[0]); execv(binary, (char* const*)args); _exit(-1); } close(pipefd[1]); 代码段4 创建新进程安装升级包 分析代码之前,首先介绍linux中函数fork与execv的用法。pid_t fork( void) 创建新的进程,fork调用的一个奇妙之处就是它仅仅被调用一次,却能够返回两次,它可能有三种不同的返回值: 1)在父进程中,fork返回新创建子进程的进程ID; 2)在子进程中,fork返回0; 3)如果出现错误,fork返回一个负值; 在fork函数执行完毕后,如果创建新进程成功,则出现两个进程,一个是子进程,一个是父进程。在子进程中,fork函数返回0,在父进程中,fork返回新创建子进程的进程ID。我们可以通过fork返回的值来判断当前进程是子进程还是父进程(http://os.chinaunix.net/a2012/0203/1306/000001306508.shtml)。 int execv(const char *progname, char *const argv[]) execv会停止执行当前的进程,并且以progname应用进程替换被停止执行的进程,进程ID没有改变。 progname: 被执行的应用程序。 argv: 传递给应用程序的参数列表, 注意,这个数组的第一个参数应该是应用程序名字本身,并且最后一个参数应该为NULL,不参将多个参数合并为一个参数放入数组。 代码4见于bootable/recovery/install.c的try_update_binary函数中,是OTA升级的核心代码之一。通过对fork及execv函数的介绍可知,代码4创建了一个新的进程并在新进程中运行升级包中的META-INF/com/google/android/updater-binary文件(参数binary已在此前赋值),此文件将按照META-INF/com/google/android/updater-script中的指令将升级包里的数据写入到存储区中。OK,我们来看下META-INF/com/google/android/updater-binary文件的来历。 在源代码的./bootable/recovery/updater目录下,存在着如下几个文件: 图4 ./bootable/recovery/updater目录
通过查看Android.mk代码可知,文件install.c、updater.c将会被编译为可执行文件updater存放到目录out/target/product//obj/EXECUTABLES/ updater_intermediates/中;而在生成差分资源包(target-files zipfile)时,会将此文件添加到压缩包中。 [plain] view plaincopy built_ota_tools := \ $(call intermediates-dir-for,EXECUTABLES,applypatch)/applypatch \ $(call intermediates-dir-for,EXECUTABLES,applypatch_static)/applypatch_static \ $(call intermediates-dir-for,EXECUTABLES,check_prereq)/check_prereq \ $(call intermediates-dir-for,EXECUTABLES,sqlite3)/sqlite3 \ $(call intermediates-dir-for,EXECUTABLES,updater)/updaterbuilt_ota_tools := \ $(call intermediates-dir-for,EXECUTABLES,applypatch)/applypatch \ $(call intermediates-dir-for,EXECUTABLES,applypatch_static)/applypatch_static \ $(call intermediates-dir-for,EXECUTABLES,check_prereq)/check_prereq \ $(call intermediates-dir-for,EXECUTABLES,sqlite3)/sqlite3 \ $(call intermediates-dir-for,EXECUTABLES,updater)/updater 代码段5 Makefile中定义的变量built_ota_tools [plain] view plaincopy $(hide) mkdir -p $(zip_root)/OTA/bin $(hide) $(ACP) $(INSTALLED_ANDROID_INFO_TXT_TARGET) $(zip_root)/OTA/ $(hide) $(ACP) $(PRIVATE_OTA_TOOLS) $(zip_root)/OTA/bin/$(hide) mkdir -p $(zip_root)/OTA/bin $(hide) $(ACP) $(INSTALLED_ANDROID_INFO_TXT_TARGET) $(zip_root)/OTA/ $(hide) $(ACP) $(PRIVATE_OTA_TOOLS) $(zip_root)/OTA/bin/ 代码段6 复制built_ota_tools工具到差分资源包 如代码段5,Makefile中定义了执行OTA所需要的一组工具(built_ota_tools),其中便包括由图4中文件编译而成的文件updater;而在生成差分资源包时,会将这组工具拷贝到差分资源包的OTA/bin目录中(见代码段6);在生成升级包时(无论是执行WriteFullOTAPackage还是WriteIncrementalOTAPackage),最后都会调用edify_generator的AddToZip方法,将updater添加到升级包中(更名为"META-INF/com/google/android/update-binary");最终在recovery模式下被执行,这便是其来龙去脉。而关于updater的执行,也大致的描述下吧。 由前文可知,updater主要由bootable/recovery/updater目录下的install.c和updater.c编译而成,主函数位于updater.c。其中,在install.c中定义了读写系统存储区的操作函数(这才是重写系统数据的真正代码)并将这些函数与updater-script中的指令映射起来。而在updater.c会首先装载install.c定义的函数,之后便解析升级脚本updater-script,执行其对应的操作命令。与此同时,执行updater的进程还会与父进程通信,通知父进程进行UI的相关操作(代码见bootable/recovery/install.c中的try_update_binary函数)。 貌似差不多了,就此打住。 |


【本文地址】