| 1 | 您所在的位置:网站首页 › 密码是1133 › 1 |
1
|
目录用户名@白名单修改密码本地管理员用户密码忘记了方式1方式2mac系统密码找回常见报错ERROR 1133 (42000): Can't find any matching row in the user table
返回MySQL目录
用户名@白名单
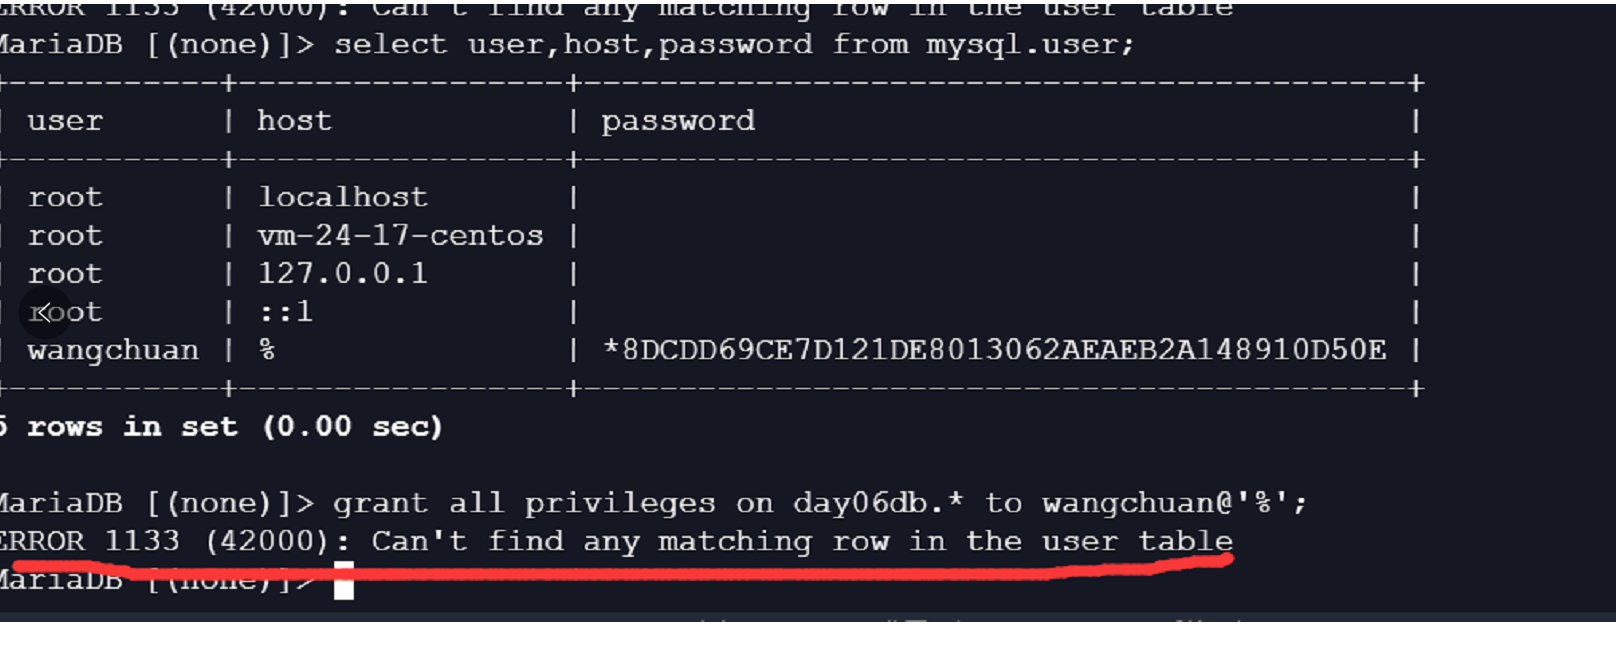
MySQL支持用户名@白名单的方式连接,有以下几种方式: 链接方式 描述 备注 wordpress@'10.0.0.%' 只允许10网段连接 常用 wordpress@'%' 所有地址 wordpress@'10.0.0.200' 只允许某一个地址链接 wordpress@'localhost' 只允许本地连接 wordpress@'db03' 只允许别名是db03连接 wordpress@'10.0.0.5%' 只允许IP地址末尾51~59的连接 wordpress@'10.0.0/255.255.254.0' 只允许254这个网段的连接白名单用户管理操作: mysql> create user zhangkai@'localhost' identified by '123'; Query OK, 0 rows affected (0.00 sec) mysql> flush privileges; Query OK, 0 rows affected (0.00 sec) mysql> select user,host from mysql.user; +---------------+-----------+ | user | host | +---------------+-----------+ | mysql.session | localhost | | mysql.sys | localhost | | root | localhost | | zhangkai | localhost | +---------------+-----------+ 4 rows in set (0.00 sec) mysql> alter user zhangkai@'localhost' identified by '1234'; Query OK, 0 rows affected (0.00 sec) mysql> flush privileges; Query OK, 0 rows affected (0.00 sec) mysql> drop user zhangkai@'localhost'; Query OK, 0 rows affected (0.00 sec) mysql> flush privileges; Query OK, 0 rows affected (0.00 sec) mysql> select user,host from mysql.user; +---------------+-----------+ | user | host | +---------------+-----------+ | mysql.session | localhost | | mysql.sys | localhost | | root | localhost | +---------------+-----------+ 3 rows in set (0.00 sec)上面示例演示了白名单用户的增删改查的操作。不过这个白名单用户仅能用来登录到MySQL,权限有限! 常用的权限: ALL: SELECT,INSERT, UPDATE, DELETE, CREATE, DROP, RELOAD, SHUTDOWN, PROCESS, FILE, REFERENCES, INDEX, ALTER, SHOW DATABASES, SUPER, CREATE TEMPORARY TABLES, LOCK TABLES, EXECUTE, REPLICATION SLAVE, REPLICATION CLIENT, CREATE VIEW, SHOW VIEW, CREATE ROUTINE, ALTER ROUTINE, CREATE USER, EVENT, TRIGGER, CREATE TABLESPACE ALL : 以上所有权限,一般是普通管理员拥有的 with grant option:超级管理员才具备的,给别的用户授权的功能创建用户并授权: mysql> grant all on database_name.* to zhangkai@'localhost' identified by '123'; -- grant:授权命令 -- all:权限 -- on:为什么对象设置权限 -- wordpress.*:wordpress库下的所有表;需要注意的是,wordpress库如果不存在,该语句也能执行 -- zhangkai@'localhost':指定的用户 -- 修改权限还是使用grant命令来做,grant命令可以反复使用一般的,应用用户的权限应该是有限的,常用的也就是select insert update delete。 PS:在MySQL8.0之后,grant命令有了新特性: 创建用户和授权分开 grant命令不再支持创建用户,也不支持修改密码 授权之前,必须要创建用户也就是,以后创建用户和授权操作要分开来做。 create user zhangkai@'%' identified by 'zhangkai1234'; grant all on *.* to zhangkai@'%';另外,权限范围有几种写法: 权限 描述 备注 *.* 所有库下的所有表,使用与管理员用户 wordpress.* 指定库下的所有表,适用于开发和应用用户 wordpress.t1 指定库下的指定表,用的不多那么,如何查看用户的权限信息和如何回收权限呢? -- 查看用户权限 show grants for zhangkai@'localhost'; -- 回收权限 revoke delete,drop on database@table from zhangkai@'localhost';关于查看用户权限,需要补充一些内容。 之前提过,使用create user root@'%' identified by '123'创建的用户,仅能用来登录MySQL,别的啥也干不了。 mysql> show grants for root@'192.168.85.%'; +---------------------------------------------+ | Grants for [email protected].% | +---------------------------------------------+ | GRANT USAGE ON *.* TO 'root'@'192.168.85.%' | +---------------------------------------------+ 1 row in set (0.00 sec)正如上例的关键字USAGE表示该用户只有登录MySQL权限。想要别的权限,需要自己用有grant权限的账号为该账号授权,因为这个账号此时也没有授权这个权限。 关于WITH GRANT OPTION,当你查看权限时,发现账号拥有ALL权限外,还有 WITH GRANT OPTION权限。 mysql> show grants for root@'localhost'; +---------------------------------------------------------------------+ | Grants for root@localhost | +---------------------------------------------------------------------+ | GRANT ALL PRIVILEGES ON *.* TO 'root'@'localhost' WITH GRANT OPTION | | GRANT PROXY ON ''@'' TO 'root'@'localhost' WITH GRANT OPTION | +---------------------------------------------------------------------+ 2 rows in set (0.00 sec)WITH GRANT OPTION表示该用户可以将自己拥有的权限授权给别人。 注意,如果在授权时没有加WITH GRANT OPTION参数,就表示该账户的权限只能自己用,而不能赋予别人,所以你在授权时要考虑好加不加WITH GRANT OPTION参数。 grant all on *.* to root@'%' identified by '123'; grant all on *.* to root@'%' identified by '123' with grant option;也就是,上面两条命令你要事情况而选择。 修改密码虽然上面已经提到了修改密码,但这里也单独把修改密码说下。 修改密码命令: -- 将本地的root用户的密码修改为 123 alter user root@'localhost' identified by '123'; 本地管理员用户密码忘记了解决思路是: 关闭MySQL服务 mysqld_safe模式启动,即关闭MySQL的用户密码验证模块,也就是不加载授权表,然后禁止远程连接,仅能通过本地socket链接 无密码登登录到MySQL 修改密码 重启MySQLlinux参考下面的方式1;Windows的参考方式2。 方式1这个流程是Linux中演示的。 流程: [root@cs mysql]# systemctl stop mysqld [root@cs mysql]# mysqld_safe --skip-grant-tables --skip-networking & [root@cs mysql]# mysql Welcome to the MySQL monitor. Commands end with ; or \g. Your MySQL connection id is 3 Server version: 5.7.20 MySQL Community Server (GPL) Copyright (c) 2000, 2017, Oracle and/or its affiliates. All rights reserved. Oracle is a registered trademark of Oracle Corporation and/or its affiliates. Other names may be trademarks of their respective owners. Type 'help;' or '\h' for help. Type '\c' to clear the current input statement. mysql> flush privileges; Query OK, 0 rows affected (0.00 sec) mysql> alter user root@'localhost' identified by '123'; Query OK, 0 rows affected (0.00 sec) mysql> flush privileges; Query OK, 0 rows affected (0.00 sec) mysql> exit; Bye [root@cs mysql]# pkill mysqld [root@cs mysql]# systemctl start mysqld相关参数解释: --skip-grant-tables:关闭授权表,这样就可以无验证登录了。 --skip-networking:关闭TCP/IP,该参数的目的是只能本地通过socket连接登录,保证修改密码时的安全性。 &是后台执行。 至于在修改密码前的flush privileges操作是因为修改密码还是要使用授权表,但是由于mysqld_safe模式启动授权表没有从磁盘加载到内存,所以直接执行alter命令会失败,所以要使用flush privileges命令将授权表加载到内存中,才能修改密码成功。修改的flush privileges让其新密码立即生效。 方式2win10 + mysql.5.7.20 这里用Windows演示。并且你的MySQL是有配置文件的。 1. 修改配置文件 其实还是关闭授权表登录,然后修改密码,然后再开启授权表那一套。 [mysqld] skip-grant-tables=12. 重启MySQL服务 net stop mysql57 net start mysql573. 无密码登录到MySQL,然后修改密码 # 无密码登录 mysql -u root -p # 修改密码 update mysql.user set authentication_string = password('123'),password_last_changed=now() where user='root'; flush privileges; # 或者使用下面的命令修改也一样 alter user root@'localhost' identified by '123'; flush privileges;4. 退出客户端,并删除配置文件中的skip-grant-tables=1选项 [mysqld] # skip-grant-tables=15. 然后在重启MySQL服务即可 net stop mysql57 net start mysql57 mac系统密码找回套路参考方式1,也是关闭授权表那一套。但命令可能稍有不同,这里做个记录。 接下来的所有操作都在终端中完成。 首先关闭MySQL服务: sudo mysql.server stop mysqld_safe模式启动,即关闭MySQL的用户密码验证模块,也就是不加载授权表,然后禁止远程连接,仅能通过本地socket链接: sudo mysqld_safe --skip-grant-tables --skip-networking & 无密码登登录到MySQL: # 3.1 终端输入mysql登录进去 mysql # 3.2 再把授权表加载到内存中,后续才能修改密码 mysql> flush privileges; Query OK, 0 rows affected (0.00 sec) # 3.3 修改密码 mysql> alter user root@'localhost' identified by '123'; Query OK, 0 rows affected (0.00 sec) # 3.4 再次刷新 mysql> flush privileges; Query OK, 0 rows affected (0.00 sec) # 3.5 退出,此时密码修改完毕了 mysql> exit; Bye 杀掉mysqld_safe模式启动的MySQL服务。 sudo pkill mysqld 重新启动MySQL服务。 sudo mysql.server start 使用新密码登录: $ mysql -uroot -p123 mysql: [Warning] World-writable config file '/usr/local/mysql/etc/my.cnf' is ignored. mysql: [Warning] Using a password on the command line interface can be insecure. Welcome to the MySQL monitor. Commands end with ; or \g. Your MySQL connection id is 8 Server version: 5.7.31 MySQL Community Server (GPL) Copyright (c) 2000, 2020, Oracle and/or its affiliates. All rights reserved. Oracle is a registered trademark of Oracle Corporation and/or its affiliates. Other names may be trademarks of their respective owners. Type 'help;' or '\h' for help. Type '\c' to clear the current input statement. mysql> show databases;ok了。 常见报错 ERROR 1133 (42000): Can't find any matching row in the user tablemariadb5.5.68 一般的,我们在MySQL上,创建用户和授权基本上就三步就行了: create user zhangkai@'%' identified by '123'; grant all on t1.* to zhangkai@'%'; flush privileges;然后,这个用户就创建成功了。 但是有次用的是mariadb,在这个过程中,遇到了报错。
首先根据这截图,要授权的账号wangchuan@'%'是存在user表中的。但授权时失败了。 这个问题产生的原因创建账号成功,也就是写入了user表中,这也是user表能查出来的原因。 但是并没有及时写入权限表(grant table),才导致的授权失败。 那么解决方案也是有的,来看正确的执行命令: insert into mysql.user(user,host,password) values('wangchuan','%',password('qwe123')); flush privileges; grant all on t1.* to wangchuan@'%'; flush privileges;一步一刷新,就没问题了。 再来进一步扩展说点其他的,这个报错是因是insert into命令造成的,insert into只是将用户写入到mysql.user表中,但此时该用户还没有生效,就执行grant命令当然失败了,所以我们才在解决方案中,一步一刷新,让插入的用户及时生效。 另外,mysql5.7之后,mysql.user表中就没有了password字段,而是改成了authentication_string,但就算改成了authentication_string,执行也会报错,因为mysql.user表中还有其它字段没有默认值(如ssl_cipher)你也要处理这些问题。 总之啊,后续不建议使用insert into 命令,因为这个命令在mysql5.6及以下使用还行,高版本你就要自己调整了,有点麻烦,所以mysql5.7以上都用create user 命令就行了,简单省事儿。 欢迎斧正,that's all,see also:WITH GRANT OPTION的作用 | mysql grant 用户权限总结 |
【本文地址】