| 网络安全管理员 | 您所在的位置:网站首页 › 安全员教程 › 网络安全管理员 |
网络安全管理员
|
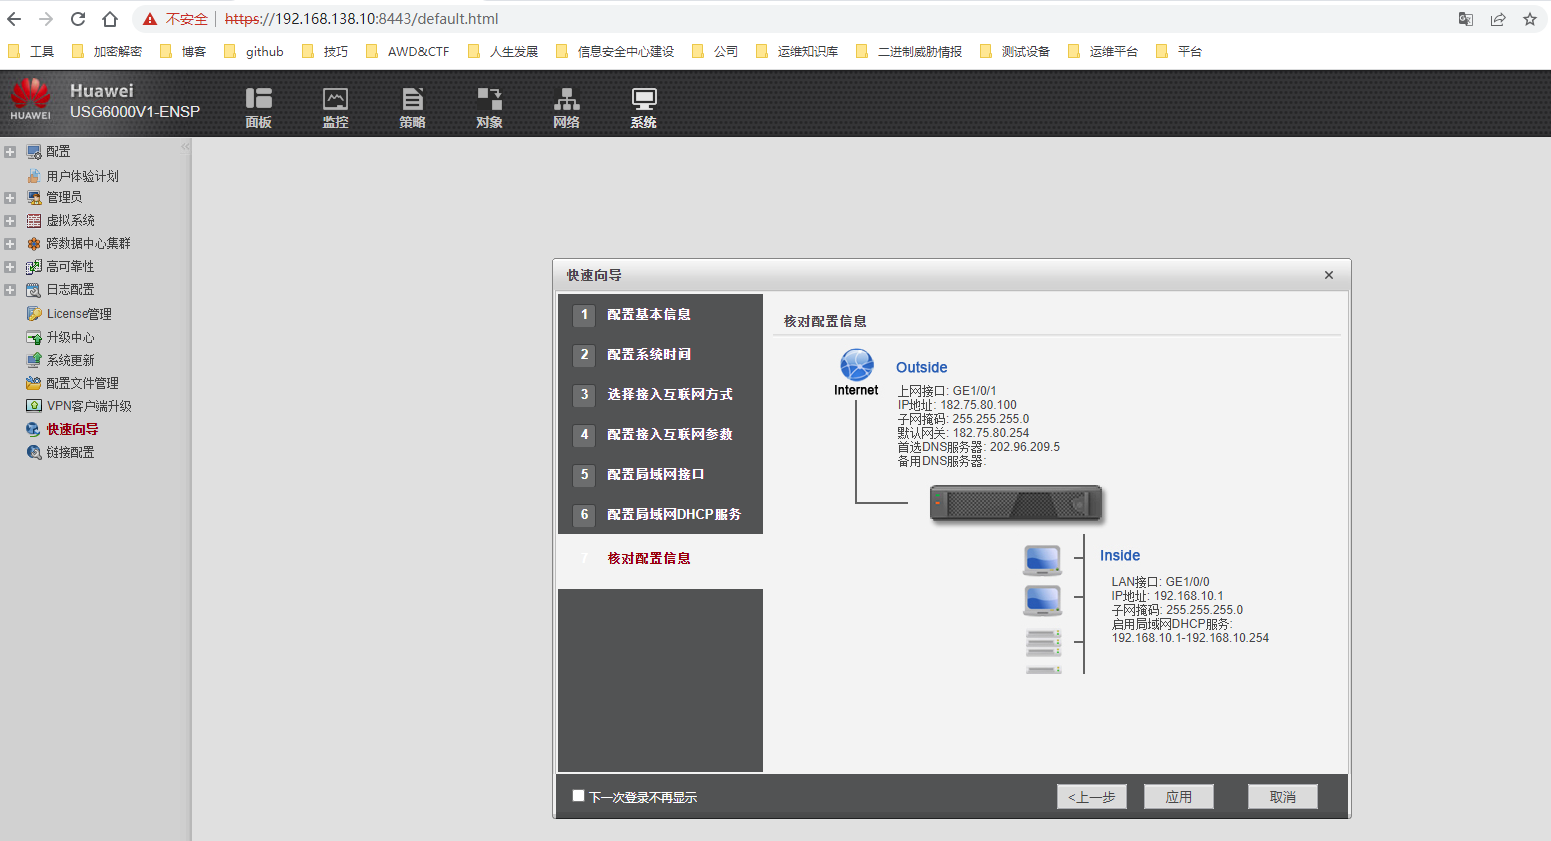
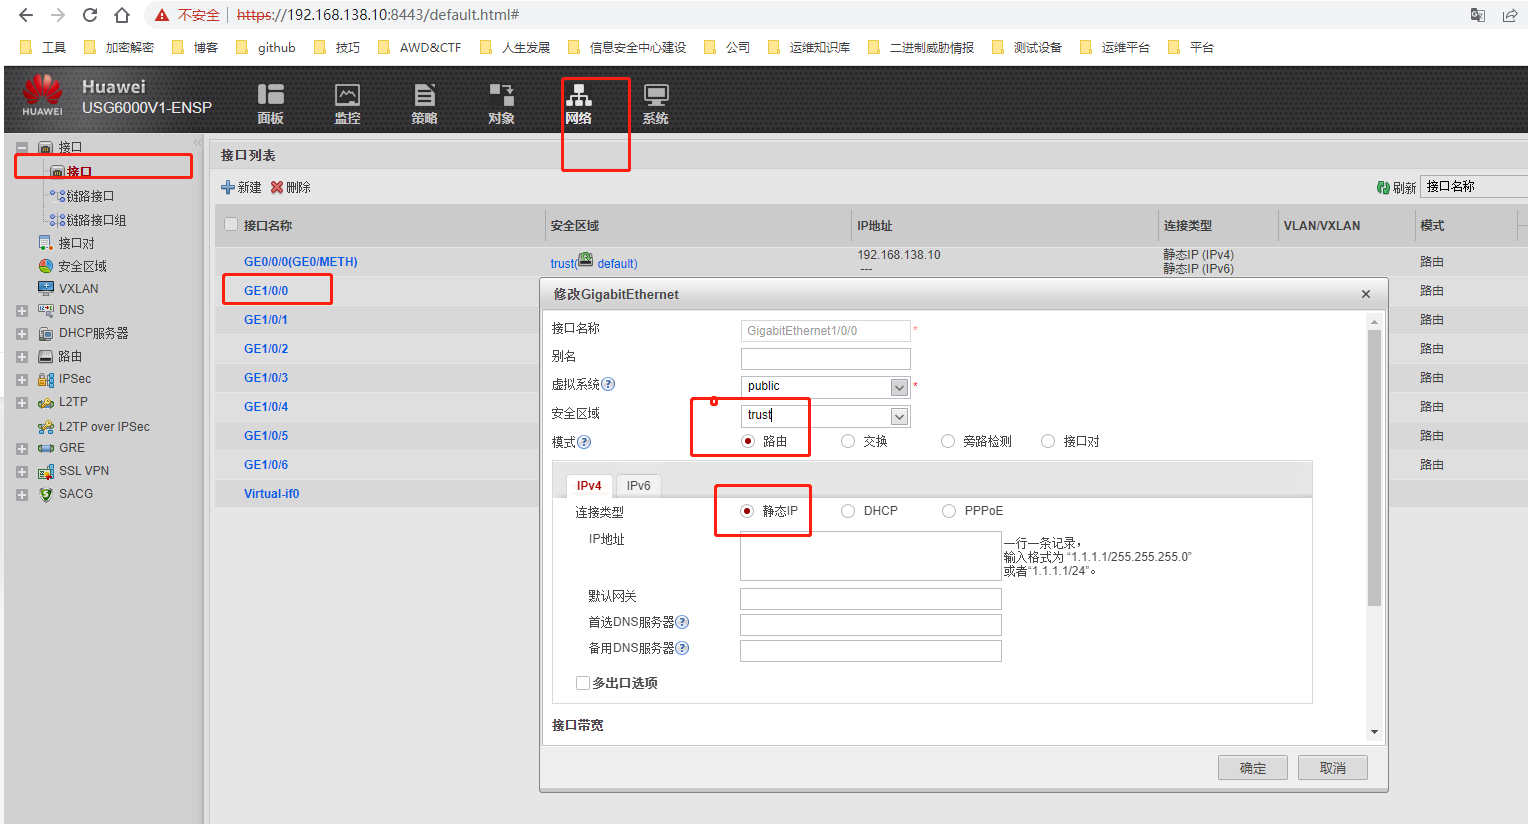
一、路由器、交换机安全加固 Switch: config terminal username Inspc privilege 15 secret P@ssw0rd crypto key generate rsa #如果环境没有定义域名则需自定义ip demain-name 0xbug.com yes 1024 ip ssh version 2 line vty 0 15 或 line vty 0 4 transport input ssh login local 或 login auth default privilege level 15 exit access-list 100 permit icmp host 192.168.11.1 host 172.16.1.1 access-list 100 deny ip host 192.168.10.1 host 172.16.1.1 interface e0/0 ip access-group 100 in exit exit write ------------------------------------------------------------------ Router: config terminal access-list 100 deny ip host 192.168.10.1 host 192.168.11.1 access-list 100 permit ip any any interface e0/1 ip access-group 100 in exit exit write最后一步分别在交换机和路由器右键选择Export config 按要求导出配置文件. 二、Windwos远程桌面安全配置 1、此电脑右击 - 属性 - 远程设置- 选择允许远程连接到此计算机并(勾选仅允许运行使用网络级别身份验证的远程桌面的计算机连接)- 选择用户 - 添加remote用户 -确定。 2、gpedit.msc - 计算机配置 - Windows设置 - 安全设置 - 本地策略 - 用户权限分配 - 拒绝本地登录 - 添加remote用户 - 确认 - 从远程系统强制关机 - 删除remote(如果没有不用理会) gpedit.msc - 计算机配置 - 管理模板 - Windows组件 - 远程桌面服务 - 远程桌面会话主机 - 远程会话环境 - 从“关机”对话框删除“断开连接” 选项 - 启用 3、gpedit.msc - 计算机配置 - 管理模板 - Windows组件 - 远程桌面服务 - 远程桌面会话主机 - 会话时间限制 - 设置活动的远程桌面服务会话的时间限制 - 启用并选择从不 - 确定。 4、服务器管理器 - 工具 - 高级安全 Windows 防火墙 - 入站规则 - 新建规则 - 端口 - 下一步 - 特定本地端口 3389(TCP) 出入站规则均需设置允许 以端口号命名规则 139、445(TCP) 入站规则 阻止连接 以端口号命名规则 137、138(UDP)入站规则 阻止连接 以端口号命名规则 入站规则 所有 “文件和打印机共享” 禁用规则三、防火墙安全配置/WEB安全配置 1、点击Start按钮启动所有设备 - 双击firewall - 待启动完成输入账号密码(root:opnsense) - 选择2 回车配置IP地址 - 选择1 LAN - N否DHCP - 192.168.100.1 - 24 - 后面全部回车。 - 选择2 回车配置IP地址 - 选择3 WAN - N否DHCP - 180.0.0.101 - 24 - 后面全部回车。 2、点击左上角Activities - 打开Firefox浏览器 - 192.168.122.100 - 输入账号密码(root:opnsense) 点击左侧Firewall - Rules - LAN - +添加 - Save保存其他不用设置 - Apply changes应用 点击左侧Firewall - Rules - WAN - +添加 - Save保存其他不用设置 - Apply changes应用 3、点击左侧Services - Nginx - Configuration - 勾选Enable nginx 应用 - Upstream - Upstream Server - +添加 Descripton:DVWA Server:192.168.100.100 Port:80 Server Priority:1 Maximum Connetions:250 Maximum Failures:5 Fail Timeout:10 4、点击左侧Services - Nginx - Configuration - Upstream - Upstream - +添加 Descripton:DVWA-backend Server Entries:DVWA Save保存 5、点击左侧Services - Nginx - Configuration - HTTPS(S) - Location - +添加 Descripton:DVWA URL Pattern:/ Custom Security Policy:SQL Injections IDs:1000-1099 Save保存 6、点击左侧Services - Nginx - Configuration - HTTPS(S) - HTTPS Server - +添加 Server Name:dvwa.example.net Locations:DVWA Save保存 7、点击左侧System - Settings - Administration TCP port:8443 HTTP Redirect:勾选 保存 8、点击左侧Lobby - Password Old password:opnsense New Password:Admin@123 保存 9、点击左侧System - Configuration - Backups - 点击Download configuration下载防火墙配置文件 剪切配置文件到/home/gns3/Documents 并重命文件名为“waf211.xml”。四、远程安全访问管理 groupadd RemoteUserGroup useradd -G RemoteUserGroup RemoteUser01 vim /etc/ssh/sshd_config Port 2222 PermitRootLogin no PermitEmptyPasswords no wq保存 systemctl restart sshd 测试 passwd RemoteUser01 设置用户密码root ssh -p 2222 [email protected] 测试链接 exit退出五、网络流量监控 打开终端输入sudo wireshark 1、打开Wireshark - 双击eth0开始抓包 - 打开浏览器访问题目要求的网址 - 点击停止抓包 - File - Save As...另存为 - 格式选择为pcap 保存到指定位置。 /opt/a.pcap 2、在筛选框中输入http回车 - File - Export Specified Packets...导出特定分组 - 格式选择为pcap 保存到指定位置。 /opt/b.pcap六、数据库查询日志提取/数据库日志提取 1、提取MySQL查询日志 mysql -u root -p show master status; 查询 exit 查看当前文件名为:binlog.000008 mysqlbinlog --no-defaults -u /var/lib/mysql/binlog.000008 > /root/mysql_server_log.sql 2、提取MySQL错误日志 cp /var/log/mysqld.log /root/mysql_server_error.log可通过cd /var/log目录查看是否有mysql或mariadb文件夹 来决定使用 提取查询日志 mysqldump --skip-lock-tables -uroot -proot mysql general_log > /root/mysql_server_log.sql 提取错误日志 cp /var/log/mariadb/mariadb.log /root/mysql_server_error.log 或 cat /var/log/mariadb/mariadb.log* > /root/mysql_server_error.log七、防火墙部署 system-view [USG6000V1]interface GigabitEthernet 0/0/0 [USG6000V1-GigabitEthernet0/0/0]dis this 2022-10-25 15:50:12.670 # interface GigabitEthernet0/0/0 undo shutdown ip binding vpn-instance default ip address 192.168.0.1 255.255.255.0 alias GE0/METH # [USG6000V1-GigabitEthernet0/0/0]ip address 192.168.138.10 255.255.255.0 [USG6000V1-GigabitEthernet0/0/0]service-manage https permit [USG6000V1-GigabitEthernet0/0/0]service-manage ping permit1.打开火狐浏览器登录防火墙图形界面并设置登录新密码为 Admin@123; 请使用向导模式对防火墙初始化并做好安全配置,防火墙主机名为: INSPC_FW,系统时间为本地系统同步时间,上网接口:GE1/0/1,入网方式为公网提供的 IP 地址:182.75.80.100/255.255.255.0,网关:182.75.80.254, DNS 服务器:202.96.209.5,并配置局域网接口 GE1/0/0 的 IP:192.168.10.1/24,安全区域:Trust,模式:路由模式,暂不开启 DHCP 功能; 访问https://192.168.138.10:8443/default.html# 八、部署入侵检测/防御系统 1、使用服务器打开Firefox浏览器 - 192.168.0.1 (root:opnsense) 2、点击左侧Services - Intrusion Detection - Administration - Settings Enabled:勾选 IPS mode:勾选 Promiscuous mode:勾选 Enable syslog alerts:勾选 Interfaces:勾选LAN,WAN Apply应用 点击User defined - +添加 Destination IP:192.168.0.100 Action:Drop Description:IPS-Alert 保存并应用 3、点击左侧System - Configuration - Backups -Download configuration file.下载防火墙配置文件 保存到桌面考生文件夹内并重命名为GB3_113.xml九、配置无线网络安全管理中心 system-view sysname AC----------1 vlan batch 100 to 101--------1 dhcp enable # interface GigabitEthernet0/0/1--------1 port link-type trunk port trunk pvid vlan 100 port trunk allow-pass vlan 100 101 # interface GigabitEthernet0/0/2---------1 port link-type trunk port trunk allow-pass vlan 100 101 interface Vlanif100-------------2 ip address 200.10.10.1 255.255.255.0 dhcp select interface # interface Vlanif101-------------------2 ip address 200.10.20.1 255.255.255.0 dhcp select interface # wlan regulatory-domain-profile name default--------4 country-code cn-------------4 quit ap-group name ap-group1--------------3 regulatory-domain-profile default------4 quit quit capwap source interface vlanif 100-------5 wlan ap auth-mode mac-auth ap-id 0 ap-mac xxxx-xxxx-xxxx-----------5 ap-name ap_1-------------5 ap-group ap-group1---------5 quit security-profile name wlan-sec-------------6 security wpa-wpa2 psk pass-phrase a1234567 aes--------6 quit ssid-profile name wlan-ssid--------6 ssid wlan-inspc--------6 quit vap-profile name wlan-vap-------------7 forward-mode direct-forward service-vlan vlan-id 101 security-profile wlan-sec ssid-profile wlan-ssid quit ap-group name ap-group1------------8 vap-profile wlan-vap wlan 1 radio 0 vap-profile wlan-vap wlan 1 radio 1 quit save GB3_114.cfg-------------9 注意:所有要求打“Y”或者“N”的地方都选择Y十、Windows安全策略配置 1、gpedit.msc - 计算机配置 - 管理模板 - 系统 - 可移动存储访问 - 可移动磁盘:拒绝写入权限 启用 2、计算机配置 - 管理模板 - Windows 设置 - 安全设置 - 高级审核策略配置 - 对象访问 - 审核可移动存储 - 勾选配置以下审核事件(成功、失败) 3、计算机配置 - 管理模板 - 系统 - 用户配置文件 - 在系统重新启动时,删除超过指定天数的用户配置文件 - 启用 设置 5 4、计算机配置 - 管理模板 - 系统 - 远程协助 - 启用会话日志记录 5、计算机配置 - 管理模板 - 服务器 - 不允许只运行一次备份 启用 6、计算机配置 - 管理模板 - Windows 组件 - 远程桌面服务 - 远程桌面连接客户端 - 不允许保存密码 启用十一、配置openwaf应用防火墙 设置保护服务器 IP 和端口号分别为 192.168.2.1、8000; 首先要理清openwaf安装在的位置,查找其配置及文件后修改配置文件生效。 配置文件通常在:/etc/ngx_openwaf.conf或/opt/openwaf/conf/ngx_openwaf.conf 规则文件通常在:/root/openwaf/conf/twaf_access_rule.json 或:/opt/OpenWAF/conf/twaf_access_rule.json 答案:修改配置文件:twaf_access_rule.json “forward_addr”: “192.168.2.1”, – 后端服务器ip地址,即需要防护的目标网站地址 “forward_port”: “8000”, – 后端服务器端口号(缺省80),即需要防护的目标网站端口 设置规则引擎:允许在周一到周五的早上 9 点至晚上 18 点访问,禁止访问/admin 目录,并且设置 192.168.6.0/24 网段不允许访问。 需要使用:user_defined_rules模块 在编辑OpenWAF/lib/twaf/inc/knowledge_db/twrules/rules.json 添加以下规则 "user_defined_rules":[ { "id": "1000001", "release_version": "858", "charactor_version": "001", "disable": false, "opts": { "nolog": false }, "phase": "access", "action": "deny", "meta": 403, "severity": "high", "rule_name": "relative time", "desc": "周一至周五的9点至18点,禁止访问/admin目录", "match": [{ "vars": [{ "var": "URI" }], "operator": "begins_with", "pattern": "/admin" }, { "vars": [{ "var": "TIME_WDAY" }], "operator": "equal", "pattern": ["1", "2", "3", "4", "5"] }, { "vars": [{ "var": "TIME" }], "operator": "str_range", "pattern": ["09:00:00-18:00:00"] }] }, { "id": "1000002", "release_version": "858", "charactor_version": "001", "disable": false, "opts": { "nolog": false }, "phase": "access", "action": "deny", "meta": 403, "severity": "high", "rule_name": "iputil", "desc": "某ip段内不许访问", "match": [{ "vars": [{ "var": "REMOTE_ADDR" }], "operator": "ip_utils", "pattern": ["192.168.6.0/24"] }] } ]3.设置 CC 防护:单一源 ip 每秒新建连接数不超过 35 个,单一源 ip 防护期间内连接总数为 85 个,单一路径每秒请求总数为 25 个,清洗时长设置为 20 秒。 waf_anti_cc 的 0.0.3 版有此功能: { "twaf_limit_conn": { "state":true, #CC防护模块开关 "log_state":true, #CC日志开关 "trigger_state":true, #触发开关 "clean_state":true, # 清洗开关 "trigger_thr":{ # 触发阈值(关系为“或”) "req_flow_max":1073741824, # 每秒请求流量,单位B "req_count_max":10000 #每秒请求数 }, "clean_thr":{ #清洗阈值 "new_conn_max":35,# 单一源ip每秒新建连接数 "conn_max":85, #单一源ip防护期间内连接总数 "req_max":50, #单一源ip每秒请求总数 "uri_frequency_max":25 #单一路径每秒请求总数 }, "attacks": 1, # -- 在一次CC攻击过程中,某ip触发清洗值的次数大于attacks,则此ip会一直被拦截,直到CC攻击结束 "timer_flush_expired":10, #清理shared_dict过期数据的时间间隔 "interval":10, #进入CC防护后发送日志的时间间隔,单位秒 "shared_dict_name":"twaf_limit_conn", # 存放其他信息的shared_dict "shared_dict_key": "remote_addr", #shared_dict的键值 "action":"DENY", # 触发CC防护执行的动作 "action_meta":403, "timeout":20#清洗时长(当再次触发清洗值时,重置) } }十二、提取 Web 服务日志 cd /var/log/nginx/ ls gzip -d access.log-20220930.gz cat access.log* > /root/access.log cd /root grep MSJ/1.0 access.log > /root/danger.log十三、Linux 系统日志管理 1、vim /etc/rsyslog.conf 添加 auth.info /var/log/auth.log 2、查找kern.* , 去掉#,并改为kern.debug 3、添加user.err /var/log/user.log 4、添加 *.* @192.168.1.2:514 5、vim /etc/logrotate.conf 把weekly注释掉,添加monthly 修改rotate参数为6 保存配置并重启服务 systemctl restart rsyslog十四、防火墙入侵检测配置与日志导出opnsense 1、打开opnsense虚拟机 - 输入账号密码(root:opnsense)- 输入2 - 选择1 LAN - N不使用DHCP - 配置IP 192.168.100.1 - 输入24子网掩码 - 其他全部回车默认 输入2 - 选择2 WAN - N不使用DHCP - 配置IP 180.0.0.101 -输入24子网掩码 - 其他全部回车默认 2、使用宿主主机访问https://192.168.100.1,点击左侧Firewall - Rules - LAN - 点击+新增一个LAN规则 - [TCP/IP Version]版本选为IPv4+Ipv6,其他配置保持默认保存并应用。 点击左侧Firewall - Rules - WAN - 点击+新增一个WAN规则 - [TCP/IP Version]版本选为IPv4+Ipv6,其他配置保持默认保存并应用。 3、点击左侧Services - Intrusion Detection - Administration Enabled:勾选 IPS mode:勾选 Promiscuous mode:勾选 Enable syslog alerts:勾选 Enable eve syslog output:勾选 Pattern matcher:Default Interfaces:LAN,WAN Rotate log:Daily Save logs:8 点击Apply应用配置 切换到User defined标签,+添加 Destination IP:192.168.100.100 Action:Alert Description:web 保存并应用 4、Lobby - Password 修改管理员密码为Inspc221 5、点击左侧Service - Intrusion Detectopm - Log File 拖动日志到最下方,点击按钮下载日志。并把日志文件夹拷贝到考生文件夹。 6、点击左侧System - Configuration - Backups 下载配置文件拷贝到考生文件夹中并重命名为IDS213.xml |
 2.为了防止防火墙被无关工作人员连线登录,提高设备的安全性使用,需修改管理员 admin 属性:关闭其 CONSOLE 的服务类型;
 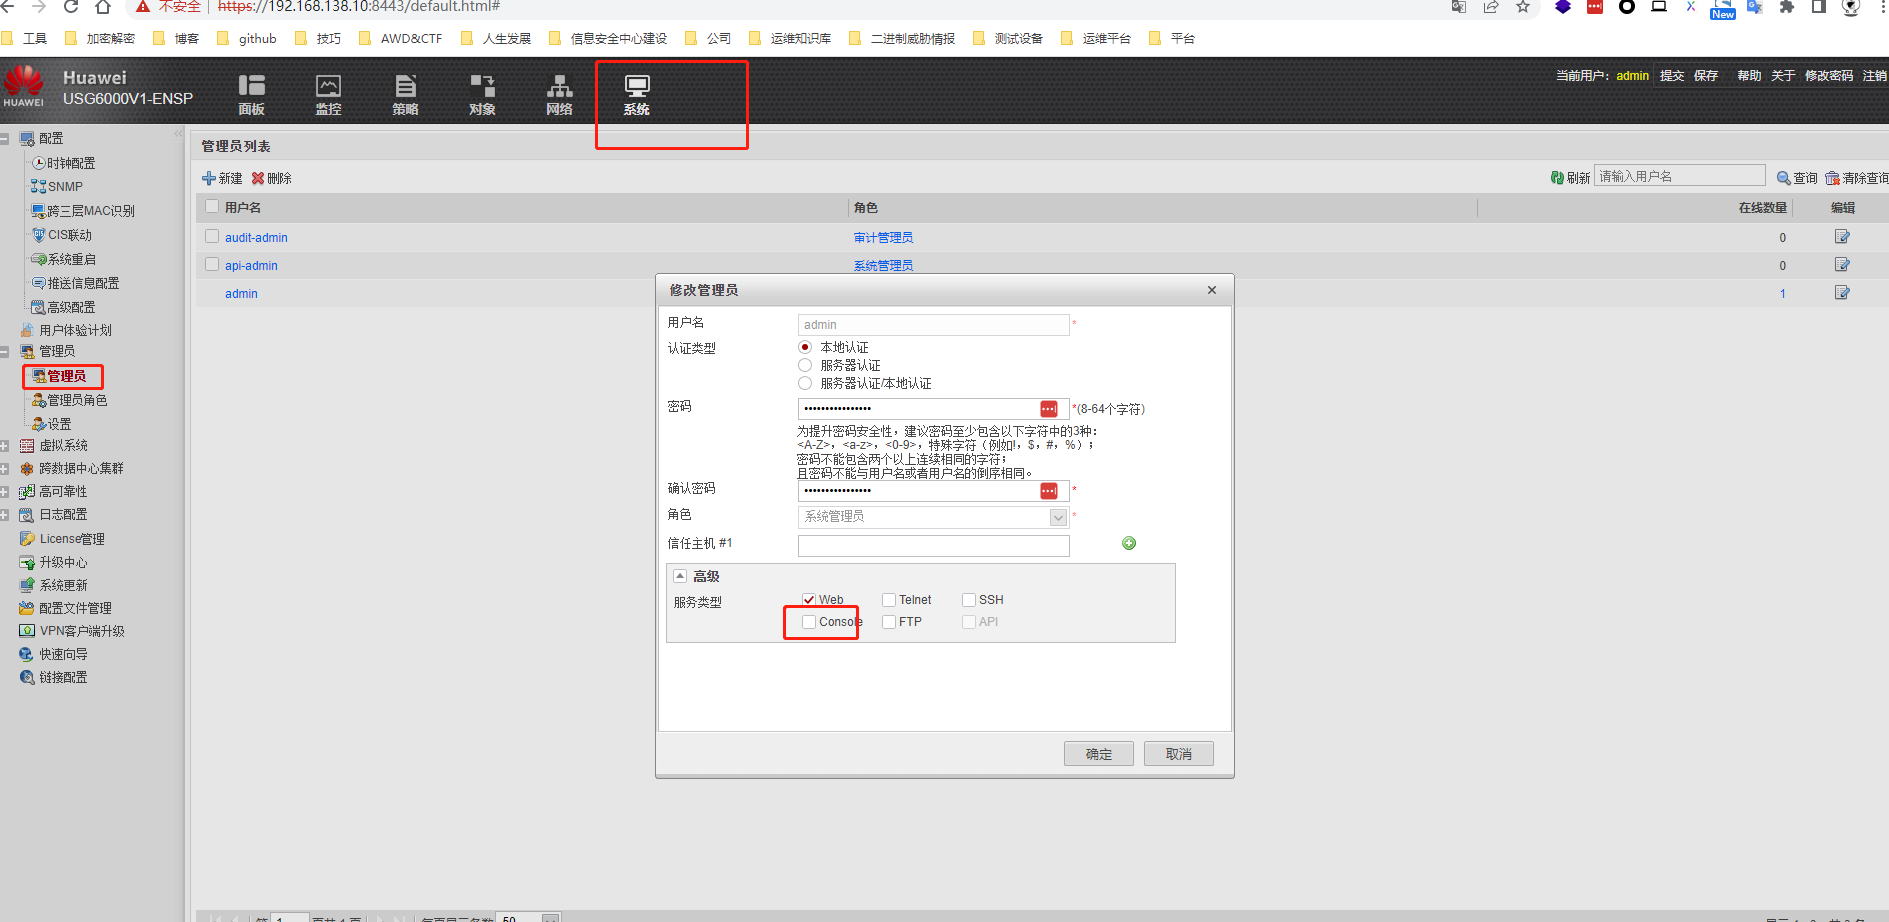 设置完成后,保存当前配置文件与拓扑图文件,并导出到桌面的“考生 文件夹”内,配置文件名为“GB3_112.cfg”,拓扑文件为“GB3_112.topo”。
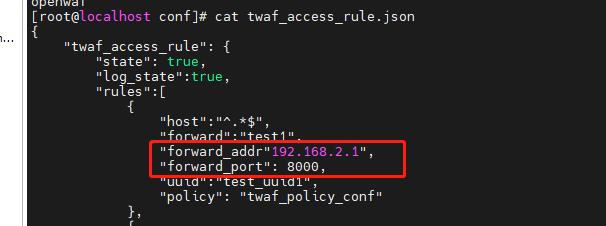 1.设置规则引擎:允许在周一到周五的早上 9 点至晚上 18 点访问,禁止访问/admin 目录,并且设置 192.168.6.0/24 网段不允许访问。
【本文地址】