| Opencv项目实战:09 物体尺寸测量 | 您所在的位置:网站首页 › 如何用苹果手机测量长度视频 › Opencv项目实战:09 物体尺寸测量 |
Opencv项目实战:09 物体尺寸测量
|
1、效果展示
我们将以两种方式来展示我们这个项目的效果。 下面这是视频的实时检测,我分别用了盒子和盖子来检测,按理来说效果不应该怎么差的,但我实在没有找到合适的背景与物体。且我的摄像头使用的是外设,我不得不手持,所以存在一点点的抖动,但我可以保证,它是缺少了适合检测物体与背景。
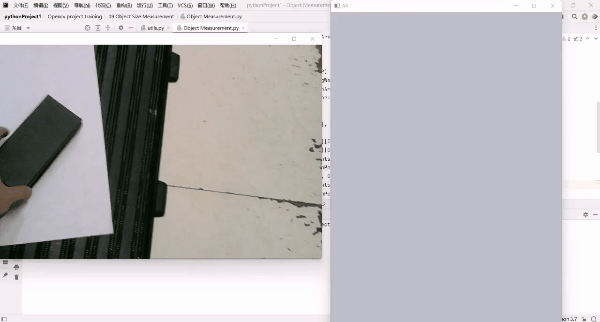
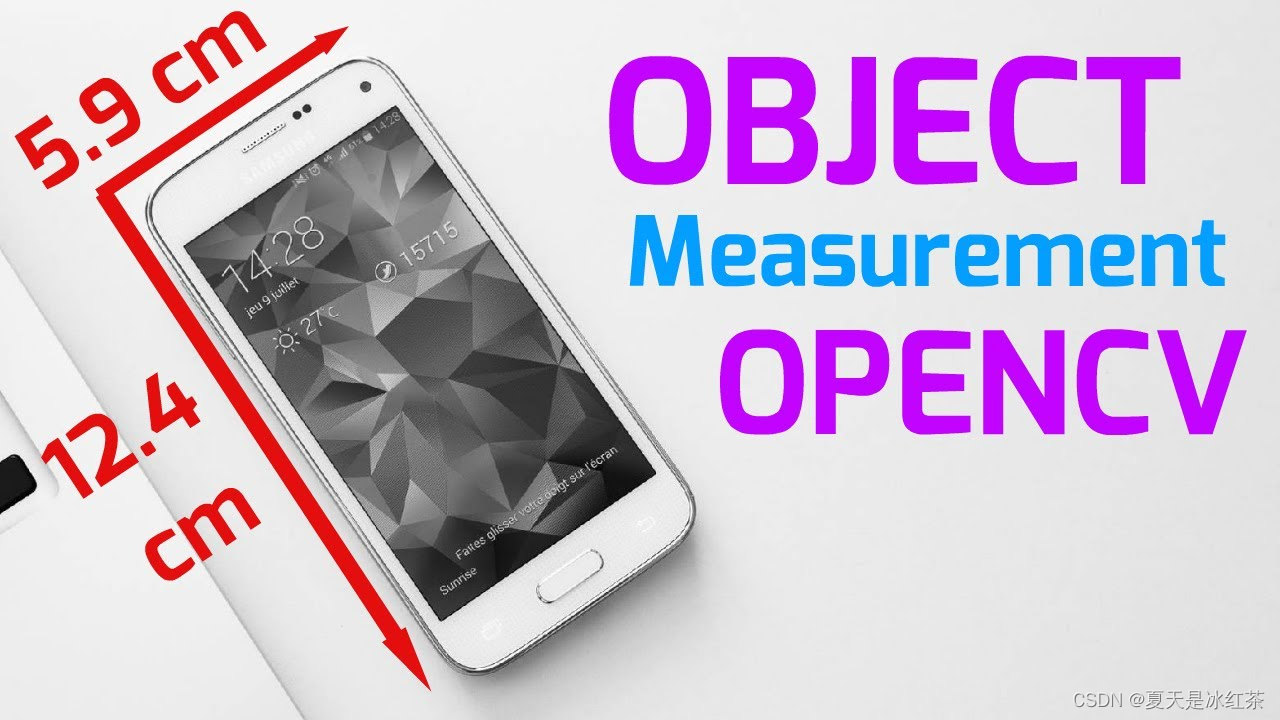
我使用手机拍了一张照片并经过了ps修改了背景,效果不错。
2、项目介绍 本项目中,我将选用A4纸张为背景,找到放在该区域中对象的长、宽。打印出相关的数值。 3、项目搭建
所有的资源,你都可以在我的GitHub上找到,我将在末尾附上链接 4、utils.py文件代码展示与讲解 在项目当中,我将引入utils,而utils是适用于在我们项目中所写的的文件。有了对它的理解能帮助我们更好的理解本项目,所以我觉得有必要在此叙述一番。 import cv2 import numpy as np def getContours(img, cThr=[100, 100], showCanny=False, minArea=1000, filter=0, draw=False): imgGray = cv2.cvtColor(img, cv2.COLOR_BGR2GRAY) imgBlur = cv2.GaussianBlur(imgGray, (5, 5), 1) imgCanny = cv2.Canny(imgBlur, cThr[0], cThr[1]) kernel = np.ones((5, 5)) imgDial = cv2.dilate(imgCanny, kernel, iterations=3) imgThre = cv2.erode(imgDial, kernel, iterations=2) if showCanny: cv2.imshow('Canny', imgThre) contours, hiearchy = cv2.findContours(imgThre, cv2.RETR_EXTERNAL, cv2.CHAIN_APPROX_SIMPLE) finalCountours = [] for i in contours: area = cv2.contourArea(i) if area > minArea: peri = cv2.arcLength(i, True) approx = cv2.approxPolyDP(i, 0.02 * peri, True) bbox = cv2.boundingRect(approx) if filter > 0: if len(approx) == filter: finalCountours.append([len(approx), area, approx, bbox, i]) else: finalCountours.append([len(approx), area, approx, bbox, i]) finalCountours = sorted(finalCountours, key=lambda x: x[1], reverse=True) if draw: for con in finalCountours: cv2.drawContours(img, con[4], -1, (0, 0, 255), 3) return img, finalCountours def reorder(myPoints): # print(myPoints.shape) myPointsNew = np.zeros_like(myPoints) myPoints = myPoints.reshape((4, 2)) add = myPoints.sum(1) myPointsNew[0] = myPoints[np.argmin(add)] myPointsNew[3] = myPoints[np.argmax(add)] diff = np.diff(myPoints, axis=1) myPointsNew[1] = myPoints[np.argmin(diff)] myPointsNew[2] = myPoints[np.argmax(diff)] return myPointsNew def warpImg(img, points, w, h, pad=20): # print(points) points = reorder(points) pts1 = np.float32(points) pts2 = np.float32([[0, 0], [w, 0], [0, h], [w, h]]) matrix = cv2.getPerspectiveTransform(pts1, pts2) imgWarp = cv2.warpPerspective(img, matrix, (w, h)) imgWarp = imgWarp[pad:imgWarp.shape[0] - pad, pad:imgWarp.shape[1] - pad] return imgWarp def findDis(pts1, pts2): return ((pts2[0] - pts1[0]) ** 2 + (pts2[1] - pts1[1]) ** 2) ** 0.5接下来,我将按照惯例讲解,我们就以每个函数的意义来讲。 getContours()函数,曾在我以前的博客中出现过。正如它的命名,我们是为了得到轮廓。将原始图像依次经过这些转化:灰度图像、高斯模糊、canny检测边缘、膨胀、侵蚀等。 cv2.findContours()从图像ROI中提取轮廓,然后在整个图像上下文中分析轮廓,参数cv2.RETR_EXTERNAL将会获取外部边缘; cv2.contourArea()计算轮廓面积; cv2.contourArea()计算轮廓周长或曲线长度; cv2.approxPolyDP()以指定精度近似多边形曲线; cv2.boundingRect()函数计算并返回指定点集或灰度图像非零像素的最小右上边界矩形; 之后用finalCountours这个空列表来接受我们需要用到的信息,再对其轮廓的大小进行排序,因为我们需要的是最大的边界框。 cv2.drawContours()绘制轮廓轮廓或填充轮廓,最后返回img, finalCountours。reorder函数,myPointsNew = np.zeros_like(myPoints),返回与myPoints具有相同形状和类型的零数组,在打印了myPoints.shape,它所返回的值是(4,1,2),不难理解,4指的是四个点,2指的是x,y,我们不需要中间的1,所以要对其进行重塑。np.argmin返回沿轴的最小值的索引,np.argmax返回沿轴的最大值的索引。所以此函数的作用是将顺序改为最下面的顺序。
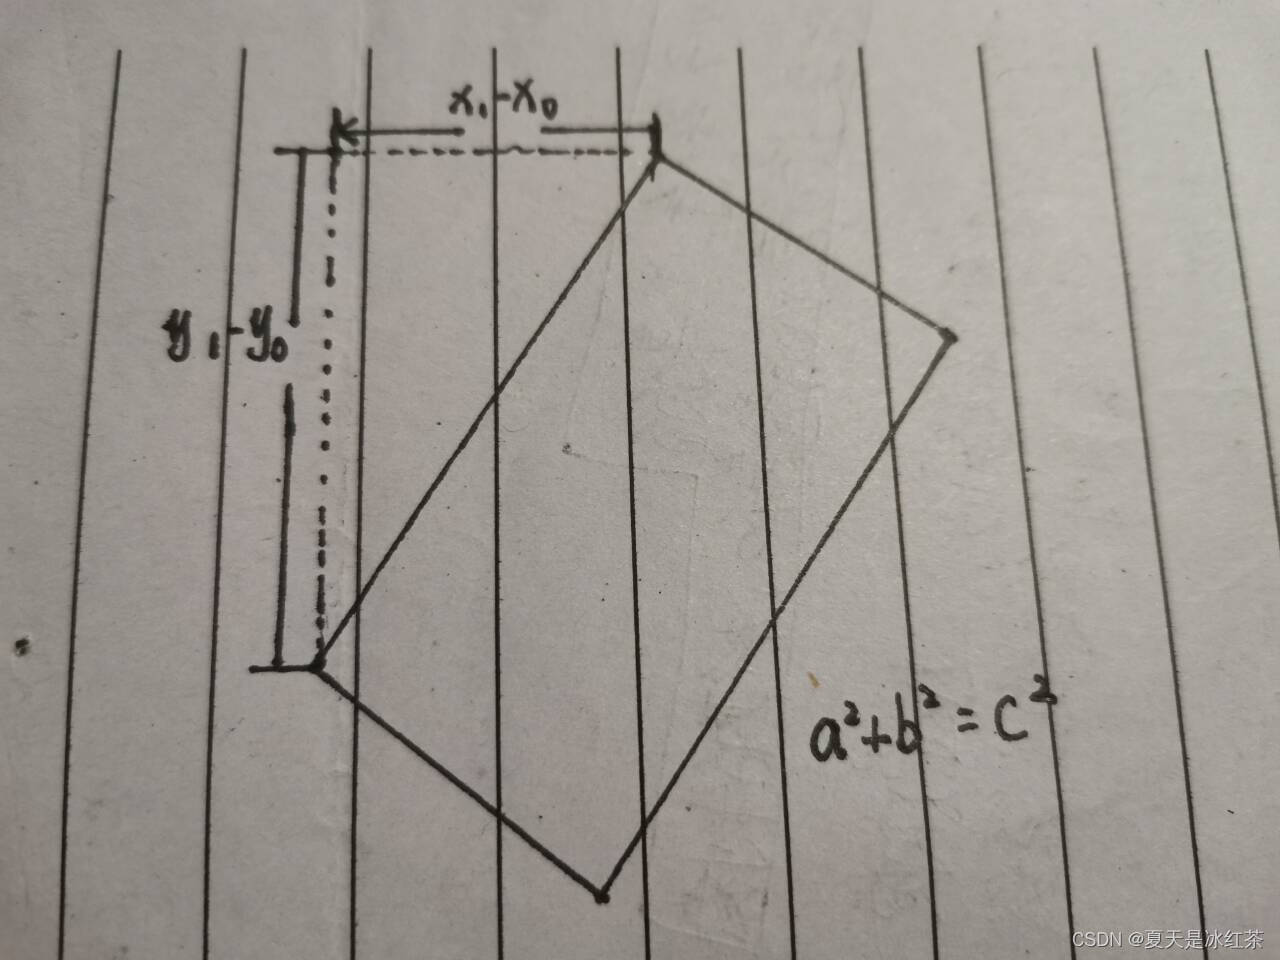
4.warpImg()函数,其实就是透视变换,详细的函数可以回头复习一下Opencv的文档,我在此不做多的讲述。 5.findDis()函数我们用一张图来解释,个人手绘:
4、项目代码展示与讲解 import cv2 import utils ################################### webcam = False path = '1.png' cap = cv2.VideoCapture(1) cap.set(10, 160) cap.set(3, 1920) cap.set(4, 1080) scale = 3 wP = 210 * scale hP = 297 * scale ################################### while True: if webcam: success, img = cap.read() else: img = cv2.imread(path) imgContours, conts = utils.getContours(img, minArea=50000, filter=4) if len(conts) != 0: biggest = conts[0][2] # print(biggest) imgWarp = utils.warpImg(img, biggest, wP, hP) imgContours2, conts2 = utils.getContours(imgWarp, minArea=2000, filter=4, cThr=[50, 50], draw=False) if len(conts) != 0: for obj in conts2: cv2.polylines(imgContours2, [obj[2]], True, (0, 255, 0), 2) nPoints = utils.reorder(obj[2]) nW = round((utils.findDis(nPoints[0][0] // scale, nPoints[1][0] // scale) / 10), 1) nH = round((utils.findDis(nPoints[0][0] // scale, nPoints[2][0] // scale) / 10), 1) cv2.arrowedLine(imgContours2, (nPoints[0][0][0], nPoints[0][0][1]), (nPoints[1][0][0], nPoints[1][0][1]), (255, 0, 255), 3, 8, 0, 0.05) cv2.arrowedLine(imgContours2, (nPoints[0][0][0], nPoints[0][0][1]), (nPoints[2][0][0], nPoints[2][0][1]), (255, 0, 255), 3, 8, 0, 0.05) x, y, w, h = obj[3] cv2.putText(imgContours2, '{}cm'.format(nW), (x + 30, y - 10), cv2.FONT_HERSHEY_COMPLEX_SMALL, 1.5, (255, 0, 255), 2) cv2.putText(imgContours2, '{}cm'.format(nH), (x - 70, y + h // 2), cv2.FONT_HERSHEY_COMPLEX_SMALL, 1.5, (255, 0, 255), 2) cv2.imshow('A4', imgContours2) img = cv2.resize(img, (0, 0), None, 0.5, 0.5) cv2.imshow('Original', img) if cv2.waitKey(1) & 0xFF ==27: break 那么,本项目的代码我看了一下,将utils.py文件看懂之后,不难理解,所以本项目我就不仔细讲解了。 5、项目资源 GitHub:https://github.com/Auorui/Opencv-project-training/tree/main/Opencv%20project%20training/09%20Object%20Size%20Measurement
6、项目总结 本项目主要是运用了之前扫描文档的思想,以A4纸为背景,检测其中区域的物体长和宽。我的摄像头无法固定,所以是手持的,且由于我在寝室里面是真的没有找到合适的测量物体以及背景色(全是米色或原木色的)。所以效果有所欠缺,但经过ps修改的图片,检测的效果还是很不错的。 那么祝你在本项目中玩的开心,否则我会在下一次项目中见到你!!!
|

【本文地址】