| Windows11 显卡GTX1650 搭建CUDA+cuDNN环境,并安装对应版本的Anaconda和TensorFlow | 您所在的位置:网站首页 › 奥德赛gtx1650怎么设置畅玩 › Windows11 显卡GTX1650 搭建CUDA+cuDNN环境,并安装对应版本的Anaconda和TensorFlow |
Windows11 显卡GTX1650 搭建CUDA+cuDNN环境,并安装对应版本的Anaconda和TensorFlow
|
文章目录
前言一、安装部署环境二、安装各个软件1.CUDA和cuDNN的版本选择及安装1.1 CUDA的版本选择及安装1.2 cuDNN的版本选择及安装1.3 测试CUDA是否安装成功
2. TensorFlow-GPU、Python和Anaconda版本的选择与安装2.1 安装Anaconda并创建虚拟环境2.2 安装TensorFlow-GPU2.3 测试TensorFlow-GPU是否可用
三. 参考文章总结
前言
为了调用计算机的GTX1650显卡进行深度学习的模型和训练,需要先搭建好CUDA和cuDNN环境。此外,TensorFlow-gpu版本对python、CUDA和cuDNN的版本也有要求,安装前需要先确定好各个软件需要安装的版本。 提示:以下是本篇文章正文内容,下面案例可供参考 一、安装部署环境 安装环境软件版本PC系统版本Windows 11 21H2显卡驱动版本496.76显卡CUDA算力7.5CUDA版本cuda_10.0.130_411.31_win10cuDNN版本cudnn-10.0-windows10-x64-v7.6.5.32Python版本python-3.7.9-amd64Anaconda版本Anaconda3-2020.02-Windows-x86_64TensorFlow-GPU版本1.13.1显卡信息: 显卡CUDA算力: 首先安装最新的显卡驱动,从NVIDIA驱动程序官网下载符合本机显卡的最新驱动,默认安装即可。 查看本机显卡支持的CUDA版本,打开NVIDIA Control Panel(NVIDIA控制面板),点左下角系统信息→组件,查看NVCUDA.DLL的系统版本,此为显卡支持的最高CUDA版本。 目前网上的教程大多要装CUDA9.0版本配合VS2015使用,但由于GTX1650显卡上市较晚,安装CUDA9.0时提示以下错误: 为了后续配合Visual Studio 2015和TensorFlow-GPU版本使用,选择CUDA10.0版本安装,进CUDA下载官网,下载离线包 若解压时提示Could not create file “C:\TEMP\CUDA1\GFExperience\chrome_elf.dll” 拒绝访问 错误,将电脑上的杀毒软件(360安全卫士)全部退出,再重新解压即可出现CUDA安装程序界面。 cuDNN版本 cuDNN v7.6.5 (November 5th, 2019), for CUDA 10.0 cmd里查看版本信息nvcc -V cmd里输入nvidia-smi查看GPU运行时的监测界面 进入下面图片的路径(C:\Program Files\NVIDIA GPU Computing Toolkit\CUDA\v10.0\extras\demo_suite),然后按住‘shift’+鼠标右击,点击’在此处打开powershell窗口‘,输入: .\bandwidthTest.exe 返回Result=PASS TensorFlow与python、CUDA、cuDNN、编译器环境的对应关系可参考官网的说明 Windows端地址:https://tensorflow.google.cn/install/source_windows 将Anaconda3-2020.02-Windows-x86_64.exe默认安装即可,安装完成后打开Anaconda Navigator,创建tensorflow-gpu虚拟环境,python版本选择3.7。
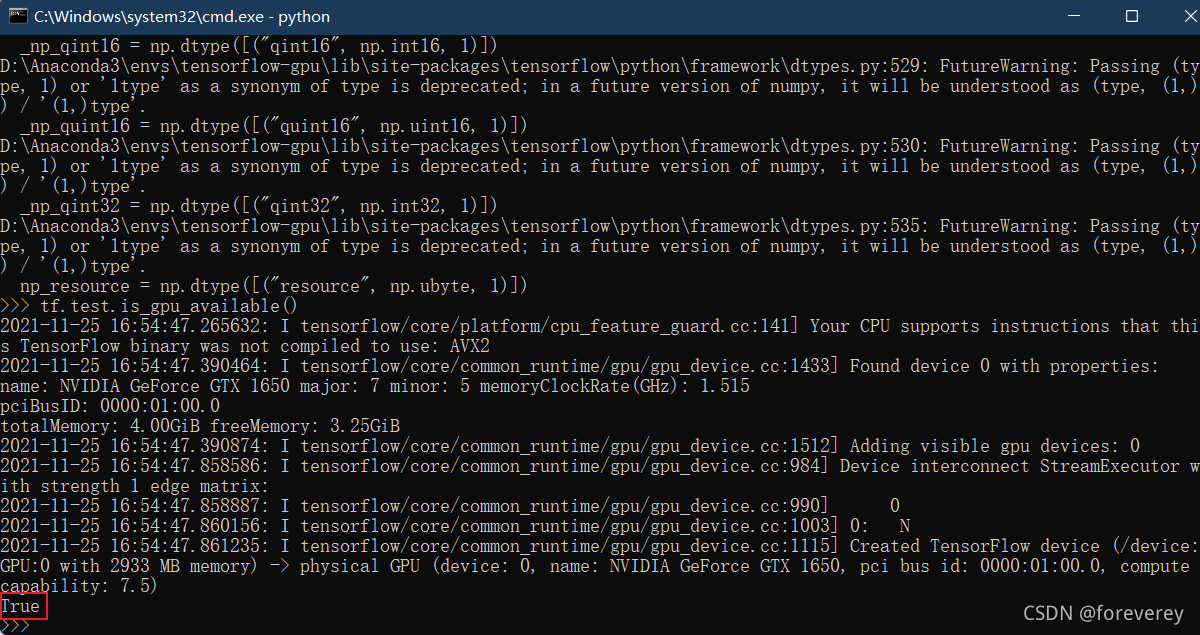
测试TensorFlow-GPU的第一种方法: 输入以下命令测试,若打印true,表示调用GPU成功。 (tensorflow-gpu) C:\Users\admin>python Python 3.7.12 | packaged by conda-forge | (default, Oct 26 2021, 05:35:01) [MSC v.1916 64 bit (AMD64)] on win32 Type "help", "copyright", "credits" or "license" for more information. >>> import tensorflow as tf >>>import tensorflow as tf >>>tf.test.is_gpu_available() 2021-11-25 16:54:47.265632: I tensorflow/core/platform/cpu_feature_guard.cc:141] Your CPU supports instructions that this TensorFlow binary was not compiled to use: AVX2 2021-11-25 16:54:47.390464: I tensorflow/core/common_runtime/gpu/gpu_device.cc:1433] Found device 0 with properties: name: NVIDIA GeForce GTX 1650 major: 7 minor: 5 memoryClockRate(GHz): 1.515 pciBusID: 0000:01:00.0 totalMemory: 4.00GiB freeMemory: 3.25GiB 2021-11-25 16:54:47.390874: I tensorflow/core/common_runtime/gpu/gpu_device.cc:1512] Adding visible gpu devices: 0 2021-11-25 16:54:47.858586: I tensorflow/core/common_runtime/gpu/gpu_device.cc:984] Device interconnect StreamExecutor with strength 1 edge matrix: 2021-11-25 16:54:47.858887: I tensorflow/core/common_runtime/gpu/gpu_device.cc:990] 0 2021-11-25 16:54:47.860156: I tensorflow/core/common_runtime/gpu/gpu_device.cc:1003] 0: N 2021-11-25 16:54:47.861235: I tensorflow/core/common_runtime/gpu/gpu_device.cc:1115] Created TensorFlow device (/device:GPU:0 with 2933 MB memory) -> physical GPU (device: 0, name: NVIDIA GeForce GTX 1650, pci bus id: 0000:01:00.0, compute capability: 7.5) True
在命令行中执行,若输出以下内容,表示调用GPU成功,TensorFlow-GPU可用。 (tensorflow-gpu) C:\Users\admin>python tfgpu-test.py 2021-11-25 16:59:45.388468: I tensorflow/core/platform/cpu_feature_guard.cc:141] Your CPU supports instructions that this TensorFlow binary was not compiled to use: AVX2 2021-11-25 16:59:45.495860: I tensorflow/core/common_runtime/gpu/gpu_device.cc:1433] Found device 0 with properties: name: NVIDIA GeForce GTX 1650 major: 7 minor: 5 memoryClockRate(GHz): 1.515 pciBusID: 0000:01:00.0 totalMemory: 4.00GiB freeMemory: 3.25GiB 2021-11-25 16:59:45.496494: I tensorflow/core/common_runtime/gpu/gpu_device.cc:1512] Adding visible gpu devices: 0 2021-11-25 16:59:45.834991: I tensorflow/core/common_runtime/gpu/gpu_device.cc:984] Device interconnect StreamExecutor with strength 1 edge matrix: 2021-11-25 16:59:45.835298: I tensorflow/core/common_runtime/gpu/gpu_device.cc:990] 0 2021-11-25 16:59:45.836502: I tensorflow/core/common_runtime/gpu/gpu_device.cc:1003] 0: N 2021-11-25 16:59:45.837311: I tensorflow/core/common_runtime/gpu/gpu_device.cc:1115] Created TensorFlow device (/device:GPU:0 with 2933 MB memory) -> physical GPU (device: 0, name: NVIDIA GeForce GTX 1650, pci bus id: 0000:01:00.0, compute capability: 7.5) 2021-11-25 16:59:45.839926: I tensorflow/core/common_runtime/gpu/gpu_device.cc:1512] Adding visible gpu devices: 0 2021-11-25 16:59:45.840107: I tensorflow/core/common_runtime/gpu/gpu_device.cc:984] Device interconnect StreamExecutor with strength 1 edge matrix: 2021-11-25 16:59:45.840986: I tensorflow/core/common_runtime/gpu/gpu_device.cc:990] 0 2021-11-25 16:59:45.842483: I tensorflow/core/common_runtime/gpu/gpu_device.cc:1003] 0: N 2021-11-25 16:59:45.843361: I tensorflow/core/common_runtime/gpu/gpu_device.cc:1115] Created TensorFlow device (/device:GPU:0 with 2933 MB memory) -> physical GPU (device: 0, name: NVIDIA GeForce GTX 1650, pci bus id: 0000:01:00.0, compute capability: 7.5) Default GPU Device: /device:GPU:0至此完成了Anaconda和TensorFlow-GPU的安装与测试。 三. 参考文章《windows10 显卡GTX1050安装tensorflow-gpu教程以及Tensorflow不同版本要求与CUDA及CUDNN版本对应关系(GPU版本)》 《windows tensorflow-gpu的安装》 《在 Windows 环境中从源代码构建》 《Tensorflow不同版本要求与CUDA及CUDNN版本对应关系》 《anaconda python 版本对应关系》 等。 总结以上内容仅供参考,按照步骤操作时应对应修改相关文件路径。 |


 将Base Installer下载下来,双击解压默认下一步安装即可。
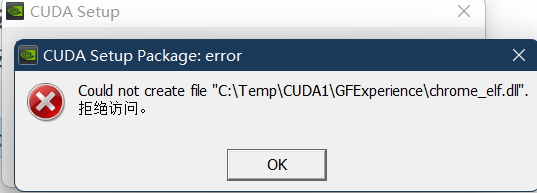 安装完成后应该会自动将CUDA安装位置添加到系统的环境变量中,可以打开设置→系统→高级系统设置→环境变量→系统环境变量,检查是否有下图红框处的环境变量,若没有,手动添加即可。
 登录上NVIDIA账号,下载zip包解压后,将对应文件夹的文件放到CUDA安装路径下的对应文件夹里即可。 将其中’bin‘中的’cudnn64_7.dll‘拷贝到cuda10.0安装路径下的bin文件夹中,cuda对应的文件夹的路径为C:\Program Files\NVIDIA GPU Computing Toolkit\CUDA\v10.0\bin,如下图所示:
  同样的,将cudnn中include下的’cudnn.h‘拷贝到cuda文件夹中的include的文件夹中(C:\Program Files\NVIDIA GPU Computing Toolkit\CUDA\v10.0\include) ,cudnn文件中的’lib/x64’中的‘cudnn.lib’拷贝到cude文件中的’lib/x64’中(C:\Program Files\NVIDIA GPU Computing Toolkit\CUDA\v10.0\lib\x64)。 至此完成了CUDA10.0和cuDNN的安装。
 注:若安装的是CUDA9.0 ,在cmd中需进到以下路径(C:\Program Files\NVIDIA Corporation\NVSMI)执行nvidia-smi才能看到GPU的监测界面。
 同理输入:.\deviceQuery.exe 返回:Result=PASS,说明CUDA安装成功了。
  同时从上图的 CUDA Capability Major/Minor version number 行可以看到CUDA算力为7.5。
 需要安装的是Windows TensorFlow-GPU版本,前面已部署好CUDA10.0环境,所以依据上表,选择安装TensorFlow-GPU 1.13.1版本,该版本支持python3.5-3.7,我们选择python 3.7版本。我们在安装anaconda的时候你并不知道会包含哪个版本的python,可以参考《anaconda python 版本对应关系》此篇博文的表来决定安装哪个版本的Anaconda。在Anaconda下载镜像站
 创建完成后选中tensorflow-gpu,Open with Terminal

 测试TensorFlow-GPU的第二种方法: 将以下代码保存成tfgpu-get.py文件
【本文地址】