|
功能介绍:图片通过原生input上传,使用canvas进行图片裁剪。 裁剪框限制不允许超出图片范围,图片限制了最大宽高(自行修改要的尺寸),点击确认获取新的base64图片数据
注:fixed布局不适用该方案,若是fixed布局请查看另一篇文章 效果图: 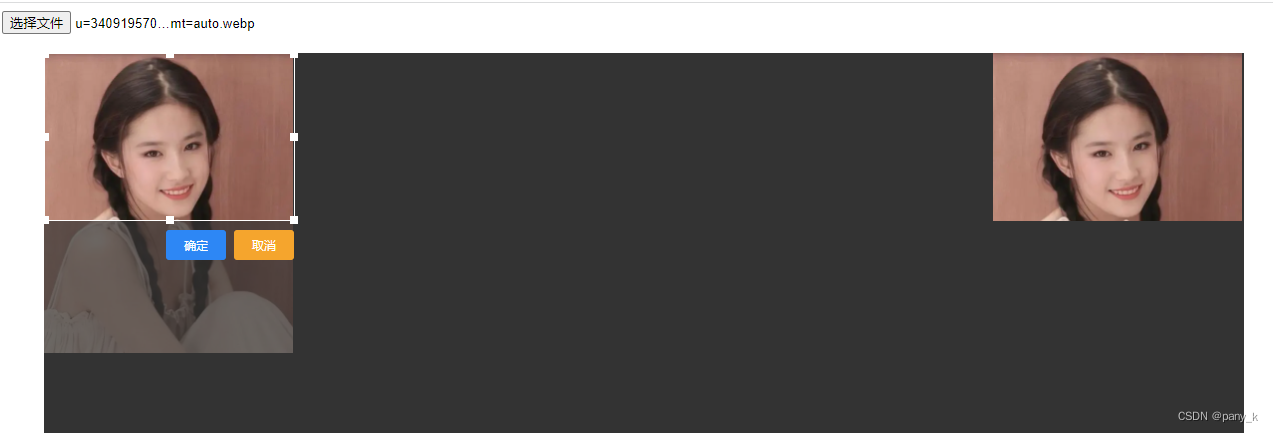 上代码 上代码
DOCTYPE HTML>
图片裁剪
确定
取消
body {}
#box {
width: 1200px;
height: 600px;
background: #333;
position: absolute;
top: 50px;
left: 50px;
}
.Divmin-btn {
bottom: -40px;
width: 60px;
height: 30px;
line-height: 30px;
color: white;
font-size: 12px;
text-align: center;
display: inline-block;
position: absolute;
border-radius: 3px 3px 3px 3px;
}
.Divmin-btn:hover {
background-color: rgba(60, 103, 222, 0.6);
color: #efeeee;
}
.Divmin-btn:active {
background-color: rgba(69, 94, 167, 0.6);
color: #efeeee;
}
.Divmin {
position: absolute;
width: 8px;
height: 8px;
background: #fff;
}
.up-left {
margin-top: -4px;
margin-left: -4px;
cursor: nw-resize;
}
.up {
left: 50%;
/*父元素盒子dragDiv宽度的一半,注意要有绝对定位*/
margin-left: -4px;
top: -4px;
cursor: n-resize;
}
.up-right {
top: -4px;
right: -4px;
cursor: ne-resize;
}
.right {
top: 50%;
margin-top: -4px;
right: -4px;
cursor: e-resize;
}
.right-down {
right: -4px;
bottom: -4px;
cursor: se-resize;
}
.down {
bottom: -4px;
left: 50%;
margin-left: -4px;
cursor: s-resize;
}
.left-down {
left: -4px;
bottom: -4px;
cursor: sw-resize;
}
.left {
left: -4px;
top: 50%;
margin-top: -4px;
cursor: w-resize;
}
#img1,
#img2 {
max-width: 600px;
max-height: 300px;
}
//禁止图片被选中
document.onselectstart = new Function('event.returnValue = false;');
let confirmBtn = document.getElementById('confirmBtn')
confirmBtn.addEventListener('click', () => {
drawRect();
})
// 获取图片base64数据
let npt = document.getElementById("npt");
npt.onchange = function () {
let reader = new FileReader();
reader.readAsDataURL(npt.files[0]);
reader.onloadend = function (e) {
img1.src = e.target.result;
img2.src = e.target.result;
// console.log(e.target.result);// 图片的base64数据
getImage(e.target.result)
};
}
let canvas = document.createElement("canvas");
let ctx = canvas.getContext('2d');
// 创建图片
let getImage = function (b64) {
// 创建图片对象
let image = new Image();
image.src = `${b64}`;
image.onload = function () {
// 获取原图宽高
let height = img1.offsetHeight;
let width = img1.offsetWidth;
//设置canvas大小与原图宽高一致
canvas.height = height;
canvas.width = width;
// 在canvas绘制图片
ctx.drawImage(this, 0, 0, width, height);
// 截图:
// drawRect();
// 图片上传后设置裁剪框与图片大小一致
dragDiv.style.height = img1.offsetHeight + 'px'
dragDiv.style.width = img1.offsetWidth + 'px'
dragDiv.style.top = 0 + 'px';
dragDiv.style.left = 0 + 'px';
setChoice();
}
};
// 绘制截图矩阵
let drawRect = function () {
let top = dragDiv.offsetTop;
let right = dragDiv.offsetLeft + dragDiv.offsetWidth;
let bottom = dragDiv.offsetTop + dragDiv.offsetHeight;
let left = dragDiv.offsetLeft;
// 截图宽度
let w = right - left;
// 截图高度
let h = bottom - top;
// 获取截图区域内容,截图区域的像素点矩阵
let cutImage = ctx.getImageData(left, top, w, h);
// 裁剪后的base64数据
let newImage = createNewCanvas(cutImage, w, h);
later.src = newImage;
// console.log(newImage);// 裁剪后的base64数据
};
var createNewCanvas = function (content, width, height) {
var nCanvas = document.createElement('canvas');
var nCtx = nCanvas.getContext('2d');
nCanvas.width = width;
nCanvas.height = height;
nCtx.putImageData(content, 0, 0);// 将画布上指定矩形的像素数据,通过 putImageData() 方法将图像数据放回画布
return nCanvas.toDataURL('image/png');
}
//获取id的函数
function $(id) {
if (id.indexOf(".") == 0) {
let className = id.substring(1, id.length);
let els = document.getElementsByClassName(className);
return els[0];
}
return document.getElementById(id);
}
//获取元素相对于屏幕左边及上边的距离,利用offsetLeft
function getPosition(el) {
let left = el.offsetLeft;
let top = el.offsetTop;
let parent = el.offsetParent;
while (parent != null) {
left += parent.offsetLeft;
top += parent.offsetTop;
parent = parent.offsetParent;
}
return { "left": left, "top": top };
}
let dragDiv = $('dragDiv');
let box = $('box')
let img1 = $('img1')
let rightDiv = $('.right');
let isDraging = false;
let contact = "";//表示被按下的触点
//鼠标按下时
$('.right').onmousedown = function () {
isDraging = true;
contact = "right";
}
$('.left').onmousedown = function () {
isDraging = true;
contact = "left";
}
$('.down').onmousedown = function () {
isDraging = true;
contact = "down";
}
$('.up').onmousedown = function () {
isDraging = true;
contact = "up";
}
$('.up-right').onmousedown = function () {
isDraging = true;
contact = "up-right";
}
$('.right-down').onmousedown = function () {
isDraging = true;
contact = "down-right";
}
$('.up-left').onmousedown = function () {
isDraging = true;
contact = "up-left";
}
$('.left-down').onmousedown = function () {
isDraging = true;
contact = "down-left";
}
//鼠标松开时
window.onmouseup = function () {
isDraging = false;
}
//鼠标移动时
window.onmousemove = function (e) {
var e = e || window.event;
if (isDraging == true) {
switch (contact) {
case "up":
upMove(e);
break;
case "right":
rightMove(e);
break;
case "down":
downMove(e);
break;
case "left":
leftMove(e);
break;
case "up-right":
upMove(e);
rightMove(e);
break;
case "down-right":
downMove(e);
rightMove(e);
break;
case "down-left":
downMove(e);
leftMove(e);
break;
case "up-left":
upMove(e);
leftMove(e);
break;
}
}
}
//up移动
function upMove(e) {
let y = e.clientY;//鼠标位置的纵坐标
let heightBefore = dragDiv.offsetHeight - 2;//选取框变化前的高度
let addHeight = getPosition(dragDiv).top - y;//增加的高度
let height = heightBefore + addHeight
let top = dragDiv.offsetTop - addHeight
if (top
let heightBefore = dragDiv.offsetHeight - 2;
let bottom = box.offsetTop + img1.offsetHeight
let addHeight = e.clientY - getPosition(dragDiv).top - dragDiv.offsetHeight;
if (e.clientY >= bottom) return
let height = heightBefore + addHeight
dragDiv.style.height = heightBefore + addHeight + 'px';
setChoice();
}
//left移动
function leftMove(e) {
let widthBefore = dragDiv.offsetWidth - 2;
let addWidth = getPosition(dragDiv).left - e.clientX;//增加的宽度等于距离屏幕左边的距离减去鼠标位置横坐标
let width = widthBefore + addWidth
let left = dragDiv.offsetLeft - addWidth
if (left |