| 毕业设计 : 基于深度学习的口罩佩戴检测【全网最详细】 | 您所在的位置:网站首页 › 口罩识别原理 › 毕业设计 : 基于深度学习的口罩佩戴检测【全网最详细】 |
毕业设计 : 基于深度学习的口罩佩戴检测【全网最详细】
|
文章目录
🚩 0 简介🚩1 课题背景🚩 2 口罩佩戴算法实现2.1 YOLO 模型概览2.2 YOLOv32.3 YOLO 口罩佩戴检测实现数据集
2.4 实现代码2.5 检测效果
🚩 3 口罩佩戴检测算法评价指标3.1 准确率(Accuracy)3.2 精确率(Precision)和召回率(Recall)3.3 平均精度(Average precision AP)
🚩 4 最后
🚩 0 简介
今天学长向大家介绍一个机器视觉的毕设项目 基于深度学习的口罩佩戴检测【全网最详细】 - opencv 卷积神经网络 机器视觉 深度学习 🚩1 课题背景从2019年末开始,新型冠状病毒肺炎(COVID-19)在我国全面爆发并迅速传播,同时国家卫生健康委员会也积极响应密切关注全国疫情的动态变化并且发布了相关的预防指南,强调个人出行需要做好安全措施,在公共场合必须严格按照要求佩戴口罩。自从新型冠状病毒蔓延以来,各行各业都受到了巨大的冲击,严重影响到人们正常生产和生活。 新型冠状病毒具有很强的传播和生存能力,只要条件合适能存活五天之久,并且可以通过唾液,飞沫等多种方式进行传播,为有效的减少病毒的传播佩戴口罩是一个很好的办法。尽管这一时期国外的形势不容乐观,但是在全国上下齐心努力之下我国的防疫取得了阶段性成功,各行业都在积极复苏,管理也随之变化进入到常态化阶段。在这一阶段复工复产也是大势所趋,口罩出行也成为了一种常态。正确佩戴口罩能够有效减少飞沫传染的风险,特别是在公共场所,这种举措尤为重要。但是,仍然还需要提高公众对主动佩戴口罩的观念,在常态化管理下人们的防范意识越来越薄弱,口罩随意佩戴或者不佩戴的情况屡见不鲜。 因此,在这期间,有意识地戴口罩不仅仅是每个公民的公共道德还是自我修养的表现。这不但需要个人积极配合,而且还需要某些监管以及有效的治理方法。
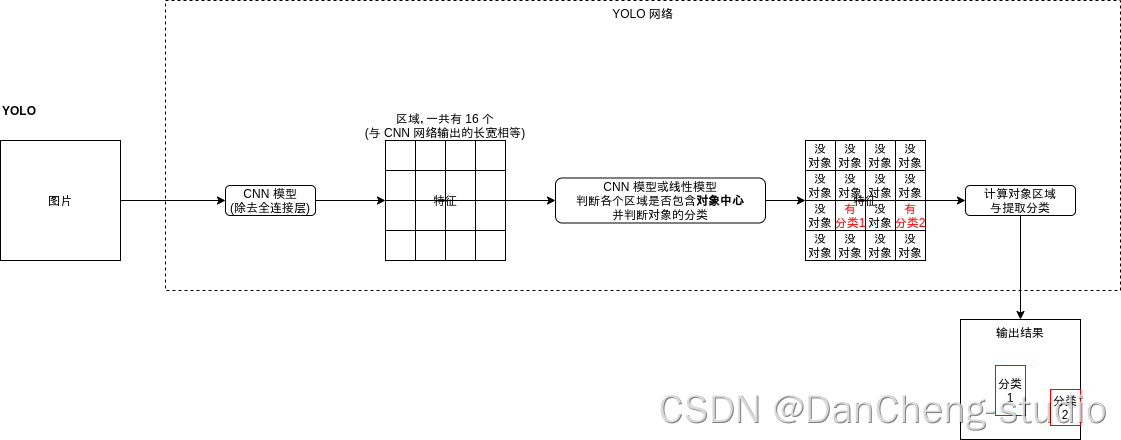
YOLO 的缩写是 You only look once。YOLO 模型可以直接根据图片输出包含对象的区域与区域对应的分类,一步到位,不像 RCNN 系列的模型需要先计算包含对象的区域,再根据区域判断对应的分类,YOLO 模型的速度比 RCNN 系列的模型要快很多。 YOLO 模型的结构如下:
YOLO 模型与 Faster-RCNN 的区域生成网络最大的不同是会判断各个区域是否包含对象中心,如下图中狗脸覆盖了四个区域,但只有左下角的区域包含了狗脸的中心,YOLO 模型应该只判断这个区域包含对象。
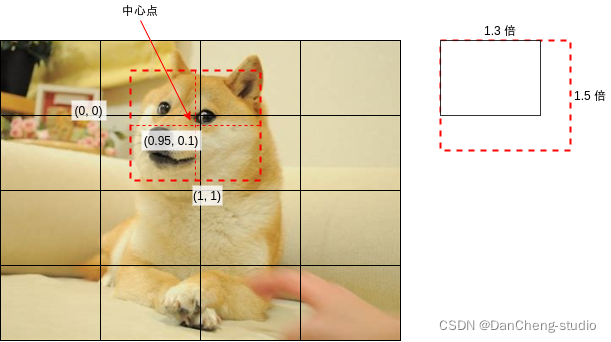
当然,如果对象中心非常接近区域的边界,那么判断起来将会很困难,YOLO 模型在训练的时候会忽略对象重叠率高于一定水平的区域,具体可以参考后面给出的代码。 YOLO 模型会针对各个区域输出以下的结果,这里假设有三个分类: 是否包含对象中心 (是为 1, 否为 0)区域偏移 x区域偏移 y区域偏移 w区域偏移 h分类 1 的可能性 (0 ~ 1)分类 2 的可能性 (0 ~ 1)分类 3 的可能性 (0 ~ 1)输出结果的维度是 批次大小, 区域数量, 5 + 分类数量。 区域偏移用于调整输出的区域范围,例如上图中狗脸的中心点大约在区域的右上角,如果把区域左上角看作 (0, 0),右下角看作 (1, 1),那么狗脸中心点应该在 (0.95, 0.1) 的位置,而狗脸大小相对于区域长宽大概是 (1.3, 1.5) 倍,生成训练数据的时候会根据这 4 个值计算区域偏移,具体计算代码在下面给出。
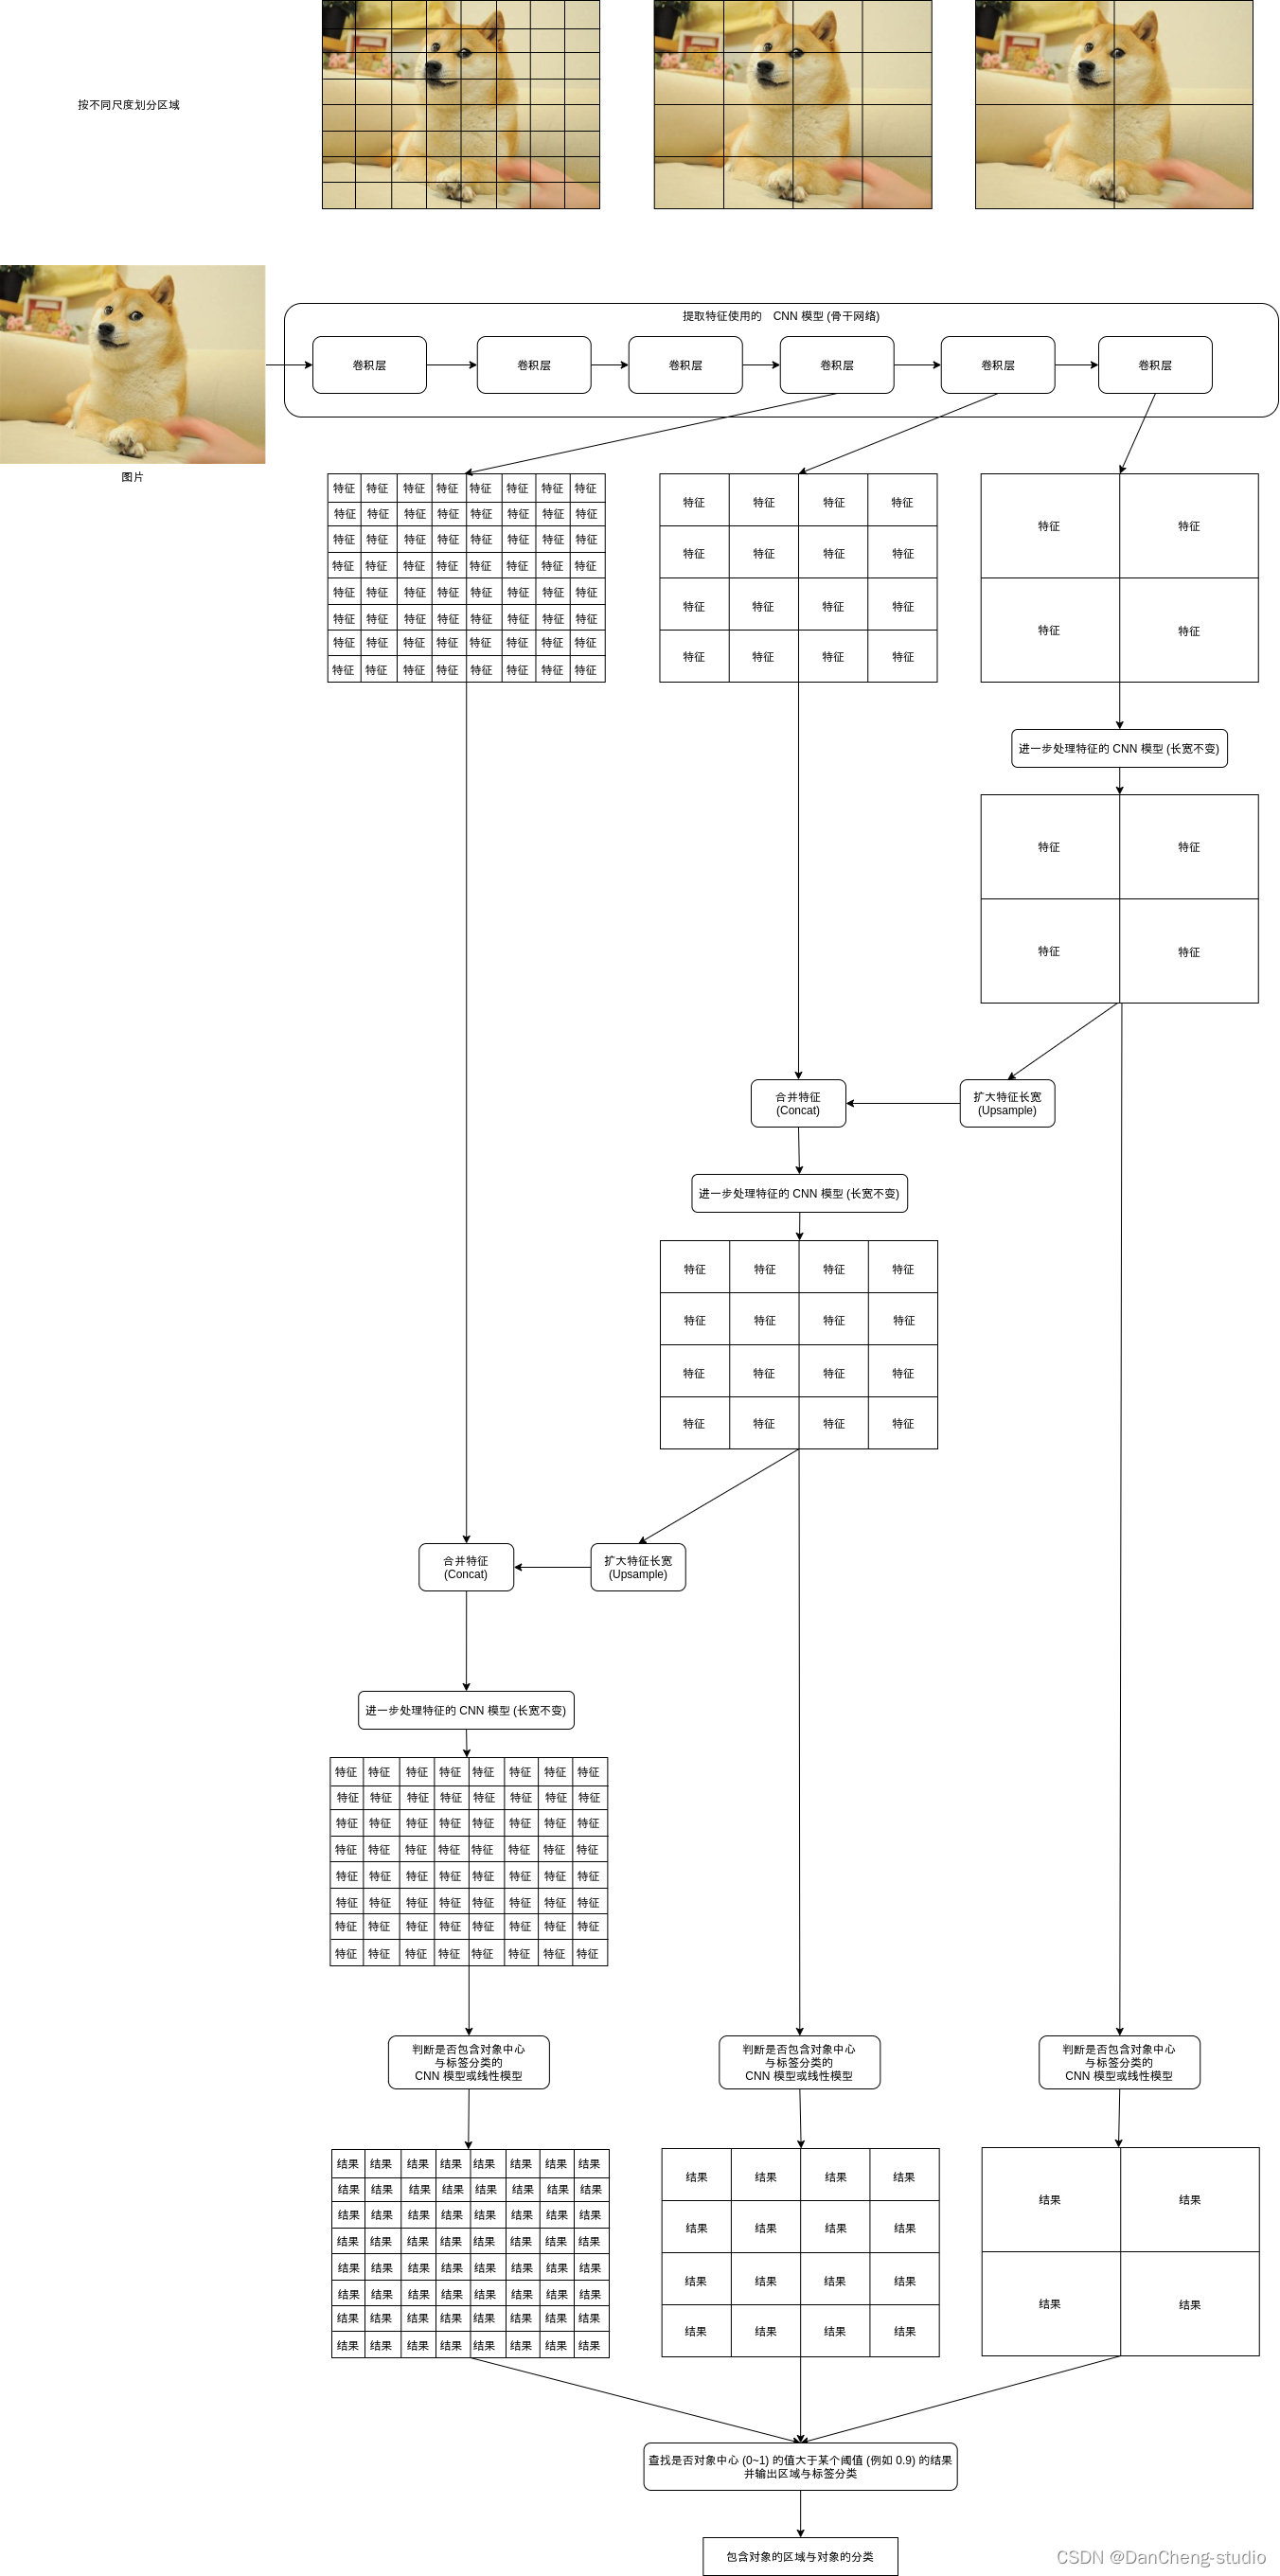
看到这里你可能会想,YOLO 模型看起来很简单啊,我可以丢掉操蛋的 Faster-RCNN 模型了🤢。 不,没那么简单,以上介绍的只是 YOLOv1 模型,YOLOv1 模型的精度非常低,后面为了改进识别精度还发展出 YOLOv2, YOLOv3, YOLOv4, YOLOv5 模型😮,学长下面会给出 YOLOv3 模型的实现。Y OLOv4 和 YOLOv5 模型主要改进了提取特征用的 CNN 模型 (也称骨干网络 Backbone Network),原始的 YOLO 模型使用了 C 语言编写的 Darknet 作为骨干网络,而这篇使用 Resnet 作为骨干网络,所以今天学长只介绍到 YOLOv3。 2.2 YOLOv3YOLOv3 引入了多尺度检测机制 (Multi-Scale Detection),这个机制可以说是 YOLO 模型的精华,引入这个机制之前 YOLO 模型的精度很不理想,而引入之后 YOLO 模型达到了接近 Faster-RCNN 的精度,并且速度还是比 Faster-RCNN 要快。 多尺度检测机制简单的来说就是按不同的尺度划分区域,然后再检测这些不同大小的区域是否包含对象,检测的时候大区域的特征会混合到小区域中,使得小区域判断时拥有一定程度的上下文信息。
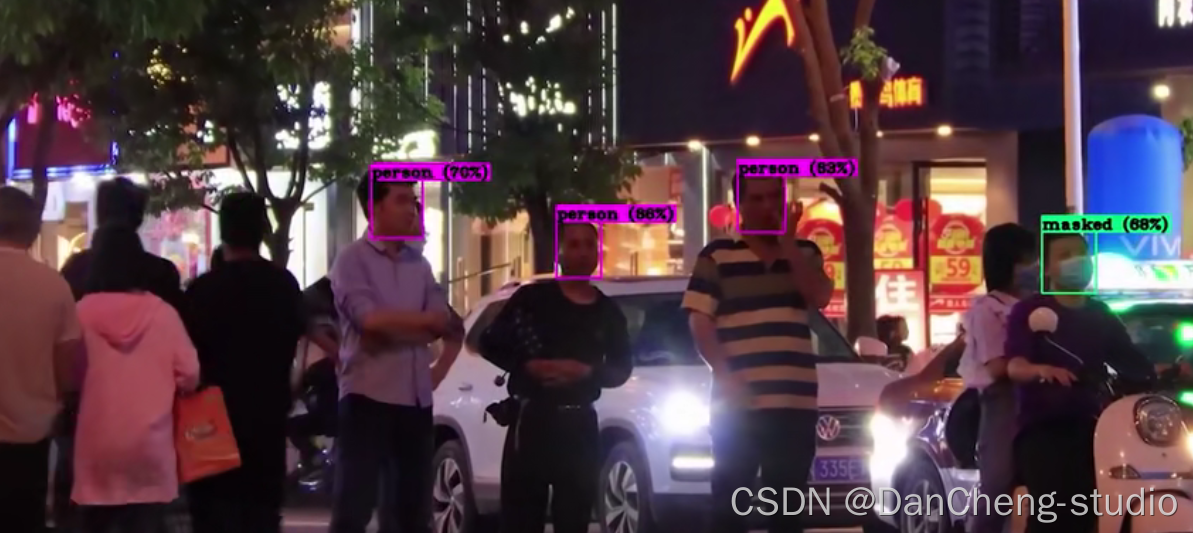
接下来学长带大家用 YOLO 模型把没带口罩的家伙抓出来吧。 数据集
因为带了口罩但姿势不正确的样本数量很少,所以都归到戴口罩里面去😠。 2.4 实现代码使用这个数据集训练,并且训练成功以后使用模型识别图片或视频的完整代码如下: # 作者:丹成学长,q746876041 import os import sys import torch import gzip import itertools import random import numpy import math import pandas import json from PIL import Image from PIL import ImageDraw from PIL import ImageFont from torch import nn from matplotlib import pyplot from collections import defaultdict from collections import deque import xml.etree.cElementTree as ET # 缩放图片的大小 IMAGE_SIZE = (256, 192) # 训练使用的数据集路径 DATASET_1_IMAGE_DIR = "./archive/images" DATASET_1_ANNOTATION_DIR = "./archive/annotations" DATASET_2_IMAGE_DIR = "./784145_1347673_bundle_archive/train/image_data" DATASET_2_BOX_CSV_PATH = "./784145_1347673_bundle_archive/train/bbox_train.csv" # 分类列表 # YOLO 原则上不需要 other 分类,但实测中添加这个分类有助于提升标签分类的精确度 CLASSES = [ "other", "with_mask", "without_mask" ] CLASSES_MAPPING = { c: index for index, c in enumerate(CLASSES) } # 判断是否存在对象使用的区域重叠率的阈值 (另外要求对象中心在区域内) IOU_POSITIVE_THRESHOLD = 0.30 IOU_NEGATIVE_THRESHOLD = 0.30 # 用于启用 GPU 支持 device = torch.device("cuda" if torch.cuda.is_available() else "cpu") class BasicBlock(nn.Module): """ResNet 使用的基础块""" expansion = 1 # 定义这个块的实际出通道是 channels_out 的几倍,这里的实现固定是一倍 def __init__(self, channels_in, channels_out, stride): super().__init__() # 生成 3x3 的卷积层 # 处理间隔 stride = 1 时,输出的长宽会等于输入的长宽,例如 (32-3+2)//1+1 == 32 # 处理间隔 stride = 2 时,输出的长宽会等于输入的长宽的一半,例如 (32-3+2)//2+1 == 16 # 此外 resnet 的 3x3 卷积层不使用偏移值 bias self.conv1 = nn.Sequential( nn.Conv2d(channels_in, channels_out, kernel_size=3, stride=stride, padding=1, bias=False), nn.BatchNorm2d(channels_out)) # 再定义一个让输出和输入维度相同的 3x3 卷积层 self.conv2 = nn.Sequential( nn.Conv2d(channels_out, channels_out, kernel_size=3, stride=1, padding=1, bias=False), nn.BatchNorm2d(channels_out)) # 让原始输入和输出相加的时候,需要维度一致,如果维度不一致则需要整合 self.identity = nn.Sequential() if stride != 1 or channels_in != channels_out * self.expansion: self.identity = nn.Sequential( nn.Conv2d(channels_in, channels_out * self.expansion, kernel_size=1, stride=stride, bias=False), nn.BatchNorm2d(channels_out * self.expansion)) def forward(self, x): # x => conv1 => relu => conv2 => + => relu # | ^ # |==============================| tmp = self.conv1(x) tmp = nn.functional.relu(tmp, inplace=True) tmp = self.conv2(tmp) tmp += self.identity(x) y = nn.functional.relu(tmp, inplace=True) return y class MyModel(nn.Module): """YOLO (基于 ResNet 的变种)""" Anchors = None # 锚点列表,包含 锚点数量 * 形状数量 的范围 AnchorSpans = (16, 32, 64) # 尺度列表,值为锚点之间的距离 AnchorAspects = ((1, 1), (1.5, 1.5)) # 锚点对应区域的长宽比例列表 AnchorOutputs = 1 + 4 + len(CLASSES) # 每个锚点范围对应的输出数量,是否对象中心 (1) + 区域偏移 (4) + 分类数量 AnchorTotalOutputs = AnchorOutputs * len(AnchorAspects) # 每个锚点对应的输出数量 ObjScoreThreshold = 0.9 # 认为是对象中心所需要的最小分数 IOUMergeThreshold = 0.3 # 判断是否应该合并重叠区域的重叠率阈值 def __init__(self): super().__init__() # 抽取图片特征的 ResNet # 因为锚点距离有三个,这里最后会输出各个锚点距离对应的特征 self.previous_channels_out = 4 self.resnet_models = nn.ModuleList([ nn.Sequential( nn.Conv2d(3, self.previous_channels_out, kernel_size=3, stride=1, padding=1, bias=False), nn.BatchNorm2d(self.previous_channels_out), nn.ReLU(inplace=True), self._make_layer(BasicBlock, channels_out=16, num_blocks=2, stride=1), self._make_layer(BasicBlock, channels_out=32, num_blocks=2, stride=2), self._make_layer(BasicBlock, channels_out=64, num_blocks=2, stride=2), self._make_layer(BasicBlock, channels_out=128, num_blocks=2, stride=2), self._make_layer(BasicBlock, channels_out=256, num_blocks=2, stride=2)), self._make_layer(BasicBlock, channels_out=256, num_blocks=2, stride=2), self._make_layer(BasicBlock, channels_out=256, num_blocks=2, stride=2) ]) # 根据各个锚点距离对应的特征预测输出的卷积层 # 大的锚点距离抽取的特征会合并到小的锚点距离抽取的特征 # 这里的三个子模型意义分别是: # - 计算用于合并的特征 # - 放大特征 # - 计算最终的预测输出 self.yolo_detectors = nn.ModuleList([ nn.ModuleList([nn.Sequential( nn.Conv2d(256 if index == 0 else 512, 256, kernel_size=1, stride=1, padding=0, bias=True), nn.ReLU(inplace=True), nn.Conv2d(256, 512, kernel_size=3, stride=1, padding=1, bias=True), nn.ReLU(inplace=True), nn.Conv2d(512, 256, kernel_size=1, stride=1, padding=0, bias=True), nn.ReLU(inplace=True)), nn.Upsample(scale_factor=2, mode="nearest"), nn.Sequential( nn.Conv2d(256, 512, kernel_size=3, stride=1, padding=1, bias=True), nn.ReLU(inplace=True), nn.Conv2d(512, 256, kernel_size=3, stride=1, padding=1, bias=True), nn.ReLU(inplace=True), nn.Conv2d(256, MyModel.AnchorTotalOutputs, kernel_size=1, stride=1, padding=0, bias=True))]) for index in range(len(self.resnet_models)) ]) # 处理结果范围的函数 self.sigmoid = nn.Sigmoid() def _make_layer(self, block_type, channels_out, num_blocks, stride): """创建 resnet 使用的层""" blocks = [] # 添加第一个块 blocks.append(block_type(self.previous_channels_out, channels_out, stride)) self.previous_channels_out = channels_out * block_type.expansion # 添加剩余的块,剩余的块固定处理间隔为 1,不会改变长宽 for _ in range(num_blocks-1): blocks.append(block_type(self.previous_channels_out, self.previous_channels_out, 1)) self.previous_channels_out *= block_type.expansion return nn.Sequential(*blocks) @staticmethod def _generate_anchors(): """根据锚点和形状生成锚点范围列表""" w, h = IMAGE_SIZE anchors = [] for span in MyModel.AnchorSpans: for x in range(0, w, span): for y in range(0, h, span): xcenter, ycenter = x + span / 2, y + span / 2 for ratio in MyModel.AnchorAspects: ww = span * ratio[0] hh = span * ratio[1] xx = xcenter - ww / 2 yy = ycenter - hh / 2 xx = max(int(xx), 0) yy = max(int(yy), 0) ww = min(int(ww), w - xx) hh = min(int(hh), h - yy) anchors.append((xx, yy, ww, hh)) return anchors def forward(self, x): # 抽取各个锚点距离对应的特征 # 维度分别是: # torch.Size([16, 256, 16, 12]) # torch.Size([16, 256, 8, 6]) # torch.Size([16, 256, 4, 3]) features_list = [] resnet_input = x for m in self.resnet_models: resnet_input = m(resnet_input) features_list.append(resnet_input) # 根据特征预测输出 # 维度分别是: # torch.Size([16, 16, 4, 3]) # torch.Size([16, 16, 8, 6]) # torch.Size([16, 16, 16, 12]) # 16 是 (5 + 分类3) * 形状2 previous_upsampled_feature = None outputs = [] for index, feature in enumerate(reversed(features_list)): if previous_upsampled_feature is not None: # 合并大的锚点距离抽取的特征到小的锚点距离抽取的特征 feature = torch.cat((feature, previous_upsampled_feature), dim=1) # 计算用于合并的特征 hidden = self.yolo_detectors[index][0](feature) # 放大特征 (用于下一次处理时合并) upsampled = self.yolo_detectors[index][1](hidden) # 计算最终的预测输出 output = self.yolo_detectors[index][2](hidden) previous_upsampled_feature = upsampled outputs.append(output) # 连接所有输出 # 注意顺序需要与 Anchors 一致 outputs_flatten = [] for output in reversed(outputs): output = output.permute(0, 2, 3, 1) output = output.reshape(output.shape[0], -1, MyModel.AnchorOutputs) outputs_flatten.append(output) outputs_all = torch.cat(outputs_flatten, dim=1) # 是否对象中心应该在 0 ~ 1 之间,使用 sigmoid 处理 outputs_all[:,:,:1] = self.sigmoid(outputs_all[:,:,:1]) # 分类应该在 0 ~ 1 之间,使用 sigmoid 处理 outputs_all[:,:,5:] = self.sigmoid(outputs_all[:,:,5:]) return outputs_all @staticmethod def loss_function(predicted, actual): """YOLO 使用的多任务损失计算器""" result_tensor, result_isobject_masks, result_nonobject_masks = actual objectness_losses = [] offsets_losses = [] labels_losses = [] for x in range(result_tensor.shape[0]): mask_positive = result_isobject_masks[x] mask_negative = result_nonobject_masks[x] # 计算是否对象中心的损失,分别针对正负样本计算 # 因为大部分区域不包含对象中心,这里减少负样本的损失对调整参数的影响 objectness_loss_positive = nn.functional.mse_loss( predicted[x,mask_positive,0], result_tensor[x,mask_positive,0]) objectness_loss_negative = nn.functional.mse_loss( predicted[x,mask_negative,0], result_tensor[x,mask_negative,0]) * 0.5 objectness_losses.append(objectness_loss_positive) objectness_losses.append(objectness_loss_negative) # 计算区域偏移的损失,只针对正样本计算 offsets_loss = nn.functional.mse_loss( predicted[x,mask_positive,1:5], result_tensor[x,mask_positive,1:5]) offsets_losses.append(offsets_loss) # 计算标签分类的损失,分别针对正负样本计算 labels_loss_positive = nn.functional.binary_cross_entropy( predicted[x,mask_positive,5:], result_tensor[x,mask_positive,5:]) labels_loss_negative = nn.functional.binary_cross_entropy( predicted[x,mask_negative,5:], result_tensor[x,mask_negative,5:]) * 0.5 labels_losses.append(labels_loss_positive) labels_losses.append(labels_loss_negative) loss = ( torch.mean(torch.stack(objectness_losses)) + torch.mean(torch.stack(offsets_losses)) + torch.mean(torch.stack(labels_losses))) return loss @staticmethod def calc_accuracy(actual, predicted): """YOLO 使用的正确率计算器,这里只计算是否对象中心与标签分类的正确率,区域偏移不计算""" result_tensor, result_isobject_masks, result_nonobject_masks = actual # 计算是否对象中心的正确率,正样本和负样本的正确率分别计算再平均 a = result_tensor[:,:,0] p = predicted[:,:,0] > MyModel.ObjScoreThreshold obj_acc_positive = ((a == 1) & (p == 1)).sum().item() / ((a == 1).sum().item() + 0.00001) obj_acc_negative = ((a == 0) & (p == 0)).sum().item() / ((a == 0).sum().item() + 0.00001) obj_acc = (obj_acc_positive + obj_acc_negative) / 2 # 计算标签分类的正确率 cls_total = 0 cls_correct = 0 for x in range(result_tensor.shape[0]): mask = list(sorted(result_isobject_masks[x] + result_nonobject_masks[x])) actual_classes = result_tensor[x,mask,5:].max(dim=1).indices predicted_classes = predicted[x,mask,5:].max(dim=1).indices cls_total += len(mask) cls_correct += (actual_classes == predicted_classes).sum().item() cls_acc = cls_correct / cls_total return obj_acc, cls_acc @staticmethod def convert_predicted_result(predicted): """转换预测结果到 (标签, 区域, 对象中心分数, 标签识别分数) 的列表,重叠区域使用 NMS 算法合并""" # 记录重叠的结果区域, 结果是 [ [(标签, 区域, RPN 分数, 标签识别分数)], ... ] final_result = [] for anchor, tensor in zip(MyModel.Anchors, predicted): obj_score = tensor[0].item() if obj_score MyModel.IOUMergeThreshold for r in exists_results): exists_results.append((label, box, obj_score, cls_score)) break else: final_result.append([(label, box, obj_score, cls_score)]) # 合并重叠的结果区域 (使用 对象中心分数 * 标签识别分数 最高的区域为结果区域) for index in range(len(final_result)): exists_results = final_result[index] exists_results.sort(key=lambda r: r[2]*r[3]) final_result[index] = exists_results[-1] return final_result @staticmethod def fix_predicted_result_from_history(cls_result, history_results): """根据历史结果减少预测结果中的误判,适用于视频识别,history_results 应为指定了 maxlen 的 deque""" # 要求历史结果中 50% 以上存在类似区域,并且选取历史结果中最多的分类 history_results.append(cls_result) final_result = [] if len(history_results) MyModel.IOUMergeThreshold: similar_results.append(history_result[-1][1]) # 判断近似区域数量是否过半 if len(similar_results) IMAGE_SIZE[1] or w == 0 or h == 0: return 0, 0, 0, 0 return x, y, w, h def map_box_to_original_image(box, sw, sh): """把缩放后图片对应的区域转换到缩放前的原始区域""" x, y, w, h = box sw_new, sh_new, pad_w, pad_h = calc_resize_parameters(sw, sh) scale = IMAGE_SIZE[0] / sw_new x = int(x / scale - pad_w) y = int(y / scale - pad_h) w = int(w / scale) h = int(h / scale) if x + w > sw or y + h > sh or x 0: # 有重叠部分 area_overlap = wi*hi area_all = w1*h1 + w2*h2 - area_overlap iou = area_overlap / area_all else: # 没有重叠部分 iou = 0 return iou def calc_box_offset(candidate_box, true_box): """计算候选区域与实际区域的偏移值,要求实际区域的中心点必须在候选区域中""" # 计算实际区域的中心点在候选区域中的位置,范围会在 0 ~ 1 之间 x1, y1, w1, h1 = candidate_box x2, y2, w2, h2 = true_box x_offset = ((x2 + w2 // 2) - x1) / w1 y_offset = ((y2 + h2 // 2) - y1) / h1 # 计算实际区域长宽相对于候选区域长宽的比例,使用 log 减少过大的值 w_offset = math.log(w2 / w1) h_offset = math.log(h2 / h1) return (x_offset, y_offset, w_offset, h_offset) def adjust_box_by_offset(candidate_box, offset): """根据偏移值调整候选区域""" x1, y1, w1, h1 = candidate_box x_offset, y_offset, w_offset, h_offset = offset w2 = math.exp(w_offset) * w1 h2 = math.exp(h_offset) * h1 x2 = x1 + w1 * x_offset - w2 // 2 y2 = y1 + h1 * y_offset - h2 // 2 x2 = min(IMAGE_SIZE[0]-1, x2) y2 = min(IMAGE_SIZE[1]-1, y2) w2 = min(IMAGE_SIZE[0]-x2, w2) h2 = min(IMAGE_SIZE[1]-y2, h2) return (x2, y2, w2, h2) def prepare_save_batch(batch, image_tensors, result_tensors, result_isobject_masks, result_nonobject_masks): """准备训练 - 保存单个批次的数据""" # 按索引值列表生成输入和输出 tensor 对象的函数 def split_dataset(indices): indices_list = indices.tolist() image_tensors_splited = torch.stack([image_tensors[x] for x in indices_list]) result_tensors_splited = torch.stack([result_tensors[x] for x in indices_list]) result_isobject_masks_splited = [result_isobject_masks[x] for x in indices_list] result_nonobject_masks_splited = [result_nonobject_masks[x] for x in indices_list] return image_tensors_splited, ( result_tensors_splited, result_isobject_masks_splited, result_nonobject_masks_splited) # 切分训练集 (80%),验证集 (10%) 和测试集 (10%) random_indices = torch.randperm(len(image_tensors)) training_indices = random_indices[:int(len(random_indices)*0.8)] validating_indices = random_indices[int(len(random_indices)*0.8):int(len(random_indices)*0.9):] testing_indices = random_indices[int(len(random_indices)*0.9):] training_set = split_dataset(training_indices) validating_set = split_dataset(validating_indices) testing_set = split_dataset(testing_indices) # 保存到硬盘 save_tensor(training_set, f"data/training_set.{batch}.pt") save_tensor(validating_set, f"data/validating_set.{batch}.pt") save_tensor(testing_set, f"data/testing_set.{batch}.pt") print(f"batch {batch} saved") def prepare(): """准备训练""" # 数据集转换到 tensor 以后会保存在 data 文件夹下 if not os.path.isdir("data"): os.makedirs("data") # 加载图片和图片对应的区域与分类列表 # { (路径, 是否左右翻转): [ 区域与分类, 区域与分类, .. ] } # 同一张图片左右翻转可以生成一个新的数据,让数据量翻倍 box_map = defaultdict(lambda: []) for filename in os.listdir(DATASET_1_IMAGE_DIR): # 从第一个数据集加载 xml_path = os.path.join(DATASET_1_ANNOTATION_DIR, filename.split(".")[0] + ".xml") if not os.path.isfile(xml_path): continue tree = ET.ElementTree(file=xml_path) objects = tree.findall("object") path = os.path.join(DATASET_1_IMAGE_DIR, filename) for obj in objects: class_name = obj.find("name").text x1 = int(obj.find("bndbox/xmin").text) x2 = int(obj.find("bndbox/xmax").text) y1 = int(obj.find("bndbox/ymin").text) y2 = int(obj.find("bndbox/ymax").text) if class_name == "mask_weared_incorrect": # 佩戴口罩不正确的样本数量太少 (只有 123),模型无法学习,这里全合并到戴口罩的样本 class_name = "with_mask" box_map[(path, False)].append((x1, y1, x2-x1, y2-y1, CLASSES_MAPPING[class_name])) box_map[(path, True)].append((x1, y1, x2-x1, y2-y1, CLASSES_MAPPING[class_name])) df = pandas.read_csv(DATASET_2_BOX_CSV_PATH) for row in df.values: # 从第二个数据集加载,这个数据集只包含没有带口罩的图片 filename, width, height, x1, y1, x2, y2 = row[:7] path = os.path.join(DATASET_2_IMAGE_DIR, filename) box_map[(path, False)].append((x1, y1, x2-x1, y2-y1, CLASSES_MAPPING["without_mask"])) box_map[(path, True)].append((x1, y1, x2-x1, y2-y1, CLASSES_MAPPING["without_mask"])) # 打乱数据集 (因为第二个数据集只有不戴口罩的图片) box_list = list(box_map.items()) random.shuffle(box_list) print(f"found {len(box_list)} images") # 保存图片和图片对应的分类与区域列表 batch_size = 20 batch = 0 image_tensors = [] # 图片列表 result_tensors = [] # 图片对应的输出结果列表,包含 [ 是否对象中心, 区域偏移, 各个分类的可能性 ] result_isobject_masks = [] # 各个图片的包含对象的区域在 Anchors 中的索引 result_nonobject_masks = [] # 各个图片不包含对象的区域在 Anchors 中的索引 (重叠率低于阈值的区域) for (image_path, flip), original_boxes_labels in box_list: with Image.open(image_path) as img_original: # 加载原始图片 sw, sh = img_original.size # 原始图片大小 if flip: img = resize_image(img_original.transpose(Image.FLIP_LEFT_RIGHT)) # 翻转然后缩放图片 else: img = resize_image(img_original) # 缩放图片 image_tensors.append(image_to_tensor(img)) # 添加图片到列表 # 生成输出结果的 tensor result_tensor = torch.zeros((len(MyModel.Anchors), MyModel.AnchorOutputs), dtype=torch.float) result_tensor[:,5] = 1 # 默认分类为 other result_tensors.append(result_tensor) # 包含对象的区域在 Anchors 中的索引 result_isobject_mask = [] result_isobject_masks.append(result_isobject_mask) # 不包含对象的区域在 Anchors 中的索引 result_nonobject_mask = [] result_nonobject_masks.append(result_nonobject_mask) # 根据真实区域定位所属的锚点,然后设置输出结果 negative_mapping = [1] * len(MyModel.Anchors) for box_label in original_boxes_labels: x, y, w, h, label = box_label if flip: # 翻转坐标 x = sw - x - w x, y, w, h = map_box_to_resized_image((x, y, w, h), sw, sh) # 缩放实际区域 if w IOU_NEGATIVE_THRESHOLD: negative_mapping[index] = 0 # 区域与某个对象重叠率超过一定值,不应该当作负样本 for matched_index, matched_box in matched_anchors: # 计算区域偏移 offset = calc_box_offset(matched_box, (x, y, w, h)) # 修改输出结果的 tensor result_tensor[matched_index] = torch.tensor(( 1, # 是否对象中心 *offset, # 区域偏移 *[int(c == label) for c in range(len(CLASSES))] # 对应分类 ), dtype=torch.float) # 添加索引值 # 注意如果两个对象同时定位到相同的锚点,那么只有一个对象可以被识别,这里后面的对象会覆盖前面的对象 if matched_index not in result_isobject_mask: result_isobject_mask.append(matched_index) # 没有找到可识别的对象时跳过图片 if not result_isobject_mask: image_tensors.pop() result_tensors.pop() result_isobject_masks.pop() result_nonobject_masks.pop() continue # 添加不包含对象的区域在 Anchors 中的索引 for index, value in enumerate(negative_mapping): if value: result_nonobject_mask.append(index) # 排序索引列表 result_isobject_mask.sort() # 保存批次 if len(image_tensors) >= batch_size: prepare_save_batch(batch, image_tensors, result_tensors, result_isobject_masks, result_nonobject_masks) image_tensors.clear() result_tensors.clear() result_isobject_masks.clear() result_nonobject_masks.clear() batch += 1 # 保存剩余的批次 if len(image_tensors) > 10: prepare_save_batch(batch, image_tensors, result_tensors, result_isobject_masks, result_nonobject_masks) def train(): """开始训练""" # 创建模型实例 model = MyModel().to(device) # 创建多任务损失计算器 loss_function = MyModel.loss_function # 创建参数调整器 optimizer = torch.optim.Adam(model.parameters()) # 记录训练集和验证集的正确率变化 training_obj_accuracy_history = [] training_cls_accuracy_history = [] validating_obj_accuracy_history = [] validating_cls_accuracy_history = [] # 记录最高的验证集正确率 validating_obj_accuracy_highest = -1 validating_cls_accuracy_highest = -1 validating_accuracy_highest = -1 validating_accuracy_highest_epoch = 0 # 读取批次的工具函数 def read_batches(base_path): for batch in itertools.count(): path = f"{base_path}.{batch}.pt" if not os.path.isfile(path): break x, (y, mask1, mask2) = load_tensor(path) yield x.to(device), (y.to(device), mask1, mask2) # 计算正确率的工具函数 calc_accuracy = MyModel.calc_accuracy # 开始训练过程 for epoch in range(1, 10000): print(f"epoch: {epoch}") # 根据训练集训练并修改参数 # 切换模型到训练模式,将会启用自动微分,批次正规化 (BatchNorm) 与 Dropout model.train() training_obj_accuracy_list = [] training_cls_accuracy_list = [] for batch_index, batch in enumerate(read_batches("data/training_set")): # 划分输入和输出 batch_x, batch_y = batch # 计算预测值 predicted = model(batch_x) # 计算损失 loss = loss_function(predicted, batch_y) # 从损失自动微分求导函数值 loss.backward() # 使用参数调整器调整参数 optimizer.step() # 清空导函数值 optimizer.zero_grad() # 记录这一个批次的正确率,torch.no_grad 代表临时禁用自动微分功能 with torch.no_grad(): training_batch_obj_accuracy, training_batch_cls_accuracy = calc_accuracy(batch_y, predicted) # 输出批次正确率 training_obj_accuracy_list.append(training_batch_obj_accuracy) training_cls_accuracy_list.append(training_batch_cls_accuracy) print(f"epoch: {epoch}, batch: {batch_index}: " + f"batch obj accuracy: {training_batch_obj_accuracy}, cls accuracy: {training_batch_cls_accuracy}") training_obj_accuracy = sum(training_obj_accuracy_list) / len(training_obj_accuracy_list) training_cls_accuracy = sum(training_cls_accuracy_list) / len(training_cls_accuracy_list) training_obj_accuracy_history.append(training_obj_accuracy) training_cls_accuracy_history.append(training_cls_accuracy) print(f"training obj accuracy: {training_obj_accuracy}, cls accuracy: {training_cls_accuracy}") # 检查验证集 # 切换模型到验证模式,将会禁用自动微分,批次正规化 (BatchNorm) 与 Dropout model.eval() validating_obj_accuracy_list = [] validating_cls_accuracy_list = [] for batch in read_batches("data/validating_set"): batch_x, batch_y = batch predicted = model(batch_x) validating_batch_obj_accuracy, validating_batch_cls_accuracy = calc_accuracy(batch_y, predicted) validating_obj_accuracy_list.append(validating_batch_obj_accuracy) validating_cls_accuracy_list.append(validating_batch_cls_accuracy) # 释放 predicted 占用的显存避免显存不足的错误 predicted = None validating_obj_accuracy = sum(validating_obj_accuracy_list) / len(validating_obj_accuracy_list) validating_cls_accuracy = sum(validating_cls_accuracy_list) / len(validating_cls_accuracy_list) validating_obj_accuracy_history.append(validating_obj_accuracy) validating_cls_accuracy_history.append(validating_cls_accuracy) print(f"validating obj accuracy: {validating_obj_accuracy}, cls accuracy: {validating_cls_accuracy}") # 记录最高的验证集正确率与当时的模型状态,判断是否在 20 次训练后仍然没有刷新记录 validating_accuracy = validating_obj_accuracy * validating_cls_accuracy if validating_accuracy > validating_accuracy_highest: validating_obj_accuracy_highest = validating_obj_accuracy validating_cls_accuracy_highest = validating_cls_accuracy validating_accuracy_highest = validating_accuracy validating_accuracy_highest_epoch = epoch save_tensor(model.state_dict(), "model.pt") print("highest validating accuracy updated") elif epoch - validating_accuracy_highest_epoch > 20: # 在 20 次训练后仍然没有刷新记录,结束训练 print("stop training because highest validating accuracy not updated in 20 epoches") break # 使用达到最高正确率时的模型状态 print(f"highest obj validating accuracy: {validating_obj_accuracy_highest}", f"from epoch {validating_accuracy_highest_epoch}") print(f"highest cls validating accuracy: {validating_cls_accuracy_highest}", f"from epoch {validating_accuracy_highest_epoch}") model.load_state_dict(load_tensor("model.pt")) # 检查测试集 testing_obj_accuracy_list = [] testing_cls_accuracy_list = [] for batch in read_batches("data/testing_set"): batch_x, batch_y = batch predicted = model(batch_x) testing_batch_obj_accuracy, testing_batch_cls_accuracy = calc_accuracy(batch_y, predicted) testing_obj_accuracy_list.append(testing_batch_obj_accuracy) testing_cls_accuracy_list.append(testing_batch_cls_accuracy) testing_obj_accuracy = sum(testing_obj_accuracy_list) / len(testing_obj_accuracy_list) testing_cls_accuracy = sum(testing_cls_accuracy_list) / len(testing_cls_accuracy_list) print(f"testing obj accuracy: {testing_obj_accuracy}, cls accuracy: {testing_cls_accuracy}") # 显示训练集和验证集的正确率变化 pyplot.plot(training_obj_accuracy_history, label="training_obj_accuracy") pyplot.plot(training_cls_accuracy_history, label="training_cls_accuracy") pyplot.plot(validating_obj_accuracy_history, label="validating_obj_accuracy") pyplot.plot(validating_cls_accuracy_history, label="validating_cls_accuracy") pyplot.ylim(0, 1) pyplot.legend() pyplot.show() def eval_model(): """使用训练好的模型识别图片""" # 创建模型实例,加载训练好的状态,然后切换到验证模式 model = MyModel().to(device) model.load_state_dict(load_tensor("model.pt")) model.eval() # 询问图片路径,并显示所有可能是人脸的区域 while True: try: image_path = input("Image path: ") if not image_path: continue # 构建输入 with Image.open(image_path) as img_original: # 加载原始图片 sw, sh = img_original.size # 原始图片大小 img = resize_image(img_original) # 缩放图片 img_output = img_original.copy() # 复制图片,用于后面添加标记 tensor_in = image_to_tensor(img) # 预测输出 predicted = model(tensor_in.unsqueeze(0).to(device))[0] final_result = MyModel.convert_predicted_result(predicted) # 标记在图片上 draw = ImageDraw.Draw(img_output) for label, box, obj_score, cls_score in final_result: x, y, w, h = map_box_to_original_image(box, sw, sh) score = obj_score * cls_score color = "#00FF00" if CLASSES[label] == "with_mask" else "#FF0000" draw.rectangle((x, y, x+w, y+h), outline=color) draw.text((x, y-10), CLASSES[label], fill=color) draw.text((x, y+h), f"{score:.2f}", fill=color) print((x, y, w, h), CLASSES[label], obj_score, cls_score) img_output.save("img_output.png") print("saved to img_output.png") print() except Exception as e: print("error:", e) def eval_video(): """使用训练好的模型识别视频""" # 创建模型实例,加载训练好的状态,然后切换到验证模式 model = MyModel().to(device) model.load_state_dict(load_tensor("model.pt")) model.eval() # 询问视频路径,给可能是人脸的区域添加标记并保存新视频 import cv2 font = ImageFont.truetype("FreeMonoBold.ttf", 20) while True: try: video_path = input("Video path: ") if not video_path: continue # 读取输入视频 video = cv2.VideoCapture(video_path) # 获取每秒的帧数 fps = int(video.get(cv2.CAP_PROP_FPS)) # 获取视频长宽 size = (int(video.get(cv2.CAP_PROP_FRAME_WIDTH)), int(video.get(cv2.CAP_PROP_FRAME_HEIGHT))) # 创建输出视频 video_output_path = os.path.join( os.path.dirname(video_path), os.path.splitext(os.path.basename(video_path))[0] + ".output.avi") result = cv2.VideoWriter(video_output_path, cv2.VideoWriter_fourcc(*"XVID"), fps, size) # 用于减少误判的历史结果 history_results = deque(maxlen = fps // 2) # 逐帧处理 count = 0 while(True): ret, frame = video.read() if not ret: break # opencv 使用的是 BGR, Pillow 使用的是 RGB, 需要转换通道顺序 frame_rgb = cv2.cvtColor(frame, cv2.COLOR_BGR2RGB) # 构建输入 img_original = Image.fromarray(frame_rgb) # 加载原始图片 sw, sh = img_original.size # 原始图片大小 img = resize_image(img_original) # 缩放图片 img_output = img_original.copy() # 复制图片,用于后面添加标记 tensor_in = image_to_tensor(img) # 预测输出 predicted = model(tensor_in.unsqueeze(0).to(device))[0] cls_result = MyModel.convert_predicted_result(predicted) # 根据历史结果减少误判 final_result = MyModel.fix_predicted_result_from_history(cls_result, history_results) # 标记在图片上 draw = ImageDraw.Draw(img_output) for label, box, obj_score, cls_score in final_result: x, y, w, h = map_box_to_original_image(box, sw, sh) score = obj_score * cls_score color = "#00FF00" if CLASSES[label] == "with_mask" else "#FF0000" draw.rectangle((x, y, x+w, y+h), outline=color, width=3) draw.text((x, y-20), CLASSES[label], fill=color, font=font) draw.text((x, y+h), f"{score:.2f}", fill=color, font=font) # 写入帧到输出视频 frame_rgb_annotated = numpy.asarray(img_output) frame_bgr_annotated = cv2.cvtColor(frame_rgb_annotated, cv2.COLOR_RGB2BGR) result.write(frame_bgr_annotated) count += 1 if count % fps == 0: print(f"handled {count//fps}s") video.release() result.release() cv2.destroyAllWindows() print(f"saved to {video_output_path}") print() except Exception as e: raise print("error:", e) def main(): """主函数""" if len(sys.argv) |
 是不是觉得有点熟悉?看上去就像 Faster-RCNN 的区域生成网络 (RPN) 啊。的确,YOLO 模型原理上就是寻找区域的同时判断区域包含的对象分类,YOLO 模型与区域生成网络有以下的不同:
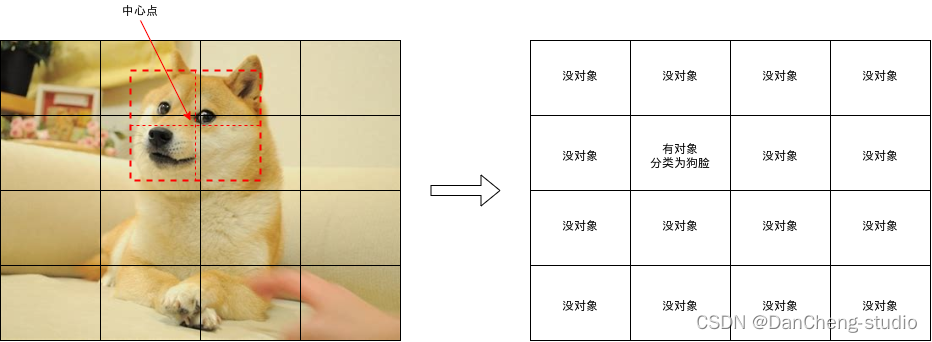
 学长的这个数据集包含了 8535 张图片 (部分图片没有使用),其中各个分类的数量如下:
【本文地址】