| MaxCompute备份与恢复的操作命令及示例 | 您所在的位置:网站首页 › 分区数据备份 › MaxCompute备份与恢复的操作命令及示例 |
MaxCompute备份与恢复的操作命令及示例
|
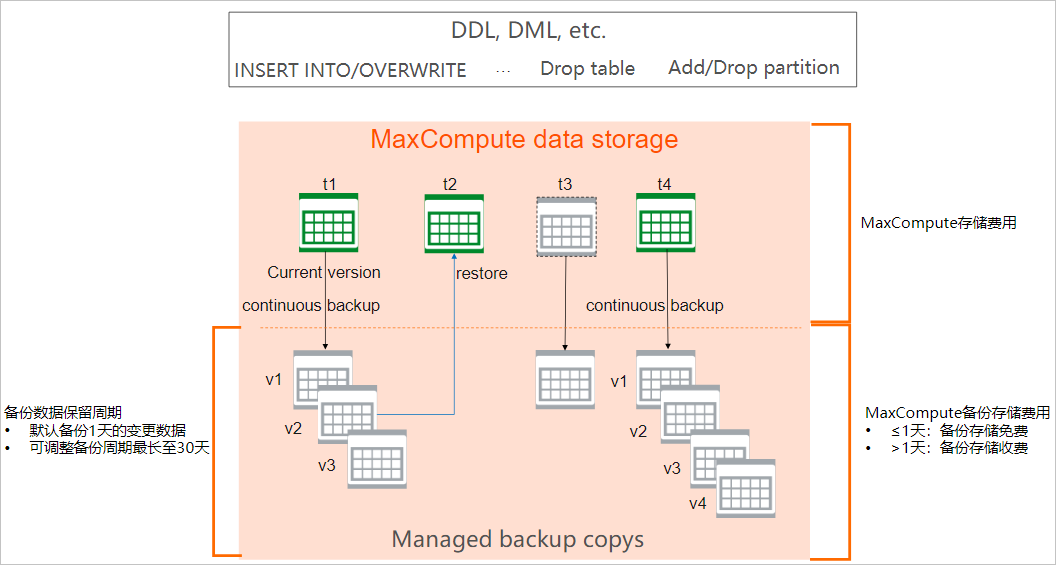
概述 MaxCompute提供数据备份与恢复功能,系统会自动备份数据的历史版本(例如被删除或修改前的数据)并保留一定时间,您可以对保留周期内的数据进行快速恢复,避免因误操作丢失数据。 备份与恢复功能具备以下特点: 默认开启,不需要手动开通 该功能不依赖外部存储,系统默认为所有MaxCompute项目开放的数据保留周期为24小时,备份和存储免费。 自动持续备份 系统自动对发生变更的数据进行备份,多次变更时将备份多个数据版本,相比固定周期性的备份策略,可以有效避免因误操作丢失数据。 恢复快速,操作简单 MaxCompute具备先进的元数据和多数据版本管理能力,备份和恢复操作不占用额外的计算资源,您可以通过命令快速恢复不同规模的数据。 注意事项使用备份恢复功能时,您需要注意如下事项: 如果您通过MaxCompute客户端查看表的备份信息,建议您下载最新版本的MaxCompute客户端,历史版本的客户端可能无法查看到备份恢复参数及表的备份信息。 对表执行一次修改操作就会生成一个备份版本。如果未对表执行修改操作,不会生成备份版本。 当某个备份版本的保留天数超过项目设置的备份数据保留天数时,MaxCompute会自动删除备份版本。被删除的备份版本无法恢复,也无法查询到。 如果表执行过Purge命令后,数据不可以恢复。 已经删除的表或分区(包含Transaction Table2.0),无法直接通过恢复到指定版本的方式进行恢复,需要先恢复表或分区后,再恢复到对应的版本 。 Transaction Table2.0使用限制: Restore操作只支持完整恢复已Drop的表或者分区,不支持Restore到具体的小版本,如想查询历史小版本数据可通过timetravel查询获取。 已Drop的表或者分区,通过Restore恢复后,对于TimeTravel查询与Incremental查询的行为和没Drop前基本保持一致,但以下细节需要注意: Drop后的表,在没有Restore恢复前,包括timetravel在内的任何查询都是不支持的,会直接报错; Drop后的分区,任何查询都查询不到数据;和现有查询行为保持一致。 Drop后的表,在Restore恢复后,如果timetravel / incremental查询的时间小于Restore操作时间,大于等于Drop操作时间,则认为数据已经删除,查询不到数据。 Drop后的表,在Restore恢复后,如果timetravel / incremental查询的时间小于Drop操作时间,则查询结果相当于没有执行过Drop操作时保持一致。 Drop后的表,在Restore恢复后,如果timetravel / incremental查询的时间大于等于Restore操作时间,则查询结果相当于没有执行过Drop和Restore操作时保持一致。即Restore操作恢复的数据不会认为是新增的数据。 Drop和Restore操作依然会产生对应的Commit时间和Version。对于分区表而言,Restore整张表时,每个分区会单独Restore,从而产生独立的Version。 操作命令备份与恢复功能涉及的操作命令如下表所示。 场景 命令 功能 权限说明 设置备份数据保留周期 setproject odps.timemachine.retention.days=days; 设置备份数据的保留天数。在此期间,您可以将当前版本恢复至任意一个备份的数据版本。 days的取值范围为[0,30],默认值为1。0代表关闭备份功能。 调整备份周期后的生效策略为: 延长备份周期:新的备份周期于当日开始生效。 缩短备份周期:系统将自动删除超过保留周期的备份数据。 仅阿里云账号或项目管理员可以操作。 setproject; 通过MaxCompute客户端控执行此命令打印项目级别的参数信息,MaxCompute客户端使用请参见使用客户端(odpscmd)连接。您可以查看odps.timemachine.retention.days参数的取值。例如odps.timemachine.retention.days=1,代表当前项目备份数据的保留周期为1天(24小时)。 查看备份数据 show history for tables [like ]; 查看当前项目内的表和处于备份状态的表信息,包括已经删除表,支持根据表名进行过滤,与show tables;命令不相同。 您需要具备Project的List权限。 权限详情请参见MaxCompute权限。 show history for table ; 查看指定表的备份数据,获取保留周期内备份的各个数据版本信息。 如果表存在,您需要具备Table的ShowHistory权限。 如果表已删除,执行该命令会报错,您可以通过show history for tables [like ];命令查找已经删除的表及备份的数据版本信息。 权限详情请参见MaxCompute权限。 show history for table table_name ('id'='xxxx'); 查看已删除表的备份数据,获取保留周期内备份的各个数据版本信息。 您可以通过show history for tables [like ];命令查找已经删除的表,获取表名和表ID信息。 您需要具备Project的List权限。 权限详情请参见MaxCompute权限。 show history for table table_name partition_spec; 查看指定分区的备份数据,获取保留周期内备份的各个数据版本信息。 无。 show history for table table_name PARTITION('id'='xxxx'); 查看已删除分区的备份数据,获取保留周期内备份的各个数据版本信息。id可以通过show history for table ;命令返回结果中的ObjectId字段获取。 恢复数据 restore table table_name ('id'='xxxxx'); 恢复已删除的表。 您可以通过show history for tables [like ];命令查找已经删除的表,获取表名和表ID信息。 执行表恢复操作时: 如果表存在,您需要具备Table的Update权限。 如果表不存在,您需要具备Project的CreateTable权限。 权限详情请参见MaxCompute权限。 说明不支持聚簇表(cluster table)。 执行分区恢复操作时,只能指定1个LSN,即备份版本。 当一次性恢复多个分区时,MaxCompute会将每个分区都恢复至指定LSN。如果某个分区不存在指定的LSN,MaxCompute会将该分区恢复至其第1个LSN。 例如,pt1的LSN分别为100、102、104和106,pt2的LSN分别为101、103、104和105,执行命令如下。 restore table table_name PARTITION(pt='1') PARTITION(pt='2') to LSN '102';执行结果为:pt1恢复至102版本,pt2恢复至101版本。 restore table table_name to LSN 'xxxx'; 恢复表至指定版本。 您可以通过show history for table ;命令获取表的版本信息。 restore table table_name to LSN 'xxxx' as new_table_name; 恢复表至指定版本,并命名为新表或将数据更新到不同名的表中。 restore table table_name PARTITION('id'='xxxx')[PARTITION('id'='xxxx')]; 恢复已删除的指定分区,支持一次恢复多个分区。通常用于恢复因执行drop partition操作或被生命周期回收后,需要恢复的分区。 restore table table_name partition_spec1[partition_spec2 ]to LSN 'xxxx'; 恢复指定分区至指定版本,支持一次恢复多个分区。通常用于恢复因执行overwrite或merge操作后,需要恢复的分区。 restore table table_name partition_spec1[partition_spec2 ]to LSN 'xxxx' as new_table_name; 恢复指定分区至指定版本,并命名为新表。 数据文件清理操作相对于普通表而言, Transactional Table 2.0会额外保留timetrval时间周期内的历史数据,当然也需要支付额外的存储成本,其他场景,系统会在合适的时机(最长不超过一天)自动删除不需要的历史数据文件,用户不需要额外操作,也可节省对应的存储成本,可删除的历史数据包括: 早于timetravel时间周期的历史数据。如果表配置了不支持timetravel查询,所有的历史数据都可自动删除。 超过了生命周期或者执行Drop操作后,并且也超过了昆仑镜备份保护时间的历史数据。 历史数据需满足上面所有的条件,才可被自动删除。 说明此处的历史数据特指已经迁移到回收站目录的数据文件,一般情况下,除了超过生命周期或者执行Drop操作外,执行Compaction或者insert overwrite也会导致当前数据写入目录的存量数据文件迁移至回收站目录,等待系统自动删除。 文件强制清理语法 --手动强制删除回收站的历史数据文件 purge table ;使用说明与限制 执行此命令后,系统会立马删除回收站里所有的历史数据,可能导致timetravel操作无法查询历史数据。 一般只在特殊场景中执行此命令应急,比如文件太多导致磁盘读写不稳定,历史数据太多导致成本暴增等。正常情况下,回收站中的历史数据等待系统自动删除即可。 使用示例 create table mf_ttt (pk bigint not null primary key, val bigint not null) tblproperties ("transactional"="true"); insert into table mf_ttt values (1, 1), (2, 2); insert into table mf_ttt values (2, 20), (3, 3); select * from mf_ttt version as of 2; --返回 +------------+------------+ | pk | val | +------------+------------+ | 1 | 1 | | 2 | 2 | +------------+------------+ --执行compaction-> purge -> timetravel查询 alter table mf_ttt compact major; select * from mf_ttt version as of 2; --返回 +------------+------------+ | pk | val | +------------+------------+ | 1 | 1 | | 2 | 2 | +------------+------------+ purge table mf_ttt; select * from mf_ttt version as of 2; --返回 +------------+------------+ | pk | val | +------------+------------+ | 1 | 1 | | 3 | 3 | | 2 | 20 | +------------+------------+查看备份数据示例以test_restore项目为例,为您介绍如何查看表的备份数据。 查看所有表的备份数据。 执行show history for tables [like ];命令,示例如下。 ## 创建表mf_slot。 odps@ test_restore>Create Table mf_slot(a string); ## 查看表mf_slot的备份数据。 odps@ test_restore>show history for tables like mf_slot;返回结果如下。 ID = 20230913031801784gyn8qbae3v8 Name Id Type IsPartitioned CreateTime DropTime mf_slot c75dccd60b224ff086171d39b1904eb4 MANAGED_TABLE FALSE 2023-09-13 11:17:52 OK查看指定表的备份数据。 执行show history for table ;命令,示例如下。 ## 创建表test_restore_x。 odps@ test_restore>Create Table test_restore_x(a string); ## 更新表test_restore_x数据。 odps@ test_restore>INSERT OVERWRITE TABLE test_restore_x values("0"); odps@ test_restore>INSERT OVERWRITE TABLE test_restore_x values("1"); odps@ test_restore>INSERT OVERWRITE TABLE test_restore_x values("2"); odps@ test_restore>INSERT OVERWRITE TABLE test_restore_x values("3"); ## 查看表test_restore_x的备份数据。 odps@ test_restore>show history for table test_restore_x;返回结果如下。 ObjectType ObjectId ObjectName LSN Time Operation TABLE d6266b2c49b9418cb999dc65c10ad7ae test_restore_x 0000000000000001 2020-02-18 14:17:58 CREATE TABLE d6266b2c49b9418cb999dc65c10ad7ae test_restore_x 0000000000000002 2020-02-18 14:22:26 OVERWRITE TABLE d6266b2c49b9418cb999dc65c10ad7ae test_restore_x 0000000000000003 2020-02-18 14:23:32 OVERWRITE TABLE d6266b2c49b9418cb999dc65c10ad7ae test_restore_x 0000000000000004 2020-02-18 14:24:37 OVERWRITE TABLE d6266b2c49b9418cb999dc65c10ad7ae test_restore_x 0000000000000005 2020-02-18 14:25:44 OVERWRITE查看已删除表的备份数据。 执行show history for table table_name ('id'='xxxx');命令,示例如下。 ## 删除表test_restore_x。 odps@ test_restore>drop table test_restore_x; ## 确认删除表test_restore_x操作。 Confirm to "drop table test_restore_x;" (yes/no)? yes ## 查看删除表test_restore_x的备份数据。 odps@ test_restore>show history for table test_restore_x('id'='d6266b2c49b9418cb999dc65c10ad7ae');返回结果如下。 ObjectType ObjectId ObjectName LSN Time Operation TABLE d6266b2c49b9418cb999dc65c10ad7ae test_restore_x 0000000000000001 2020-02-18 14:17:58 CREATE TABLE d6266b2c49b9418cb999dc65c10ad7ae test_restore_x 0000000000000002 2020-02-18 14:22:26 OVERWRITE TABLE d6266b2c49b9418cb999dc65c10ad7ae test_restore_x 0000000000000003 2020-02-18 14:23:32 OVERWRITE TABLE d6266b2c49b9418cb999dc65c10ad7ae test_restore_x 0000000000000004 2020-02-18 14:24:37 OVERWRITE TABLE d6266b2c49b9418cb999dc65c10ad7ae test_restore_x 0000000000000005 2020-02-18 14:25:44 OVERWRITE TABLE d6266b2c49b9418cb999dc65c10ad7ae test_restore_x 0000000000000006 2020-02-18 14:30:32 DROP查看分区表或分区的备份数据。 执行show history for table table_name ('id'='xxxx');命令,查看分区表的备份数据。执行show history for table table_name partition_spec;或show history for table table_name PARTITION('id'='xxxx');命令,查看分区的备份数据。 查看分区表的备份数据,示例如下。 ## 新建表test_restore_part_x。 odps@ test_restore>Create Table test_restore_part_x(a string) PARTITIONED BY(ds string); ## 更新表test_restore_part_x。 odps@ test_restore>INSERT OVERWRITE TABLE test_restore_part_x partition(ds="20191201") values ("1"); odps@ test_restore>INSERT OVERWRITE TABLE test_restore_part_x partition(ds="20191202") values ("2"); odps@ test_restore>INSERT OVERWRITE TABLE test_restore_part_x partition(ds="20191203") values ("3"); odps@ test_restore>INSERT OVERWRITE TABLE test_restore_part_x partition(ds="20191204") values ("4"); odps@ test_restore>INSERT OVERWRITE TABLE test_restore_part_x partition(ds="20191205") values ("5"); odps@ test_restore>INSERT OVERWRITE TABLE test_restore_part_x partition(ds="20191205") values ("6"); odps@ test_restore>INSERT OVERWRITE TABLE test_restore_part_x partition(ds="20200101") values ("20200101"); odps@ test_restore>INSERT OVERWRITE TABLE test_restore_part_x partition(ds="20200102") values ("20200102"); ## 查看表test_restore_part_x的备份数据。 odps@ test_restore>show history for table test_restore_part_x('id'='94d436523fe14ba39f33d2dee738c018');返回结果如下。 ObjectType ObjectId ObjectName LSN Time Operation TABLE 94d436523fe14ba39f33d2dee738c018 test_restore_part_x 0000000000000001 2020-02-18 17:29:35 CREATE PARTITION f4614a34620346aaa729761f082aae74 ds=20191201 0000000000000002 2020-02-18 17:32:56 CREATE PARTITION 0698ed40169044c7bf66b14a3c3c2f35 ds=20191202 0000000000000003 2020-02-18 17:35:12 CREATE PARTITION 19f26f7b1976438c94f8f53cfb5c6912 ds=20191203 0000000000000004 2020-02-18 17:35:22 CREATE PARTITION dc15ed7d5da441649a5f32c4929b2fb2 ds=20191204 0000000000000005 2020-02-18 17:35:57 CREATE PARTITION e01128f1183b44369b06dae1e73a8134 ds=20191205 0000000000000006 2020-02-18 17:37:21 CREATE PARTITION e01128f1183b44369b06dae1e73a8134 ds=20191205 0000000000000007 2020-02-18 17:37:48 OVERWRITE PARTITION 189727214c0d4e8e92b52814211dd086 ds=20200101 0000000000000008 2020-02-18 17:37:59 CREATE PARTITION adbc79ade65d4b0dbea4a4dcbf0ce719 ds=20200102 0000000000000009 2020-02-18 17:38:09 CREATE查看分区的备份数据,示例如下。 ## 查看表test_restore_part_x指定分区的备份数据。 odps@ test_restore>show history for table test_restore_part_x('id'='94d436523fe14ba39f33d2dee738c018') partition(ds='20191201') partition(ds='20191202');返回结果如下。 ObjectType ObjectId ObjectName LSN Time Operation PARTITION f4614a34620346aaa729761f082aae74 ds=20191201 0000000000000002 2020-02-18 17:32:56 CREATE PARTITION 0698ed40169044c7bf66b14a3c3c2f35 ds=20191202 0000000000000003 2020-02-18 17:35:12 CREATE恢复非分区表示例以test_restore项目为例,为您介绍如何恢复非分区表的数据。 恢复已删除的表。 执行restore table table_name ('id'='xxxxx');命令,示例如下。如果存在同名的表,您需要将同名的表重命名后才能执行恢复操作。 ## 查询已删除表test_restore_x的备份数据。 odps@ test_restore>show history for table test_restore_x('id'='d6266b2c49b9418cb999dc65c10ad7ae'); ## 创建同名表test_restore_part_x。 odps@ test_restore>Create Table test_restore_x(a string); ## 恢复表test_restore_part_x,但因为存在同名表会报错。 odps@ test_restore>restore table test_restore_x('id'='d6266b2c49b9418cb999dc65c10ad7ae'); ## 重命名存在的同名表test_restore_part_x。 odps@ test_restore>alter table test_restore_x rename to test_restore_x_rename; ## 恢复已删除的表test_restore_part_x。 odps@ test_restore>restore table test_restore_x('id'='d6266b2c49b9418cb999dc65c10ad7ae');返回结果显示OK。 恢复表至指定版本。 对于已经删除的表,需要先恢复表之后再进行此操作。 执行restore table table_name to LSN 'xxxx';命令,示例如下。 ## 恢复表test_restore_x至指定版本。 odps@ test_restore>restore table test_restore_x to LSN '0000000000000004'; ## 查询表test_restore_part_x数据。 odps@ test_restore>select * from test_restore_x;返回结果如下。 Summary: +---+ | a | +---+ | 2 | +---+恢复表至指定版本,并命名为新表或将数据更新到不同名的表中。 执行restore table table_name to LSN 'xxxx' as new_table_name;命令,示例如下。 包含以下三种场景: 恢复表至指定版本,并命名为新表。 ## 恢复已删除的表test_restore_x至指定版本,并命名为新表。 odps@ test_restore>restore table test_restore_x to LSN '0000000000000005' as test_restore_x_v5; ## 查询表test_restore_x_v5数据。 odps@ test_restore>select * from test_restore_x_v5;返回结果如下。 Summary: +---+ | a | +---+ | 3 | +---+恢复表至指定版本,并将数据更新到已存在的不同名表中。 ## 恢复表test_restore_x至指定版本,并更新到已存在的不同名表中。 odps@ test_restore>restore table test_restore_x to LSN '0000000000000005' as test_restore_x_v5; ## 查询表test_restore_x_v5的备份数据。 odps@ test_restore>show history for table test_restore_x_v5;返回结果如下。 ObjectType ObjectId ObjectName LSN Time Operation TABLE 2e17a61561e4456db8ab66d0dd41e1b9 test_restore_x_v5 0000000000000001 2020-02-18 16:18:41 CREATE TABLE 2e17a61561e4456db8ab66d0dd41e1b9 test_restore_x_v5 0000000000000003 2020-02-18 16:22:07 OVERWRITE恢复表至指定版本,并将数据更新到不同名且Schema不一致的表中。该操作执行失败,两个表的Schema必须要保持一致。示例如下。 ## 创建一个Schema不一致的表。 odps@ test_restore>Create Table test_restore_2cols(a string, b string); ## 恢复表test_restore_x数据至指定版本,并将数据更新到test_restore_2cols表中。 odps@ test_restore>restore table test_restore_x to LSN '0000000000000005' as test_restore_2cols;返回结果如下。 FAILED: Catalog Service Failed, ErrorCode: 105, Error Message: ODPS-0110061: Failed to run ddltask - Restore table failed because: field schema not same, [{"comment":"","id":"","name":"a","type":"string"}] vs [{"comment":"","id":"","name":"a","type":"string"},{"comment":"","id":"","name":"b","type":"string"}]恢复分区表和分区示例以test_restore项目为例,为您介绍如何恢复分区表或分区的数据。 恢复分区表。 执行restore table table_name ('id'='xxxxx');命令,示例如下。 ## 新建表test_restore_part_x。 odps@ test_restore>Create Table test_restore_part_x(a string) PARTITIONED BY(ds string); ## 更新表test_restore_part_x。 odps@ test_restore>INSERT OVERWRITE TABLE test_restore_part_x partition(ds="20191201") values ("1"); odps@ test_restore>INSERT OVERWRITE TABLE test_restore_part_x partition(ds="20191202") values ("2"); odps@ test_restore>INSERT OVERWRITE TABLE test_restore_part_x partition(ds="20191203") values ("3"); odps@ test_restore>INSERT OVERWRITE TABLE test_restore_part_x partition(ds="20191204") values ("4"); odps@ test_restore>INSERT OVERWRITE TABLE test_restore_part_x partition(ds="20191205") values ("5"); odps@ test_restore>INSERT OVERWRITE TABLE test_restore_part_x partition(ds="20191205") values ("6"); odps@ test_restore>INSERT OVERWRITE TABLE test_restore_part_x partition(ds="20200101") values ("20200101"); odps@ test_restore>INSERT OVERWRITE TABLE test_restore_part_x partition(ds="20200102") values ("20200102"); ## 查看表test_restore_part_x的分区。 odps@ test_restore>list partitions test_restore_part_x; ## 查看表test_restore_part_x的数据。 odps@ test_restore>select * from test_restore_part_x; ## 删除表test_restore_part_x。 odps@ test_restore>drop table test_restore_part_x; ## 确认删除表test_restore_part_x操作。 Confirm to "drop table test_restore_part_x;" (yes/no)? yes ## 恢复表test_restore_part_x。 odps@ test_restore>restore table test_restore_part_x('id'='94d436523fe14ba39f33d2dee738c018'); ## 查看表test_restore_part_x的备份数据。 odps@ test_restore>show history for table test_restore_part_x('id'='94d436523fe14ba39f33d2dee738c018'); ## 查看表test_restore_part_x的分区。 odps@ test_restore>list partitions test_restore_part_x;返回结果如下。 ds=20191201 ds=20191202 ds=20191203 ds=20191204 ds=20191205 ds=20200101 ds=20200102恢复分区。 对于已经删除的表,需要先恢复表之后再进行此操作。 执行restore table table_name PARTITION('id'='xxxx')[PARTITION('id'='xxxx')];命令,示例如下。 ## 新建表test_restore_part_y。 odps@ test_restore>Create Table test_restore_part_y(a string) PARTITIONED BY(ds string); ## 更新表test_restore_part_y。 odps@ test_restore>INSERT OVERWRITE TABLE test_restore_part_y partition(ds="20191201") values ("1"); odps@ test_restore>INSERT OVERWRITE TABLE test_restore_part_y partition(ds="20191202") values ("2"); odps@ test_restore>INSERT OVERWRITE TABLE test_restore_part_y partition(ds="20191203") values ("3"); odps@ test_restore>INSERT OVERWRITE TABLE test_restore_part_y partition(ds="20191204") values ("4"); odps@ test_restore>INSERT OVERWRITE TABLE test_restore_part_y partition(ds="20191205") values ("5"); odps@ test_restore>INSERT OVERWRITE TABLE test_restore_part_y partition(ds="20191206") values ("6"); odps@ test_restore>INSERT OVERWRITE TABLE test_restore_part_y partition(ds="20200101") values ("20200101"); odps@ test_restore>INSERT OVERWRITE TABLE test_restore_part_y partition(ds="20200102") values ("20200102"); ## 查看表test_restore_part_y的分区。 odps@ test_restore>list partitions test_restore_part_y; ## 删除表test_restore_part_y的分区。 odps@ test_restore>alter table test_restore_part_y drop partition(ds='20191201'),partition(ds='20191202'); ## 确认删除分区操作。 Confirm to "alter table test_restore_part_y drop partition(ds='20191201'),partition(ds='20191202');" (yes/no)? yes ## 查看表test_restore_part_y的分区。 odps@ test_restore>list partitions test_restore_part_y; ## 恢复表test_restore_part_y的分区。 odps@ test_restore>restore table test_restore_part_y partition('id'='e6647109adbe44b69068a4dd83a577ad') partition('id'='bc4aaf375ab94998b02dabb0fed0b5fe'); ## 查看表test_restore_part_y的分区。 odps@ test_restore>list partitions test_restore_part_y;返回结果如下。 ds=20191201 ds=20191202 ds=20191203 ds=20191204 ds=20191205 ds=20191206 ds=20200101 ds=20200102恢复分区至指定版本。 对于已经删除的表,需要先恢复表之后再进行此操作。 执行restore table table_name partition_spec1[partition_spec2 ]to LSN 'xxxx';命令,示例如下。 ## 更新分区表test_restore_part_y。 odps@ test_restore>INSERT OVERWRITE TABLE test_restore_part_y partition(ds="20200101") values ("20200101_v1"); odps@ test_restore>INSERT OVERWRITE TABLE test_restore_part_y partition(ds="20200102") values ("20200102_v1"); odps@ test_restore>INSERT OVERWRITE TABLE test_restore_part_y partition(ds="20200101") values ("20200101_v2"); odps@ test_restore>INSERT OVERWRITE TABLE test_restore_part_y partition(ds="20200102") values ("20200102_v2"); ## 查看test_restore_part_y指定分区的数据。 odps@ test_restore>select * from test_restore_part_y where ds='20200101' or ds='20200102'; ## 恢复test_restore_part_y指定分区至指定版本。 odps@ test_restore>restore table test_restore_part_y partition(ds='20200101') partition(ds='20200102') to LSN '0000000000000010'; ## 查看test_restore_part_y指定分区的数据。 odps@ test_restore>select * from test_restore_part_y where ds='20200101' or ds='20200102';返回结果如下。 +---+----+ | a | ds | +---+----+ | 20200101| 20200101| | 20200102| 20200102| +---+----+恢复分区至指定版本,并命名为新表。 对于已经删除的表,需要先恢复表之后再进行此操作。 执行restore table table_name partition_spec1[partition_spec2 ]to LSN 'xxxx' as new_table_name;命令,示例如下。 ## 恢复分区至指定版本,并命名为新表test_restore_part_y_v10。 odps@ test_restore>restore table test_restore_part_y partition(ds='20200101') partition(ds='20200102') to LSN '0000000000000010' as test_restore_part_y_v10; ## 查看新表test_restore_part_y_v10的数据。 odps@ test_restore>select * from test_restore_part_y_v10;返回结果如下。 +---+----+ | a | ds | +---+----+ | 20200101| 20200101| | 20200102| 20200102| +---+----+Transaction Table2.0示例说明目前Transaction Table2.0处于邀测阶段,默认不支持直接使用,如果您需要使用该功能,请点击申请开通,在新功能试用申请页面申请开通使用Transaction Table2.0功能后,再运行相关命令。详情请参见Transaction Table2.0概述。 --创建表 create table mf_tts (pk bigint not null primary key, val bigint not null) partitioned by (dd string, hh string) tblproperties ("transactional"="true"); insert overwrite table mf_tts partition(dd='01', hh='01') values (1, 1), (2, 2), (3, 3); insert into table mf_tts partition(dd='01', hh='01') values (3, 30), (4, 4), (5, 5); select * from mf_tts where dd='01' and hh='01'; --返回 +------------+------------+----+----+ | pk | val | dd | hh | +------------+------------+----+----+ | 1 | 1 | 01 | 01 | | 3 | 30 | 01 | 01 | | 4 | 4 | 01 | 01 | | 5 | 5 | 01 | 01 | | 2 | 2 | 01 | 01 | +------------+------------+----+----+ --恢复表, 'table_id' 可以通过desc extended table获取 desc extended mf_tts; +------------------------------------------------------------------------------------+ | Owner: [email protected] | | Project: mf_mc_bj | | TableComment: | +------------------------------------------------------------------------------------+ | CreateTime: 2023-06-13 20:45:33 | | LastDDLTime: 2023-06-13 20:45:33 | | LastModifiedTime: 2023-06-13 20:45:41 | +------------------------------------------------------------------------------------+ | InternalTable: YES | Size: 8538 | +------------------------------------------------------------------------------------+ | Native Columns: | +------------------------------------------------------------------------------------+ | Field | Type | Label | ExtendedLabel | Nullable | DefaultValue | Comment | +------------------------------------------------------------------------------------+ | pk | bigint | | | false | NULL | | | val | bigint | | | false | NULL | | +------------------------------------------------------------------------------------+ | Partition Columns: | +------------------------------------------------------------------------------------+ | dd | string | | | hh | string | | +------------------------------------------------------------------------------------+ | Extended Info: | +------------------------------------------------------------------------------------+ | TableID: a80ff25de1444ac3aa6a67a522d2110f | | IsArchived: false | | PhysicalSize: 25614 | | FileNum: 9 | | StoredAs: AliOrc | | CompressionStrategy: normal | | Transactional: true | | IsolationMin: NONSTRICT_SNAPSHOT_ISOLATION | | odps.timemachine.retention.days: 1 | | encryption_enable: false | | ClusterType: hash | | BucketNum: 16 | | ClusterColumns: [pk] | | SortColumns: [pk ASC] | +------------------------------------------------------------------------------------+ drop table mf_tts; restore table mf_tts ('id' = 'a80ff25de1444ac3aa6a67a522d2110f'); select * from mf_tts where dd='01' and hh='01'; --返回 +------------+------------+----+----+ | pk | val | dd | hh | +------------+------------+----+----+ | 1 | 1 | 01 | 01 | | 3 | 30 | 01 | 01 | | 4 | 4 | 01 | 01 | | 5 | 5 | 01 | 01 | | 2 | 2 | 01 | 01 | +------------+------------+----+----+ --恢复分区,'partition_id'可通过show history for table show history for table mf_tts; ObjectType ObjectId ObjectName VERSION(LSN) Time Operation TABLE a80ff25de1444ac3aa6a67a522d2110f mf_tts 0000000000000001 2023-06-13 20:45:33 CREATE PARTITION 90a22a7f485742f7b56c460ce1c246be dd=01/hh=01 0000000000000002 2023-06-13 20:45:37 CREATE PARTITION 90a22a7f485742f7b56c460ce1c246be dd=01/hh=01 0000000000000003 2023-06-13 20:45:42 APPEND TABLE a80ff25de1444ac3aa6a67a522d2110f mf_tts 0000000000000004 2023-06-13 20:46:49 DROP TABLE a80ff25de1444ac3aa6a67a522d2110f mf_tts 0000000000000005 2023-06-13 20:46:51 RESTORE PARTITION 90a22a7f485742f7b56c460ce1c246be dd=01/hh=01 0000000000000006 2023-06-13 20:46:52 RESTORE alter table mf_tts drop partition (dd = '01', hh = '01'); restore table mf_tts partition('id' = '90a22a7f485742f7b56c460ce1c246be'); select * from mf_tts where dd='01' and hh='01'; +------------+------------+----+----+ | pk | val | dd | hh | +------------+------------+----+----+ | 1 | 1 | 01 | 01 | | 3 | 30 | 01 | 01 | | 4 | 4 | 01 | 01 | | 5 | 5 | 01 | 01 | | 2 | 2 | 01 | 01 | +------------+------------+----+----+ --timetravel查询restore的表 select * from mf_tts version as of 2 where dd = '01' and hh = '01'; --返回 +------------+------------+----+----+ | pk | val | dd | hh | +------------+------------+----+----+ | 1 | 1 | 01 | 01 | | 3 | 3 | 01 | 01 | | 2 | 2 | 01 | 01 | +------------+------------+----+----+ select * from mf_tts version as of get_latest_version('mf_tts') where dd = '01' and hh = '01'; --返回 +------------+------------+----+----+ | pk | val | dd | hh | +------------+------------+----+----+ | 1 | 1 | 01 | 01 | | 3 | 30 | 01 | 01 | | 4 | 4 | 01 | 01 | | 5 | 5 | 01 | 01 | | 2 | 2 | 01 | 01 | +------------+------------+----+----+ |
【本文地址】