| 二十分钟秒懂:实现前后端分离开发(vue+element+spring boot+mybatis+MySQL) | 您所在的位置:网站首页 › 何为边界层分离 › 二十分钟秒懂:实现前后端分离开发(vue+element+spring boot+mybatis+MySQL) |
二十分钟秒懂:实现前后端分离开发(vue+element+spring boot+mybatis+MySQL)
|
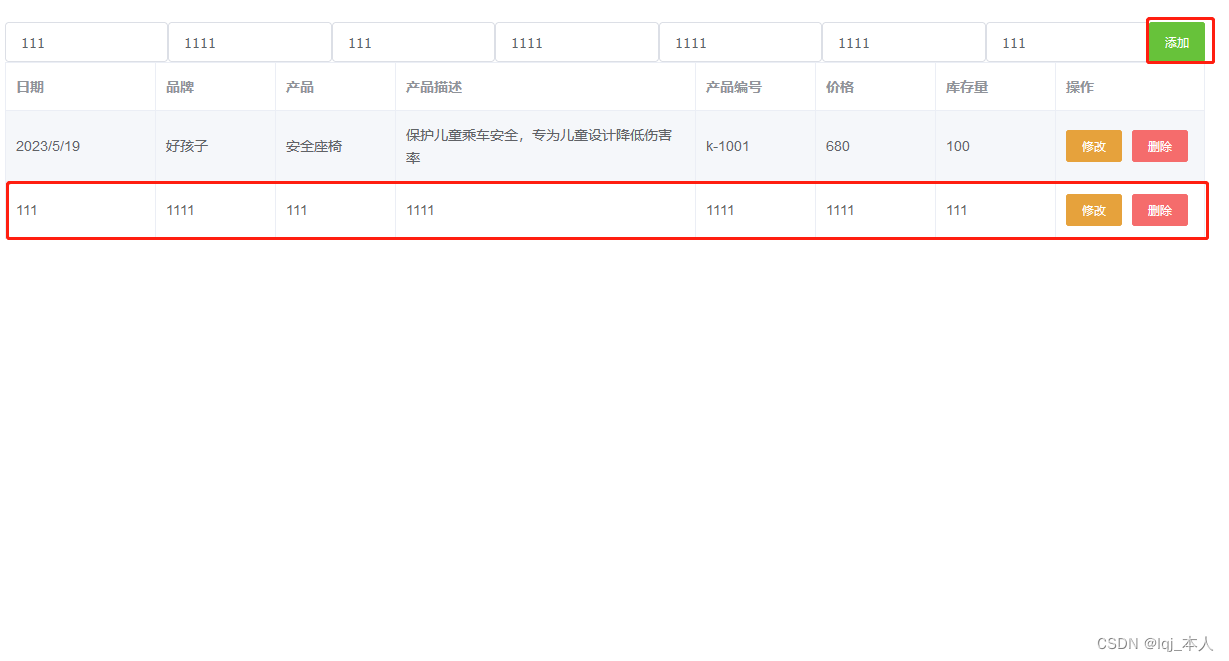
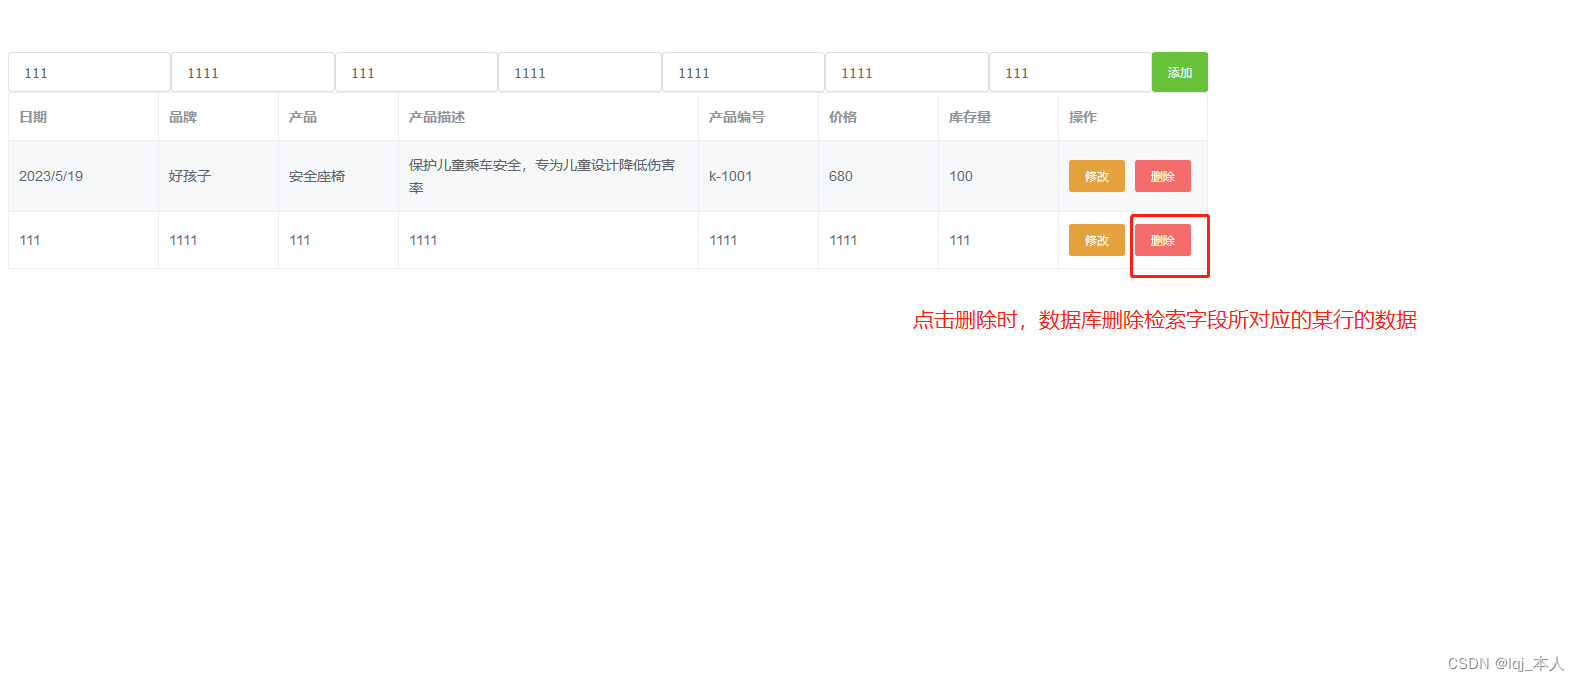
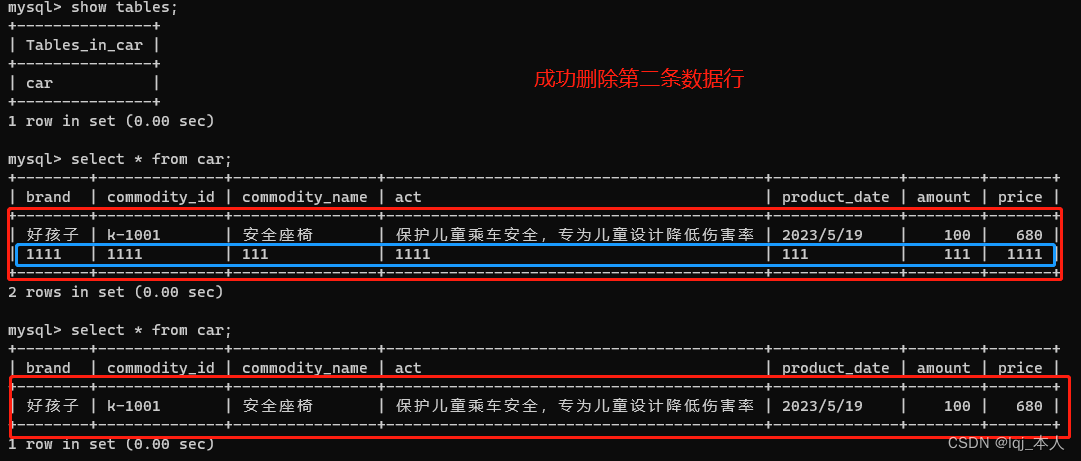
目录 开发者介绍 什么是前后端分离开发 vue与springboot开发的优势 Vue.js 的优势: Spring Boot 的优势: vue与springboot如何实现前后端连接 demo简介 重要部分前端部分代码 重要部分后端代码 后端解决跨域问题 Controller部分 xml部分 service部分 demo示例演示 开发者介绍后端开发者:小昕ᵇᵃᵇʸ.的博客_CSDN博客-领域博主小昕ᵇᵃᵇʸ.关注python,css,java,c语言,html5,数据结构领域. lqj_本人的博客_CSDN博客-python人工智能视觉(opencv)从入门到实战,微信小程序,前端领域博主lqj_本人擅长python人工智能视觉(opencv)从入门到实战,微信小程序,前端,等方面的知识 前后端分离开发是一种软件开发模式,将前端和后端的开发分离开来,使得前端和后端可以独立开发、测试和部署。在前后端分离开发中,前端负责展示数据和用户交互,后端负责处理业务逻辑和数据存储。 具体来说,前端开发人员使用 HTML、CSS、JavaScript 等技术实现用户界面和交互逻辑,通过 AJAX 或 WebSocket 等技术与后端进行通信,获取数据并将数据展示给用户。后端开发人员则负责编写业务逻辑和数据存储的代码,提供 API 接口供前端调用。 前后端分离开发的优点包括: 提高开发效率:前后端可以并行开发,减少了开发时间。提高可维护性:前后端分离后,代码耦合度降低,修改一个模块不会影响到其他模块。提高可扩展性:前后端分离后,可以更容易地添加新的功能模块。提高用户体验:前端可以更快地响应用户操作,提高用户体验。 vue与springboot开发的优势Vue.js 和 Spring Boot 是两个非常流行的开发框架,它们分别用于前端和后端开发。它们的优势如下: Vue.js 的优势: 响应式数据绑定:Vue.js 的核心是响应式数据绑定,它可以自动追踪数据的变化,并且更新视图。这使得开发者可以更加专注于业务逻辑的实现,而不用过多关注 DOM 操作。组件化开发:Vue.js 支持组件化开发,可以将一个页面拆分成多个组件,每个组件都有自己的状态和行为。这样可以提高代码的复用性和可维护性。轻量级:Vue.js 的体积非常小,只有 20KB 左右,加载速度非常快,可以提高用户体验。 Spring Boot 的优势: 快速开发:Spring Boot 提供了自动配置和快速启动的特性,可以快速搭建一个基于 Spring 的应用程序。高度集成:Spring Boot 集成了大量的第三方库和框架,可以方便地与其他技术进行集成,如数据库、消息队列、缓存等。易于部署:Spring Boot 应用程序可以打包成一个可执行的 JAR 文件,可以方便地部署到任何支持 Java 的环境中。综上所述,Vue.js 和 Spring Boot 都有各自的优势,它们可以很好地配合使用,实现高效的全栈开发。Vue.js 负责前端 UI 的实现和交互逻辑,Spring Boot 负责后端业务逻辑的实现和数据处理。 vue与springboot如何实现前后端连接Vue和Spring Boot可以通过RESTful API实现前后端连接。 首先,在Spring Boot中创建一个RESTful API,可以使用Spring Boot提供的@RestController注解来实现。在这个API中,你可以定义HTTP请求的处理逻辑,比如从数据库中获取数据并返回给前端。 然后,在Vue中,你可以使用Vue提供的axios库来发送HTTP请求,获取后端数据。你可以在Vue组件中使用axios发送请求,然后将返回的数据渲染到页面上。 具体实现步骤如下: 在Spring Boot中创建一个RESTful API,使用@RestController注解来标记这个API。在API中定义HTTP请求的处理逻辑,比如从数据库中获取数据并返回给前端。在Vue中使用axios库发送HTTP请求,获取后端数据。在Vue组件中将返回的数据渲染到页面上。简单的示例: 在Spring Boot中创建一个RESTful API: @RestController @RequestMapping("/api") public class ApiController { @Autowired private UserService userService; @GetMapping("/users") public List getUsers() { return userService.getUsers(); } }在Vue中使用axios发送HTTP请求: import axios from 'axios' export default { data() { return { users: [] } }, mounted() { axios.get('/api/users') .then(response => { this.users = response.data }) .catch(error => { console.log(error) }) } }在Vue组件中将返回的数据渲染到页面上: {{ user.name }} import axios from 'axios' export default { data() { return { users: [] } }, mounted() { axios.get('/api/users') .then(response => { this.users = response.data }) .catch(error => { console.log(error) }) } } demo简介注:小demo只是做了简单的演示示例,功能齐全但样式简单,望大家谅解! 此小demo适用于刚接触前端后分离开发的小伙伴,尤其针对前端vue+后端spring boot分离开发的小伙伴。 本项目主要完成了通过前端的vue.js与后端的spring boot的连接,实现了简单的实现了通过前端页面来调用后端API接口,从而完成对数据库中内容的增删改查。 重要部分前端部分代码 添加 修改 删除 修改 import axios from 'axios' export default{ mounted(){ // 显示数据 axios.get('http://localhost:8090/car/query').then(res=>{ console.log(res.data.data); this.tableData = res.data.data }) }, methods: { handleClick(row) { this.update = true this.row_data = row console.log(this.row_data); this.id = row.commodity_id }, // 条件修改 edit_put(){ axios.post('http://localhost:8090/car/update',{ commodity_id:this.upData.commodity_id }).then(res=>{ console.log(res.data) this.update = false }) }, // 添加数据 add(){ axios.post('http://localhost:8090/car/add',this.newData).then(res=>{ console.log(res.data) }) }, // 删除数据 del_data(commodity_id){ console.log(commodity_id); axios.get('http://localhost:8090/car/del?commodity_id='+commodity_id).then(res=>{ console.log(res.data) }) } }, data() { return { update:false, id:'', row_data:'', // 添加数据data newData:{ brand:'', commodity_id:'', commodity_name:'', product_date:'', act:'', amount:null, price:null }, // 修改数据data upData:{ brand:'', commodity_id:'', commodity_name:'', product_date:'', act:'', amount:null, price:null }, tableData: [] } } } .big_box{ width: 1200px; } 重要部分后端代码 后端解决跨域问题 @CrossOrigin(origins = "*") Controller部分 package com.wfit.boot.controller; import com.wfit.boot.commons.Result; import com.wfit.boot.model.Car; import com.wfit.boot.service.CarService; import org.springframework.beans.factory.annotation.Autowired; import org.springframework.web.bind.annotation.*; import java.util.List; @RestController @RequestMapping("/car") public class CarController { @Autowired private CarService carService; /** * 新增汽车用品信息 * @param car * @return */ @PostMapping("/add") @CrossOrigin(origins = "*") public Result addCar(@RequestBody Car car){ carService.saveCar(car); return Result.success("新增汽车用品信息成功:" + car); } /** * 修改 * @param car * @return */ @PostMapping ("/update") @CrossOrigin(origins = "*") public Result updateCar(@RequestBody Car car){ carService.updateCar(car); return Result.success("修改汽车用品信息成功:" + car); } /** * 删除 * @param commodity_id * @return */ @GetMapping("/del") @CrossOrigin(origins = "*") public Result delCar(String commodity_id){ carService.delCar(commodity_id); return Result.success("删除编号为" + commodity_id + "汽车用品信息成功!"); } /** * 查询 * @return */ @GetMapping("/query") @CrossOrigin(origins = "*") public Result queryCar(){ List carList = carService.queryCar(); return Result.success(carList); } } xml部分 insert into car values ( #{brand}, #{commodity_id}, #{commodity_name}, #{act}, #{product_date}, #{amount}, #{price} ) update car set price = #{price} where commodity_id =#{commodity_id} delete from car where commodity_id = #{commodity_id}; select * from car service部分 package com.wfit.boot.service.impl; import com.wfit.boot.mapper.CarMapper; import com.wfit.boot.model.Car; import com.wfit.boot.service.CarService; import org.springframework.beans.factory.annotation.Autowired; import org.springframework.stereotype.Service; import java.util.List; @Service public class CarServiceImpl implements CarService { @Autowired private CarMapper carMapper; @Override public void saveCar(Car car) { carMapper.saveCar(car); } @Override public void updateCar(Car car) { carMapper.updateCar(car); } @Override public void delCar(String commodity_id) { carMapper.delCar(commodity_id); } @Override public List queryCar() { return carMapper.queryCar(); } } demo示例演示
|

【本文地址】