|
文章目录
一、实现代码1.图片预处理读取图片处理车牌上的螺丝转灰度二值化闭运算找字符边界绘制边界预处理效果
2.切割字符预处理图转灰度计算每一列的黑色和白色数量以及最大值定义找右边界函数切割字符以及保存切割结果到文件切割结果
3.源代码
二、原数据三、最终结果四、总结五、参考
一、实现代码
1.图片预处理
读取图片
# 车牌路径
file_path="./car/"
# 读取所有车牌
cars = os.listdir(file_path)
cars.sort()
src = cv2.imread(file_path+car)
img = src.copy()

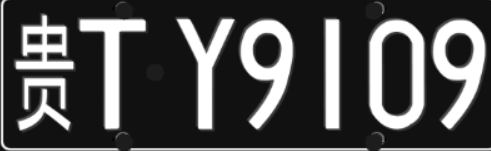
处理车牌上的螺丝
用蓝色覆盖,后面二值化的时候可以直接去除
cv2.circle(img, (145, 20), 10, (255, 0, 0), thickness=-1)
cv2.circle(img, (430, 20), 10, (255, 0, 0), thickness=-1)
cv2.circle(img, (145, 170), 10, (255, 0, 0), thickness=-1)
cv2.circle(img, (430, 170), 10, (255, 0, 0), thickness=-1)
cv2.circle(img, (180, 90), 10, (255, 0, 0), thickness=-1)

转灰度
gray = cv2.cvtColor(img, cv2.COLOR_BGR2GRAY)
二值化
# 二值化
adaptive_thresh = cv2.adaptiveThreshold(gray, 255, cv2.ADAPTIVE_THRESH_MEAN_C, cv2.THRESH_BINARY_INV, 333, 1)

闭运算
除去螺丝痕迹
kernel = np.ones((5, 5), int)
morphologyEx = cv2.morphologyEx(adaptive_thresh, cv2.MORPH_CLOSE, kernel)

找字符边界
contours, hierarchy = cv2.findContours(morphologyEx, cv2.RETR_LIST, cv2.CHAIN_APPROX_SIMPLE)
绘制边界
用黑色把原来图片的蓝底换成黑底
img_1 = img.copy()
cv2.drawContours(img_1, contours, -1, (0, 0, 0), -1)

预处理效果

2.切割字符
预处理图转灰度
gray_1 = cv2.cvtColor(img_1, cv2.COLOR_BGR2GRAY)
计算每一列的黑色和白色数量以及最大值
# 每一列的白色数量
white = []
# 每一列的黑色数量
black = []
# 区域高度取决于图片高
height = gray_1.shape[0]
# 区域宽度取决于图片宽
width = gray_1.shape[1]
# 最大白色数量
white_max = 0
# 最大黑色数量
black_max = 0
# 计算每一列的黑白色像素总和
for i in range(width):
s = 0 # 这一列白色总数
t = 0 # 这一列黑色总数
for j in range(height):
if gray_1[j][i] == 255:
s += 1
if gray_1[j][i] == 0:
t += 1
white_max = max(white_max, s)
black_max = max(black_max, t)
white.append(s)
black.append(t)
定义找右边界函数
def find_end(start):
end = start + 1
for m in range(start + 1, width - 1):
# 基本全黑的列视为边界
if black[m] >= black_max * 0.95: # 0.95这个参数请多调整,对应下面的0.05
end = m
break
return end
切割字符以及保存切割结果到文件
# 临时变量
n = 1
# 起始位置
start = 1
# 结束位置
end = 2
# 分割结果数量
num=0
# 分割结果
res = []
# 保存分割结果路径,以图片名命名
output_path= output_dir + car.split('.')[0]
if not os.path.exists(output_path):
os.makedirs(output_path)
# 从左边网右边遍历
while n white_max
if white[n] > 0.05 * white_max:
start = n
# 找到结束坐标
end = find_end(start)
# 下一个的起始地址
n = end
# 确保找到的是符合要求的,过小不是车牌号
if end - start > 10:
# 分割
char = gray_1[1:height, start - 5:end + 5]
# 保存分割结果到文件
cv2.imwrite(output_path+'/' + str(num) + '.jpg',char)
num+=1
# 重新绘制大小
char = cv2.resize(char, (300, 300), interpolation=cv2.INTER_CUBIC)
# 添加到结果集合
res.append(char)
切割结果

3.源代码
import cv2
import numpy as np
import os
def stackImages(scale, imgArray):
"""
将多张图像压入同一个窗口显示
:param scale:float类型,输出图像显示百分比,控制缩放比例,0.5=图像分辨率缩小一半
:param imgArray:元组嵌套列表,需要排列的图像矩阵
:return:输出图像
"""
rows = len(imgArray)
cols = len(imgArray[0])
rowsAvailable = isinstance(imgArray[0], list)
# 用空图片补齐
for i in range(rows):
tmp = cols - len(imgArray[i])
for j in range(tmp):
img = np.zeros((imgArray[0][0].shape[0], imgArray[0][0].shape[1]), dtype='uint8')
imgArray[i].append(img)
# 判断维数
if rows>=2:
width = imgArray[0][0].shape[1]
height = imgArray[0][0].shape[0]
else:
width = imgArray[0].shape[1]
height = imgArray[0].shape[0]
if rowsAvailable:
for x in range(0, rows):
for y in range(0, cols):
if imgArray[x][y].shape[:2] == imgArray[0][0].shape[:2]:
imgArray[x][y] = cv2.resize(imgArray[x][y], (0, 0), None, scale, scale)
else:
imgArray[x][y] = cv2.resize(imgArray[x][y], (imgArray[0][0].shape[1], imgArray[0][0].shape[0]),
None, scale, scale)
if len(imgArray[x][y].shape) == 2:
imgArray[x][y] = cv2.cvtColor(imgArray[x][y], cv2.COLOR_GRAY2BGR)
imageBlank = np.zeros((height, width, 3), np.uint8)
hor = [imageBlank] * rows
hor_con = [imageBlank] * rows
for x in range(0, rows):
hor[x] = np.hstack(imgArray[x])
ver = np.vstack(hor)
else:
for x in range(0, rows):
if imgArray[x].shape[:2] == imgArray[0].shape[:2]:
imgArray[x] = cv2.resize(imgArray[x], (0, 0), None, scale, scale)
else:
imgArray[x] = cv2.resize(imgArray[x], (imgArray[0].shape[1], imgArray[0].shape[0]), None, scale, scale)
if len(imgArray[x].shape) == 2: imgArray[x] = cv2.cvtColor(imgArray[x], cv2.COLOR_GRAY2BGR)
hor = np.hstack(imgArray)
ver = hor
return ver
# 分割结果输出路径
output_dir = "./output/"
# 车牌路径
file_path="./car/"
# 读取所有车牌
cars = os.listdir(file_path)
cars.sort()
# 循环操作每一张车牌
for car in cars:
# 读取图片
print("正在处理"+file_path+car)
src = cv2.imread(file_path+car)
img = src.copy()
# 预处理去除螺丝点
cv2.circle(img, (145, 20), 10, (255, 0, 0), thickness=-1)
cv2.circle(img, (430, 20), 10, (255, 0, 0), thickness=-1)
cv2.circle(img, (145, 170), 10, (255, 0, 0), thickness=-1)
cv2.circle(img, (430, 170), 10, (255, 0, 0), thickness=-1)
cv2.circle(img, (180, 90), 10, (255, 0, 0), thickness=-1)
# 转灰度
gray = cv2.cvtColor(img, cv2.COLOR_BGR2GRAY)
# 二值化
adaptive_thresh = cv2.adaptiveThreshold(gray, 255, cv2.ADAPTIVE_THRESH_MEAN_C, cv2.THRESH_BINARY_INV, 333, 1)
# 闭运算
kernel = np.ones((5, 5), int)
morphologyEx = cv2.morphologyEx(adaptive_thresh, cv2.MORPH_CLOSE, kernel)
# 找边界
contours, hierarchy = cv2.findContours(morphologyEx, cv2.RETR_LIST, cv2.CHAIN_APPROX_SIMPLE)
# 画边界
img_1 = img.copy()
cv2.drawContours(img_1, contours, -1, (0, 0, 0), -1)
imgStack = stackImages(0.7, ([src, img, gray], [adaptive_thresh, morphologyEx, img_1]))
cv2.imshow("imgStack", imgStack)
cv2.waitKey(0)
# 转灰度为了方便切割
gray_1 = cv2.cvtColor(img_1, cv2.COLOR_BGR2GRAY)
# 每一列的白色数量
white = []
# 每一列的黑色数量
black = []
# 区域高度取决于图片高
height = gray_1.shape[0]
# 区域宽度取决于图片宽
width = gray_1.shape[1]
# 最大白色数量
white_max = 0
# 最大黑色数量
black_max = 0
# 计算每一列的黑白色像素总和
for i in range(width):
s = 0 # 这一列白色总数
t = 0 # 这一列黑色总数
for j in range(height):
if gray_1[j][i] == 255:
s += 1
if gray_1[j][i] == 0:
t += 1
white_max = max(white_max, s)
black_max = max(black_max, t)
white.append(s)
black.append(t)
# 找到右边界
def find_end(start):
end = start + 1
for m in range(start + 1, width - 1):
# 基本全黑的列视为边界
if black[m] >= black_max * 0.95: # 0.95这个参数请多调整,对应下面的0.05
end = m
break
return end
# 临时变量
n = 1
# 起始位置
start = 1
# 结束位置
end = 2
# 分割结果数量
num=0
# 分割结果
res = []
# 保存分割结果路径,以图片名命名
output_path= output_dir + car.split('.')[0]
if not os.path.exists(output_path):
os.makedirs(output_path)
# 从左边网右边遍历
while n white_max
if white[n] > 0.05 * white_max:
start = n
# 找到结束坐标
end = find_end(start)
# 下一个的起始地址
n = end
# 确保找到的是符合要求的,过小不是车牌号
if end - start > 10:
# 分割
char = gray_1[1:height, start - 5:end + 5]
# 保存分割结果到文件
cv2.imwrite(output_path+'/' + str(num) + '.jpg',char)
num+=1
# 重新绘制大小
char = cv2.resize(char, (300, 300), interpolation=cv2.INTER_CUBIC)
# 添加到结果集合
res.append(char)
# cv2.imshow("imgStack", char)
# cv2.waitKey(0)
# 构造结果元祖方便结果展示
res2 = (res[:2], res[2:4], res[4:6], res[6:])
# 显示结果
imgStack = stackImages(0.5, res2)
cv2.imshow("imgStack", imgStack)
cv2.waitKey(0)
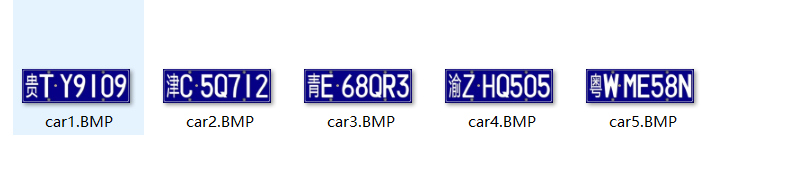
二、原数据
三、最终结果

    
四、总结
图片预处理对于后面图像的分析有很大的影响
五、参考
https://blog.csdn.net/m0_38024433/article/details/78650024
|