| CICD平台搭建 | 您所在的位置:网站首页 › 中国移动余额查询指令代码 › CICD平台搭建 |
CICD平台搭建
|
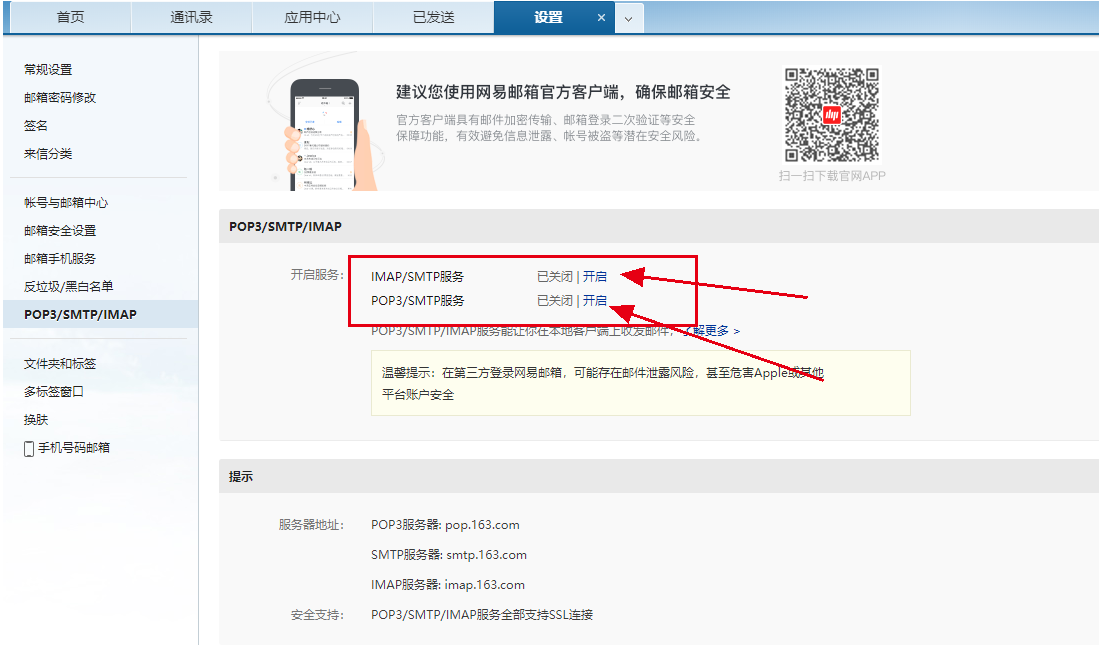
作者:中国移动云能力中心 —— 潘鹏 概要:本文重点介绍了代码仓库与代码评审平台Gerrit的搭建 前言:工厂里的装配线以快速、自动化、可重复的方式从原材料生产出消费品。同样,软件交付管道以快速、自动化和可重复的方式从源代码生成发布版本。如何完成这项工作的总体设计称为“持续交付”(CD)。启动装配线的过程称为“持续集成”(CI)。确保质量的过程称为“持续测试”,将最终产品提供给用户的过程称为“持续部署”。一些专家让这一切简单、顺畅、高效地运行,这些人被称为运维开发DevOps践行者。 “持续”用于描述遵循我在此提到的许多不同流程实践。这并不意味着“一直在运行”,而是“随时可运行”。在软件开发领域,它还包括几个核心概念/最佳实践。这些是: 频繁发布:持续实践背后的目标是能够频繁地交付高质量的软件。此处的交付频率是可变的,可由开发团队或公司定义。对于某些产品,一季度、一个月、一周或一天交付一次可能已经足够频繁了。对于另一些来说,一天可能需要多次交付也是可行的。所谓持续也有“偶尔、按需”的方面。最终目标是相同的:在可重复、可靠的过程中为最终用户提供高质量的软件更新。通常,这可以通过很少甚至无需用户的交互或掌握的知识来完成(想想设备更新)。自动化流程:实现此频率的关键是用自动化流程来处理软件生产中的方方面面。这包括构建、测试、分析、版本控制,以及在某些情况下的部署。可重复:如果我们使用的自动化流程在给定相同输入的情况下始终具有相同的行为,则这个过程应该是可重复的。也就是说,如果我们把某个历史版本的代码作为输入,我们应该得到对应相同的可交付产出。这也假设我们有相同版本的外部依赖项(即我们不创建该版本代码使用的其它交付物)。理想情况下,这也意味着可以对管道中的流程进行版本控制和重建(请参阅稍后的 DevOps 讨论)。快速迭代:“快速”在这里是个相对术语,但无论软件更新/发布的频率如何,预期的持续过程都会以高效的方式将源代码转换为交付物。自动化负责大部分工作,但自动化处理的过程可能仍然很慢。例如,对于每天需要多次发布候选版更新的产品来说,一轮集成测试下来耗时就要大半天可能就太慢了。一.环境准备 操作系统:Centos7 JDK版本:1.8 Gerrit版本:3.2.4 二.Gerrit代码审查系统安装 1.安装JDK ①.下载jdk安装包:jdk-8u191-linux-x64.tar.gz ②.上传到指定路径并解压重命名,示例: mkdir /apps上传安装包到/apps目录下 tar -zxvf jdk-8u191-linux-x64.tar.gz mv jdk-8u191-linux-x64 jdk1.8③.修改环境变量 vi /etc/profire在底部添加如下语句: export JAVA_HOME=/apps/jdk1.8 export JRE_HOME=${JAVA_HOME}/jre export CLASSPATH=.:${JAVA_HOME}/lib:${JRE_HOME}/lib export PATH=${JAVA_HOME}/bin:$PATH source /etc/profile java -version // 测试环境变量是否生效2.安装gitweb yum install gitweb配置文件地址:/etc/gitweb.conf 无特殊需求不用修改配置 3.安装gerrit ①.新建目录: mkdir /apps/gerrit②.获取邮箱授权码,以163邮箱为例: 登录网页版邮箱(https://email.163.com/),进入邮箱首页,点击上方设置,选择POP/SMTP/IMAP选项。
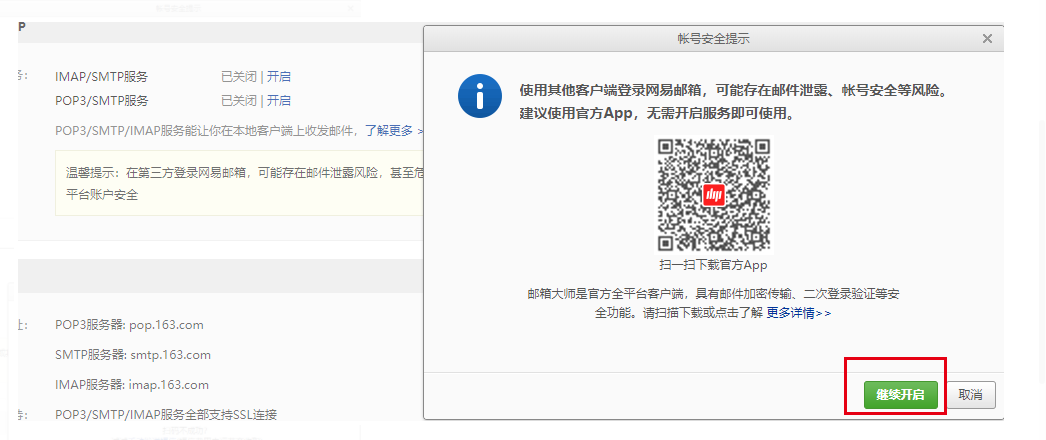
在客户端协议界面,选择开启对应的协议,IMAP或者POP3分别为不同的收信协议,您可以选择只开启需要的收信协议,比如IMAP,推荐使用IMAP协议来收发邮件,它可以和网页版完全同步。
在新弹出的弹窗中,点击继续开启,扫码页面您可以选择扫码发送短信,或者点击下方“手动发送短信”。(如果发送5分钟后系统依旧提示未收到短信,请联系移动运营商核实短信发送情况。)
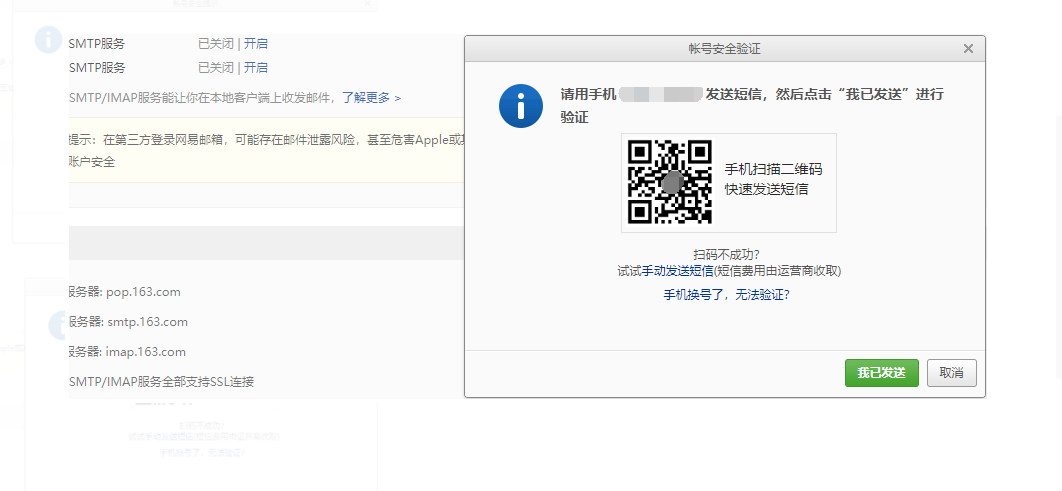
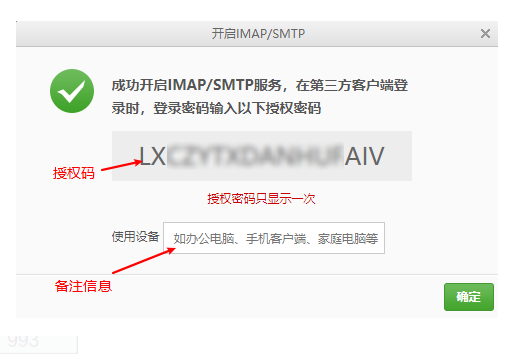
点击我已发送后,如果系统检测到用户成功发送短信,则会提示您的客户端授权码(自动生成一串(16位字母组合)唯一随机授权密码),为了最大程度保证用户授权密码使用安全,一个授权码在开启后网页上只出现一次,但是一个授权码可以同时设置多个客户端。 您可以选择开启时记录该授权码在其他地方(不推荐) 或者需要设置额外的客户端时候,再次新增授权码使用(推荐) 最多同时存在5个授权码
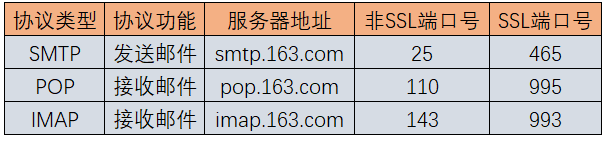
目前主流的常用新版本客户端,Foxmail,Outlook,都已经支持网易邮箱一键登录,即网易邮箱帐号+客户端授权码直接登录,无需设置服务器地址。如果您需要设置正确的163邮箱服务器地址,信息如下:
③.安装gerrit java -jar init -d /apps/gerrit gerrit-3.2.3.war执行结果与选择参照如下,红字为注释: INFO com.google.gerrit.server.config.GerritServerConfigProvider : No /apps/gerrit/etc/gerrit.config; assuming defaults *** Gerrit Code Review 3.2.3 *** Create '/apps/gerrit' [Y/n]? Y//创建目录 *** Git Repositories *** Location of Git repositories [git]://设置git仓库地址,默认在根目录下创建git目录,可通过配置文件修改 *** Index *** Type [lucene]://默认 *** User Authentication *** Authentication method [openid/?]: http//设置鉴权模式为http Get username from custom HTTP header [y/N]?//默认 SSO logout URL : Enable signed push support [y/N]?//默认 *** Review Labels *** Install Verified label [y/N]? y//确认y *** Email Delivery *** SMTP server hostname [localhost]://默认 SMTP server port [(default)]://默认 SMTP encryption [none/?]://默认 SMTP username : [email protected]//gerrit服务器发送邮件的email用户,可通过配置文件修改 [email protected]'s password ://输入email用户服务授权码,步骤②获取,可通过配置文件修改 confirm password : //输入email用户服务授权码,步骤②获取,可通过配置文件修改 *** Container Process *** Run as [root]://默认 Java runtime [/apps/jdk1.8/jre]://默认 Copy gerrit-3.2.3.war to /apps/gerrit/bin/gerrit.war [Y/n]? Y//选择Y,将war复制到bin目录下 Copying gerrit-3.2.3.war to /apps/gerrit/bin/gerrit.war *** SSH Daemon *** Listen on address [*]://默认 Listen on port [29418]://默认 Generating SSH host key ... rsa... ed25519... ecdsa 256... ecdsa 384... ecdsa 521... done *** HTTP Daemon *** Behind reverse proxy [y/N]? y//选择y Proxy uses SSL (https://) [y/N]?//默认 Subdirectory on proxy server [/]://默认 Listen on address [*]://默认 Listen on port [8081]://默认 Canonical URL [http://k8s4/]: http://192.168.239.1//设置前端页面对外访问地址,可通过配置文件修改,如果修改了httpd访问端口,同步修改 *** Cache *** *** Plugins//插件安装全部选y *** Installing plugins. Install plugin codemirror-editor version v3.2.3 [y/N]? y Installed codemirror-editor v3.2.3 Install plugin commit-message-length-validator version v3.2.3 [y/N]? y Installed commit-message-length-validator v3.2.3 Install plugin delete-project version v3.2.3 [y/N]? y Installed delete-project v3.2.3 Install plugin download-commands version v3.2.3 [y/N]? y Installed download-commands v3.2.3 Install plugin gitiles version v3.2.3 [y/N]? y Installed gitiles v3.2.3 Install plugin hooks version v3.2.3 [y/N]? y Installed hooks v3.2.3 Install plugin plugin-manager version v3.2.3 [y/N]? y Installed plugin-manager v3.2.3 Install plugin replication version v3.2.3 [y/N]? y Installed replication v3.2.3 Install plugin reviewnotes version v3.2.3 [y/N]? y Installed reviewnotes v3.2.3 Install plugin singleusergroup version v3.2.3 [y/N]? y Installed singleusergroup v3.2.3 Install plugin webhooks version v3.2.3 [y/N]? y Installed webhooks v3.2.3 Initializing plugins. Initialized /apps/gerrit Init complete, reindexing accounts with: reindex --site-path /apps/gerrit --threads 1 --index accountsReindexed 0 documents in accounts index in 0.0s (0.0/s) Index accounts in version 11 is ready Warning: InterruptedException//可能会有异常信息 Collecting projects: 2 changes with: reindex --site-path /apps/gerrit --threads 1 --index changes Reindexing changes: project-slices: 100% (2/2), done Reindexed 0 documents in changes index in 0.0s (0.0/s) Index changes in version 60 is ready Reindexing groups: 100% (2/2)ith: reindex --site-path /apps/gerrit --threads 1 --index groups Reindexed 2 documents in groups index in 0.1s (20.6/s) Index groups in version 8 is ready Reindexing projects: 100% (2/2) with: reindex --site-path /apps/gerrit --threads 1 --index projects Reindexed 2 documents in projects index in 0.1s (13.6/s) Index projects in version 4 is ready Executing /apps/gerrit/bin/gerrit.sh start Starting Gerrit Code Review://启动gerrit④.修改与不全配置文件 vi /apps/gerrit/etc/gerrit.config内容如下,红字为注释: [gerrit] basePath = git //git仓库地址,可自定义 canonicalWebUrl = http://192.168.239.1 //设置前端页面对外访问地址 serverId = 76e3ef31-6e52-4506-b004-26fecabe35dc [container] javaOptions = "-Dflogger.backend_factory=com.google.common.flogger.backend.log4j.Log4jBackendFactory#getInstance" javaOptions = "-Dflogger.logging_context=com.google.gerrit.server.logging.LoggingContext#getInstance" user = root javaHome = /apps/jdk1.8/jre [index] type = lucene [auth] type = HTTP [receive] enableSignedPush = false [sendemail] enable = true smtpServer = smtp.163.com //邮箱服务器协议,可参照步骤②提供信息,smtpServer、smtpServerPort、smtpEncryption配合使用 smtpServerPort = 465 //邮箱服务器协议端口,可参照步骤②提供信息,smtpServer、smtpServerPort、smtpEncryption配合使用 smtpEncryption = SSL //邮箱服务器ssl协议,可参照步骤②提供信息,smtpServer、smtpServerPort、smtpEncryption配合使用 sslVerify = false //不进行ssl校验 smtpUser = ****** //邮箱名称“111111”,即邮箱账号中@前面的用户信息,与初始化时填写的“SMTP username”有区别 smtpPass = BNVCOSVUIOEYCLCK //授权码可参照步骤②获取 from = Code Review //自动发送邮件主题 [sshd] listenAddress = *:29418 [httpd] listenUrl = proxy-http://127.0.0.1:8081/ //如果修改端口,需要同步修改 [cache] directory = cache [gitweb] cgi = /var/www/git/gitweb.cgi type = gitweb重启gerrit /apps/gerrit/bin/gerrit.sh restart运行结果如下: Stopping Gerrit Code Review: OK Starting Gerrit Code Review: OK注:如果失败,可以查看错误日志,/apps/gerrit/logs/error_log ⑤.创建密码 htpasswd -c /apps/gerrit.password admin//首次创建需要指定-C,生成文件,后续创建不需要使用-C输入密码与再次确认输入密码完成创建 ⑥.安装httpd yum install httpd//安装 systemctl enable httpd//设置自启动 systemctl start httpd//启动 systemctl status httpd//查看状态创建代理策略 vi /etc/httpd/conf.d/gerrit.conf内容如下: //如有必要,可以修改默认80端口,注意同步修改gerrit.config配置中canonicalWebUrl ServerName 192.168.239.1 ProxyRequests Off ProxyVia Off ProxyPreserveHost On Order deny,allow Allow from all AuthType Basic AuthName "Gerrit Code Review" AuthBasicProvider file AuthUserFile /apps/gerrit.password //步骤⑤生成的gerrit.password文件 Require valid-user AllowEncodedSlashes On //设置开启,应对一些被转义的 ProxyPass / http://127.0.0.1:8081/ nocanon //设置代理路径,ProxyPass后面的路径为前缀路径,对应初始化设置中的Subdirectory on proxy server,如果初始化默认,则为/;nocanon必须,否则将有系列错误注:如果ProxyPass / http://127.0.0.1:8081/ nocanon缺失nocanon, gerrit在创建带有“/”项目名称的project时将报 You might have not enough privileges..168.239. 404 Endpoint: /project/.................... 点开带有/的具体路径的代码进行review时报 You might have not enough privileges. 404 Endpoint: /changes/*~*/revisions/*/files/*/reviewed 如果做了修改,除了需要同步修改gerrit.config配置中canonicalWebUrl,还需要修改httpd的默认监听端口 vi /etc/httpd/conf/httpd.conf修改Listen 80对应行 重启httpd systemctl restart httpd三.登录gerrit 在浏览器中输入访问地址:http://192.168.239.1(即/apps/gerrit/etc/gerrit.config配置文件中canonicalWebUrl = http://192.168.239.1 )
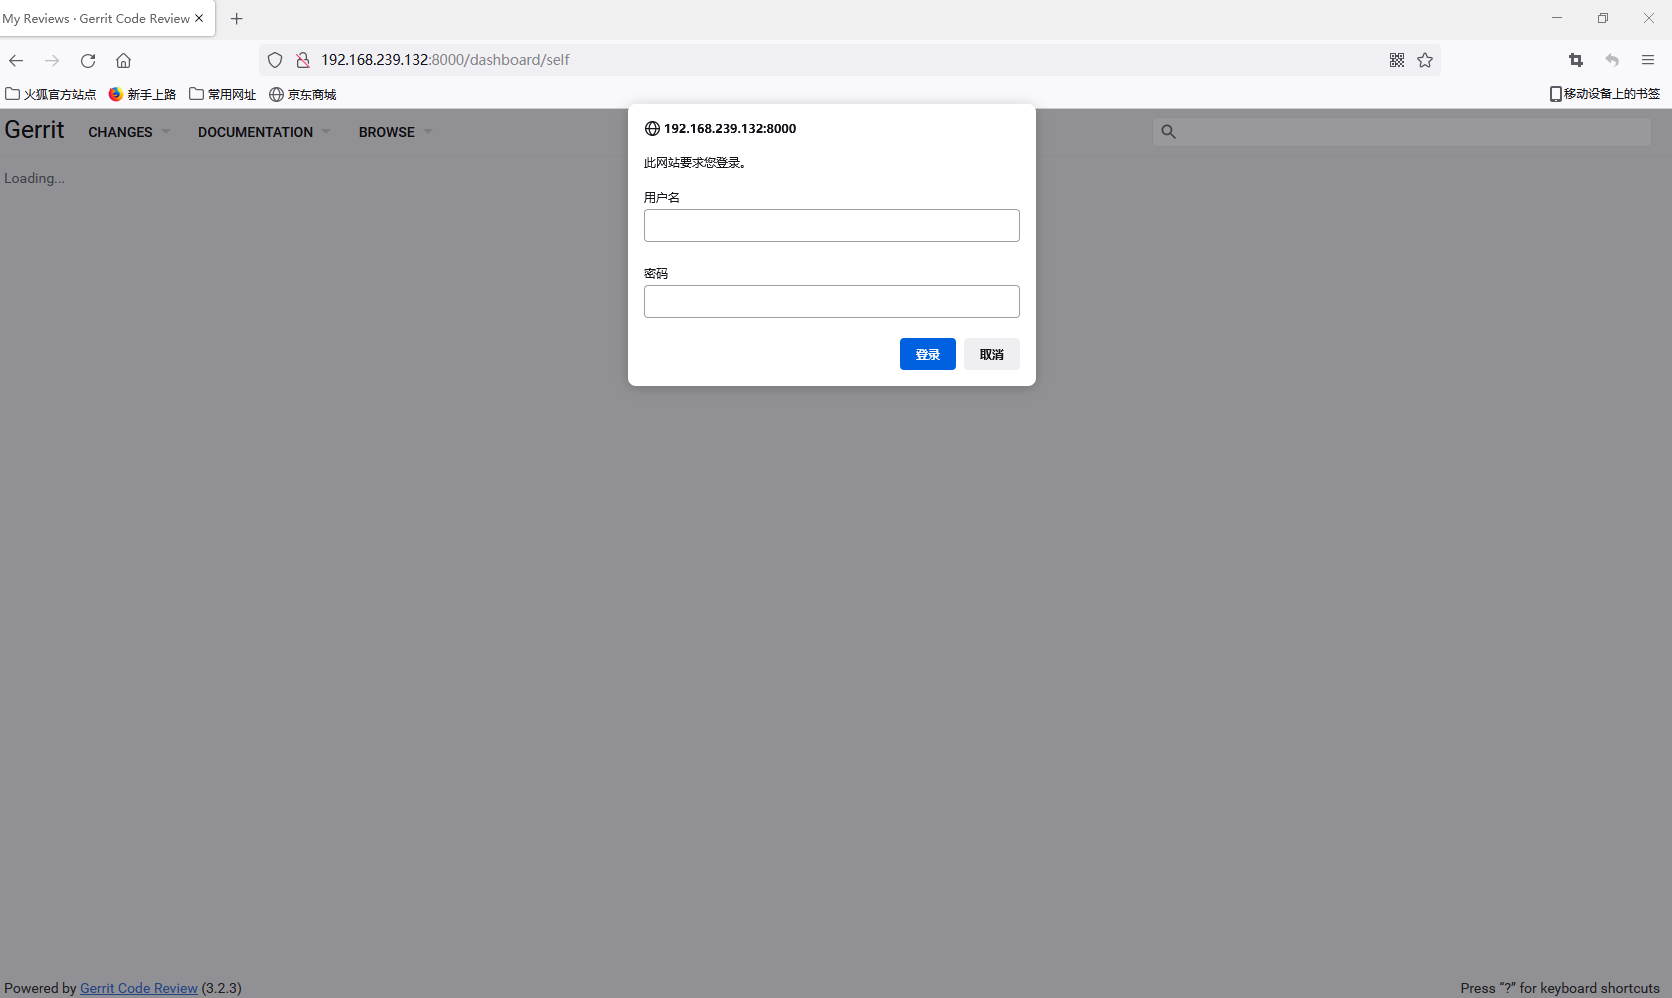
输入用户名:admin,密码
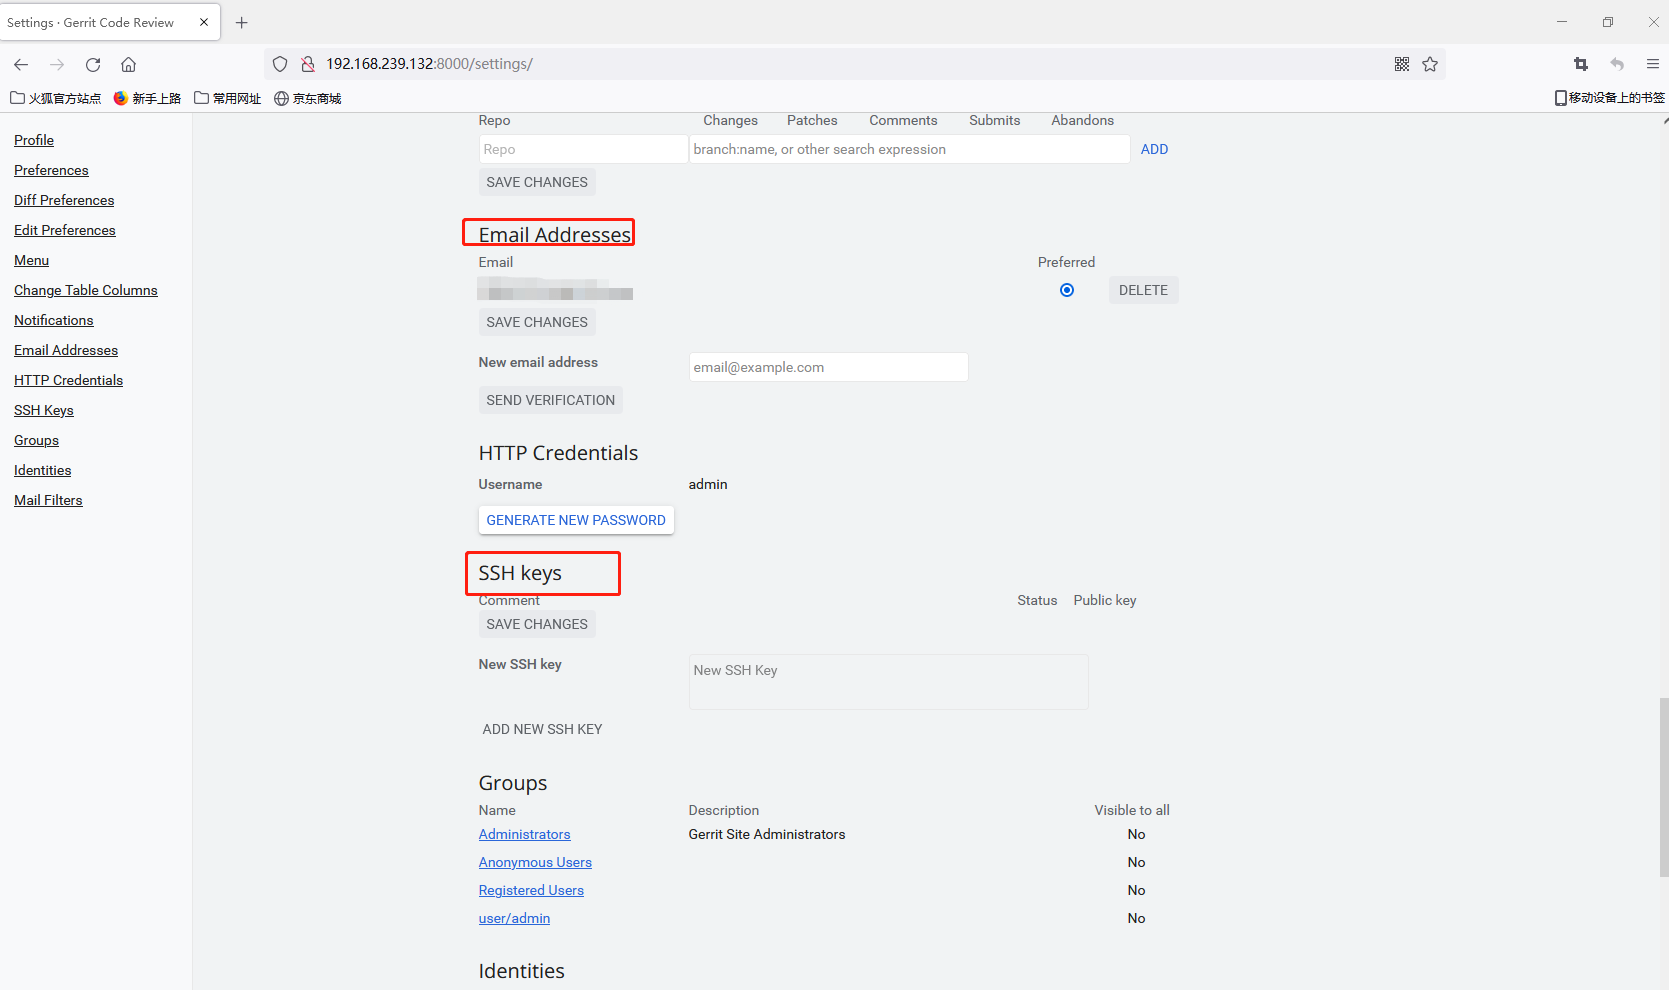
设置邮箱地址和配置公钥
关于163授权码获取方式,参考了文章:https://note.youdao.com/ynoteshare1/index.html?id=f9fef46114fb922b45460f4f55d96853&type=note 版权声明 (原创):本文内容由移动云用户自发贡献,版权归原作者所有,移动云开发者社区不拥有其著作权,亦不承担相应法律责任。如果您发现本社区有涉嫌抄袭的内容,可填写举报信息,一经查实,本社区将立刻删除涉嫌侵权内容。 |

【本文地址】