| Python如何使用Networkx实现复杂的人物关系图? | 您所在的位置:网站首页 › 三国人物关系梳理图 › Python如何使用Networkx实现复杂的人物关系图? |
Python如何使用Networkx实现复杂的人物关系图?
|
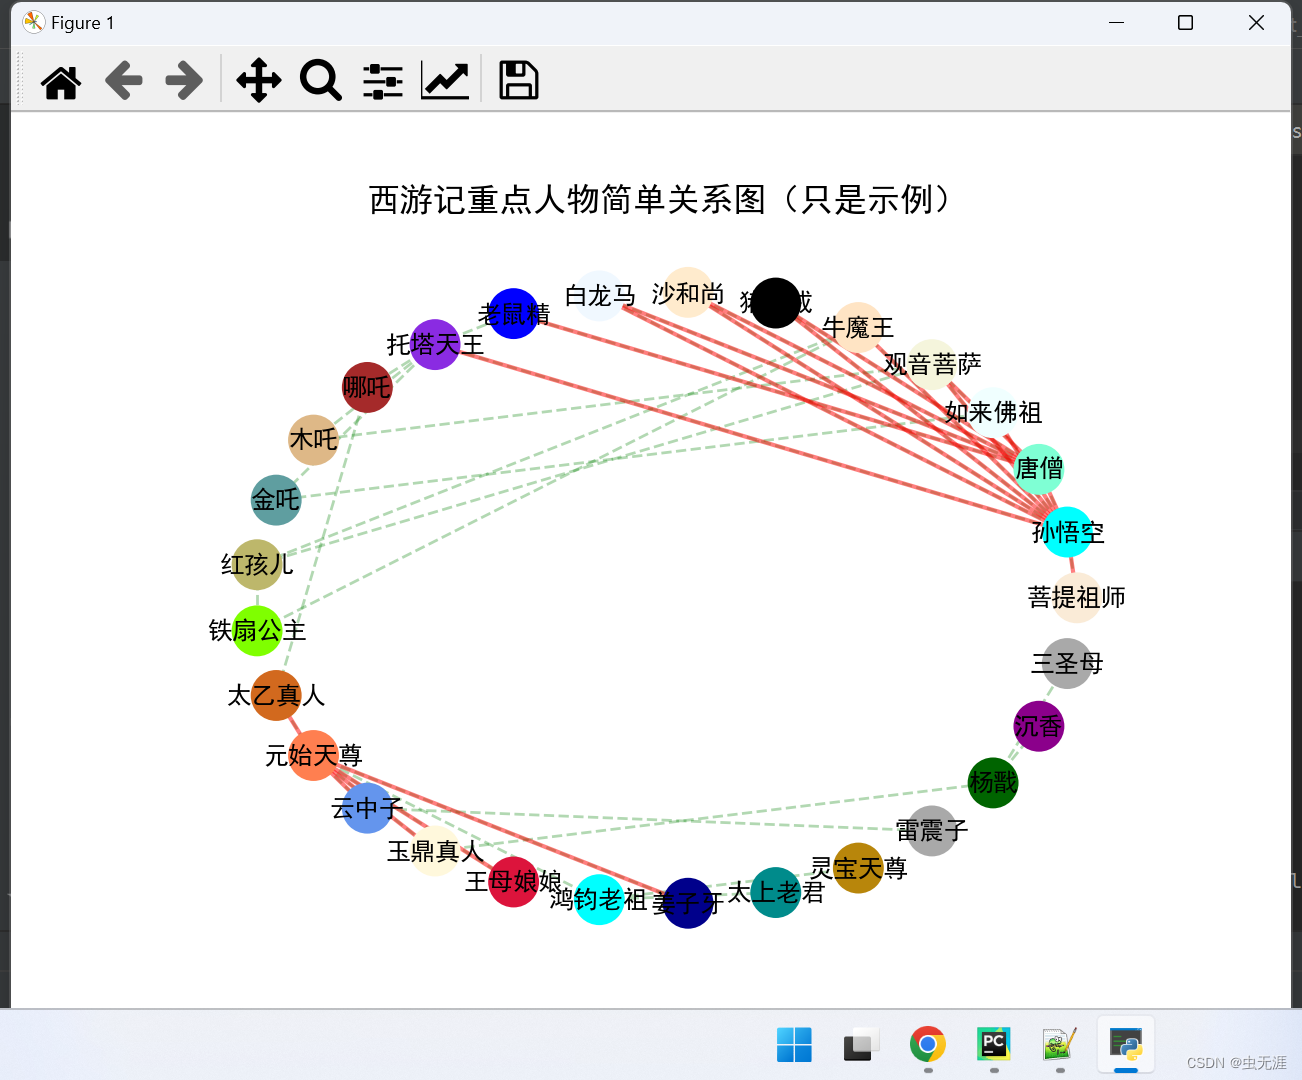
本文学习建议和用到的知识点: 1、学习建议:在画人物关系图的时候,建议提前先整理好自己需要的数据,缕清人物关系;本文提供了一个完整的案例,可以正常运行查看效果; 2、本文用到的Python知识点为Python的network模块的使用、列表的基本操作、循环的使用、excel文件的读写、pandas应用、matplotlib应用、类的使用、元组的操作等,便于大家阅读本文前提前对相关知识进行回顾。 1 简单引入日常工作、生活中我们经常会遇到一些复杂的事务关系,比如人物关系,那如何才能清楚直观的看清楚这些任务关系呢?比如我们从网上搜索1个人物关系图,大家看看:声明:以下图片来源于网络,如果涉及版权问题,请联系作者删除。本文仅供学习,不做他用。  在这里插入图片描述那我们如何使用Python来实现类似的人物关系图呢?这里我们需要用到Python的networkx模块,它可以帮助我们很好的显示我们需要的效果。2 关于Networkx2.1 Networkx简单说明NetworkX是一个用于创建、操作和研究复杂网络的 Python 库;可以创建、分析和可视化各种类型的网络,例如社交网络、Web图、生物网络等;NetworkX可以用来创建各种类型的网络,包括有向图和无向图;提供各种方法来添加、删除和修改网络中的节点和边;NetworkX还提供许多图的算法和分析工具;NetworkX还提供多种方式来可视化网络。2.2 Networkx部分源码NetworkX支持四种图,从以下源码可以看出: 在这里插入图片描述那我们如何使用Python来实现类似的人物关系图呢?这里我们需要用到Python的networkx模块,它可以帮助我们很好的显示我们需要的效果。2 关于Networkx2.1 Networkx简单说明NetworkX是一个用于创建、操作和研究复杂网络的 Python 库;可以创建、分析和可视化各种类型的网络,例如社交网络、Web图、生物网络等;NetworkX可以用来创建各种类型的网络,包括有向图和无向图;提供各种方法来添加、删除和修改网络中的节点和边;NetworkX还提供许多图的算法和分析工具;NetworkX还提供多种方式来可视化网络。2.2 Networkx部分源码NetworkX支持四种图,从以下源码可以看出:Python37\Lib\site-packages\networkx\classes__init__.py 以下是源码内容 from .graph import Graph from .digraph import DiGraph from .multigraph import MultiGraph from .multidigraph import MultiDiGraph from .ordered import * from .function import *from networkx.classes import filtersfrom networkx.classes import coreviews from networkx.classes import graphviews from networkx.classes import reportviews 四种图即为:图 说明 Graph 无多重边无向图 DiGraph 无多重边有向图 MultiGraph 有多重边无向图 MultiDiGraph 有多重边有向图 而本文我们要用的是 Graph,它主要是用点和线来刻画离散事务集合,每对事务之间以某种方式相联系的数学模型;Graph可以用来表示的关系图为人物关系图、流程图等等;以下为Graph的几个方法源码:Python37\Lib\site-packages\networkx\classes\graph.py 以下为draw_networkx_nodes方法源码:def draw_networkx_nodes( G, pos, nodelist=None, node_size=300, node_color="#1f78b4", node_shape="o", alpha=None, cmap=None, vmin=None, vmax=None, ax=None, linewidths=None, edgecolors=None, label=None, margins=None, ): """Draw the nodes of the graph G. 以下为draw_networkx_edges源码:def draw_networkx_edges( G, pos, edgelist=None, width=1.0, edge_color="k", style="solid", alpha=None, arrowstyle="-|>", arrowsize=10, edge_cmap=None, edge_vmin=None, edge_vmax=None, ax=None, arrows=None, label=None, node_size=300, nodelist=None, node_shape="o", connectionstyle="arc3", min_source_margin=0, min_target_margin=0, ): r"""Draw the edges of the graph G. 以下为draw_networkx_labels源码:def draw_networkx_labels( G, pos, labels=None, font_size=12, font_color="k", font_family="sans-serif", font_weight="normal", alpha=None, bbox=None, horizontalalignment="center", verticalalignment="center", ax=None, clip_on=True, ): """Draw node labels on the graph G. 以下为circular_layout源码:def circular_layout(G, scale=1, center=None, dim=2):dim=2 only """Position nodes on a circle.
Parametersundefined G : NetworkX graph or list of nodes
A position will be assigned to every node in G.
scale : number (default: 1)
Scale factor for positions.
center : array-like or None
Coordinate pair around which to center the layout.
dim : int
Dimension of layout.
If dim>2, the remaining dimensions are set to zero
in the returned positions.
If dim3复制# -*- coding:utf-8 -*-
# 作者:虫无涯
# 作用:network应用
import subprocess
import sys
# 如果需要通过本文运行器运行代码,需要加上这句
subprocess.check_call([sys.executable, "-m", "pip", "install", "networkx"])
import pandas as pd
import networkx as nx
import matplotlib.pyplot as plt
class TestRelation():
def __init__(self):
super(TestRelation, self).__init__()
# 获取目标文件数据
self.data = "./relation.xls"
self.data_content = pd.DataFrame(pd.read_excel(self.data))
self.character = self.data_content['character1'].drop_duplicates().values.tolist()
self.characters = self.data_content[['character1', 'character2', 'num']]
print(self.characters)
def test_relation(self):
# 设置画布大小,可以使用默认的
# plt.figure(figsize=(4, 5))
# 获取颜色数据
self.colors = self.data_content['color'].drop_duplicates().values.tolist()
print(self.colors)
self.my_graph = nx.Graph()
# 添加边
for i in self.characters.index:
self.my_graph.add_edge(self.characters.character1[i],
self.characters.character2[i],
weight=self.characters.num[i])
# 定义两个边,边给权重,s起点,e终点,w权重
edge1 = [(s, e) for (s, e, w) in self.my_graph.edges(data=True) if (w['weight'] >= 1)]
edge2 = [(s, e) for (s, e, w) in self.my_graph.edges(data=True) if (w['weight'] >= 5)]
# 图的布局
pos = nx.circular_layout(self.my_graph)
# 点
nx.draw_networkx_nodes(self.my_graph, pos, alpha=1, node_size=300,
node_color=self.colors, node_shape='o')
# 边
nx.draw_networkx_edges(self.my_graph, pos, edgelist=edge1, width=1,
alpha=0.3, edge_color='g', style='dashed')
nx.draw_networkx_edges(self.my_graph, pos, edgelist=edge2, width=1.5,
alpha=0.5, edge_color='red')
# 标签
nx.draw_networkx_labels(self.my_graph, pos, font_size=9)
# 结果显示
plt.axis('off')
plt.title('西游记重点人物简单关系图(只是示例)')
plt.rcParams['font.size'] = 8
plt.rcParams['font.sans-serif'] = ['SimHei'] # 解决中文乱码
# plt.show()
plt.savefig("pic02.jpg")
if __name__ == "__main__":
relation = TestRelation()
relation.test_relation()4 人物关系效果图运行上边的完整源码得到如下效果:
我正在参与2023腾讯技术创作特训营第三期有奖征文,组队打卡瓜分大奖! |
 在这里插入图片描述
【本文地址】