| OpenHarmony | 您所在的位置:网站首页 › y字图案解锁 › OpenHarmony |
OpenHarmony
|
作者:杨尚晓 前言Openharmony作为我们国内开源系统,并且以js/ets最为开发语言,完全抛弃了java。作为一名前端开发人员,也需要为咱们国产系统壮大起来,所以贡献一份微薄之力。😄😄 项目介绍ohos-pattern是一个解锁功能的组件,是基于openharmony AkrUI(JS)实现的。在手机指纹解锁还没来临之前,图案解锁是一个很热门的功能,包括数字解锁。不过现在也还很多应用场景中有使用到图案解锁和数字解锁的功能。本文图案解锁仅仅只是实现UI层面,并不涉及到加密解密的的方式。这个可以二次开发使用。 本文为第一篇,后续会更新加入数字解锁功能,如果后续能涉及到生物识别API,还会加入指纹解锁等三种解锁方式。 环境说明 开发工具:DevEco Studio 3.0 Beta4 SDK版本:3.1.6.6(API Version 8) 主要组件:canvas 效果展示
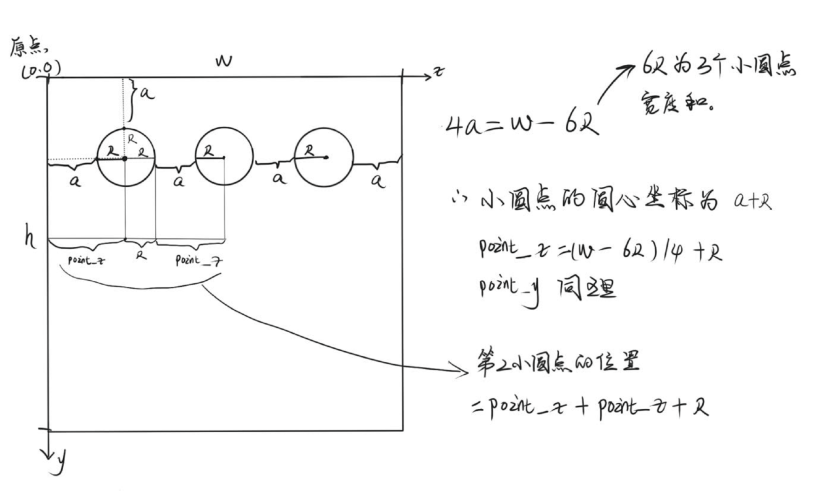
实现思路比较简单,使用canvas绘制九个密码点,然后通过监听手势触摸和9个密码点的碰撞产生密码数据 创建canvas 绘制9个密码点 绘制可控区域(就是密码点跟随手指一动区域) 监听手势 实现过程 1. 创建canvas创建canvas元素,并且绑定touchstart,touchmove,touchend手势事件 在js中初始化canvas对象 onShow(){ this.initCanvas(); }, // 初始化画布 initCanvas(){ const c = this.$refs.canvas; this.ctx = c.getContext('2d', { antialias: true }); }, 2. 绘制九个密码点下面看个草图
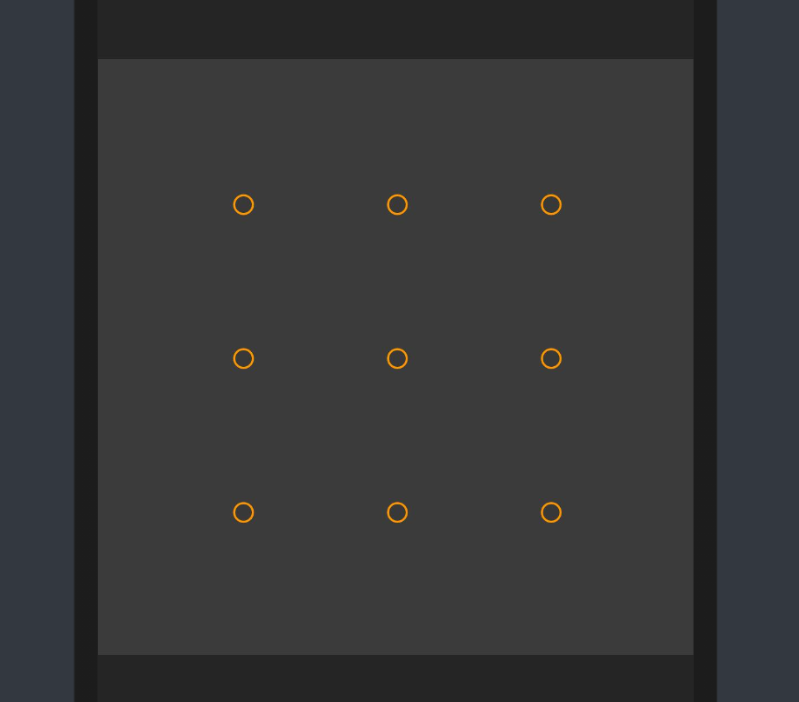
从草图上可以看出我们的密码点位置了,这里使用for循环方法实现,创建3行,每行3个点。 这里有个注意点,因为我们密码点有一个需要跟随手势移动的需求,需要修改point_list的数据,所以使用point_list_copy复制了一份出来,这里使用es6的展开运算符...来实现深拷贝。 // 创建9个密码点 createPoint(){ let point_x = Math.ceil((this.w - this.R * 6) / 4 + this.R); let point_y = Math.ceil((this.h - this.R * 6) / 4 + this.R); for (var j = 0; j < 3; j++) { for (var i = 0; i < 3; i++) { let d = { x: point_x * (i + 1) + this.R * i, y: point_y * (j + 1) + this.R * j } this.point_list.push(d); this.point_list_copy = [...this.point_list]; this.drawPoint(d); } } },下面实现将9个密码点到画布上 // 绘制9个密码点到画布上 drawPoint(obj) { let {x, y} = obj; // 绘制外圆环 this.ctx.beginPath(); this.ctx.lineCap = "round"; //向线条的每个末端添加圆形线帽 this.ctx.lineWidth = (this.R / 2); //绘制圆的边框 this.ctx.strokeStyle = '#ff9800'; //绘制边框的颜色 this.ctx.arc(x, y, this.R, 0, 2 * Math.PI); this.ctx.stroke(); this.ctx.closePath(); // 绘制内圆 this.ctx.beginPath(); this.ctx.arc(x, y, this.R, 0, 2 * Math.PI); this.ctx.fillStyle = "#383838"; this.ctx.fill(); this.ctx.closePath(); },下面来看看绘制后的效果
我们写了三个手势事件 触摸开始 onTouchStart 触摸变化 onTouchMove 触摸结束 onTouchEnd onTouchStart(e){ let x = e.touches[0].localX; let y = e.touches[0].localY; this.isCollision(x, y) }, onTouchMove(e){ let x = e.touches[0].localX; let y = e.touches[0].localY; this.isCollision(x, y); // 每次触摸后都需要清除画布重新绘制 this.ctx.clearRect(0, 0, this.w, this.h); this.reDraw(x, y, true); }, onTouchEnd(e){ this.ctx.clearRect(0, 0, this.w, this.h); this.reDraw(e.touches[0].clientX, e.touches[0].clientY, false); // 松开手后,记录所有触摸的点 lg.log('图案结果:',this.result) this.result = []; },重绘画布 // 重绘 reDraw(x, y, bol) { for (let i in this.point_list) { // 重新绘制9个密码点 this.drawPoint(this.point_list[i]); } for (let i in this.result) { // 重新绘制密码状态 this.drawStatus(this.result[i]); } },监听手势触摸是否和密码点发生碰撞 this.scope表示热区范围,当触摸点进入这个热区范围,说明已经跟该密码点发生接触碰撞了 // 是否跟9个密码点发生接触。 isCollision(x, y) { let c_x, c_y; for (let i in this.point_list) { c_x = Math.abs(x - this.point_list[i].x); c_y = Math.abs(y - this.point_list[i].y); // 如果发生碰撞,记录状态 if (c_x < this.scope && c_y < this.scope) { lg.warn('发生了碰撞,碰撞点是:', i) this.drawStatus(i) return } } },当触摸点和密码点发生碰撞之后,需要给该密码点绘制触摸状态 // 绘制触摸到密码点的状态 drawStatus(index) { // 绘制状态内圆 this.ctx.beginPath(); this.ctx.arc(this.point_list[index].x, this.point_list[index].y, (this.R / 2), 0, 2 * Math.PI); this.ctx.fillStyle = "#ac2dfb"; this.ctx.fill(); this.ctx.closePath(); //记录缓存碰撞的结果 if(this.result.indexOf(index) === -1){ this.result.push(index) } },下面看看效果
但是这样还不够,我们能还需要绘制连接的密码线 4. 绘制密码线在重绘方法里最顶端加入绘制密码线方法 this.drawLine(this.result, x, y, bol);绘制密码线方法 这里需要绘制两条线: 一条是跟随触摸移动的线 一条是已经存在两点之间的线 drawLine(arr, x, y, bol) { if(arr.length === 0){ return; } // 当存在已经两个点的时候,两点直线形成连线 this.ctx.beginPath(); for (let i in arr) { if (i == 0) { this.ctx.moveTo(this.point_list[arr[i]].x, this.point_list[arr[i]].y); } else { this.ctx.lineTo(this.point_list[arr[i]].x, this.point_list[arr[i]].y); } } this.ctx.strokeStyle = '#1a73e8'; this.ctx.lineWidth = (this.R / 2); this.ctx.stroke(); // 跟着手机滑动的线条 if (bol) { this.ctx.beginPath(); this.ctx.moveTo(this.point_list[arr[arr.length - 1]].x, this.point_list[arr[arr.length - 1]].y); this.ctx.lineTo(x, y); this.ctx.strokeStyle = '#04be02'; this.ctx.lineWidth = (this.R / 2); this.ctx.stroke(); } },好了,下面我们看看加上密码线的效果
优化体验,增加了密码点跟随手势一起移动的效果。 在重绘的顶部添加绘制可移动的密码点方法 // 绘制跟随手势移动的密码点 this.pointAn(x,y,bol);r_x,r_y表示密码点热区范围,在热区范围内可以将该密码点变为触摸点跟随触摸点一起移动,当触摸点离开了热区之后,密码点回到原来的中心位置。 // 绘制状态point范围内活动 pointAn(x, y, bol){ if(bol){ if(this.result.length === 0){ return; } let t = this.result[this.result.length - 1]; let r_x = Math.abs(x - this.point_list_copy[t].x); let r_y = Math.abs(y - this.point_list_copy[t].y); if(r_x < this.scope && r_y < this.scope){ this.point_list[t] = {x,y} } else { this.point_list = [...this.point_list_copy]; } } else { this.point_list = [...this.point_list_copy]; } },最后来看看加上热区的效果
到这里,整个基本功能已经实现了。 最后再来看一下最终效果
ohos-pattern 基于OpenHarmony JSAPI实现图案解锁组件 总结该组件整体实现逻辑都比较简单,主要是通过手势去绘制canvas画布实现的,这里需要注意的是,api version需要7以上,因为在api version 6 之前,存在canvas重绘闪屏的情况,在api 7之后修复了这个问题。相比api 6之前的版本,api8真的优化和修复了很多功能。很期待harmongOS 3.0更新,可以在真机下去体验ets开发的应用。 更多原创内容请关注:中软国际 HarmonyOS 技术团队入门到精通、技巧到案例,系统化分享HarmonyOS开发技术,欢迎投稿和订阅,让我们一起携手前行共建鸿蒙生态。 想了解更多关于开源的内容,请访问: 51CTO 开源基础软件社区 https://ost.51cto.com/#bkwz |
【本文地址】
| 今日新闻 |
| 推荐新闻 |
| 专题文章 |