| s | 您所在的位置:网站首页 › vant上传组件缩略图偶尔出不来 › s |
s
|
实现效果
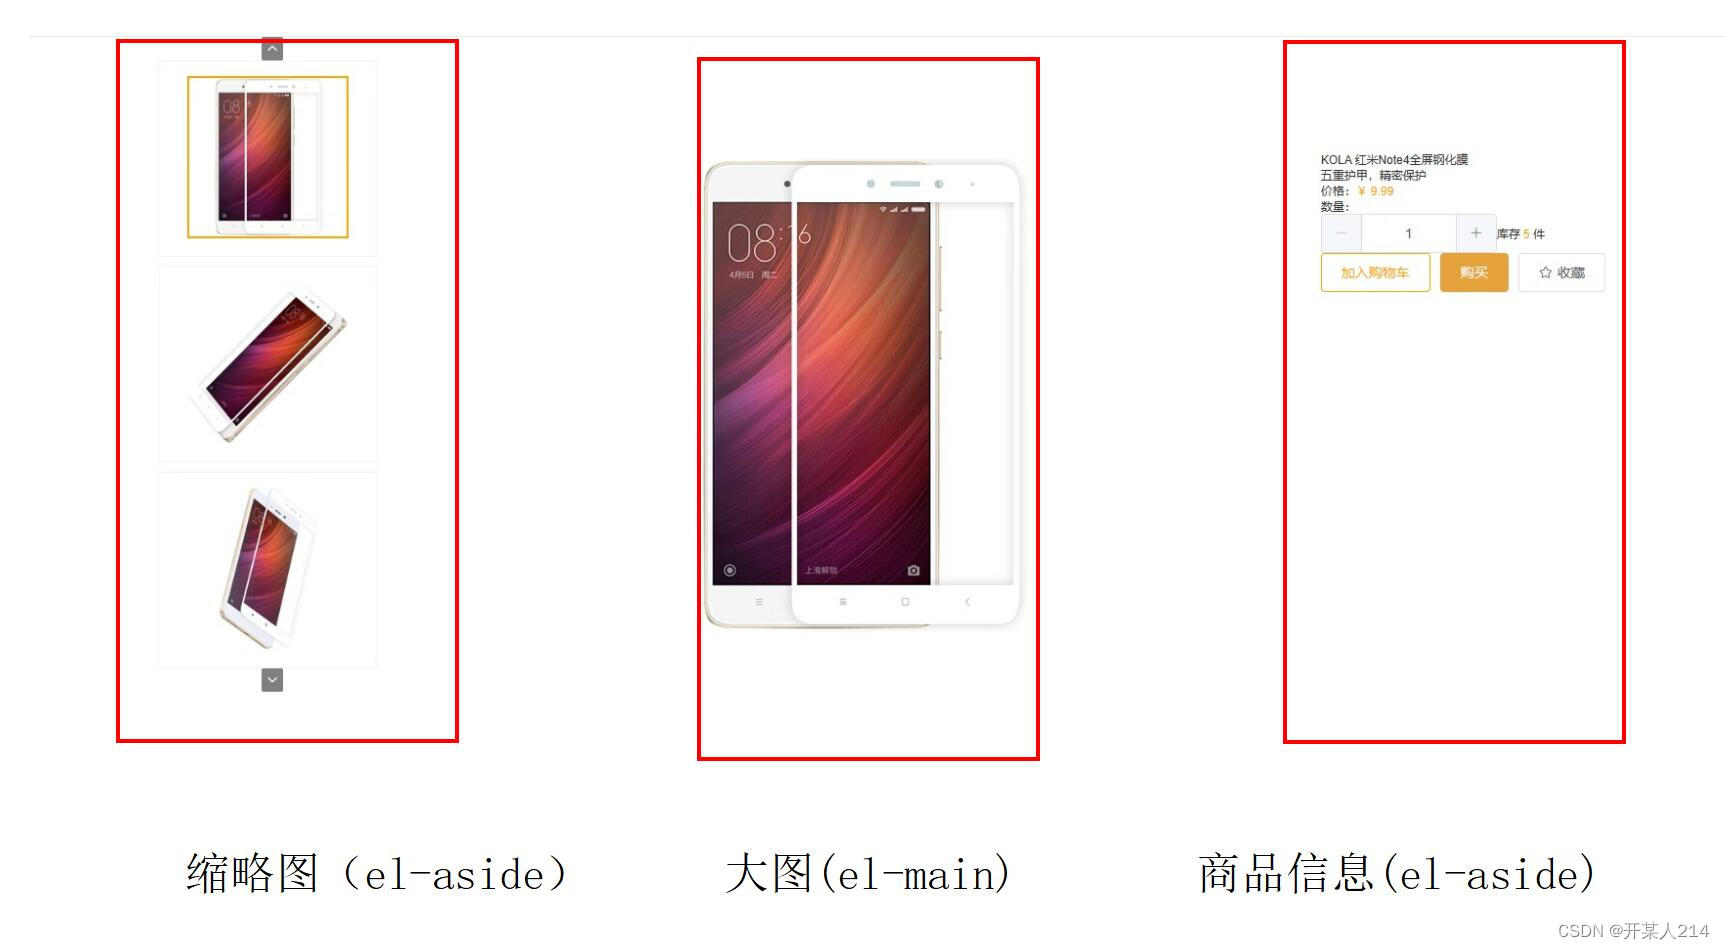
productDetail 目录 实现效果 1.使用$router传参,实现点击商品跳转到商品详情页 实现效果 实现代码 1. 定义productDetail路由 2. 商品列表 用 $router 传递参数(商品列表可以参考之前的s-shop项目——用Vant-ui实现商品列表的展示功能-CSDN博客) 3. 在商品详情页用$route 接收传递过来的参数 2.实现详情页 布局:使用到了element-ui中的 Container 布局容器 缩略图: 实现效果 主要步骤 大图: 实现效果 代码 商品信息: 总代码: 1.使用$router传参,实现点击商品跳转到商品详情页第一步是实现了,点击商品进入商品详情页。并在详情页的控制台打印了当前商品的信息 实现效果productDetail01 实现代码 1. 定义productDetail路由需要传递商品的id值 { path: '/productDetail/:id', component: () => import('./pages/productDetail.vue'), }, 2. 商品列表 用 $router 传递参数(商品列表可以参考之前的s-shop项目——用Vant-ui实现商品列表的展示功能-CSDN博客){{ i.name }} ¥ {{ i.price }} 3. 在商品详情页用$route 接收传递过来的参数 export default { name: "productDetail", data(){ return{ id:0, } }, mounted() { this.getProductDetail() }, methods:{ getProductDetail(){ var that = this //用$route接收传递过来的id值,没有$router没有使用path时,传递的参数会存在 params中 //在使用path后params会被忽略,这种情况可以使用querry that.id = this.$route.params.id this.axios.get(`/api/product/${that.id}`).then(function (response){ console.log(response.data) }) console.log(that.id) } } } 2.实现详情页 布局:使用到了element-ui中的 Container 布局容器主要分为三个部分(三个盒子 调为行内元素)
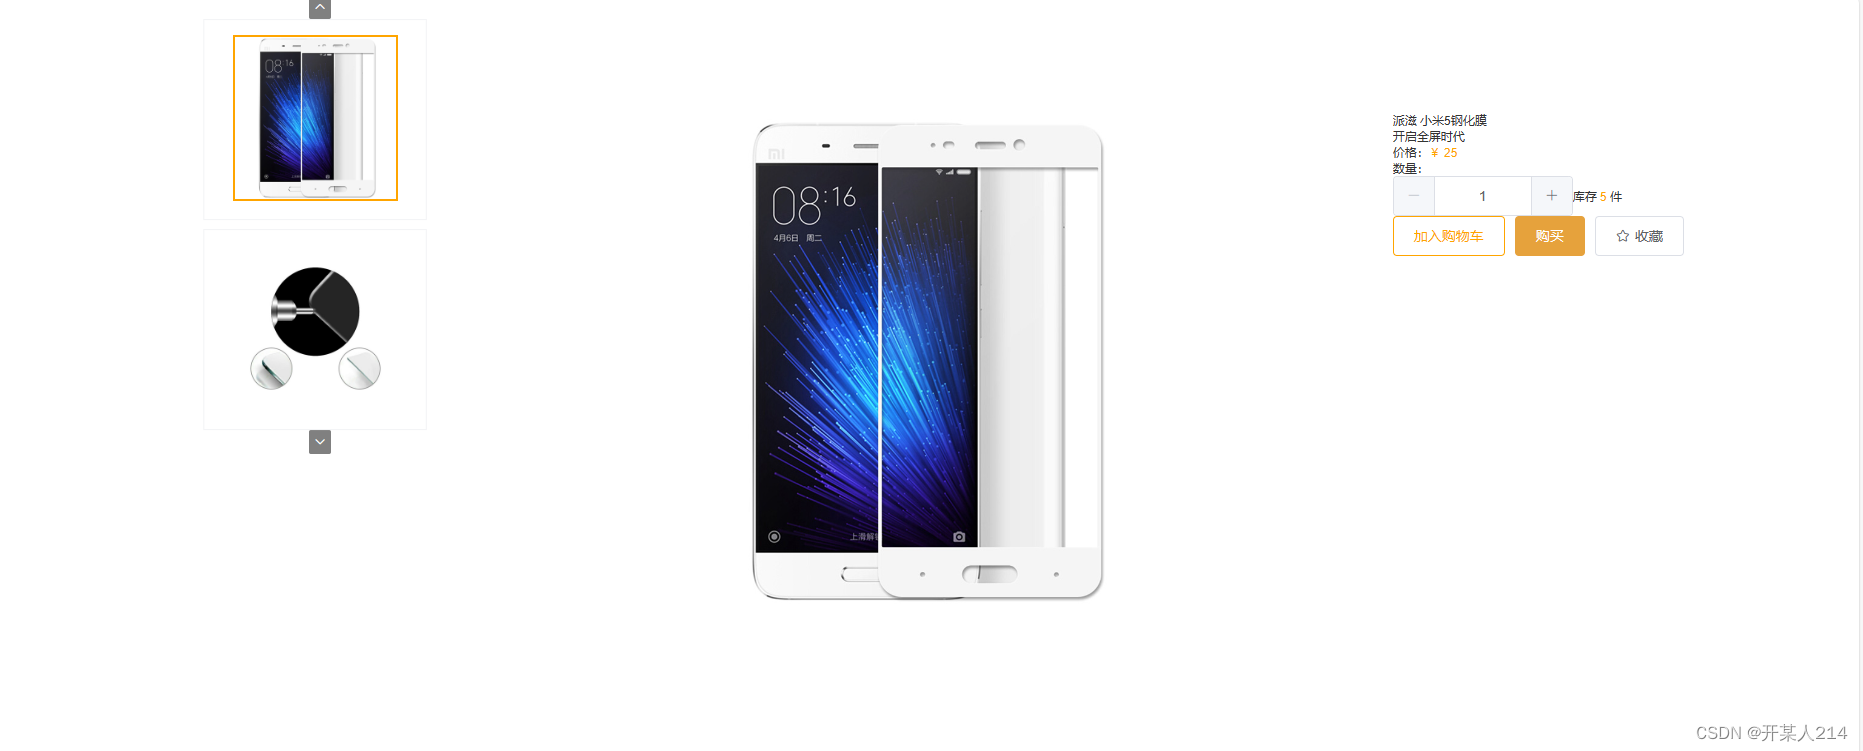
productDetail02 主要步骤1. 使用到了 vant-ui 的宫格 使用:column-num="1",自定义列数为1 2. 在宫格内容前后分别放上一个 图标按钮 (vant-ui)
3.用axiso调用后端接口,将全部图片取出放入 iamges ,并在取出数据时给给每张图片附上一个id getProductDetail() { var that = this //用$route接收传递过来的id值,没有$router没有使用path时,传递的参数会存在 params中 //在使用path后params会被忽略,这种情况可以使用querry that.id = this.$route.params.id this.axios.get(`/api/product/${that.id}`).then(function (response) { that.productDetail = response.data // console.log(that.productDetail) //将所有图片都放在 image 对象中 that.imageList = response.data.subImages.split(","); for (let i = 0; i < that.imageList.length; i++) { //每张图片赋值一个id = 索引号 let obj = {id: i, url: that.imageList[i]} that.images.push(obj) } // console.log(that.images) }) }4.用v-for 将图片渲染到宫格中,并将每张图片的id值赋值给 activeId(用于判断当前在那一张图片) getId(id)代码 //获取对应缩略图的id值 getId(i) { var that = this that.activeId = i.id },5.实现 橘色边框(点击动态绑定样式) 橘色边框CSS代码 .thumbnailActive{ border: 2px solid orange; }判断是否显示橘色边框 // 改变样式 currentClass(inx) { var that = this // 当div的索引号等于 当前图片的id 时,显示橘色边框 否则不显示 return [that.activeId == inx ? 'thumbnailActive' : '']; }点击上一张的 图标按钮 (判断是否在第一张) // 上一张 preImage() { var that = this // console.log("activeId " + that.activeId) // console.log(that.id) //判断是否是第一张,如果是第一张返回最后一张图 if (that.activeId == 0) { return that.activeId = that.images.length - 1 } else { return that.activeId -= 1 } // that.currentClass(that.activeId) // console.log(that.images.length) },点击下一张的 图标按钮 (判断是否在最后一张) // 下一张 nextImage() { var that = this //判断是否是最后一张图,如果是最后一张图返回第一张图 if (that.activeId == that.images.length - 1) { return that.activeId = 0 } else { return that.activeId += 1 } // console.log(that.activeId) },给缩略图绑定方法 大图: 实现效果productDetail03 代码根据返回的activeId 在images中 取对应的图片 商品信息:根据自己需要的信息 将数据取出 渲染到野蛮上即可 {{ productDetail.name }} {{ productDetail.subTitle }} 价格:¥ {{ productDetail.price }} 数量: 库存 {{ productDetail.stock }} 件 加入购物车 购买 收藏 总代码:{{ productDetail.name }} {{ productDetail.subTitle }} 价格:¥ {{ productDetail.price }} 数量: 库存 {{ productDetail.stock }} 件 加入购物车 购买 收藏 export default { name: "productDetail", data() { return { activeId: 0, //商品id id: 0, productDetail: [], imageList: [], images: [], num1: 1, } }, mounted() { this.getProductDetail() }, methods: { handleChange(value) { console.log(value); }, getProductDetail() { var that = this //用$route接收传递过来的id值,没有$router没有使用path时,传递的参数会存在 params中 //在使用path后params会被忽略,这种情况可以使用querry that.id = this.$route.params.id this.axios.get(`/api/product/${that.id}`).then(function (response) { that.productDetail = response.data // console.log(that.productDetail) //将所有图片都放在 image 对象中 that.imageList = response.data.subImages.split(","); for (let i = 0; i < that.imageList.length; i++) { //每张图片赋值一个id = 索引号 let obj = {id: i, url: that.imageList[i]} that.images.push(obj) } // console.log(that.images) }) }, //获取对应缩略图的id值 getId(i) { var that = this that.activeId = i.id }, // 上一张 preImage() { var that = this // console.log("activeId " + that.activeId) // console.log(that.id) //判断是否是第一张,如果是第一张返回最后一张图 if (that.activeId == 0) { return that.activeId = that.images.length - 1 } else { return that.activeId -= 1 } // that.currentClass(that.activeId) // console.log(that.images.length) }, // 下一张 nextImage() { var that = this //判断是否是最后一张图,如果是最后一张图返回第一张图 if (that.activeId == that.images.length - 1) { return that.activeId = 0 } else { return that.activeId += 1 } // console.log(that.activeId) }, // 改变样式 currentClass(inx) { var that = this return [that.activeId == inx ? 'thumbnailActive' : '']; } } } #thumbnail { display: inline-block; margin-left: 200px; width: 25%; /*margin-top: 20%;*/ } #slider { display: inline-block; width: 70%; margin-top: 15%; } #mes { margin-top: 25%; } .thumbnail { /*border: 2px solid orange;*/ width: 80%; } .thumbnailActive{ border: 2px solid orange; } |
【本文地址】
| 今日新闻 |
| 推荐新闻 |
| 专题文章 |