| 你可能已经忽略的git commit规范 | 您所在的位置:网站首页 › url提交是什么意思 › 你可能已经忽略的git commit规范 |
你可能已经忽略的git commit规范
|
引言 在日常的开发工作中,我们通常使用 git 来管理代码,当我们对代码进行某项改动后,都可以通过 git commit 来对代码进行提交。 git 规定提交时必须要写提交信息,作为改动说明,保存在 commit 历史中,方便回溯。规范的 log 不仅有助于他人 review, 还可以有效的输出 CHANGELOG,甚至对于项目的研发质量都有很大的提升。 但是在日常工作中,大多数同学对于 log 信息都是简单写写,没有很好的重视,这对于项目的管理和维护来说,无疑是不友好的。本篇文章主要是结合我自己的使用经验来和大家分享一下 git commit 的一些规范,让你的 log 不仅“好看”还“实用”。 为什么要规范 git commit一直在说要规范 commit 格式,那为什么要这样做呢? 让我们先来看一个不太规范的 commit 记录:  看完什么感觉,写的是啥啊(内心 OS),这种 commit 信息对于想要从中获取有效信息的人来说无疑是一种致命的打击。 那我们来看一个社区里面比较流行的Angular规范的 commit 记录:  看完是不是一目了然呢? 上图中这种规范的 commit 信息首先提供了更多的历史信息,方便快速浏览。其次,可以过滤某些 commit(比如文档改动),便于快速查找信息。 既然说到了 Angular 团队的规范是目前社区比较流行的 commit 规范,那它具体是什么呢?下面让我们来具体深入了解下吧。 Angular 团队的 commit 规范它的 message 格式如下: (): // 空一行 // 空一行分别对应 Commit message 的三个部分:Header,Body 和 Footer。 HeaderHeader 部分只有一行,包括三个字段:type(必需)、scope(可选)和subject(必需)。 type: 用于说明 commit 的类型。一般有以下几种: feat: 新增feature fix: 修复bug docs: 仅仅修改了文档,如readme.md style: 仅仅是对格式进行修改,如逗号、缩进、空格等。不改变代码逻辑。 refactor: 代码重构,没有新增功能或修复bug perf: 优化相关,如提升性能、用户体验等。 test: 测试用例,包括单元测试、集成测试。 chore: 改变构建流程、或者增加依赖库、工具等。 revert: 版本回滚 scope: 用于说明 commit 影响的范围,比如: views, component, utils, test... subject: commit 目的的简短描述 Body对本次 commit 修改内容的具体描述, 可以分为多行。如下所示: # body: 72-character wrapped. This should answer: # * Why was this change necessary? # * How does it address the problem? # * Are there any side effects? # initial commitFooter一些备注, 通常是 BREAKING CHANGE(当前代码与上一个版本不兼容) 或修复的 bug(关闭 Issue) 的链接。 简单介绍完上面的规范,我们下面来说一下commit.template,也就是 git 提交信息模板。 git 提交信息模板如果你的团队对提交信息有格式要求,可以在系统上创建一个文件,并配置 git 把它作为默认的模板,这样可以更加容易地使提交信息遵循格式。 通过以下命令来配置提交信息模板: git config commit.template [模板文件名] //这个命令只能设置当前分支的提交模板 git config — —global commit.template [模板文件名] //这个命令能设置全局的提交模板,注意global前面是两杠新建 .gitmessage.txt(模板文件) 内容可以如下: # headr: (): # - type: feat, fix, docs, style, refactor, test, chore # - scope: can be empty # - subject: start with verb (such as 'change'), 50-character line # # body: 72-character wrapped. This should answer: # * Why was this change necessary? # * How does it address the problem? # * Are there any side effects? # # footer: # - Include a link to the issue. # - BREAKING CHANGE #看完上面这些,你会不会像我一样感觉配置下来挺麻烦的,配置一个适合自己和团队使用的近乎完美的 commit 规范看来也不是一件容易的事情。不过社区也为我们提供了一些辅助工具来帮助进行提交,下面来简单介绍一下这些工具。 commitizen(cz-cli)commitizen是一款可以交互式建立提交信息的工具。它帮助我们从 type 开始一步步建立提交信息,具体效果如图所示:  首先通过上下键控制指向你想要的 type 类型,分别对应有上面提到的feat、fix、docs、perf等: 首先通过上下键控制指向你想要的 type 类型,分别对应有上面提到的feat、fix、docs、perf等: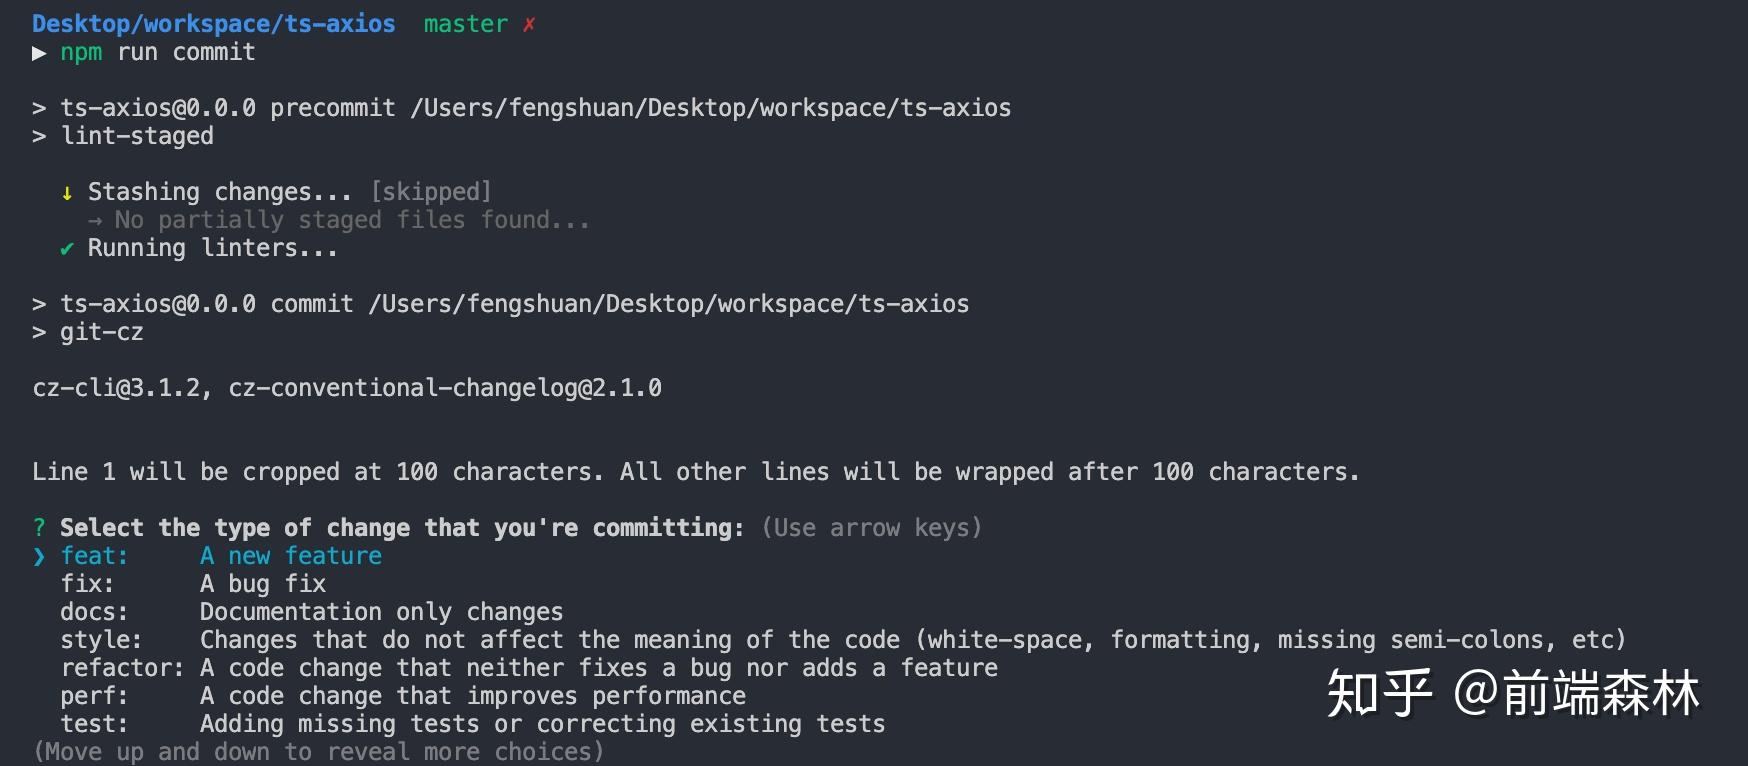 然后会让你选择本次提交影响到的文件: 然后会让你选择本次提交影响到的文件: 后面会让你分别写一个简短的和详细的提交描述: 后面会让你分别写一个简短的和详细的提交描述: 最后会让你去判断本次提交是否是BREAKING CHANGE或者有关联已开启的issue: 最后会让你去判断本次提交是否是BREAKING CHANGE或者有关联已开启的issue: 看完上面的 commitizen 的整个流程,下面让我们来看下如何来安装。 全局环境下安装:commitizen 根据不同的adapter配置 commit message。例如,要使用 Angular 的 commit message 格式,可以安装cz-conventional-changelog。# 需要同时安装commitizen和cz-conventional-changelog,后者是adapter $ npm install -g commitizen cz-conventional-changelog # 配置安装的adapter $ echo '{ "path": "cz-conventional-changelog" }' > ~/.czrc # 使用 $ git cz本地项目安装:# 安装commitizen $ npm install --save-dev commitizen # 接下来安装适配器 # for npm >= 5.2 $ npx commitizen init cz-conventional-changelog --save-dev --save-exact # for npm < 5.2 $ ./node_modules/.bin/commitizen init cz-conventional-changelog --save-dev --save-exact // package.json script字段中添加commit命令 "scripts": { "commit": "git-cz" } // use $ npm run commitcommitlint commitlint是一个提交验证工具。原理是可以在实际的 git commit 提交到远程仓库之前使用 git 钩子来验证信息。提交不符合规则的信息将会被阻止提交到远程仓库。 先来看一下演示: 对于 Conventional Commits 规范,社区已经整理好了 @commitlint/config-conventional 包,我们只需要安装并启用它就可以了。 首先安装 commitlint 以及 conventional 规范: npm install --save-dev @commitlint/cli @commitlint/config-conventional接着在 package.json 中配置 commitlint 脚本: "commitlint": { "extends": [ "@commitlint/config-conventional" ] }, 当然如果你想单独对 commitlint 进行配置的话,需要建立校验文件 commitlint.config.js,不然会校验失败为了可以在每次 commit 时执行 commitlint 来 检查我们输入的 message,我们还需要用到一个工具 —— husky。 husky 是一个增强的 git hook 工具。可以在 git hook 的各个阶段执行我们在 package.json 中配置好的 npm script。 首先安装 husky: npm install --save-dev husky接着在 package.json 中配置 commitmsg 脚本: "husky": { "hooks": { "commit-msg": "commitlint -E HUSKY_GIT_PARAMS" } },到这里,commitlint就配置完成了~ gitmoji-cli平时与朋友聊天时,我们一定会用到表情包,比如。表情包的出现让我们与朋友之间的沟通变得更加有趣。如果能在 git 提交 commit 时用到表情包,岂不是使每次的 commit 能够更加直观,维护起来也更加方便。 gitmoji就是可以实现这种功能的插件,先让我们来感受一下  有没有感觉很 cool~~ 其实gitmoji的使用是很简单的: # 安装 npm i -g gitmoji-cli # 使用 git commit -m ':bug: 问题fix'我们来看一下官方的示例吧:  是不是跃跃欲试了呢? gitmoji项目地址 gitmoji使用示例 看完本文,是不是感觉对于git commit message又有了新的认识呢?去在你的项目中运用这些吧,让你的commit更加规范的同时,也不要忘了给你的log加上emoji哦! 同时你可以关注我的同名公众号【前端森林】,这里我会定期发一些大前端相关的前沿文章和日常开发过程中的实战总结。  最后附上一个之前项目针对git commit配置的package.json,作为参考: { "name": "ts-axios", "version": "0.0.0", "description": "", "keywords": [], "main": "dist/ts-axios.umd.js", "module": "dist/ts-axios.es5.js", "typings": "dist/types/ts-axios.d.ts", "files": [ "dist" ], "author": "fengshuan ", "repository": { "type": "git", "url": "" }, "license": "MIT", "engines": { "node": ">=6.0.0" }, "scripts": { "dev": "node examples/server.js", "lint": "tslint --project tsconfig.json -t codeFrame 'src/**/*.ts' 'test/**/*.ts'", "prebuild": "rimraf dist", "build": "tsc --module commonjs && rollup -c rollup.config.ts && typedoc --out docs --target es6 --theme minimal --mode file src", "start": "rollup -c rollup.config.ts -w", "test": "jest --coverage", "test:watch": "jest --coverage --watch", "test:prod": "npm run lint && npm run test -- --no-cache", "deploy-docs": "ts-node tools/gh-pages-publish", "report-coverage": "cat ./coverage/lcov.info | coveralls", "commit": "git-cz", "semantic-release": "semantic-release", "semantic-release-prepare": "ts-node tools/semantic-release-prepare", "precommit": "lint-staged", "travis-deploy-once": "travis-deploy-once" }, "husky": { "hooks": { "commit-msg": "commitlint -E HUSKY_GIT_PARAMS" } }, "lint-staged": { "{src,test}/**/*.ts": [ "prettier --write", "git add" ] }, "config": { "commitizen": { "path": "node_modules/cz-conventional-changelog" } }, "jest": { "transform": { ".(ts|tsx)": "ts-jest" }, "testEnvironment": "node", "testRegex": "(/__tests__/.*|\\.(test|spec))\\.(ts|tsx|js)$", "moduleFileExtensions": [ "ts", "tsx", "js" ], "coveragePathIgnorePatterns": [ "/node_modules/", "/test/" ], "coverageThreshold": { "global": { "branches": 90, "functions": 95, "lines": 95, "statements": 95 } }, "collectCoverageFrom": [ "src/*.{js,ts}" ] }, "prettier": { "semi": false, "singleQuote": true }, "commitlint": { "extends": [ "@commitlint/config-conventional" ] }, "devDependencies": { "@commitlint/cli": "^7.1.2", "@commitlint/config-conventional": "^7.1.2", "@types/jest": "^23.3.2", "@types/node": "^10.11.0", "body-parser": "^1.19.0", "colors": "^1.3.2", "commitizen": "^3.0.0", "coveralls": "^3.0.2", "cross-env": "^5.2.0", "cz-conventional-changelog": "^2.1.0", "express": "^4.17.1", "husky": "^1.0.1", "jest": "^23.6.0", "jest-config": "^23.6.0", "lint-staged": "^8.0.0", "lodash.camelcase": "^4.3.0", "prettier": "^1.14.3", "prompt": "^1.0.0", "replace-in-file": "^3.4.2", "rimraf": "^2.6.2", "rollup": "^0.67.0", "rollup-plugin-commonjs": "^9.1.8", "rollup-plugin-json": "^3.1.0", "rollup-plugin-node-resolve": "^3.4.0", "rollup-plugin-sourcemaps": "^0.4.2", "rollup-plugin-typescript2": "^0.18.0", "semantic-release": "^15.9.16", "shelljs": "^0.8.3", "travis-deploy-once": "^5.0.9", "ts-jest": "^23.10.2", "ts-loader": "^6.1.1", "ts-node": "^7.0.1", "tslint": "^5.11.0", "tslint-config-prettier": "^1.15.0", "tslint-config-standard": "^8.0.1", "tslint-loader": "^3.5.4", "typedoc": "^0.12.0", "typescript": "^3.0.3", "webpack": "^4.40.2", "webpack-dev-middleware": "^3.7.1", "webpack-hot-middleware": "^2.25.0" } } |
【本文地址】