| Unity3D开发一个2D横版射击游戏 | 您所在的位置:网站首页 › unity横版卷轴射击2d游戏设计毕业论文 › Unity3D开发一个2D横版射击游戏 |
Unity3D开发一个2D横版射击游戏
|
教程基于http://pixelnest.io/tutorials/2d-game-unity/ , 这个例子感觉还是比较经典的, 网上转载的也比较多. 刚好最近也在学习U3D, 做的过程中自己又修改了一些地方, 写篇文和大家一起分享下, 同时也加深记忆. 有什么纰漏的地方还请大家多包涵. 1.创建第一个场景
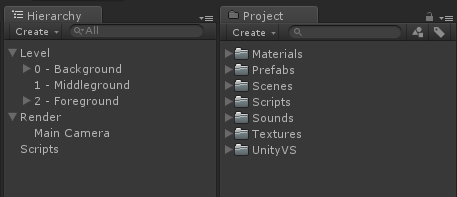
新建工程,在Project面板创建文件夹, 是为了更好的规划管理资源文件. 接着在Hierarchy面板上创建多个空对象(这样的结构也是清晰了整个游戏的层次, 对象之间的关系一目了然), 这些空对象的Position保持(0,0,0)即可. 保存场景到Scenes文件夹中, 名称为Stage1. 2.添加显示背景 将背景图片放入Textures文件夹, 确认这张图片的纹理类型Texture Type为Sprite. 在场景中添加一个Sprite游戏对象,命名为Background1,设置Sprite属性为刚才导入的背景图片, 将它移动到0 - Background中, 设置Position为(0,0,0). 接着添加背景元素. 导入平台岛屿图片到Textures文件夹, 选中Platforms图片, 设置它的Sprite Mode为Multiple, 然后点击Sprite Editor, 如下图:
在弹出的Sprite Editor窗口中, 进行绘制每个平台岛屿的包围矩形, 以便将纹理分隔成更小的部分. 然后分别命名为platform1和platform2.
创建一个新的Sprite对象, 设置它的Sprite为platform1. 然后同样再创建一个Sprite对象, 设置Sprite为platform2. 将它们放置到1 - Middleground对象里, 并且确认他们的Z坐标为0. 设置完成后, 将这两个对象从Hierarchy面板拖动到Project面板下的Prefabs文件夹, 保存为预制对象. 接着, 为了避免显示顺序问题, 修改下游戏对象的Z坐标, 如下所示: LayerZ Position0 - Background101 - Middleground52 - Foreground0此时, 点击Scene面板上的2D到3D视图切换, 可以清除的看到层次:
3.创建玩家和敌人 导入主角图片到Textures文件夹, 创建一个Sprite对象, 命名为Player, 设置其Sprite属性为刚才导入的主角图片. 将它放入2 - Foreground中, 设置Scale为(0.2,0.2,1). 接着, 为主角添加碰撞机, 点击Add Component按钮, 选择Box Collider 2D, 设置Size为(10,10), 虽然大于实际区域, 但是已经比图片小多了.
但是我更愿意去使用Polygon Collider 2D来达到更精致的效果, 这里只是个例子, 大家可以自由选择.
接着, 再为主角对象添加Rigidbody 2D刚体组件, 现在运行可以看到如下结果:
可以看到主角往下落了, 这是因为刚体带有重力, 但在这个游戏中我们用不到重力, 将Gravity Scale设置为0即可. 另外, 不想因为物理而引起的主角旋转, 则将Fixed Angles勾选上.
开始准备让主角移动. 在Scripts文件夹中, 创建一个C#脚本, 名称为PlayerScript, 实现让方向键移动主角, 代码如下: using UnityEngine; using System.Collections; /// /// 玩家控制器和行为 /// public class PlayerScript : MonoBehaviour { #region 1 - 变量 /// /// 飞船移动速度 /// private Vector2 speed = new Vector2(50, 50); // 存储运动 private Vector2 movement; #endregion // Update is called once per frame void Update() { #region 运动控制 // 2 - 获取轴信息 float inputX = Input.GetAxis("Horizontal"); float inputY = Input.GetAxis("Vertical"); // 3 - 保存运动轨迹 movement = new Vector2(speed.x * inputX, speed.y * inputY); #endregion } void FixedUpdate() { // 4 - 让游戏物体移动 rigidbody2D.velocity = movement; } }这里以改变刚体的速率来达到主角移动的效果, 而不是通过直接改变transform.Translate, 因为那样的话, 可能会不产生碰撞. 另外, 这里有人可能会疑问为什么实现移动的代码要写在FixedUpdate而不是Update中, 请看Update和FixedUpdate的区别: 传送门. 现在将此脚本附加到主角对象上, 点击运行, 方向键来控制移动.
接下来, 添加第一个敌人. 导入章鱼敌人图片到Textures文件夹, 创建一个Sprite对象, 命名为Poulpi, 设置Sprite为刚才导入的章鱼图片, 设置Scale为(0.4,0.4,1), 添加碰撞机(Polygon Collider 2D或Box Collider 2D都可以), 如果是Box Collider 2D, 设置Size为(4,4), 添加Rigidbody 2D组件, 设置Gravity Scale为0, 并且勾选Fixed Angles属性. 设置完成后, 将对象保存为预制. 在这里只让章鱼简单的往前行走, 创建一个脚本, 命名为MoveScript, 代码如下: using UnityEngine; using System.Collections; /// /// 当前游戏对象简单的移动行为 /// public class MoveScript : MonoBehaviour { #region 1 - 变量 /// /// 物体移动速度 /// public Vector2 speed = new Vector2(10, 10); /// /// 移动方向 /// public Vector2 direction = new Vector2(-1, 0); private Vector2 movement; #endregion // Use this for initialization void Start() { } // Update is called once per frame void Update() { // 2 - 保存运动轨迹 movement = new Vector2(speed.x * direction.x, speed.y * direction.y); } void FixedUpdate() { // 3 - 让游戏物体移动 rigidbody2D.velocity = movement; } }将此脚本附加到章鱼对象上, 现在运行吗可以看到章鱼往前移动, 如图:
此时如果主角和章鱼发生碰撞, 会互相阻塞对方的移动. 4.射击 导入子弹图片到"Textures"文件夹,创建一个Sprite游戏对象,命名为"PlayerShot",设置其"Sprite"属性为刚才导入的图片,设置"Scale"属性为(0.75, 0.75, 1),添加"Rigidbody 2D"组件,其"Gravity Scale"属性为0,并且勾选"Fixed Angles"属性框,添加"Box Collider 2D"组件,其Size为(1, 1),并且勾选"IsTrigger"属性。勾选"IsTrigger"属性表示该碰撞体用于触发事件,并将被物理引擎所忽略。意味着,子弹将穿过触碰到的对象,而不会阻碍对象的移动,触碰的时候将会引发"OnTriggerEnter2D"事件。创建一个脚本,命名为"ShotScript",代码如下: using UnityEngine; using System.Collections; /// /// 子弹行为 /// public class ShotScript : MonoBehaviour { #region 1 - 变量 /// /// 造成伤害 /// public int damage = 1; /// /// 子弹归属 , true-敌人的子弹, false-玩家的子弹 /// public bool isEnemyShot = false; #endregion // Use this for initialization void Start() { // 2 - 为避免任何泄漏,只给予有限的生存时间.[20秒] Destroy(gameObject, 20); } }将此脚本附加到子弹对象上,然后将"MoveScript"脚本也附加到子弹对象上以便可以移动。保存此对象为预制。接着,让碰撞产生伤害效果。创建一个脚本,命名为"HealthScript",代码如下: using UnityEngine; using System.Collections; /// /// 处理生命值和伤害 /// public class HealthScript : MonoBehaviour { #region 1 - 变量 /// /// 总生命值 /// public int hp = 1; /// /// 敌人标识 /// public bool isEnemy = true; #endregion /// /// 对敌人造成伤害并检查对象是否应该被销毁 /// /// public void Damage(int damageCount) { hp -= damageCount; if (hp 0) { shootCooldown -= Time.deltaTime; } } /// /// 射击 /// /// 是否是敌人的子弹 public void Attack(bool isEnemy) { if (CanAttack) { if (isEnemy) { SoundEffectsHelper.Instance.MakeEnemyShotSound(); } else { SoundEffectsHelper.Instance.MakePlayerShotSound(); } shootCooldown = shootingRate; // 创建一个子弹 var shotTransform = Instantiate(shotPrefab) as Transform; // 指定子弹位置 shotTransform.position = transform.position; // 设置子弹归属 ShotScript shot = shotTransform.gameObject.GetComponent(); if (shot != null) { shot.isEnemyShot = isEnemy; } // 设置子弹运动方向 MoveScript move = shotTransform.gameObject.GetComponent(); if (move != null) { // towards in 2D space is the right of the sprite move.direction = this.transform.right; } } } /// /// 武器是否准备好再次发射 /// public bool CanAttack { get { return shootCooldown = 0) { bool damagePlayer = false; // 与敌人发生碰撞 EnemyScript enemy = collision.gameObject.GetComponent(); if (enemy != null) { // 杀死敌人 HealthScript enemyHealth = enemy.GetComponent(); if (enemyHealth != null) { enemyHealth.Damage(enemyHealth.hp); } damagePlayer = true; } // 玩家也受到伤害 if (damagePlayer) { HealthScript playerHealth = this.GetComponent(); if (playerHealth != null) { playerHealth.Damage(1); } } } } 5.视差卷轴效果为了达到这种视差卷轴的效果,可以让背景层以不同的速度进行移动,越远的层,移动地越慢。如果操作得当,这可以造成深度的错觉,这将很酷,又是可以容易做到的效果。在这里存在两个滚动: 主角随着摄像机向前推进背景元素除了摄像机的移动外,又以不同的速度移动一个循环的背景将在水平滚动的时候,一遍又一遍的重复进行显示。现有的层如下: LayerLoopPosition 0 - BackgroundYes(0, 0, 10)1 - MiddlegroundNo(0, 0, 5)2 - ForegroundNo(0, 0, 0)接下来,实现无限背景。当左侧的背景对象远离了摄像机的左边缘,那么就将它移到右侧去,一直这样无限循环,如下图所示:
要做到检查的对象渲染器是否在摄像机的可见范围内,需要一个类扩展。创建一个C#文件,命名为"RendererExtensions.cs",代码如下: using UnityEngine; using System.Collections; /// /// 渲染扩展 /// public static class RendererExtensions { /// /// 检查对象渲染器是否在摄像机的可见范围内 /// /// 渲染对象 /// 摄像机 /// public static bool IsVisibleFrom(this Renderer renderer, Camera camera) { Plane[] planes = GeometryUtility.CalculateFrustumPlanes(camera); return GeometryUtility.TestPlanesAABB(planes, renderer.bounds); } }接下来,可以开始实现不带背景循环的滚动。创建一个脚本,命名为"ScrollingScript",代码如下: using UnityEngine; using System.Collections; using System.Collections.Generic; using System.Linq; /// /// 背景视差滚动脚本 /// public class ScrollingScript : MonoBehaviour { #region 变量 /// /// 滚动速度 /// public Vector2 speed = new Vector2(2, 2); /// /// 移动方向 /// public Vector2 direction = new Vector2(-1, 0); /// /// 相机是否运动 /// public bool isLinkedToCamera = false; /// /// 背景是否循环 /// public bool isLooping = false; /// /// 渲染对象名单 /// private List backgroundPart; #endregion // Use this for initialization void Start() { // 只循环背景 if (isLooping) { // 获取该层渲染器的所有子集对象 backgroundPart = new List(); for (int i = 0; i < transform.childCount; i++) { Transform child = transform.GetChild(i); // 只添加可见子集 if (child.renderer != null) { backgroundPart.Add(child); } } // 根据位置排序 // Note: 根据从左往右的顺序获取子集对象 // 我们需要增加一些条件来处理所有可能的滚动方向。 backgroundPart = backgroundPart.OrderBy(t => t.position.x).ToList(); } } // Update is called once per frame void Update() { // 创建运动状态 Vector3 movement = new Vector3(speed.x * direction.x, speed.y * direction.y, 0); movement *= Time.deltaTime; transform.Translate(movement); // 移动相机 if (isLinkedToCamera) { Camera.main.transform.Translate(movement); } // 循环 if (isLooping) { // 获取第一个对象 // 该列表的顺序是从左往右(基于x坐标) Transform firstChild = backgroundPart.FirstOrDefault(); if (firstChild != null) { // 检查子集对象(部分)是否在摄像机前已准备好. // We test the position first because the IsVisibleFrom // method is a bit heavier to execute. if (firstChild.position.x 0) { CreatePlatform1(); } else { CreatePlatform2(); } } } void CreatePlatform1() { var platformTransform = Instantiate(platform1Prefab) as Transform; platformTransform.position = new Vector3(Camera.main.transform.position.x + Random.Range(14, 23), Random.Range(-3, 3), 5); platformTransform.transform.parent = transform; } void CreatePlatform2() { var platformTransform = Instantiate(platform2Prefab) as Transform; platformTransform.position = new Vector3(Camera.main.transform.position.x + Random.Range(14, 23), Random.Range(-3, 3), 5); platformTransform.transform.parent = transform; } }将MakePlatformScript附加到1 - Middleground, 设置它的预制体为对应的平台岛屿预制体. 接着继续创建一个脚本文件,命名为"MakeEnemyScript",代码如下: using UnityEngine; using System.Collections; /// /// 制造敌人 /// public class MakeEnemyScript : MonoBehaviour { /// /// 敌人预设体 /// public Transform enemyPrefab; // Use this for initialization void Start() { } // Update is called once per frame void Update() { if (transform.childCount < 2) { CreateEnemy(); } } /// /// 创建敌人 /// void CreateEnemy() { var enemyTransform = Instantiate(enemyPrefab) as Transform; enemyTransform.position = new Vector3(Camera.main.transform.position.x + 15, Random.Range(-4, 4), 0); enemyTransform.transform.parent = transform; MoveScript move = enemyTransform.gameObject.GetComponent(); if (move != null) { move.direction.x = -1f; move.speed = new Vector2(3, 3); } } }将MakeEnemyScript附加到2 - Foreground, 同样, 设置对应的预制体为章鱼. 现在再次运行, 就会看到系统自动创建的章鱼敌人和漂浮岛屿了!
到这里, 整个游戏就完成了, 推荐大家可以去页首找原文链接去看看, 老外的原文解说的更详细, 我也是在原文的基础上自己再次整理. 最后附上程序源码, 文中有纰漏或看不太明白的地方大家可以对照着源码一起看, 欢迎留言指教. 源代码地址: http://pan.baidu.com/s/1b51XmQ |


【本文地址】