| Tun/Tap接口使用指导 | 您所在的位置:网站首页 › tap注册 › Tun/Tap接口使用指导 |
Tun/Tap接口使用指导
|
Tun/Tap接口指导
目录Tun/Tap接口指导概述工作机制创建接口举例简单的程序隧道拓展参考
概述
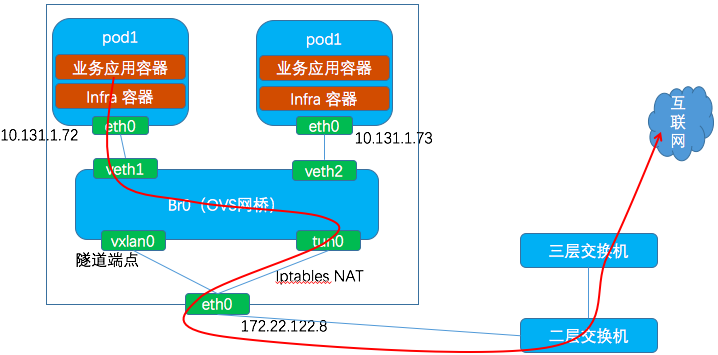
对tun接口的了解需求主要来自于openshift的网络,在openshift3和openshift4的OVS网络中使用到了tun0接口,作为容器egresss访问路径上的接口之一。
下面用到了tunctl和openvpn命令来创建tun/tap接口,但目前推荐使用ip tuntap命令: # ip tuntap help Usage: ip tuntap { add | del | show | list | lst | help } [ dev PHYS_DEV ] [ mode { tun | tap } ] [ user USER ] [ group GROUP ] [ one_queue ] [ pi ] [ vnet_hdr ] [ multi_queue ] [ name NAME ] Where: USER := { STRING | NUMBER } GROUP := { STRING | NUMBER }tap/tun 是Linux内核 2.4.x 版本之后使用软件实现的虚拟网络设备,这类接口仅能工作在内核中。不同于普通的网络接口,没有物理硬件(因此也没有物理线路连接到这类接口)。可以将tun/tap接口认为是一个普通的网络接口,当内核决定发送数据时,会将数据发送到连接到该接口上的用户空间的应用(而不是"线路"上)。当一个程序附加到tun/tap接口上时,该程序将获得一个特定的文件描述符,从该描述符上可以获得接口上发送过来的数据。类似地,程序也可以往该描述符上发送数据(需要保证数据格式的正确性),然后这些数据会输入给tun/tap接口,内核中的tun/tap接口就像从线路上接收到数据一样。 tap接口和tun接口的区别是,tap接口会会输出完整的以太帧,而tun接口会输出IP报文(不含以太头)。可以在创建接口时指定该接口是tun接口还是tap接口。 这类接口可能是临时的,意味着某些程序可以创建这类接口,并在使用后销毁。当程序结束,即使没有明确地删除接口,也会被系统回收。另一种方式是通过专有工具(如tunctl或openvpn --mktun)将接口持久化,这样其他程序就可以使用该接口,此时,使用该接口的程序必须使用与接口相同的类型(tun或tap)。 一旦创建了一个tun/tap接口,就可以像使用其他接口一样使用该接口,既可以给该接口分配IP,分析流量,创建防火墙规则,创建指向该接口的路由等。 下面看下如何使用一个tun/tap接口。 创建接口创建一个新接口的代码与连接到一个持久接口的代码基本是相同的,不同点是前者必须使用root权限执行(即使用CAP_NET_ADMIN capability权限的用户),而后者可以被任意用户执行。下面看下创建新接口的场景。 首先,/dev/net/tun必须以读写方式打开,由于该设备被用作创建任何tun/tap虚拟接口的起点,因此也被称为克隆设备(clone device)。操作(open())后会返回一个文件描述符,但此时还无法与接口通信。 下一步会使用一个特殊的ioctl()系统调用,该函数的入参为上一步得到的文件描述符,以及一个TUNSETIFF常数和一个指向描述虚拟接口的结构体指针(基本上为接口名称和操作模式--tun或tap)。作为一个可变的值,可以不指定虚拟接口名,此时内核将通过尝试分配“下一个”设备来选择一个名称(例如,如果已经存在tap2,则内核会分配tap3,以此类推)。这些操作必须通过root用户完成(或具有CAP_NET_ADMIN capability权限的用户)。 如果ioctl()执行成功,则说明已经成功创建虚拟接口,且可以使用文件描述符通信。 此时,会有两种情况:程序可以使用该接口(可能会在使用前分配IP),并在程序执行完后结束并销毁该接口;另一种是通过两个特殊的ioctl()调用来将接口持久化,在程序运行结束后会保留该接口,这样其他程序就可以使用该接口(当使用tunctl或openvpn --mktun时会发生这种情况)。同时设置虚拟接口的所有者为一个非root的用户或组,这样当程序以非root用户运行时也可以使用该接口(程序也需要有合适的权限)。 可以在内核源码的Documentation/networking/tuntap.rst下找到基本的创建虚拟接口的示例代码,下面对该代码进行简单修改: #include #include int tun_alloc(char *dev, int flags) { struct ifreq ifr; int fd, err; char *clonedev = "/dev/net/tun"; /* Arguments taken by the function: * * char *dev: the name of an interface (or '\0'). MUST have enough * space to hold the interface name if '\0' is passed * int flags: interface flags (eg, IFF_TUN etc.) */ /* open the clone device */ if( (fd = open(clonedev, O_RDWR)) < 0 ) { /* 使用读写方式打开 */ return fd; } /* preparation of the struct ifr, of type "struct ifreq" */ memset(&ifr, 0, sizeof(ifr)); ifr.ifr_flags = flags; /* IFF_TUN or IFF_TAP, plus maybe IFF_NO_PI */ if (*dev) { /* if a device name was specified, put it in the structure; otherwise, * the kernel will try to allocate the "next" device of the * specified type */ strncpy(ifr.ifr_name, dev, IFNAMSIZ); /* 设置设备名称 */ } /* try to create the device */ if( (err = ioctl(fd, TUNSETIFF, (void *) &ifr)) < 0 ) { close(fd); return err; } /* if the operation was successful, write back the name of the * interface to the variable "dev", so the caller can know * it. Note that the caller MUST reserve space in *dev (see calling * code below) */ strcpy(dev, ifr.ifr_name); /* this is the special file descriptor that the caller will use to talk * with the virtual interface */ return fd; }tun_alloc() 函数具有两个参数: char *dev:包含接口的名称(例如,tap0,tun2等)。虽然可以使用任意名称,但建议最好使用能够代表该接口类型的名称。实际中通常会用到类似tunX或tapX这样的名称。如果*dev为'\0',则内核会尝试使用第一个对应类型的可用的接口(如tap0,但如果已经存在该接口,则使用tap1,以此类推)。 int flags:包含接口的类型(tun或tap)。通常会使用IFF_TUN来指定一个TUN设备(报文不包括以太头),或使用IFF_TAP来指定一个TAP设备(报文包含以太头)。此外,还有一个IFF_NO_PI标志,可以与IFF_TUN或IFF_TAP执行OR配合使用。IFF_NO_PI 会告诉内核不需要提供报文信息,即告诉内核仅需要提供"纯"IP报文,不需要其他字节。否则(不设置IFF_NO_PI),会在报文开始处添加4个额外的字节(2字节的标识和2字节的协议)。IFF_NO_PI不需要再创建和连接之间进行匹配(即当创建时指定了该标志,可以在连接时不指定),需要注意的是,当使用wireshark在该接口上抓取流量时,不会显示这4个字节。 因此可以使用如下代码创建一个设备: char tun_name[IFNAMSIZ]; char tap_name[IFNAMSIZ]; char *a_name; ... strcpy(tun_name, "tun1"); tunfd = tun_alloc(tun_name, IFF_TUN); /* tun interface */ strcpy(tap_name, "tap44"); tapfd = tun_alloc(tap_name, IFF_TAP); /* tap interface */ a_name = malloc(IFNAMSIZ); a_name[0]='\0'; tapfd = tun_alloc(a_name, IFF_TAP); /* let the kernel pick a name */到此为止,程序可以使用该接口进行通信,或将接口持久化(或将接口分配给特定的用户/组)。 还有两个ioctl()调用,通常是一起使用的。第一个调用用于设置(或移除)接口的持久化状态,第二个用于将接口分配给一个普通的(非root)用户。tunctl和openvpn --mktun这两个程序都实现了该特性。下面看下tunctl的代码: ... /* "delete" is set if the user wants to delete (ie, make nonpersistent) an existing interface; otherwise, the user is creating a new interface */ if(delete) { /* remove persistent status */ if(ioctl(tap_fd, TUNSETPERSIST, 0) < 0){ perror("disabling TUNSETPERSIST"); exit(1); } printf("Set '%s' nonpersistent\n", ifr.ifr_name); } else { /* emulate behaviour prior to TUNSETGROUP */ if(owner == -1 && group == -1) { owner = geteuid(); /* 如果没有设置用户或组,则使用本uid */ } if(owner != -1) { if(ioctl(tap_fd, TUNSETOWNER, owner) < 0){ /* 设置接口用户所属者 */ perror("TUNSETOWNER"); exit(1); } } if(group != -1) { if(ioctl(tap_fd, TUNSETGROUP, group) < 0){ /* 设置接口组所属者 */ perror("TUNSETGROUP"); exit(1); } } if(ioctl(tap_fd, TUNSETPERSIST, 1) < 0){ /* 设置接口持久化 */ perror("enabling TUNSETPERSIST"); exit(1); } if(brief) printf("%s\n", ifr.ifr_name); else { printf("Set '%s' persistent and owned by", ifr.ifr_name); if(owner != -1) printf(" uid %d", owner); if(group != -1) printf(" gid %d", group); printf("\n"); } } ...上述的ioctl()调用必须以root执行。但如果该接口已经是一个属于特定用户的持久化接口,那么该用户就可以使用该接口。 如上所述,连接到一个已有的tun/tap接口的代码与创建一个tun/tap接口的代码相同,即,可以多次使用tun_alloc()。为了执行成功,需要注意如下三点: 接口必须已经存在,且所有者与连接该接口的用户相同 用户必须有 /dev/net/tun的读写权限 必须提供创建接口时使用的相同的标志(即,如果接口使用IFF_TUN创建,则在连接时也必须使用该标志)当用户指定一个已经存在的接口执行 TUNSETIFF ioctl() (且该用户是该接口的所有者)时会返回成功,但这种情况下不会创建新的接口,因此一个普通用户可以成功执行该操作。 因此这样也可以尝试解释当调用ioctl(TUNSETIFF) 会发生什么,以及内核如何区分请求分配一个新接口和请求连接到一个现有的接口。 如果没有现有的接口或没有指定接口名称,意味着用户需要请求申请一个新的接口,这样内核会使用给定的名称创建一个接口(如果没有给定接口名称,则会挑选下一个可用的名称)。仅能在root用户下执行。 如果指定了一个存在的接口名称,意味着用户期望连接到前面分配好的接口上。可以使用普通用户完成该操作。用户需要拥有克隆设备的合适(读写)权限,且为接口的所有者,且指定的模式(tun或tap)可以匹配创建时的模式。可以在内核源码drivers/net/tun.c中查看上述代码的实现,实现函数为tun_attach(), tun_net_init(), tun_set_iff(), tun_chr_ioctl(),其中最后一个函数各种ioctl(),包括TUNSETIFF, TUNSETPERSIST, TUNSETOWNER, TUNSETGROUP等。 任何一种场景下,非root用户都可以配置接口(如分配IP地址,并up该接口),但这些操作同样可以作用于任何一个接口。如果一个非root用户需要执行一些root特权才能执行的操作,而可以使用一些方法实现这种需求,如使用suid,sudo等。 下面是一般的使用场景: 创建一个虚拟接口,将其持久化,分配给一个用户,并使用root权限进行配置(如,使用tunctl或其他命令实现启动初始化脚本); 然后普通用户就可以连接(或取消连接)到他们期望的虚拟接口上; 使用root权限销毁虚拟接口,如在系统shutdown时使用脚本(如使用tunctl -d或其他命令)进行清理。 举例使用tun/tap接口与使用其他接口并没有什么不同,在创建或连接到已有的接口时必须知道接口的类型,以及期望读取或写入的数据。下面创建一个持久化接口,并给该接口分配IP地址。 # openvpn --mktun --dev tun2 #当然也可以使用 ip tuntap add tun3 mode tun创建tun接口 Fri Mar 26 10:29:29 2010 TUN/TAP device tun2 opened Fri Mar 26 10:29:29 2010 Persist state set to: ON # ip link set tun2 up # ip addr add 10.0.0.1/24 dev tun2下面启动一个网络分析器来查看流量: # tshark -i tun2 #使用 tcpdump -i tun2 即可 Running as user "root" and group "root". This could be dangerous. Capturing on tun2 # On another console # ping 10.0.0.1 PING 10.0.0.1 (10.0.0.1) 56(84) bytes of data. 64 bytes from 10.0.0.1: icmp_seq=1 ttl=64 time=0.115 ms 64 bytes from 10.0.0.1: icmp_seq=2 ttl=64 time=0.105 ms执行ping操作后发现tshark并没有任何打印信息,即没有任何流量经过该接口。这种现象是符合预期的,因为当ping该接口的IP地址时,操作系统会认为报文不需要在"线路"上进行传输,由内核负责回应ping请求(当ping其他接口的IP地址时的现象也是一样的)。tshark抓包是在网络协议栈外进行的,ping本地IP地址时的报文会在协议层面处理,因此无法抓到报文。 当给一个接口分配了一个24位的IP地址时,系统会为接口对应的整个IP段分配一个可连接的路由。如果路由可达,当使用tun接口时,内核会发送IP报文(无以太头),而使用tap接口时,内核首先会发送ARP请求报文。下面是创建的一个tun,一个tap接口,可以看到tap0上是有mac地址的(可以使用 SIOCSIFHWADDR ioctl() 对mac地址进行修改,参考drivers/net/tun.c中的函数tun_chr_ioctl()),而tun3则没有。 10: tun3: mtu 1500 qdisc pfifo_fast state DOWN mode DEFAULT group default qlen 500 link/none 11: tap0: mtu 1500 qdisc pfifo_fast state DOWN mode DEFAULT group default qlen 1000 link/ether d6:64:12:d9:19:44 brd ff:ff:ff:ff:ff:ff在原文中,可能是因为10.0.0.2是一个可达的地址,因此能够ping通。在实际测试时配置的网段10.0.0.0/24是个虚拟的地址,因此可以看到该路由是linkdown的(下面可以看到,如果有程序连接到这些接口,则对应的link是up的),因此ping 10.0.0.2时无法抓到报文。 # ip route default via 172.x.x.x.x dev eth0 1.1.1.0/24 dev tap0 proto kernel scope link src 1.1.1.1 dead linkdown 10.0.0.0/24 dev tun2 proto kernel scope link src 10.0.0.1 dead linkdown可以使用如下命令进行修改,这样当该路由可用时,会走默认路由 # echo 1 > /proc/sys/net/ipv4/conf/tun2/ignore_routes_with_linkdown这样就可以在默认路由接口eth0上抓到该报文 # tcpdump -i eth0 host 10.0.0.2 tcpdump: verbose output suppressed, use -v or -vv for full protocol decode listening on eth0, link-type EN10MB (Ethernet), capture size 262144 bytes 13:11:38.063274 IP iZuf6et6kto8eoc1kok0ydZ > 10.0.0.2: ICMP echo request, id 7030, seq 1, length 64 13:11:39.074138 IP iZuf6et6kto8eoc1kok0ydZ > 10.0.0.2: ICMP echo request, id 7030, seq 2, length 64 ...上面已经创建了接口,但没有程序连接这些接口,下面编写一个简单的程序来在接口上读取内核发送的数据。 简单的程序下面的程序会连接到一个tun接口,并读取内核发送到该接口的数据。如果该接口已经被持久化,那么就可以i使用一个普通用户(可以读写克隆设备/dev/net/tun,并且为接口的所有者)来运行这个程序。下面程序只是个框架,展示了如何从设备获取数据,并对这些数据进行简单的处理。下面程序使用了上面定义的tun_alloc()函数,完整代码如下: #include #include #include #include int tun_alloc(char *dev, int flags) { struct ifreq ifr; int fd, err; char *clonedev = "/dev/net/tun"; /* Arguments taken by the function: * * char *dev: the name of an interface (or '\0'). MUST have enough * space to hold the interface name if '\0' is passed * int flags: interface flags (eg, IFF_TUN etc.) */ /* open the clone device */ if( (fd = open(clonedev, O_RDWR)) < 0 ) { return fd; } /* preparation of the struct ifr, of type "struct ifreq" */ memset(&ifr, 0, sizeof(ifr)); ifr.ifr_flags = flags; /* IFF_TUN or IFF_TAP, plus maybe IFF_NO_PI */ if (*dev) { /* if a device name was specified, put it in the structure; otherwise, * the kernel will try to allocate the "next" device of the * specified type */ strncpy(ifr.ifr_name, dev, IFNAMSIZ); } /* try to create the device */ if( (err = ioctl(fd, TUNSETIFF, (void *) &ifr)) < 0 ) { close(fd); return err; } /* if the operation was successful, write back the name of the * interface to the variable "dev", so the caller can know * it. Note that the caller MUST reserve space in *dev (see calling * code below) */ strcpy(dev, ifr.ifr_name); /* this is the special file descriptor that the caller will use to talk * with the virtual interface */ return fd; } int main(){ int tun_fd,nread; unsigned char buffer[2000]; char tun_name[IFNAMSIZ]; /* Connect to the device */ strcpy(tun_name, "tun77"); tun_fd = tun_alloc(tun_name, IFF_TUN | IFF_NO_PI); /* tun interface */ if(tun_fd < 0){ perror("Allocating interface"); exit(1); } /* Now read data coming from the kernel */ while(1) { /* Note that "buffer" should be at least the MTU size of the interface, eg 1500 bytes */ nread = read(tun_fd,buffer,sizeof(buffer)); if(nread < 0) { perror("Reading from interface"); close(tun_fd); exit(1); } /* Do whatever with the data */ printf("Read %d bytes from device %s\n", nread, tun_name); } }在一个终端中执行如下命令,创建一个与程序中使用的名称相同的tun接口tun77,并执行ping操作: # openvpn --mktun --dev tun77 --user waldner Fri Mar 26 10:48:12 2010 TUN/TAP device tun77 opened Fri Mar 26 10:48:12 2010 Persist state set to: ON # ip link set tun77 up # ip addr add 10.0.0.1/24 dev tun77 # ping 10.0.0.2在另一个终端中启用编译好的程序,可以得到如下结果。84字节中,20个字节为IP首部,8字节为ICMP首部,其余56字节为ICMP的echo负载。 # ./tunclient Read 84 bytes from device tun77 Read 84 bytes from device tun77 Read 84 bytes from device tun77 Read 84 bytes from device tun77 ...此时看下路由信息,由于连接了程序,tun77对应的路由是linkup的 # ip route default via 172.20.98.253 dev eth0 10.0.0.0/24 dev tun77 proto kernel scope link src 10.0.0.1可以使用上述程序将多种类型的流量发送到创建的tun接口,并校验从接口上读取的数据的大小。每次read()操作都会返回一个完整的报文。类似地,如果需要往该接口写入数据,则需要写入完整的IP报文。 那么如何使用这些数据呢?例如可以模拟读取的目标流量行为,为了方便解释,以上面的ping为例。可以解析报文,并从IP首部,ICMP首部和负载中抽取信息,用于构造一个包含ICMP响应的IP报文,并发送出去(即,写入tun/tap设备对应的描述符),这样发送ping的源头将会接收到该响应。当然,上述程序的使用场景并没有限制为ping,因此可以实现各种网络协议。通常需要解析接收到的报文,并作出相应动作。如果使用tap,为了正确构建响应帧,需要在代码中实现ARP。User-Mode Linux也是做了类似的事情:将一个用户空间运行的(修改过的)内核连接到主机上的一个tap接口,并通过该接口与主机进行通信。当然,一个完整的Linux内核会实现TCP/IP和以太网,新的虚拟化平台,如libvirt广泛使用tap接口与支持qemu/kvm的客户机进行通信,接口通常会被命名为vnet0,vnet1等。这些接口只有当它们连接的客户还在运行的时候才会存在,因此没有持久化,但可以在客户机运行期间使用ip link show和brctl show进行查看。 类似地,也可以将自己的代码连接到接口上,并尝试网络编程以及实现以太网和TCP/IP栈。可以通过查看 drivers/net/tun.c中的函数 tun_get_user() 和tun_put_user()来了解tun驱动在内核侧做的事情。 隧道此外,还可以使用tun/tap接口来实现隧道功能。此时不需要重新实现TCP/IP,只需要编写一个程序,在运行相同程序的主机之间进行原始数据的传递即可(通过反射方式)。假设上面的程序中,除了连接到了tun/tap接口,还与一个远端主机建立了网络连接(该远端主机以服务器模式运行了一个类型的程序)。(实际上两个程序都是相同的,谁是客户端,谁是服务端取决于命令行参数)。一旦运行了两个程序,就可以在两个方向上传递数据。网络连接使用了TCP,但也可以使用给其他协议(如UDP,甚至ICMP)。可以在simpletun下载完整的代码。 下面是程序的主要循环,主要的工作是在tun/tap接口和网络隧道之间传数据。下面简化了debug语句: ... /* net_fd is the network file descriptor (to the peer), tap_fd is the descriptor connected to the tun/tap interface */ /* use select() to handle two descriptors at once */ maxfd = (tap_fd > net_fd)?tap_fd:net_fd; while(1) { int ret; fd_set rd_set; FD_ZERO(&rd_set); FD_SET(tap_fd, &rd_set); FD_SET(net_fd, &rd_set); ret = select(maxfd + 1, &rd_set, NULL, NULL, NULL); if (ret < 0 && errno == EINTR) { continue; } if (ret < 0) { perror("select()"); exit(1); } if(FD_ISSET(tap_fd, &rd_set)) { /* data from tun/tap: just read it and write it to the network */ nread = cread(tap_fd, buffer, BUFSIZE); /* write length + packet */ plength = htons(nread); nwrite = cwrite(net_fd, (char *)&plength, sizeof(plength)); nwrite = cwrite(net_fd, buffer, nread); } if(FD_ISSET(net_fd, &rd_set)) { /* data from the network: read it, and write it to the tun/tap interface. * We need to read the length first, and then the packet */ /* Read length */ nread = read_n(net_fd, (char *)&plength, sizeof(plength)); /* read packet */ nread = read_n(net_fd, buffer, ntohs(plength)); /* now buffer[] contains a full packet or frame, write it into the tun/tap interface */ nwrite = cwrite(tap_fd, buffer, nread); } } ...上述代码的主要逻辑为: 程序使用select()多路复用来同时操作两个描述符,当任何一个描述符接收到数据后,就会发送到另一个描述符中 由于程序使用了TCP,接收者会会看到一条数据流,比较难以分辨报文边界。因此当向网络写入一个报文或一个帧时,会在实际数据包的前面加上它的长度(2个字节)。 当数据来自于tap_fd 描述符时,会一次性读取一个完整的报文或帧,这样就可以将读取的数据直接写入网络,并在报文前面加上长度。由于长度字段为一个short int类型的值,大于1个字节,且使用了二进制格式,因此可以使用ntohs()/htons()来兼容不同机器的字节序。 当数据来自于网络时,使用前面提到的技巧,可以通过报文前面的两个字节了解到后面要读取字节流中的报文的长度。当读取报文后,会将其写入tun/tap接口描述符,后续会被内核接收。使用上述代码可以创建一个隧道。首先在隧道两端的主机上配置必要的tun/tap接口,并分配IP地址。在本例中使用了两个tun接口:本机的tun11接口,IP为192.168.0.1/24;远端主机的tun3接口,IP为192.168.0.2/24。simpletun默认会使用TCP端口55555进行连接。远端主机以服务器模式运行simpletun程序,本机以客户端模式运行(远端服务器为10.86.43.52)。 [remote]# openvpn --mktun --dev tun3 --user waldner Fri Mar 26 11:11:41 2010 TUN/TAP device tun3 opened Fri Mar 26 11:11:41 2010 Persist state set to: ON [remote]# ip link set tun3 up [remote]# ip addr add 192.168.0.2/24 dev tun3 [remote]$ ./simpletun -i tun3 -s # server blocks waiting for the client to connect [local]# openvpn --mktun --dev tun11 --user waldner Fri Mar 26 11:17:37 2010 TUN/TAP device tun11 opened Fri Mar 26 11:17:37 2010 Persist state set to: ON [local]# ip link set tun11 up [local]# ip addr add 192.168.0.1/24 dev tun11 [local]$ ./simpletun -i tun11 -c 10.86.43.52 # nothing happens, but the peers are now connected [local]$ ping 192.168.0.2 PING 192.168.0.2 (192.168.0.2) 56(84) bytes of data. 64 bytes from 192.168.0.2: icmp_seq=1 ttl=241 time=42.5 ms 64 bytes from 192.168.0.2: icmp_seq=2 ttl=241 time=41.3 ms 64 bytes from 192.168.0.2: icmp_seq=3 ttl=241 time=41.4 ms 64 bytes from 192.168.0.2: icmp_seq=4 ttl=241 time=41.0 ms --- 192.168.0.2 ping statistics --- 4 packets transmitted, 4 received, 0% packet loss, time 2999ms rtt min/avg/max/mdev = 41.047/41.599/42.588/0.621 ms # let's try something more exciting now [local]$ ssh [email protected] [email protected]'s password: Linux remote 2.6.22-14-xen #1 SMP Fri Feb 29 16:20:01 GMT 2008 x86_64 Welcome to remote! [remote]$上面例子中tun3和tun11之间的流量实际最终还是走的默认路由,通过eth0出去。 不要在k8s环境或容器环境中运行上述程序,可能会由于iptables导致连接失败 # route -n Kernel IP routing table Destination Gateway Genmask Flags Metric Ref Use Iface 0.0.0.0 10.86.42.1 0.0.0.0 UG 100 0 0 eth0 10.86.42.0 0.0.0.0 255.255.254.0 U 100 0 0 eth0 169.254.169.254 10.86.43.39 255.255.255.255 UGH 100 0 0 eth0 192.168.0.0 0.0.0.0 255.255.255.0 U 0 0 0 tun11当上述隧道up之后,就可以看到simpletun两端的TCP连接。"真实的"数据(即,上层应用传输的数据,ping或ssh)不会在线路上传输。如果在运行simpletun的主机上启用了IP转发,并在其他主机上创建了必要的路由,那么就可以通过隧道连接到远端网络。 当使用的虚拟接口类型为tap时,可以透明地桥接两个地理位置遥远的以太网LAN,这样设备会认为它们位于相同的二层网络。为了到这种效果,需要将本地LAN接口和虚拟tap接口一起桥接到网关(即,运行simpletun的主机或使用tap接口的另外一个隧道软件)上。这样,从LAN接收到的帧也会发送到tap接口上(因为使用了桥接),隧道应用会读取数据并发送到远端。另一个网桥将确保将接收到的帧转发到远程LAN。另外一端也会发生相同的情况。由于在两个LAN之间使用了以太帧,因此可以将两个局域网有效地连接在一起。意味着可以在伦敦有10台机器,而在柏林有50台机器,且可以使用192.168.1.0/24 子网创建一个60台计算机的以太网络(或使用其他子网地址)。 拓展simpletun 是一个非常简单的程序,可以通过多种方式进行扩展。首先,可以增加新的连接方式,例如,可以实现使用UDP的连接。再者,目前的数据是以明文方式传输的,但当数据位于程序的buffer中时,可以在传输前进行变更,例如进行加密。 虽然simpletun是一个简单的程序,但很多热门的程序也是通过这种方式使用tun/tap网络的,如 OpenVPN, vtun或Openssh的 VPN 特性。 最后要说明的是,在TCP之上运行隧道并没有任何意义,上述使用场景被称为"tcp之上的tcp",更多参见"Why tcp over tcp is a bad idea"。OpenVPN等应用程序默认使用UDP正是出于这个原因,使用TCP会导致性能降低。 参考 TUN/TAP概述及操作 tuntap-interface-tutorial本文来自博客园,作者:charlieroro,转载请注明原文链接:https://www.cnblogs.com/charlieroro/p/13497340.html |
【本文地址】