| Spring Boot:最全SpringBoot启动流程原理分析(全网最全最完善) | 您所在的位置:网站首页 › spring启动原理 › Spring Boot:最全SpringBoot启动流程原理分析(全网最全最完善) |
Spring Boot:最全SpringBoot启动流程原理分析(全网最全最完善)
|
前言 我们启动一个springboot项目,最简单的就是配置一个springboot启动类,然后运行即可 @SpringBootApplication public class SpringBoot { public static void main(String[] args) { SpringApplication.run(SpringBoot.class, args); } }通过上面的代码,我们可以看出springboot启动的关键主要有两个地方, 第一个就是@SpringBootApplication注解第二个就是 SpringApplication.run(SpringBoot.class, args);SpringBoot启动流程图图1: 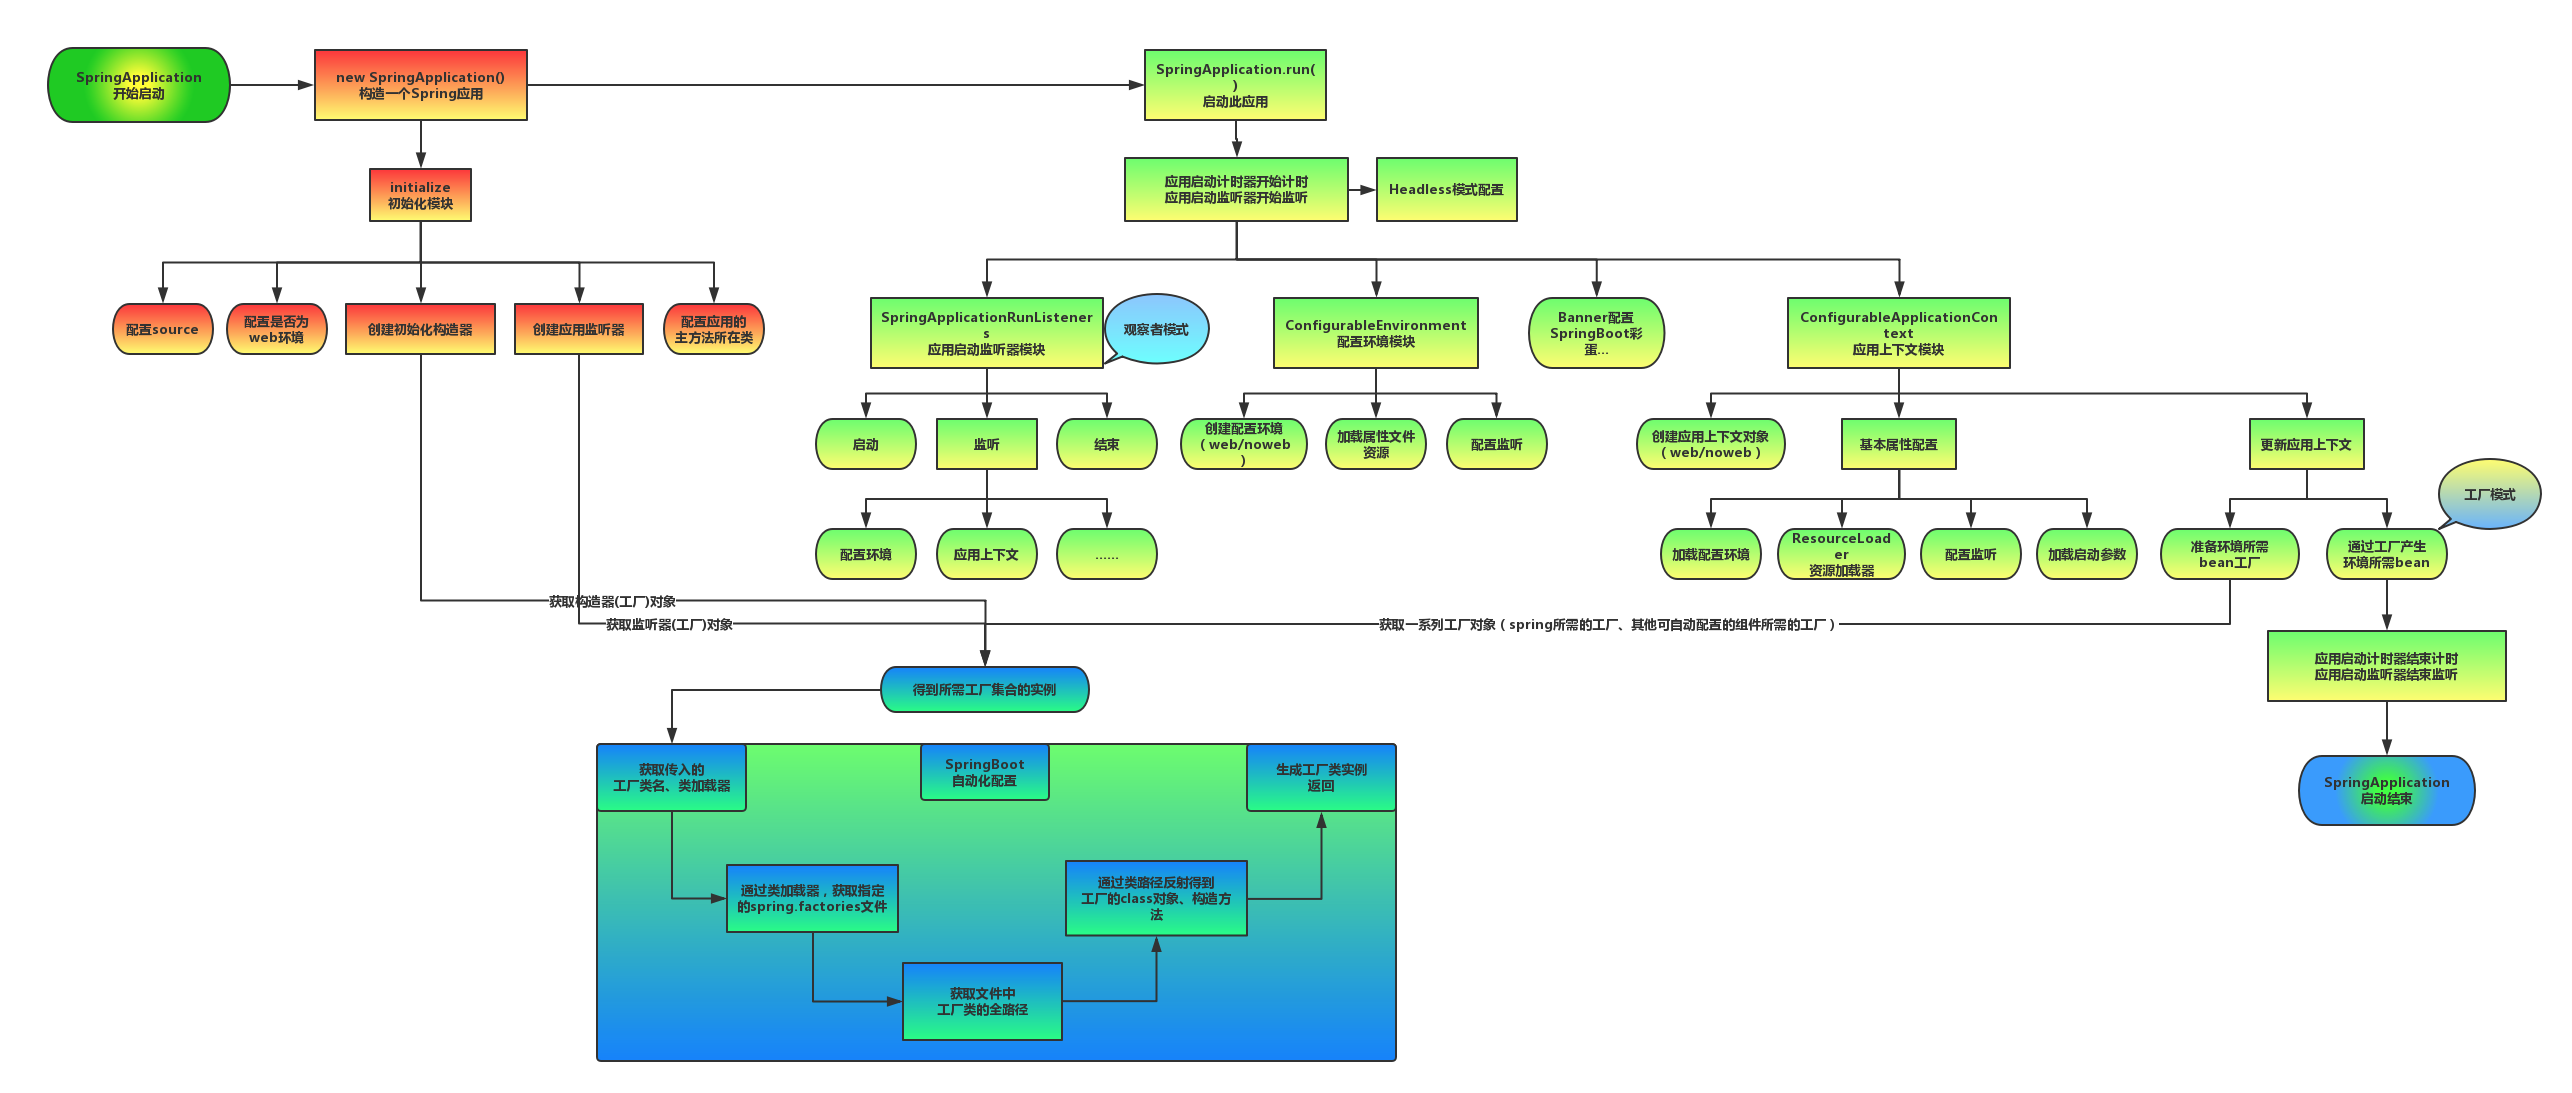 图2: 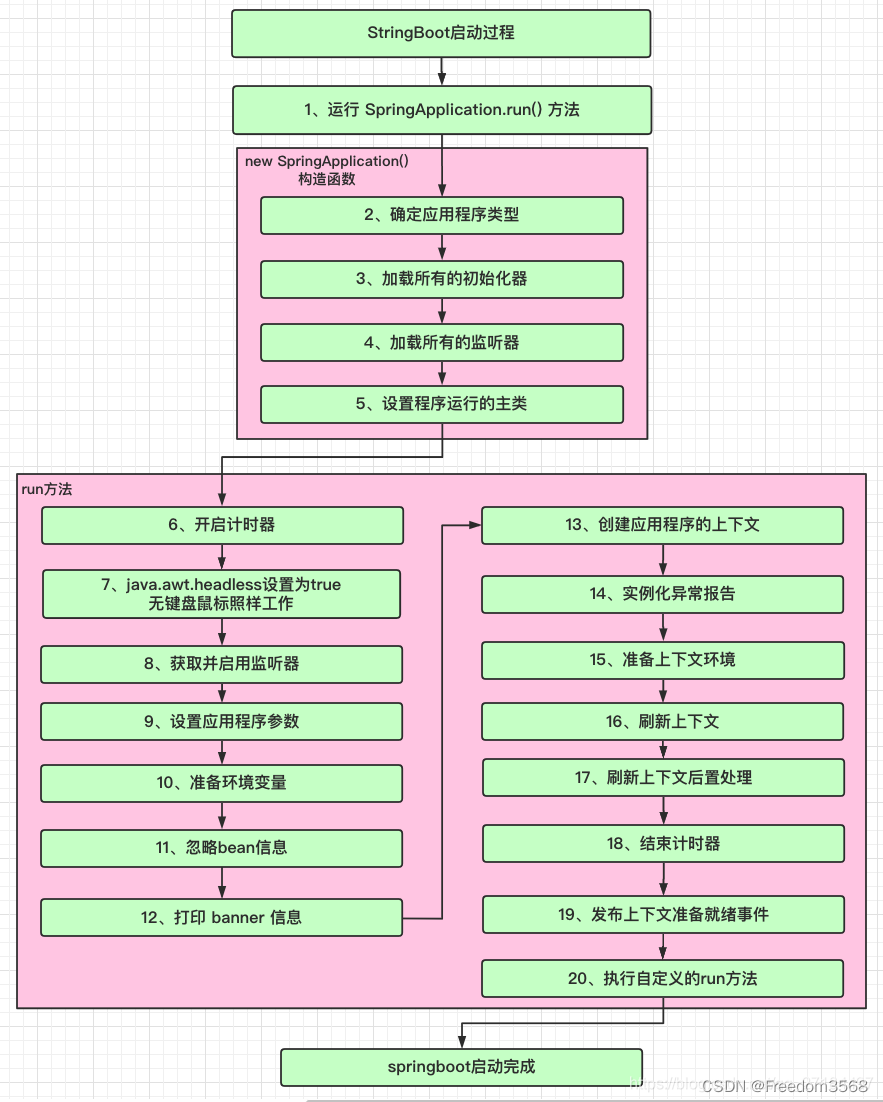 一、@SpringBootApplication 注解解析1.1 @SpringBootApplication 一、@SpringBootApplication 注解解析1.1 @SpringBootApplication我们直接追踪@SpringBootApplication的源码,可以看到其实@SpringBootApplication是一个组合注解,他分别是由底下这些注解组成。 @Target(ElementType.TYPE) @Retention(RetentionPolicy.RUNTIME) @Documented @Inherited @SpringBootConfiguration @EnableAutoConfiguration @ComponentScan(excludeFilters = { @Filter(type = FilterType.CUSTOM, classes = TypeExcludeFilter.class), @Filter(type = FilterType.CUSTOM, classes = AutoConfigurationExcludeFilter.class) })这些注解虽然看起来很多,但是除去元注解,真正起作用的注解只有以下三个注解: @SpringBootConfiguration @EnableAutoConfiguration @ComponentScan那这三个注解是有啥用?其实在Spring Boot 1.2版之前,或者我们初学者刚开始接触springboot时,都还没开始使用@SpringBootApplication这个注解,而是使用以上三个注解启动项目。如果有兴趣的,也可以手动敲敲代码,就会发现这样也可以正常启动项目! @SpringBootConfiguration @EnableAutoConfiguration @ComponentScan public class SpringBoot { public static void main(String[] args) { SpringApplication.run(SpringBoot.class, args); } }所以说这三个注解才是背后的大佬,@SpringBootApplication只是个空壳子。接下来,我来说明下这三个注解各自的作用。 1.2 @SpringBootConfiguration同样,我们跟踪下@SpringBootConfiguration的源代码,看下他由哪些注解组成 @Target(ElementType.TYPE) @Retention(RetentionPolicy.RUNTIME) @Documented @Configuration可以看到,除去元注解,剩下的@Configuration注解我相信大家应该都很熟了!我们springboot为什么可以去除xml配置,靠的就是@Configuration这个注解。所以,它的作用就是将当前类申明为配置类,同时还可以使用@bean注解将类以方法的形式实例化到spring容器,而方法名就是实例名,看下代码你就懂了! @Configuration public class TokenAutoConfiguration { @Bean public TokenService tokenService() { return new TokenService(); } }作用等同于xml配置文件的 1.3 @ComponentScan我们先说下@ComponentScan作用。他的作用就是扫描当前包以及子包,将有@Component,@Controller,@Service,@Repository等注解的类注册到容器中,以便调用。 注:大家第一眼见到@ComponentScan这个注解的时候是否有点眼熟?之前,一些传统框架用xml配置文件配置的时候,一般都会使用context:component-scan来扫描包。以下两中写法的效果是相同的` @Configuration @ComponentScan(basePackages="XXX") public class SpringBoot { }注:如果@ComponentScan不指定basePackages,那么默认扫描当前包以及其子包,而@SpringBootApplication里的@ComponentScan就是默认扫描,所以我们一般都是把springboot启动类放在最外层,以便扫描所有的类。 1.4 @EnableAutoConfiguration这里先总结下@EnableAutoConfiguration的工作原理,大家后面看的应该会更清晰: 它主要就是通过内部的方法,扫描classpath的META-INF/spring.factories配置文件(key-value),将其中的 org.springframework.boot.autoconfigure.EnableAutoConfiguration 对应的配置项实例化并且注册到spring容器。 ok,我们同样打开@EnableAutoConfiguration源码,可以发现他是由以下几个注解组成的 @Target(ElementType.TYPE) @Retention(RetentionPolicy.RUNTIME) @Documented @Inherited @AutoConfigurationPackage @Import(AutoConfigurationImportSelector.class)除去元注解,主要注解就是@AutoConfigurationPackage和@Import(AutoConfigurationImportSelector.class) 我们springboot项目为什么可以自动载入应用程序所需的bean?就是因为这个神奇的注解@Import。那么这个@Import怎么这么牛皮?没关系!我们一步一步的看下去! 首先我们先进入AutoConfigurationImportSelector类,可以看到他有一个方法selectImports() 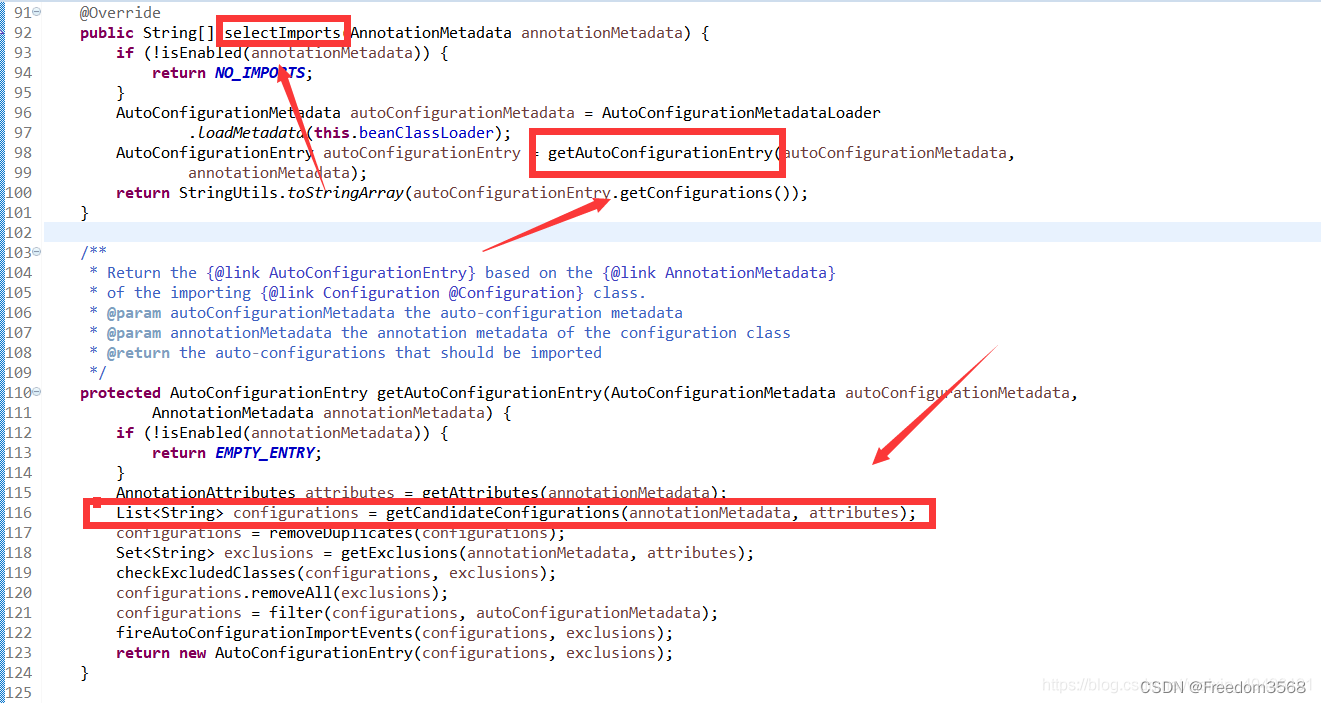 继续跟踪,进入getAutoConfigurationEntry()方法,可以看到这里有个List集合,那这个List集合又是干嘛的?没事,我们继续跟踪getCandidateConfigurations()方法!  可以看到这里有个方法,这个方法的作用就是读取classpath下的META-INF/spring.factories文件的配置,将key为 org.springframework.boot.autoconfigure.EnableAutoConfiguration 对应的配置项读取出来,通过反射机制实例化为配置文件,然后注入spring容器。 注:假如你想要实例化一堆bean,可以通过配置文件先将这些bean实例化到容器,等其他项目调用时,在spring.factories中写入这个配置文件的路径即可! 然后直接在SpringFactoriesLoader.loadFactoryNames;这个方法后面打个断点,可以在返回的集合里找到我们自定义的配置文件路径! 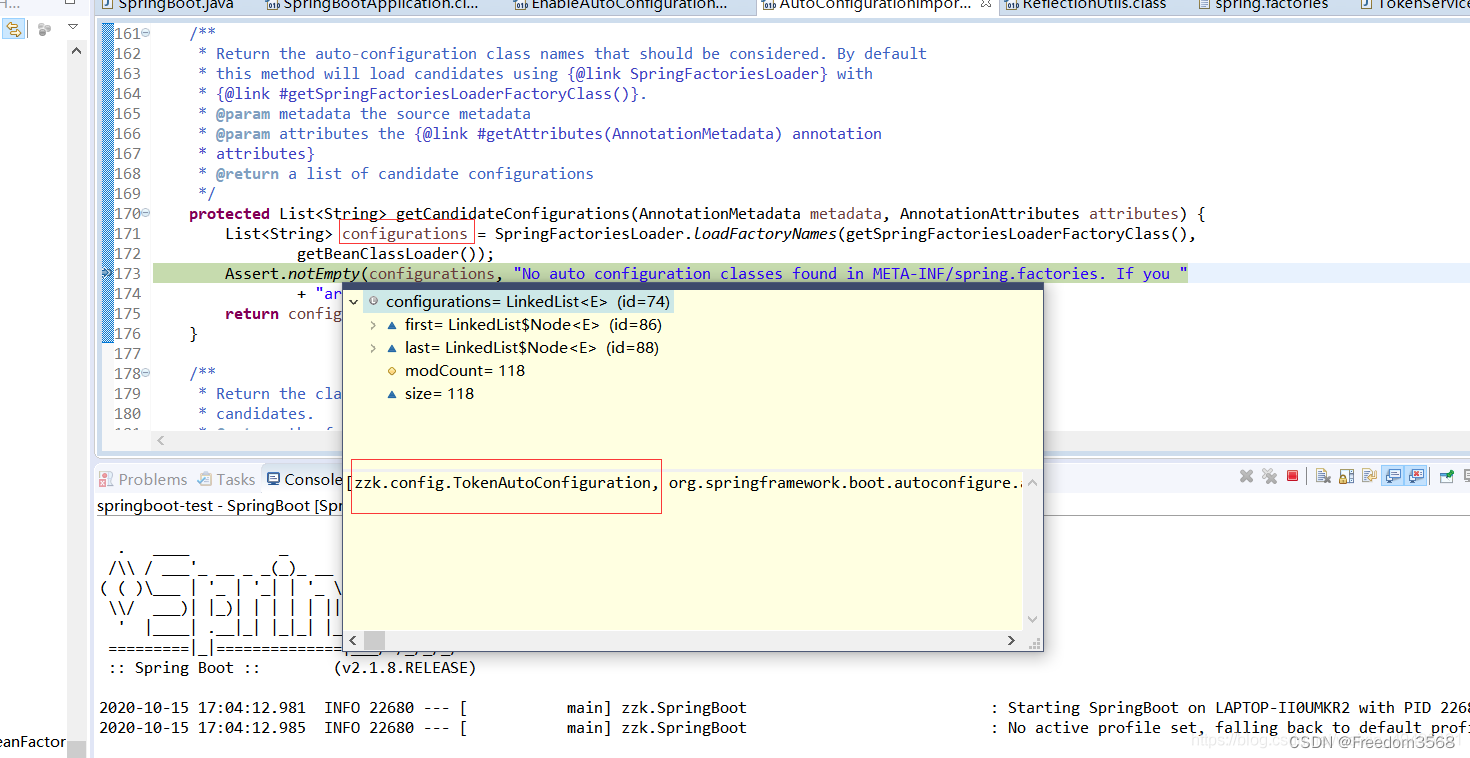 说明成功引入我们自定义的依赖包! 二、SpringApplication.run()原理解析SpringApplication.run()原理相对于前面注解的原理,会稍微麻烦点,为了方便我会适当贴出一些注解代码。 首先我们点击查看run方法的源码  可以看出,其实SpringApplication.run()包括两个部分,一部分就是创建SpringApplicaiton实例,另一部分就是调用run()方法,那他们又是怎么运行的? 2.1 SpringApplicaiton创建继续跟踪SpringApplication实例的源码  继续跟踪进入,到如下这个方法中 @SuppressWarnings({ "unchecked", "rawtypes" }) public SpringApplication(ResourceLoader resourceLoader, Class... primarySources) { this.resourceLoader = resourceLoader; Assert.notNull(primarySources, "PrimarySources must not be null"); this.primarySources = new LinkedHashSet(Arrays.asList(primarySources)); //获取应用类型 this.webApplicationType = WebApplicationType.deduceFromClasspath(); //获取所有初始化器 setInitializers((Collection) getSpringFactoriesInstances(ApplicationContextInitializer.class)); //获取所有监听器 setListeners((Collection) getSpringFactoriesInstances(ApplicationListener.class)); //定位main方法 this.mainApplicationClass = deduceMainApplicationClass(); }2.1.1 获取应用类型跟踪deduceFromClasspath方法  从返回结果我们可以看出应用类型一共有三种,分别是 NONE: 非web应用,即不会启动服务器SERVLET: 基于servlet的web应用REACTIVE: 响应式web应用(暂未接触过)判断一共涉及四个常量: WEBFLUX_INDICATOR_CLASS , WEBMVC_INDICATOR_CLASS,JERSEY_INDICATOR_CLASS,SERVLET_INDICATOR_CLASSES springboot在初始化容器的时候,会对以上四个常量所对应的class进行判断,看看他们是否存在,从而返回应用类型!至于常量代表哪些class,大家可以自己跟踪看看,也在当前类中 2.1.2 获取初始化器跟踪进入getSpringFactoriesInstances方法 private Collection getSpringFactoriesInstances(Class type) { return getSpringFactoriesInstances(type, new Class[] {}); } private Collection getSpringFactoriesInstances(Class type, Class[] parameterTypes, Object... args) { ClassLoader classLoader = getClassLoader(); // Use names and ensure unique to protect against duplicates //获取所有初始化器的名称集合 Set names = new LinkedHashSet(SpringFactoriesLoader.loadFactoryNames(type, classLoader)); //根据名称集合实例化这些初始化器 List instances = createSpringFactoriesInstances(type, parameterTypes, classLoader, args, names); //排序 AnnotationAwareOrderComparator.sort(instances); return instances; }从代码可以看出是在META-INF/spring.factories配置文件里获取初始化器,然后实例化、排序后再设置到initializers属性中 2.1.3 获取初监听器其实监听器和初始化的操作是基本一样的 2.1.4 定位main方法跟踪源码进入deduceMainApplicationClass方法 private Class deduceMainApplicationClass() { try { //通过创建运行时异常的方式获取栈 StackTraceElement[] stackTrace = new RuntimeException().getStackTrace(); //遍历获取main方法所在的类并且返回 for (StackTraceElement stackTraceElement : stackTrace) { if ("main".equals(stackTraceElement.getMethodName())) { return Class.forName(stackTraceElement.getClassName()); } } } catch (ClassNotFoundException ex) { // Swallow and continue } return null; }2.2 SpringApplication.run()调用2.2.1 Run代码总览public ConfigurableApplicationContext run(String... args) { //1、创建并启动计时监控类 StopWatch stopWatch = new StopWatch(); stopWatch.start(); //2、初始化应用上下文和异常报告集合 ConfigurableApplicationContext context = null; Collection exceptionReporters = new ArrayList(); //3、设置系统属性“java.awt.headless”的值,默认为true,用于运行headless服务器,进行简单的图像处理,多用于在缺少显示屏、键盘或者鼠标时的系统配置,很多监控工具如jconsole 需要将该值设置为true configureHeadlessProperty(); //4、创建所有spring运行监听器并发布应用启动事件,简单说的话就是获取SpringApplicationRunListener类型的实例(EventPublishingRunListener对象),并封装进SpringApplicationRunListeners对象,然后返回这个SpringApplicationRunListeners对象。说的再简单点,getRunListeners就是准备好了运行时监听器EventPublishingRunListener。 SpringApplicationRunListeners listeners = getRunListeners(args); listeners.starting(); try { //5、初始化默认应用参数类 ApplicationArguments applicationArguments = new DefaultApplicationArguments(args); //6、根据运行监听器和应用参数来准备spring环境 ConfigurableEnvironment environment = prepareEnvironment(listeners, applicationArguments); //将要忽略的bean的参数打开 configureIgnoreBeanInfo(environment); //7、创建banner打印类 Banner printedBanner = printBanner(environment); //8、创建应用上下文,可以理解为创建一个容器 context = createApplicationContext(); //9、准备异常报告器,用来支持报告关于启动的错误 exceptionReporters = getSpringFactoriesInstances(SpringBootExceptionReporter.class, new Class[] { ConfigurableApplicationContext.class }, context); //10、准备应用上下文,该步骤包含一个非常关键的操作,将启动类注入容器,为后续开启自动化提供基础 prepareContext(context, environment, listeners, applicationArguments, printedBanner); //11、刷新应用上下文 refreshContext(context); //12、应用上下文刷新后置处理,做一些扩展功能 afterRefresh(context, applicationArguments); //13、停止计时监控类 stopWatch.stop(); //14、输出日志记录执行主类名、时间信息 if (this.logStartupInfo) { new StartupInfoLogger(this.mainApplicationClass).logStarted(getApplicationLog(), stopWatch); } //15、发布应用上下文启动监听事件 listeners.started(context); //16、执行所有的Runner运行器 callRunners(context, applicationArguments); }catch (Throwable ex) { handleRunFailure(context, ex, exceptionReporters, listeners); throw new IllegalStateException(ex); } try { //17、发布应用上下文就绪事件 listeners.running(context); }catch (Throwable ex) { handleRunFailure(context, ex, exceptionReporters, null); throw new IllegalStateException(ex); } //18、返回应用上下文 return context; }2.2.2 创建spring运行监听器并发布应用启动事件SpringApplicationRunListeners listeners = getRunListeners(args); listeners.starting(); //创建spring监听器 private SpringApplicationRunListeners getRunListeners(String[] args) { Class[] types = new Class[] { SpringApplication.class, String[].class }; return new SpringApplicationRunListeners(logger, getSpringFactoriesInstances(SpringApplicationRunListener.class, types, this, args)); } SpringApplicationRunListeners(Log log, Collection listener : getApplicationListeners(event, type)) { if (executor != null) { //异步发送事件 executor.execute(() -> invokeListener(listener, event)); } else { //同步发送事件 invokeListener(listener, event); } } }SpringApplicationRunListener这个接口是干啥的呢?没错,他就是用来加载我们配置文件用的。接下来我弄个简单的例子,大家就知道怎么用了。 2.2.2 番外(listener示例,可跳过)主要实现自定义监听器并且读取我们配置文件内容,先献上我的文件结构 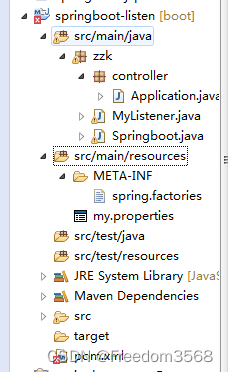 创建一个maven项目,pom配置只需要添加web依赖即可 org.springframework.boot spring-boot-starter-parent 2.1.8.RELEASE org.springframework.boot spring-boot-starter-web在resource自定义配置文件my.properties tzr.name=zzk自定义监听器,这里主要是对starting、environmentPrepared、started、running方法进行实现 package zzk; import java.io.IOException; import java.util.Properties; import org.springframework.boot.SpringApplication; import org.springframework.boot.SpringApplicationRunListener; import org.springframework.context.ConfigurableApplicationContext; import org.springframework.core.Ordered; import org.springframework.core.env.ConfigurableEnvironment; import org.springframework.core.env.MutablePropertySources; import org.springframework.core.env.PropertiesPropertySource; import org.springframework.core.env.PropertySource; /** * 集成监听器加载我们的配置文件 * @author zhanzhk * */ public class MyListener implements SpringApplicationRunListener,Ordered { private SpringApplication application; private String[] args; @Override public void starting() { System.out.println("表示准备开始使用监听器"); } public MyListener(SpringApplication application, String[] args) { this.application = application; this.args = args; } @Override public void environmentPrepared(ConfigurableEnvironment environment) { System.out.println("表示已经开始读取配置文件"); //配置文件到程序,再然后放入springboot容器 Properties properties=new Properties(); try { //读取properties容器 properties.load(this.getClass().getClassLoader().getResourceAsStream("my.properties")); //读取名字为my PropertySource propertySource=new PropertiesPropertySource("my",properties) ; //加载资源到springboot容器 MutablePropertySources propertySources=environment.getPropertySources(); propertySources.addLast(propertySource); //换种思路,如果你配置文件是放在网络上,可以直接读取放入我们的项目中 } catch (IOException e) { System.out.println("出错"); } } @Override public void contextPrepared(ConfigurableApplicationContext context) { // TODO Auto-generated method stub } @Override public void contextLoaded(ConfigurableApplicationContext context) { // TODO Auto-generated method stub } @Override public void started(ConfigurableApplicationContext context) { System.out.println("表示初始化容器已经结束"); } @Override public void running(ConfigurableApplicationContext context) { System.out.println("表示可以使用springboot了"); } @Override public void failed(ConfigurableApplicationContext context, Throwable exception) { // TODO Auto-generated method stub } //读取优先级 @Override public int getOrder() { // TODO Auto-generated method stub return -1; } }然后编写controller文件对我们的配置参数进行调用 package zzk.controller; import org.springframework.beans.factory.annotation.Value; import org.springframework.stereotype.Controller; import org.springframework.web.bind.annotation.RequestMapping; import org.springframework.web.bind.annotation.ResponseBody; @Controller public class Application { @Value("${tzr.name}") private String name; @RequestMapping("test") @ResponseBody public String test() { String x = name; return x; } }ok,那我们自定义的监听器springboot程序又是如何获取的?前面我们代码里讲过了,它主要是读取META-INF底下的spring.factories文件,然后获取监听器,ok那就简单了,我们直接照着EventPublishingRunListener一样在resource增加METAA_INF/spring.factories文件 org.springframework.boot.SpringApplicationRunListener=\ zzk.MyListener最后设置spring启动器 package zzk; import org.springframework.boot.SpringApplication; import org.springframework.boot.autoconfigure.SpringBootApplication; @SpringBootApplication public class Springboot { public static void main(String[] args) { SpringApplication.run(Springboot.class, args); } }启动!可以看到启动信息 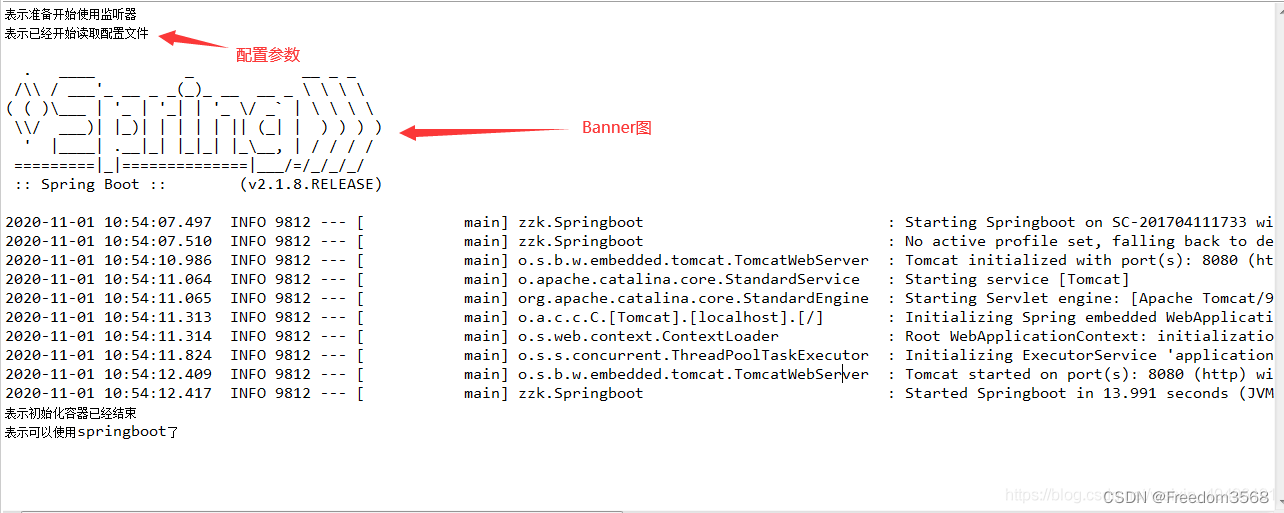 然后我们再调用controller方法  成功读取我们自定义的配置文件,现在再回头看看run方法,是不是就清晰了! 2.2.3 准备基础运行环境初始化默认应用参数类 ApplicationArguments applicationArguments = new DefaultApplicationArguments(args); public DefaultApplicationArguments(String... args) { Assert.notNull(args, "Args must not be null"); this.source = new Source(args); this.args = args; }根据运行监听器和应用参数来准备spring环境 ConfigurableEnvironment environment = prepareEnvironment(listeners, applicationArguments); //详细环境的准备 private ConfigurableEnvironment prepareEnvironment(SpringApplicationRunListeners listeners, ApplicationArguments applicationArguments) { // 获取或者创建应用环境 ConfigurableEnvironment environment = getOrCreateEnvironment(); // 配置应用环境,配置propertySource和activeProfiles configureEnvironment(environment, applicationArguments.getSourceArgs()); //listeners环境准备,广播ApplicationEnvironmentPreparedEvent ConfigurationPropertySources.attach(environment); listeners.environmentPrepared(environment); //将环境绑定给当前应用程序 bindToSpringApplication(environment); //对当前的环境类型进行判断,如果不一致进行转换 if (!this.isCustomEnvironment) { environment = new EnvironmentConverter(getClassLoader()).convertEnvironmentIfNecessary(environment, deduceEnvironmentClass()); } //配置propertySource对它自己的递归依赖 ConfigurationPropertySources.attach(environment); return environment; } // 获取或者创建应用环境,根据应用程序的类型可以分为servlet环境、标准环境(特殊的非web环境)和响应式环境 private ConfigurableEnvironment getOrCreateEnvironment() { //存在则直接返回 if (this.environment != null) { return this.environment; } //根据webApplicationType创建对应的Environment switch (this.webApplicationType) { case SERVLET: return new StandardServletEnvironment(); case REACTIVE: return new StandardReactiveWebEnvironment(); default: return new StandardEnvironment(); } } //配置应用环境 protected void configureEnvironment(ConfigurableEnvironment environment, String[] args) { if (this.addConversionService) { ConversionService conversionService = ApplicationConversionService.getSharedInstance(); environment.setConversionService((ConfigurableConversionService) conversionService); } //配置property sources configurePropertySources(environment, args); //配置profiles configureProfiles(environment, args); }创建banner的打印类 Banner printedBanner = printBanner(environment);//打印类的详细操作过程private Banner printBanner(ConfigurableEnvironment environment) { if (this.bannerMode == Banner.Mode.OFF) { return null; } ResourceLoader resourceLoader = (this.resourceLoader != null) ? this.resourceLoader : new DefaultResourceLoader(getClassLoader()); SpringApplicationBannerPrinter bannerPrinter = new SpringApplicationBannerPrinter(resourceLoader, this.banner); if (this.bannerMode == Mode.LOG) { return bannerPrinter.print(environment, this.mainApplicationClass, logger); } return bannerPrinter.print(environment, this.mainApplicationClass, System.out); }创建应用的上下文:根据不同哦那个的应用类型初始化不同的上下文应用类 context = createApplicationContext(); protected ConfigurableApplicationContext createApplicationContext() { return this.applicationContextFactory.create(this.webApplicationType); } protected ConfigurableApplicationContext createApplicationContext() { Class contextClass = this.applicationContextClass; if (contextClass == null) { try { switch (this.webApplicationType) { case SERVLET: contextClass = Class.forName(DEFAULT_SERVLET_WEB_CONTEXT_CLASS); break; case REACTIVE: contextClass = Class.forName(DEFAULT_REACTIVE_WEB_CONTEXT_CLASS); break; default: contextClass = Class.forName(DEFAULT_CONTEXT_CLASS); } } catch (ClassNotFoundException ex) { throw new IllegalStateException("Unable create a default ApplicationContext, please specify an ApplicationContextClass", ex); } } return (ConfigurableApplicationContext) BeanUtils.instantiateClass(contextClass); }2.2.4 准备上下文prepareContext(context, environment, listeners, applicationArguments, printedBanner); private void prepareContext(ConfigurableApplicationContext context, ConfigurableEnvironment environment, SpringApplicationRunListeners listeners, ApplicationArguments applicationArguments, Banner printedBanner) { //应用上下文的environment context.setEnvironment(environment); //应用上下文后处理 postProcessApplicationContext(context); //为上下文应用所有初始化器,执行容器中的 applicationContextInitializer(spring.factories的实例), //将所有的初始化对象放置到context对象中 applyInitializers(context); //触发所有SpringApplicationRunListener监听器的ContextPrepared事件方法。添加所有的事件监听器 listeners.contextPrepared(context); //记录启动日志 if (this.logStartupInfo) { logStartupInfo(context.getParent() == null); logStartupProfileInfo(context); } // 注册启动参数bean,将容器指定的参数封装成bean,注入容器 ConfigurableListableBeanFactory beanFactory = context.getBeanFactory(); beanFactory.registerSingleton("springApplicationArguments", applicationArguments); //设置banner if (printedBanner != null) { beanFactory.registerSingleton("springBootBanner", printedBanner); } if (beanFactory instanceof DefaultListableBeanFactory) { ((DefaultListableBeanFactory) beanFactory).setAllowBeanDefinitionOverriding(this.allowBeanDefinitionOverriding); } if (this.lazyInitialization) { context.addBeanFactoryPostProcessor(new LazyInitializationBeanFactoryPostProcessor()); } // 加载所有资源,指的是启动器指定的参数 Set sources = getAllSources(); Assert.notEmpty(sources, "Sources must not be empty"); //将bean加载到上下文中 load(context, sources.toArray(new Object[0])); //触发所有springapplicationRunListener监听器的contextLoaded事件方法, listeners.contextLoaded(context); } //这里没有做任何的处理过程,因为beanNameGenerator和resourceLoader默认为空,可以方便后续做扩展处理 protected void postProcessApplicationContext(ConfigurableApplicationContext context) { if (this.beanNameGenerator != null) { context.getBeanFactory().registerSingleton(AnnotationConfigUtils.CONFIGURATION_BEAN_NAME_GENERATOR, this.beanNameGenerator); } if (this.resourceLoader != null) { if (context instanceof GenericApplicationContext) { ((GenericApplicationContext) context).setResourceLoader(this.resourceLoader); } if (context instanceof DefaultResourceLoader) { ((DefaultResourceLoader) context).setClassLoader(this.resourceLoader.getClassLoader()); } } if (this.addConversionService) { context.getBeanFactory().setConversionService(ApplicationConversionService.getSharedInstance()); } } //将启动器类加载到spring容器中,为后续的自动化配置奠定基础,之前看到的很多注解也与此相关 protected void load(ApplicationContext context, Object[] sources) { if (logger.isDebugEnabled()) { logger.debug("Loading source " + StringUtils.arrayToCommaDelimitedString(sources)); } BeanDefinitionLoader loader = createBeanDefinitionLoader(getBeanDefinitionRegistry(context), sources); if (this.beanNameGenerator != null) { loader.setBeanNameGenerator(this.beanNameGenerator); } if (this.resourceLoader != null) { loader.setResourceLoader(this.resourceLoader); } if (this.environment != null) { loader.setEnvironment(this.environment); } loader.load(); } //springboot会优先选择groovy加载方式,找不到在选择java方式 private int load(Class source) { if (isGroovyPresent() && GroovyBeanDefinitionSource.class.isAssignableFrom(source)) { // Any GroovyLoaders added in beans{} DSL can contribute beans here GroovyBeanDefinitionSource loader = BeanUtils.instantiateClass(source, GroovyBeanDefinitionSource.class); load(loader); } if (isComponent(source)) { this.annotatedReader.register(source); return 1; } return 0; }2.2.5 刷新上下文springboot的启动分为两部分,一部分是注解,一部分是SpringApplication.run(Springboot.class, args),那么我们的注解又是如何嵌入到程序中呢?靠的就是refreshContext方法,同理,我们跟踪源码进入refreshContext方法   @Override
public void refresh() throws BeansException, IllegalStateException {
synchronized (this.startupShutdownMonitor) {
// 准备这个上下文来刷新。
prepareRefresh();
// 告诉子类刷新内部bean工厂。
ConfigurableListableBeanFactory beanFactory = obtainFreshBeanFactory();
// 准备bean在此上下文中使用。
prepareBeanFactory(beanFactory);
try {
// 允许在上下文子类中对bean工厂进行后处理。
postProcessBeanFactory(beanFactory);
// 调用在上下文中注册为bean的工厂处理器。
invokeBeanFactoryPostProcessors(beanFactory);
// 注册拦截bean创建的bean处理器。
registerBeanPostProcessors(beanFactory);
// 初始化此上下文的消息源。
initMessageSource();
// 为此上下文初始化事件多播。
initApplicationEventMulticaster();
// 在特定的上下文子类中初始化其他特殊bean。
onRefresh();
// 检查侦听器bean并注册它们。
registerListeners();
// 实例化所有剩余的(非拉齐-init)单例。
finishBeanFactoryInitialization(beanFactory);
// 最后一步:发布相应事件.
finishRefresh();
}
catch (BeansException ex) {
if (logger.isWarnEnabled()) {
logger.warn("Exception encountered during context initialization - " +
"cancelling refresh attempt: " + ex);
}
// 销毁已经创建的单例以避免悬空资源。
destroyBeans();
// 重置“actiove”标志。
cancelRefresh(ex);
// 向调用者传播异常。
throw ex;
}
finally {
// 重置Spring核心中常见的内省缓存,因为我们可能不再需要单例bean的元数据了。。。
resetCommonCaches();
}
}
} @Override
public void refresh() throws BeansException, IllegalStateException {
synchronized (this.startupShutdownMonitor) {
// 准备这个上下文来刷新。
prepareRefresh();
// 告诉子类刷新内部bean工厂。
ConfigurableListableBeanFactory beanFactory = obtainFreshBeanFactory();
// 准备bean在此上下文中使用。
prepareBeanFactory(beanFactory);
try {
// 允许在上下文子类中对bean工厂进行后处理。
postProcessBeanFactory(beanFactory);
// 调用在上下文中注册为bean的工厂处理器。
invokeBeanFactoryPostProcessors(beanFactory);
// 注册拦截bean创建的bean处理器。
registerBeanPostProcessors(beanFactory);
// 初始化此上下文的消息源。
initMessageSource();
// 为此上下文初始化事件多播。
initApplicationEventMulticaster();
// 在特定的上下文子类中初始化其他特殊bean。
onRefresh();
// 检查侦听器bean并注册它们。
registerListeners();
// 实例化所有剩余的(非拉齐-init)单例。
finishBeanFactoryInitialization(beanFactory);
// 最后一步:发布相应事件.
finishRefresh();
}
catch (BeansException ex) {
if (logger.isWarnEnabled()) {
logger.warn("Exception encountered during context initialization - " +
"cancelling refresh attempt: " + ex);
}
// 销毁已经创建的单例以避免悬空资源。
destroyBeans();
// 重置“actiove”标志。
cancelRefresh(ex);
// 向调用者传播异常。
throw ex;
}
finally {
// 重置Spring核心中常见的内省缓存,因为我们可能不再需要单例bean的元数据了。。。
resetCommonCaches();
}
}
}到这里,就可以看到一系列bean的操作,继续跟踪进入invokeBeanFactoryPostProcessors(调用在上下文中注册为bean的工厂处理器)方法    进入ConfigurationClassParser这个类后,方法调用也是挺绕的,这里就不深究了…进入这个类主要是想看下它的一些方法,因为对于springboot注解的引用就是在这个类进行的,比如doProcessConfigurationClass: @Nullable protected final SourceClass doProcessConfigurationClass(ConfigurationClass configClass, SourceClass sourceClass) throws IOException { if (configClass.getMetadata().isAnnotated(Component.class.getName())) { // Recursively process any member (nested) classes first processMemberClasses(configClass, sourceClass); } //处理 @PropertySource 注解 for (AnnotationAttributes propertySource : AnnotationConfigUtils.attributesForRepeatable( sourceClass.getMetadata(), PropertySources.class, org.springframework.context.annotation.PropertySource.class)) { if (this.environment instanceof ConfigurableEnvironment) { processPropertySource(propertySource); } else { logger.info("Ignoring @PropertySource annotation on [" + sourceClass.getMetadata().getClassName() + "]. Reason: Environment must implement ConfigurableEnvironment"); } } // 处理 @ComponentScan 注解 Set componentScans = AnnotationConfigUtils.attributesForRepeatable( sourceClass.getMetadata(), ComponentScans.class, ComponentScan.class); if (!componentScans.isEmpty() && !this.conditionEvaluator.shouldSkip(sourceClass.getMetadata(), ConfigurationPhase.REGISTER_BEAN)) { for (AnnotationAttributes componentScan : componentScans) { // The config class is annotated with @ComponentScan -> perform the scan immediately Set scannedBeanDefinitions = this.componentScanParser.parse(componentScan, sourceClass.getMetadata().getClassName()); // Check the set of scanned definitions for any further config classes and parse recursively if needed for (BeanDefinitionHolder holder : scannedBeanDefinitions) { BeanDefinition bdCand = holder.getBeanDefinition().getOriginatingBeanDefinition(); if (bdCand == null) { bdCand = holder.getBeanDefinition(); } if (ConfigurationClassUtils.checkConfigurationClassCandidate(bdCand, this.metadataReaderFactory)) { parse(bdCand.getBeanClassName(), holder.getBeanName()); } } } } //处理 @Import 注解 processImports(configClass, sourceClass, getImports(sourceClass), true); //处理 @ImportResource 注解 AnnotationAttributes importResource = AnnotationConfigUtils.attributesFor(sourceClass.getMetadata(), ImportResource.class); if (importResource != null) { String[] resources = importResource.getStringArray("locations"); Class |
【本文地址】