| HDFS源码分析(二) | 您所在的位置:网站首页 › secondnamenode主要用于备份主节点的元数据 › HDFS源码分析(二) |
HDFS源码分析(二)
|
前言
在Hadoop中,所有的元数据的保存都是在namenode节点之中,每次重新启动整个集群,Hadoop都需要从这些持久化了的文件中恢复数据到内存中,然后通过镜像和编辑日志文件进行定期的扫描与合并,ok,这些稍微了解Hadoop的人应该都知道,这不就是SecondNameNode干的事情嘛,但是很多人只是了解此机制的表象,内部的一些实现机理估计不是每个人都又去深究过,你能想象在写入编辑日志的过程中,用到了双缓冲区来加大并发量的写吗,你能想象为了避免操作的一致性性,作者在写入的时候做过多重的验证操作,还有你有想过作者是如何做到操作中断的处理情况吗,如果你不能很好的回答上述几个问题,那么没有关系,下面来分享一下我的学习成果。 相关涉及类 建议读者在阅读本文的过程中,结合代码一起阅读, Hadoop的源码可自行下载,这样效果可能会更好。与本文有涉及的类包括下面一些,比上次的分析略多一点,个别主类的代码量已经在上千行了。 1.FSImage--命名空间镜像类,所有关于命名空间镜像的操作方法都被包括在了这个方法里面。 2.FSEditLog--编辑日志类,编辑日志类涉及到了每个操作记录的写入。 3.EditLogInputStream和EditLogOutputStream--编辑日志输入类和编辑日志输出类,编辑日志的许多文件写入读取操作都是在这2个类的基础上实现的,这2个类是普通输入流类的继承类,对外开放了几个针对于日志读写的特有方法。 4.Storage和StorageInfo--存储信息相关类。其中后者是父类,Storage继承了后者,这2个类是存储目录直接相关的类,元数据的备份相关的很多目录操作都与此相关。 5.SecondaryNameNode--本来不想把这个类拉进去来的,但是为了使整个备份机制更加完整的呈现出来,同样也是需要去了解这一部分的代码。 ok,介绍完了这些类,下面正式进入元数据备份机制的讲解,不过在此之前,必须要了解各个对象的具体操作实现,里面有很多巧妙的设计,同时也为了防止被后面的方法绕晕,方法的确很多,但我会挑出几个代表性的来讲。 命名空间镜像 命名空间镜像在这里简称为FsImage,镜像这个词我最早听的时候是在虚拟机镜像恢复的时候听过的,很强大,不过在这里的镜像好像比较小规模一些,只是用于目录树的恢复。镜像的保存路径是由配置文件中的下面这个属性所控制 [java] view plain copy print ? ${dfs.name.dir}
当然你可以不配,是有默认值的。在命名空间镜像中,FSImage起着主导的作用,他管理着存储空间的生存期。下面是这个类的基本变量定义 [java] view plain copy print ? /** * FSImage handles checkpointing and logging of the namespace edits. * fsImage镜像类 */ public class FSImage extends Storage { //标准时间格式 private static final SimpleDateFormat DATE_FORM = new SimpleDateFormat("yyyy-MM-dd HH:mm:ss"); // // The filenames used for storing the images // 在命名空间镜像中可能用的几种名称 // enum NameNodeFile { IMAGE ("fsimage"), TIME ("fstime"), EDITS ("edits"), IMAGE_NEW ("fsimage.ckpt"), EDITS_NEW ("edits.new"); private String fileName = null; private NameNodeFile(String name) {this.fileName = name;} String getName() {return fileName;} } // checkpoint states // 检查点击几种状态 enum CheckpointStates{START, ROLLED_EDITS, UPLOAD_START, UPLOAD_DONE; } /** * Implementation of StorageDirType specific to namenode storage * A Storage directory could be of type IMAGE which stores only fsimage, * or of type EDITS which stores edits or of type IMAGE_AND_EDITS which * stores both fsimage and edits. * 名字节点目录存储类型 */ static enum NameNodeDirType implements StorageDirType { //名字节点存储类型定义主要有以下4种定义 UNDEFINED, IMAGE, EDITS, IMAGE_AND_EDITS; public StorageDirType getStorageDirType() { return this; } //做存储类型的验证 public boolean isOfType(StorageDirType type) { if ((this == IMAGE_AND_EDITS) && (type == IMAGE || type == EDITS)) return true; return this == type; } } protected long checkpointTime = -1L; //内部维护了编辑日志类,与镜像类配合操作 protected FSEditLog editLog = null; private boolean isUpgradeFinalized = false; 马上看到的是几个文件状态的名称,什么edit,edit.new,fsimage.ckpt,后面这些都会在元数据机制的中进行细致讲解,可以理解为就是临时存放的目录名称。而对于这些目录的遍历,查询操作,都是下面这个类实现的
[java] view plain copy print ? //目录迭代器 private class DirIterator implements Iterator { //目录存储类型 StorageDirType dirType; //向前的指标,用于移除操作 int prevIndex; // for remove() //向后指标 int nextIndex; // for next() DirIterator(StorageDirType dirType) { this.dirType = dirType; this.nextIndex = 0; this.prevIndex = 0; } public boolean hasNext() { .... } public StorageDirectory next() { StorageDirectory sd = getStorageDir(nextIndex); prevIndex = nextIndex; nextIndex++; if (dirType != null) { while (nextIndex edit文件 大体上是以上4条思路。 首先镜像文件的备份都是从第二名字节点的周期性检查点检测开始的 [java] view plain copy print ? // // The main work loop // public void doWork() { long period = 5 * 60; // 5 minutes long lastCheckpointTime = 0; if (checkpointPeriod = checkpointSize || now >= lastCheckpointTime + 1000 * checkpointPeriod) { //周期性调用检查点方法 doCheckpoint(); ... } } 然后我们就找doCheckpoint()检查点检查方法
[java] view plain copy print ? /** * Create a new checkpoint */ void doCheckpoint() throws IOException { // Do the required initialization of the merge work area. //做初始化的镜像操作 startCheckpoint(); // Tell the namenode to start logging transactions in a new edit file // Retuns a token that would be used to upload the merged image. CheckpointSignature sig = (CheckpointSignature)namenode.rollEditLog(); // error simulation code for junit test if (ErrorSimulator.getErrorSimulation(0)) { throw new IOException("Simulating error0 " + "after creating edits.new"); } //从名字节点获取当前镜像或编辑日志 downloadCheckpointFiles(sig); // Fetch fsimage and edits //进行镜像合并操作 doMerge(sig); // Do the merge // // Upload the new image into the NameNode. Then tell the Namenode // to make this new uploaded image as the most current image. //把合并好后的镜像重新上传到名字节点 putFSImage(sig); // error simulation code for junit test if (ErrorSimulator.getErrorSimulation(1)) { throw new IOException("Simulating error1 " + "after uploading new image to NameNode"); } //通知名字节点进行镜像的替换操作,包括将edit.new的名称重新改为edit,镜像名称fsimage.ckpt改为fsImage namenode.rollFsImage(); checkpointImage.endCheckpoint(); LOG.info("Checkpoint done. New Image Size: " + checkpointImage.getFsImageName().length()); } 这个方法中描述了非常清晰的备份机制。我们主要再来看下文件的替换方法,也就是namenode.rollFsImage方法,这个方法最后还是会调到FSImage的同名方法。
[java] view plain copy print ? /** * Moves fsimage.ckpt to fsImage and edits.new to edits * Reopens the new edits file. * 完成2个文件的名称替换 */ void rollFSImage() throws IOException { if (ckptState != CheckpointStates.UPLOAD_DONE) { throw new IOException("Cannot roll fsImage before rolling edits log."); } // // First, verify that edits.new and fsimage.ckpt exists in all // checkpoint directories. // if (!editLog.existsNew()) { throw new IOException("New Edits file does not exist"); } Iterator it = dirIterator(NameNodeDirType.IMAGE); while (it.hasNext()) { StorageDirectory sd = it.next(); File ckpt = getImageFile(sd, NameNodeFile.IMAGE_NEW); if (!ckpt.exists()) { throw new IOException("Checkpoint file " + ckpt + " does not exist"); } } editLog.purgeEditLog(); // renamed edits.new to edits 方法前半部分交待的很明确,做2类文件的替换,
[java] view plain copy print ? // // Renames new image // 重命名新镜像名称 // it = dirIterator(NameNodeDirType.IMAGE); while (it.hasNext()) { StorageDirectory sd = it.next(); File ckpt = getImageFile(sd, NameNodeFile.IMAGE_NEW); File curFile = getImageFile(sd, NameNodeFile.IMAGE); // renameTo fails on Windows if the destination file // already exists. if (!ckpt.renameTo(curFile)) { curFile.delete(); if (!ckpt.renameTo(curFile)) { editLog.removeEditsForStorageDir(sd); updateRemovedDirs(sd); it.remove(); } } } editLog.exitIfNoStreams(); 中间代码部分完成fsimage.ckpt的新镜像重命名为当前名称fsimage,最后要对旧的目录文件进行删除操作
[java] view plain copy print ? // // Updates the fstime file on all directories (fsimage and edits) // and write version file // this.layoutVersion = FSConstants.LAYOUT_VERSION; this.checkpointTime = FSNamesystem.now(); it = dirIterator(); while (it.hasNext()) { StorageDirectory sd = it.next(); // delete old edits if sd is the image only the directory if (!sd.getStorageDirType().isOfType(NameNodeDirType.EDITS)) { File editsFile = getImageFile(sd, NameNodeFile.EDITS); editsFile.delete(); } // delete old fsimage if sd is the edits only the directory if (!sd.getStorageDirType().isOfType(NameNodeDirType.IMAGE)) { File imageFile = getImageFile(sd, NameNodeFile.IMAGE); imageFile.delete(); }
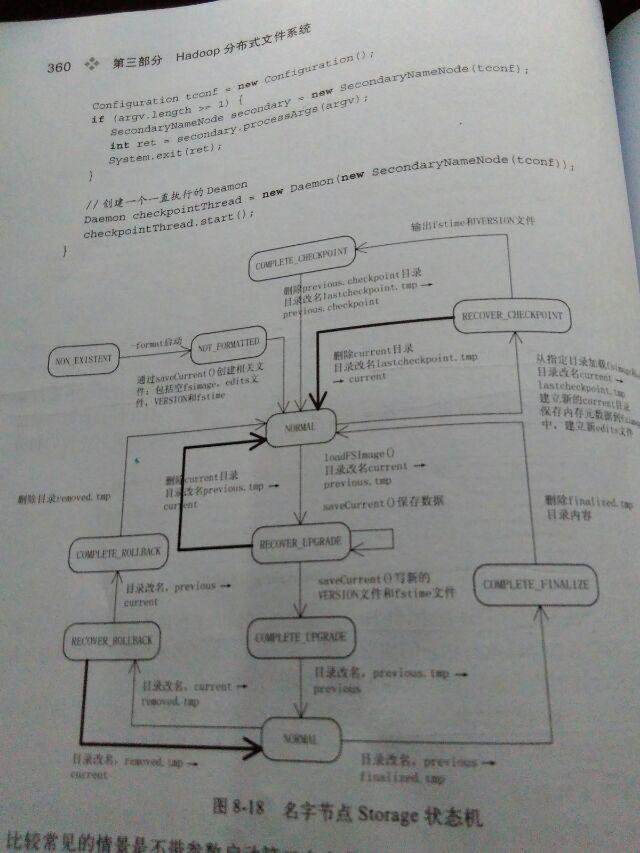
这个过程本身比较复杂,还是用书中的一张图来表示好了,图可能有点大。 总结 至此,本篇内容阐述完毕,其实我还是忽略了许多细节部分,还是主要从主要的操作一步步的理清整个线索。建议可以在Hadoop运行的时候,跑到name和edit目录下观察各个目录的情况以此验证这整套机制了,或直接做upgrade测试升级工作也是可以的。全部代码的分析请点击链接
https://github.com/linyiqun/hadoop-hdfs,后续将会继续更新HDFS其他方面的代码分析。 参考文献 《Hadoop技术内部–HDFS结构设计与实现原理》.蔡斌等 |
【本文地址】