| 尚医通day11 | 您所在的位置:网站首页 › response返回文件流和状态 › 尚医通day11 |
尚医通day11
|
页面预览
用户认证
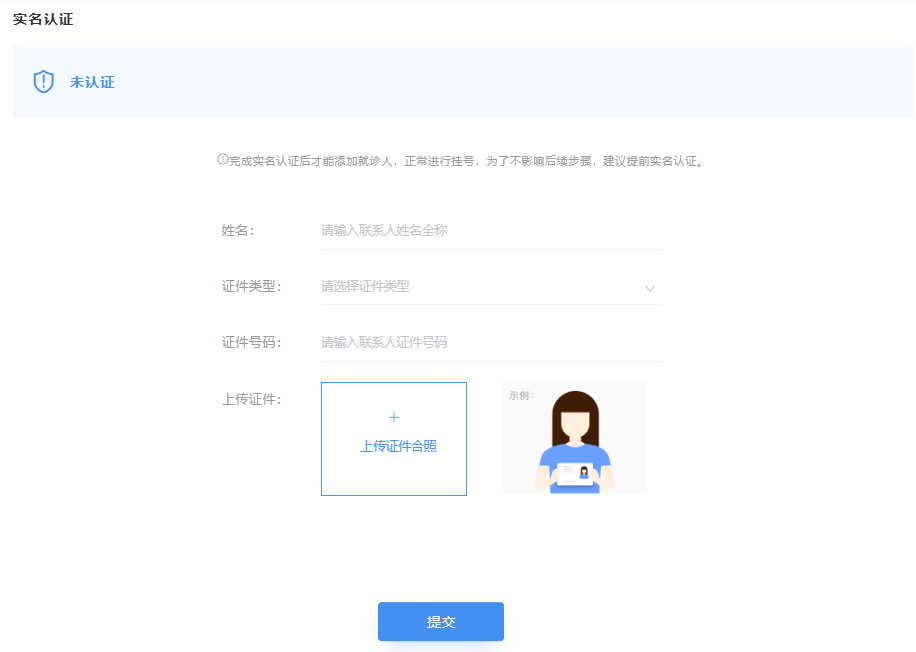
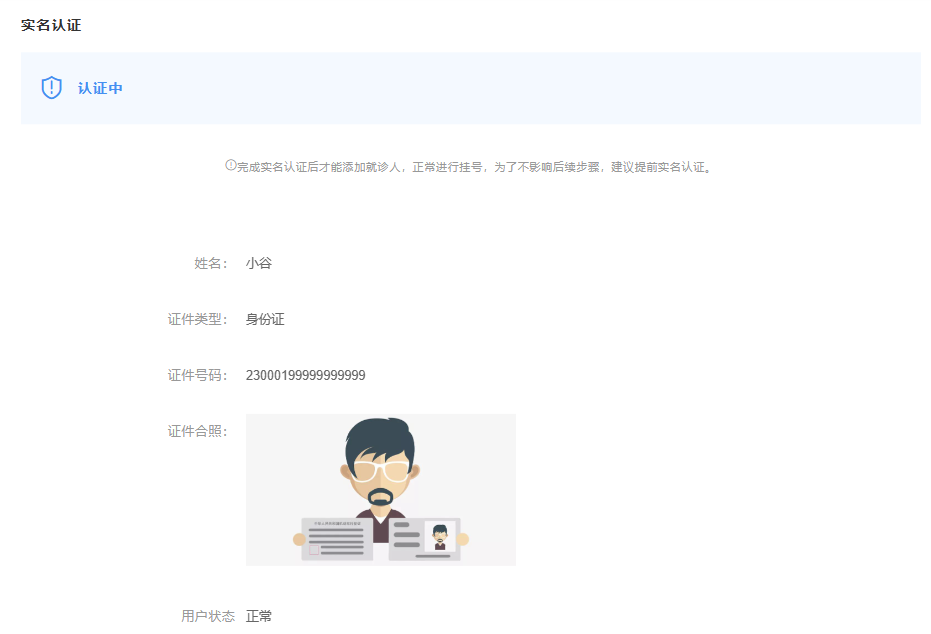
用户登录成功后都要进行身份认证,认证通过后才可以预约挂号。 认证过程:用户填写基本信息(姓名、证件类型、证件号码和证件照片),提交平台审核 用户认证相关接口: (1)上传证件图片 (2)提交认证 (3)获取认证信息 提交认证
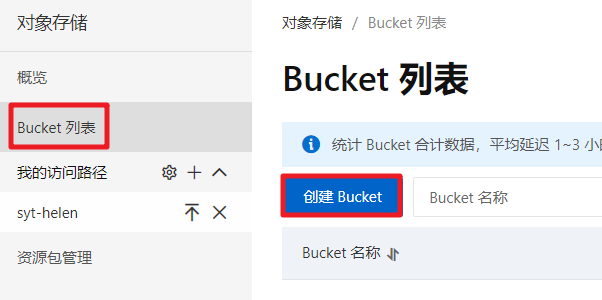
用户认证需要上传证件图片,因此我们要做文件服务,为了解决海量数据存储与弹性扩容,项目中我们采用云存储的解决方案:阿里云OSS。 1.1、开通“对象存储OSS”服务(1)申请阿里云账号 (2)实名认证 (3)开通“对象存储OSS”服务 (4)进入管理控制台 1.2、创建Bucket为Bucket起一个名字,其余选项默认即可。 注意:项目中涉及身份证照片,读写权限选择默认的“私有”
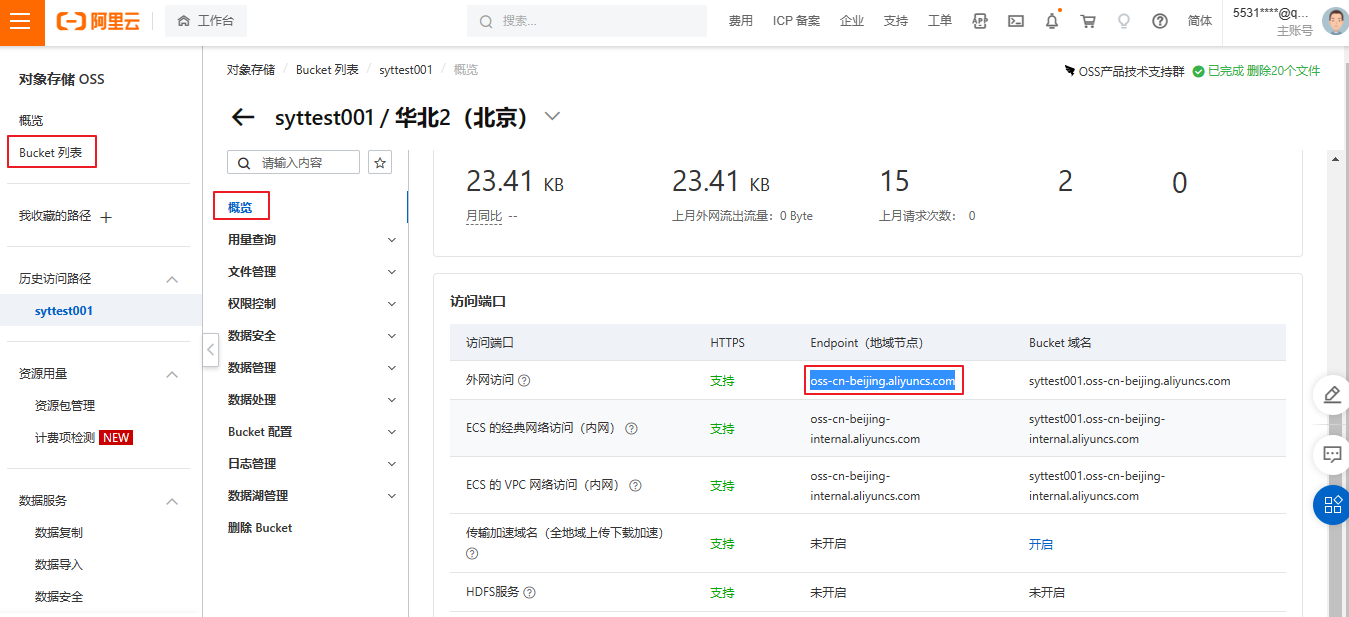
得到endpoint:创建Bucket后,在概览页面可以获取当前Bucket的endpoint值,这个值后面编程的时候会用到
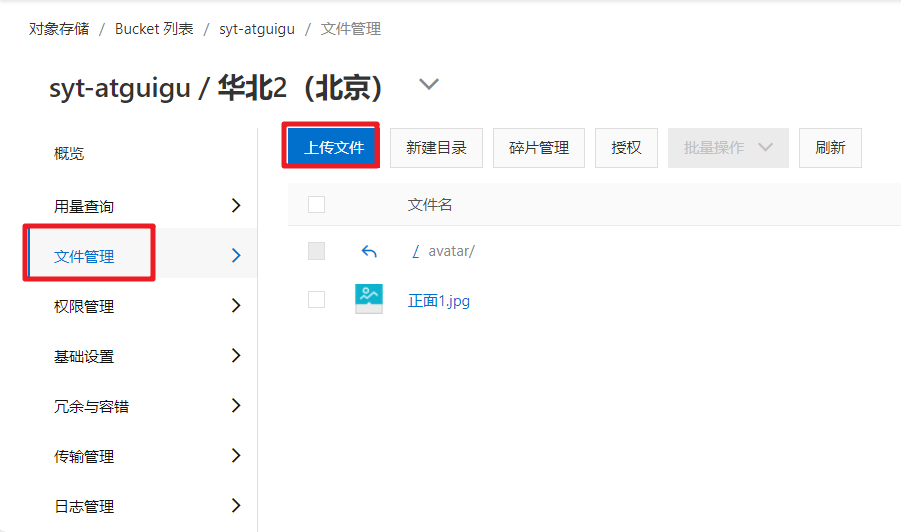
创建一个文件夹,上传一个文件
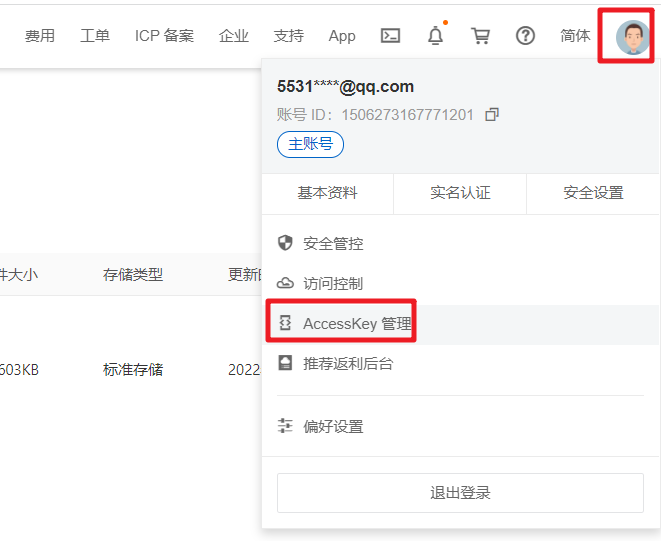
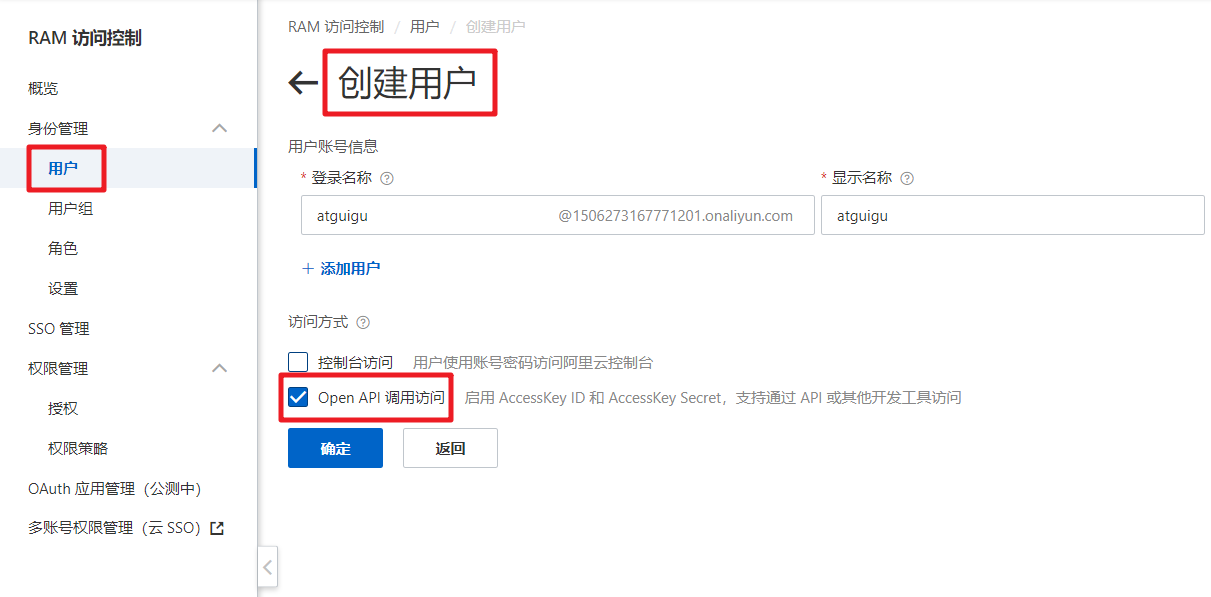
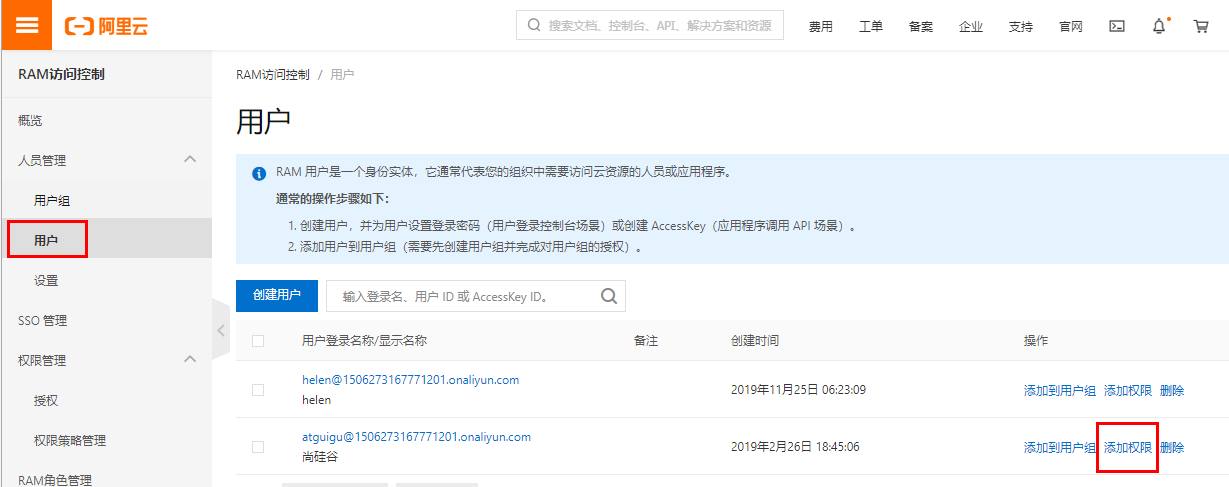
AccessKeyId, AccessKeySecret 2.4、设置用户权限添加权限:AliyunOSSFullAccess
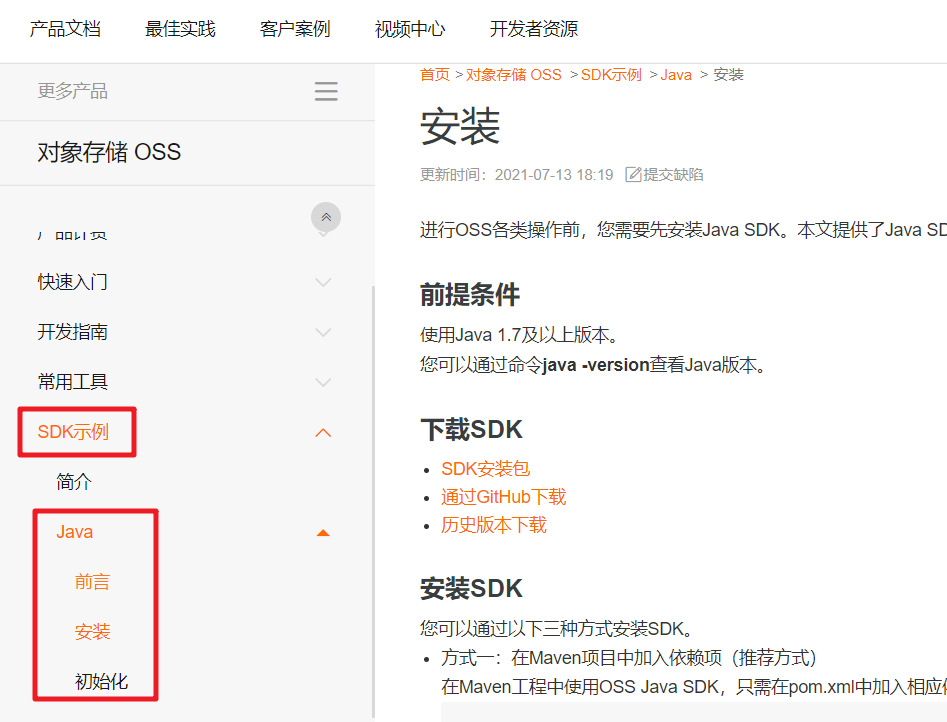
在对象存储首页的右侧,可以找到帮助文档的入口
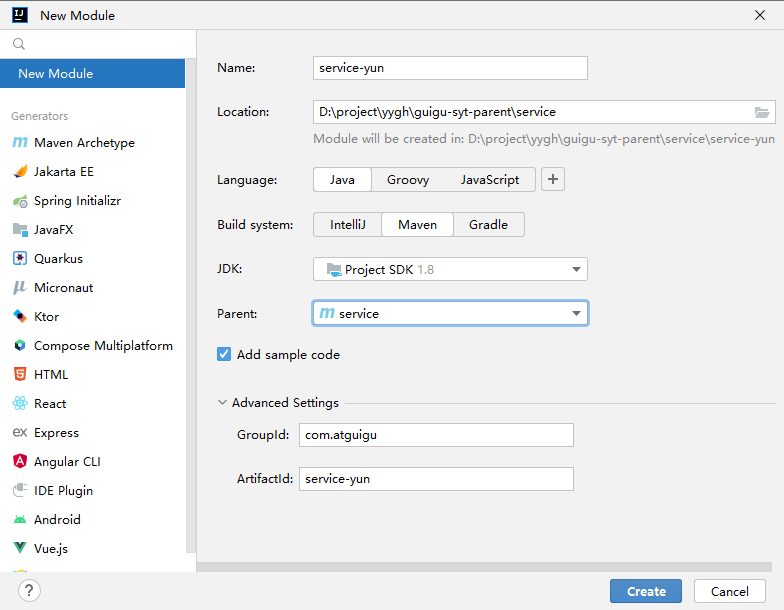
在service模块下创建子模块service-yun
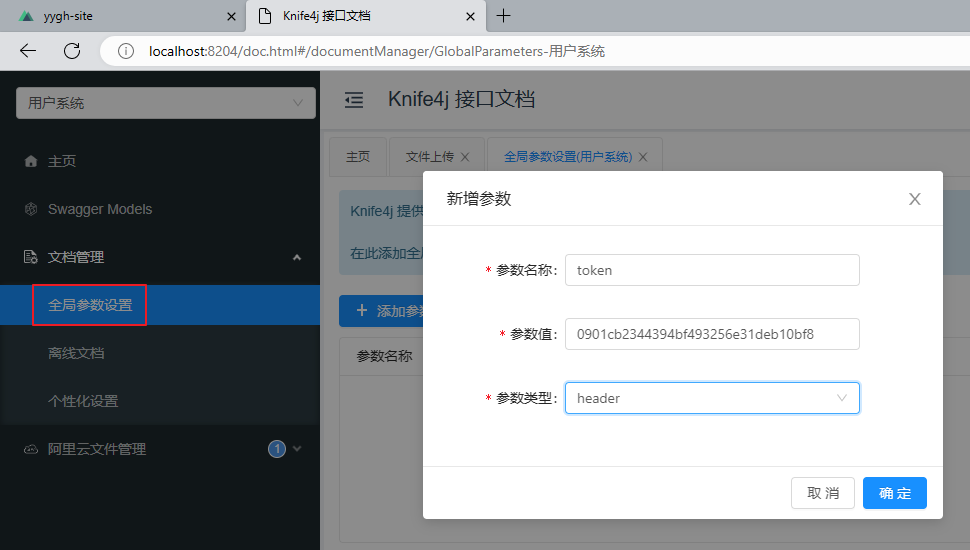
在service-yun中引入依赖 com.aliyun.oss aliyun-sdk-oss 3.15.1 com.atguigu model 1.0 com.atguigu service-util 1.0 joda-time joda-time com.atguigu spring-security 1.0 org.springframework.boot spring-boot-starter-test test 1.3、创建配置文件在server-yun模块中resources目录下创建文件 application.yml: spring: application: name: service-yun profiles: active: dev,redisapplication-dev.yml: server: port: 8204 spring: cloud: nacos: discovery: server-addr: 127.0.0.1:8848 servlet: multipart: max-file-size: 10MB max-request-size: 10MB logging: level: root: info file: path: yun aliyun: oss: #阿里云 OSS endpoint: your endpoint key-id: your accessKeyId key-secret: your accessKeySecret bucket-name: your bucketname 1.4、创建启动类创建ServiceYunApplication package com.atguigu.syt.yun; @SpringBootApplication(exclude = DataSourceAutoConfiguration.class)//取消数据源配置自动读取 @ComponentScan(basePackages = {"com.atguigu"}) public class ServiceYunApplication { public static void main(String[] args) { SpringApplication.run(ServiceYunApplication.class, args); } } 1.5、配置网关在网关中配置如下内容: - id: service-yun predicates: Path=/*/yun/** uri: lb://service-yun 2、文件上传 2.1、从配置文件读取常量创建常量读取工具类:OssConstantProperties.java package com.atguigu.syt.yun.utils; @Configuration @ConfigurationProperties(prefix="aliyun.oss") //读取节点 @Data public class OssConstantProperties { private String endpoint; private String keyId; private String keySecret; private String bucketName; } 2.2、Controller创建controller.front包,创建FrontFileController类 package com.atguigu.syt.yun.controller.front; @Api(tags = "阿里云文件管理") @RestController @RequestMapping("/front/yun/file") public class FrontFileController { @Resource private FileService fileService; /** * 文件上传 */ @ApiOperation("文件上传") @ApiImplicitParam(name = "file",value = "上传文件", required = true) @PostMapping("/auth/upload") public Result upload(MultipartFile file) { Map map = fileService.upload(file); return Result.ok(map); } } 2.3、Service接口:FileService package com.atguigu.syt.oss.service; public interface FileService { /** * 文件上传 * @param file * @return */ Map upload(MultipartFile file); }实现:FileServiceImpl 参考SDK中的:Java->上传文件->简单上传->流式上传->上传文件流 package com.atguigu.syt.oss.service.impl; @Service @Slf4j public class FileServiceImpl implements FileService { @Resource private OssConstantProperties ossConstantProperties; /** * 参考SDK中的:Java->上传文件->简单上传->流式上传->上传文件流 * @param file * @return */ @Override public Map upload(MultipartFile file) { // Endpoint以华东1(杭州)为例,其它Region请按实际情况填写。 String endpoint = ossConstantProperties.getEndpoint(); // 阿里云账号AccessKey拥有所有API的访问权限,风险很高。强烈建议您创建并使用RAM用户进行API访问或日常运维,请登录RAM控制台创建RAM用户。 String accessKeyId = ossConstantProperties.getKeyId(); String accessKeySecret = ossConstantProperties.getKeySecret(); // 填写Bucket名称,例如examplebucket。 String bucketName = ossConstantProperties.getBucketName(); // 文件名称 String originalFilename = file.getOriginalFilename(); String dateString = new DateTime().toString("yyyyMMdd"); // 填写Object完整路径,完整路径中不能包含Bucket名称,例如exampledir/exampleobject.txt。 String objectName = dateString + "/" + UUID.randomUUID().toString().replace("-", "") + originalFilename.substring(originalFilename.lastIndexOf(".")); // 创建OSSClient实例。 OSS ossClient = new OSSClientBuilder().build(endpoint, accessKeyId, accessKeySecret); try { InputStream inputStream = file.getInputStream(); // 创建PutObjectRequest对象。 PutObjectRequest putObjectRequest = new PutObjectRequest(bucketName, objectName, inputStream); // 设置该属性可以返回response。如果不设置,则返回的response为空。 putObjectRequest.setProcess("true"); // 创建PutObject请求。 PutObjectResult result = ossClient.putObject(putObjectRequest); // 如果上传成功,则返回200。 log.info(Integer.toString(result.getResponse().getStatusCode())); if(result.getResponse().getStatusCode() != 200){ throw new GuiguException(ResultCodeEnum.FAIL); } //返回图片路径 //参考SDK中的:Java-> Java授权访问-> 生成以GET方法访问的签名URL // 设置URL过期时间为1小时,单位:毫秒 Date expiration = new Date(new Date().getTime() + 60 * 60 * 1000); URL url = ossClient.generatePresignedUrl(bucketName, objectName, expiration); Map map = new HashMap(); map.put("previewUrl", url.toString()); //页面中授权预览图片 map.put("url", objectName); //数据库存储 return map; } catch (OSSException oe) { System.out.println("Caught an OSSException, which means your request made it to OSS, " + "but was rejected with an error response for some reason."); System.out.println("Error Message:" + oe.getErrorMessage()); System.out.println("Error Code:" + oe.getErrorCode()); System.out.println("Request ID:" + oe.getRequestId()); System.out.println("Host ID:" + oe.getHostId()); throw new GuiguException(ResultCodeEnum.FAIL, oe); } catch (GuiguException ce) { System.out.println("Caught an ClientException, which means the client encountered " + "a serious internal problem while trying to communicate with OSS, " + "such as not being able to access the network."); System.out.println("Error Message:" + ce.getMessage()); throw new GuiguException(ResultCodeEnum.FAIL, ce); } catch (IOException e) { throw new GuiguException(ResultCodeEnum.FAIL, e); } finally { if (ossClient != null) { ossClient.shutdown(); } } } } 3、授权校验 3.1、辅助类在service-util模块中添加AuthContextHolder.java package com.atguigu.common.service.utils; /** * 授权校验 */ @Component public class AuthContextHolder { @Resource private RedisTemplate redisTemplate; /** * 校验token是否存在并返回UserId * @param request */ public Long checkAuth(HttpServletRequest request){ //从http请求头中获取token String token = request.getHeader("token"); if(StringUtils.isEmpty(token)) { throw new GuiguException(ResultCodeEnum.LOGIN_AUTH); } Object userIdObj = redisTemplate.opsForValue().get("user:token:" + token); //数据存入redis时,按照实际的大小分配空间,取出时int能存下,默认使用int类型,int存不下再用long //我们无法判断redis中存储的是什么类型的id,因此在此做一个转换 Long userId = null; if(userIdObj instanceof Integer){ userId = ((Integer)userIdObj).longValue(); }else if(userIdObj instanceof Long){ userId = (Long)userIdObj; }else if(userIdObj instanceof String){ userId = Long.parseLong(userIdObj.toString()); } if(StringUtils.isEmpty(userId)) { throw new GuiguException(ResultCodeEnum.LOGIN_AUTH); } return userId; } } 3.2、修改文件上传controller添加校验代码 ... public class FrontFileController { ... @Resource private AuthContextHolder authContextHolder; ... public Result upload(MultipartFile file, HttpServletRequest request) { authContextHolder.checkAuth(request); ... } } 3.3、测试文件上传首先添加全局参数token,然后再进行测试
创建FrontUserInfoController中添加如下方法 package com.atguigu.syt.user.controller.front; @Api(tags = "用户管理") @RestController @RequestMapping("/front/user/userInfo") public class FrontUserInfoController { @Resource private UserInfoService userInfoService; @Resource private AuthContextHolder authContextHolder; @ApiOperation(value = "用户认证") @ApiImplicitParam(name = "userAuthVo",value = "用户实名认证对象", required = true) @PostMapping("/auth/userAuth") public Result userAuth(@RequestBody UserAuthVo userAuthVo, HttpServletRequest request) { Long userId = authContextHolder.checkAuth(request); userInfoService.userAuth(userId, userAuthVo); return Result.ok(); } } 4.2、Service接口:UserInfoService /** * 保存实名认证信息 * @param userId * @param userAuthVo */ void userAuth(Long userId, UserAuthVo userAuthVo);实现:UserInfoServiceImpl @Override public void userAuth(Long userId, UserAuthVo userAuthVo) { //设置认证信息 UserInfo userInfo = new UserInfo(); userInfo.setId(userId); userInfo.setName(userAuthVo.getName()); userInfo.setCertificatesType(userAuthVo.getCertificatesType()); userInfo.setCertificatesNo(userAuthVo.getCertificatesNo()); userInfo.setCertificatesUrl(userAuthVo.getCertificatesUrl()); userInfo.setAuthStatus(AuthStatusEnum.AUTH_RUN.getStatus()); //信息更新 baseMapper.updateById(userInfo); } 5、获取认证信息 5.1、Controller在service-user模块的FrontUserInfoController中添加如下方法 @ApiOperation(value = "获取认证信息") @GetMapping("/auth/getUserInfo") public Result getUserInfo(HttpServletRequest request) { Long userId = authContextHolder.checkAuth(request); UserInfo userInfo = userInfoService.getUserInfoById(userId); return Result.ok(userInfo); } 5.2、Service主类添加 @EnableFeignClients("com.atguigu.syt")接口:UserInfoService /** * 根据用户id获取用户信息 * @param userId * @return */ UserInfo getUserInfoById(Long userId);实现:UserInfoServiceImpl @Override public UserInfo getUserInfoById(Long userId) { UserInfo userInfo = baseMapper.selectById(userId); return this.packUserInfo(userInfo); }辅助方法:UserInfoServiceImpl @Resource private DictFeignClient dictFeignClient; /** * 封装用户状态、认证状态、证件类型信息 * @param userInfo * @return */ private UserInfo packUserInfo(UserInfo userInfo) { String certificatesTypeString = dictFeignClient.getName( DictTypeEnum.CERTIFICATES_TYPE.getDictTypeId(), userInfo.getCertificatesType() ); userInfo.getParam().put("certificatesTypeString", certificatesTypeString); userInfo.getParam().put( "authStatusString", AuthStatusEnum.getStatusNameByStatus(userInfo.getAuthStatus()) ); userInfo.getParam().put( "statusString", UserStatusEnum.getStatusNameByStatus(userInfo.getStatus()) ); return userInfo; } 6、显示图片 6.1、ControllerInnerFileController类 package com.atguigu.syt.yun.controller.inner; @Api(tags = "阿里云文件管理") @RestController @RequestMapping("/inner/yun/file") public class InnerFileController { @Resource private FileService fileService; @ApiOperation(value = "获取图片预览Url") @ApiImplicitParam(name = "objectName",value = "文件名", required = true) @GetMapping("/getPreviewUrl") public String getPreviewUrl(@RequestParam String objectName) { return fileService.getPreviewUrl(objectName); } } 6.2、Service接口:FileService /** * 获取图片url地址 * @param objectName * @return */ String getPreviewUrl(String objectName);实现:FileServiceImpl @Override public String getPreviewUrl(String objectName) { // Endpoint以华东1(杭州)为例,其它Region请按实际情况填写。 String endpoint = ossConstantProperties.getEndpoint(); // 阿里云账号AccessKey拥有所有API的访问权限,风险很高。强烈建议您创建并使用RAM用户进行API访问或日常运维,请登录RAM控制台创建RAM用户。 String accessKeyId = ossConstantProperties.getKeyId(); String accessKeySecret = ossConstantProperties.getKeySecret(); // 填写Bucket名称,例如examplebucket。 String bucketName = ossConstantProperties.getBucketName(); OSS ossClient = new OSSClientBuilder().build(endpoint, accessKeyId, accessKeySecret); // 设置URL过期时间为1小时,单位:毫秒 Date expiration = new Date(new Date().getTime() + 60 * 60 * 1000); URL url = ossClient.generatePresignedUrl(bucketName, objectName, expiration); System.out.println(url.toString()); return url.toString(); } 6.3、创建service-yun-client
接口: package com.atguigu.syt.yun.client; @FeignClient( value = "service-yun", contextId = "fileFeignClient", fallback = FileDegradeFeignClient.class ) public interface FileFeignClient { @GetMapping("inner/yun/file/getPreviewUrl") String getPreviewUrl(@RequestParam String objectName); }降级: package com.atguigu.syt.yun.client.impl; @Component public class FileDegradeFeignClient implements FileFeignClient { @Override public String getPreviewUrl(String objectName) { return "图片显示失败"; } } 6.5、service中添加依赖 com.atguigu service-yun-client 1.0 6.6、远程调用UserInfoServiceImpl: @Resource private FileFeignClient fileFeignClient;UserInfoServiceImpl:packUserInfo方法中添加如下代码 String previewUrl = fileFeignClient.getPreviewUrl(userInfo.getCertificatesUrl()); userInfo.getParam().put("previewUrl", previewUrl);注意:由于是远程调用阿里云服务器,因此配置文件中feignClient的远程超时时间可以设置的稍微长一些,避免个别情况下由于网络原因出现的图片无法加载的情况 7、用户认证前端 7.1、api创建api/userInfo.js import request from '@/utils/request' //引入js-cookie import cookie from 'js-cookie' export default { saveUserAuth(userAuth) { return request({ url: `/front/user/userInfo/auth/userAuth`, method: 'post', data: userAuth, headers:{token: cookie.get('token')} }) }, getUserInfo() { return request({ url: `/front/user/userInfo/auth/getUserInfo`, method: `get`, headers:{token: cookie.get('token')} }) } } 7.2、页面渲染pages/user/index.vue文件 资料:资料>实名认证>user 7.3、统一发送请求头也可以统一发送请求头:删除api/user.js 中对请求头的设置,修改utils/request.js文件如下 //引入js-cookie import cookie from 'js-cookie'修改请求拦截器 // http request 拦截器 service.interceptors.request.use( config => { //从cookie中取出token,并且在请求头中携带token if (cookie.get('token')) { config.headers['token'] = cookie.get('token') } return config }, err => { return Promise.reject(err) })源码:https://gitee.com/dengyaojava/guigu-syt-parent 本文来自博客园,作者:自律即自由-,转载请注明原文链接:https://www.cnblogs.com/deyo/p/17479789.html |


【本文地址】