| Linux多网卡绑定(bond)及网络组(team) | 您所在的位置:网站首页 › redhat双网卡绑定配置 › Linux多网卡绑定(bond)及网络组(team) |
Linux多网卡绑定(bond)及网络组(team)
|
Linux多网卡绑定(bond)及网络组(team)
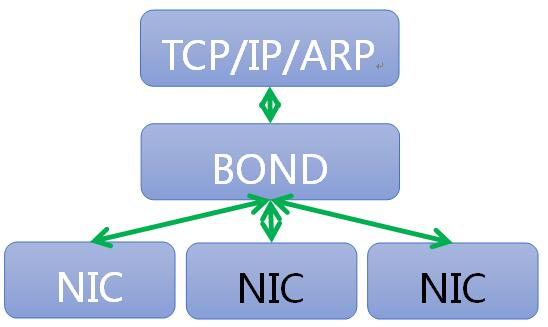
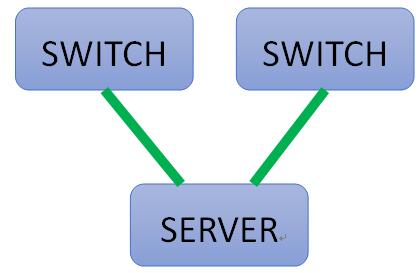
很多时候,由于生产环境业务的特殊需求,我们需要对服务器的物理网卡实施特殊的配置,从而来满足不同业务场景下对服务器网络的特殊性要求。如高并发的网络IO型业务,需要高速的网络IO,即对网卡的收收发包处理能力及网卡最大带宽速度等性能指标提出了更高的要求;事务处理型的系统,如金融交易系统、电商平台等,对物理网络线路、网卡等物理设备的稳定可靠性提出了更高的要求。 Linux系统中,可以通过多网卡绑定(bonding)和网络组(team)等技术,通过软件的方式来实现,来满足不同业务场景下的各种特殊需求。 Linux多网卡绑定(bond) bond基本原理bond技术是将多块物理网卡绑定同一IP地址对外提供服务,通过不同的模式配置,从而达到高可用、负载均衡及链路冗余等效果。我们知道,两块物理网卡是不可以直接配置同一个IP地址的,多网卡bond技术的基本原理就是通过虚拟出一块逻辑网卡对外提供网络连接。 bond基本工作原理如下图:
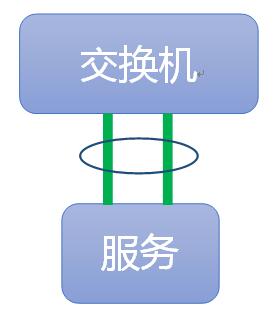
bond技术提供了(0-6)共7种工作模式,分别如下: mode=0 round-robin轮询策略(balance-rr) mode=1 active-backup主备策略(active-backup) mode=2 load balancing (xor)异或策略(balance-xor) mode=3 fault-tolerance (broadcast)广播策略(broadcast) mode=4 lacp IEEE 802.3ad 动态链路聚合(IEEE 802.3ad Dynamic link aggregation) (802.3ad) mode=5 transmit load balancing适配器传输负载均衡(balance-tlb) mode=6 adaptive load balancing适配器负载均衡(balance-alb) 以上7种工作模式的定义如下: mode=0 round-robin轮询策略(balance-rr) cat /proc/net/bonding/bond0 Bonding Mode: load balancing (round-robin)此模式下,链路处于负载均衡状态,数据以轮询方式向每条链路发送报文,基于per packet方式发送。即每条链路各一个数据包。这模式好处在于增加了带宽,同时支持容错能力,当有链路出问题,会把流量切换到正常的链路上。该模式下,交换机端需要配置聚合口,在cisco交换机上叫port channel。 mode0工作模式图如下:
此模式下,一个端口处于主状态,一个处于备状态,所有流量都在主链路上发出和接收,备用链路不会有任何流量。当主链路端口down掉时,备用端口立即启动接管主状态,从而达到链路冗余热备目的。这种模式接入不需要交换机端支持。 mode1工作模式图如下:
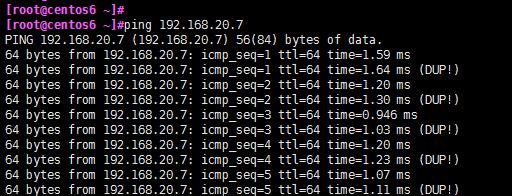
在此模式下,通过源和目标mac做hash因子来做xor算法来选择链路,这样就使得到达特定对端的流量总是从同一个接口上发出。和balance-rr一样,交换机端口需要配置为“port channel”。需要注意的是,若选择这种模式,如果所有流量源和目标mac都固定了,例如使用“网关模式”,即所有对外的数据传输均固定走一个网关,那么根据该模式的描述,分发算法算出的线路就一直是同一条,另外一条链路不会有任何数据流,那么这种模式就没有多少意义了。 mode2模式拓补图同mode0、mode1 mode=3 fault-tolerance (broadcast)广播策略 cat /proc/net/bonding/bond0 Bonding Mode: fault-tolerance (broadcast)这种模式的特点是一个报文会复制两份往bond下的两个接口分别发送出去。当有对端交换机失效,我们感觉不到任何丢包。这个模式也需要交换机配置聚合口。如下图,带dup的行即是重复发往第2个网卡的数据。
mode3模式的拓扑图如下所示:
该模式拓扑结构与mode1模式相同 cat /proc/net/bonding/bond0 Bonding Mode: IEEE 802.3ad Dynamic link aggregation该模式是基于IEEE 802.3ad Dynamic link aggregation(动态链接聚合)协议。在该模式下,操作系统和交换机都会创建一个聚合组,在同一聚合组下的网口共享同样的速率和双工设定。操作系统根据802.3ad 协议将多个slave 网卡绑定在一个聚合组下。聚合组向外发送数据选择哪一块儿网卡是基于传输hash 策略,该策略可以通过xmit_hash_policy 选项从缺省的XOR 策略改变到其他策略。 该模式的必要条件: 1、ethtool 支持获取每个slave 的速率和双工设定; 2、交换机支持IEEE 802.3ad Dynamic link aggregation(动态链路聚合)。大多数交换机需要经过特定配置才能支持802.3ad模式。 mode=5 transmit load balancing适配器传输负载均衡(balance-tlb) cat /proc/net/bonding/bond0 Bonding Mode: transmit load balancing这种模式相较mode2异或策略及mode4 LACP模式的hash策略相对智能,会主动根据对端的MAC地址上的流量,智能的分配流量从哪个网卡发出。但不足之处在于,仍使用一块网卡接收数据。存在的问题与load balancing (xor)也是一样的一样,如果对端MAC地址是唯一的,那么策略就会失效。这个模式下bond成员使用各自的mac,而不是上面几种模式是使用bond0接口的mac。此模式无需交换机支持。 此模式拓扑图如下:
此模式拓扑结构与mode5相同。 cat /proc/net/bonding/bond0 Bonding Mode: adaptive load balancing该模式除了balance-tlb适配器传输负载均衡模式的功能外,同时加上针对IPV4流量接收的负载均衡。接收负载均衡是通过ARP协商实现的。在进行ARP协商的过程中,bond模块将对端和本地的mac地址进行绑定,这样从同一端发出的数据,在本地也会一直使用同一块网卡来接收。若是网络上发出的广播包,则由不同网卡轮询的方式来进行接收。通过这种方式实现了接收的负载均衡。该模式同样无需交换机支持。 注意:在网卡绑定的七种模式下,其中mode=0、2、3需要交换机支持EtherChannel,mode=4需要交换机同时支持EtherChannel和LACP,mode=1、5、6不需要交换机配置支持。 以上7种工作模式,可以根据实际生产环境中的业务场景需求来灵活的选择配置。 Linux多网卡bond配置1、手动创建配置文件方式 创建bond0网卡配置文件 [root@centos6 ~]#vim /etc/sysconfig/network-scripts/ifcfg-bond0 DEVICE=bond0 #虚拟网卡设备名称 BOOTPROTO=none #使用静态IP BONDING_OPTS="mode=1 miimon=100" #bond模式设定,此例使用mode1模式 miimon=100 为每隔100ms监控主网卡的状态 IPADDR=192.168.20.100 #IP地址 PREFIX=24 #子网掩码 GATEWAY=192.168.20.2 #默认网关 DNS1=114.114.114.114 #DNS服务器 修改第一块网卡配置文件 vim /etc/sysconfig/network-scripts/ifcfg-eth0 DEVICE=eth0 BOOTPROTO=none MASTER=bond0 SLAVE=yes 修改第二块网卡配置文件 vim /etc/sysconfig/network-scripts/ifcfg-eth1 DEVICE=eth1 BOOTPROTO=none MASTER=bond0 SLAVE=yes 将所有物理网卡启用 [root@centos6 ~]#cd /etc/sysconfig/network-scripts/ ifconfig eth0 up ifconfig eth1 up 重启网络服务 [root@centos6 ~]#/etc/init.d/network restart Shutting down interface bond0: [ OK ] Shutting down loopback interface: [ OK ] Bringing up loopback interface: [ OK ] Bringing up interface bond0: Determining if ip address 192.168.20.100 is already in use for device bond0... [ OK ] [root@centos6 ~]# 可以看到bond0网络已成功启动并获得IP地址=查看一下当前bond0网卡的工作状态 [root@centos6 ~]#cat /proc/net/bonding/bond0 Ethernet Channel Bonding Driver: v3.7.1 (April 27, 2011) Bonding Mode: fault-tolerance (active-backup) Primary Slave: None Currently Active Slave: eth0 MII Status: up MII Polling Interval (ms): 100 Up Delay (ms): 0 Down Delay (ms): 0 Slave Interface: eth0 MII Status: up Speed: 1000 Mbps Duplex: full Link Failure Count: 0 Permanent HW addr: 00:0c:29:54:90:f2 Slave queue ID: 0 Slave Interface: eth1 MII Status: up Speed: 1000 Mbps Duplex: full Link Failure Count: 0 Permanent HW addr: 00:0c:29:54:90:fc Slave queue ID: 0 [root@centos6 ~]#可以看到当前工作在mode1模式,且eth0网卡为活动的主网卡,eth1处于备用状态 注意:在centos6系统下,由于NetworkManager服务于network会存在相互干扰问题,建议将NetworkManager服务停止,否则容易导致发生以下错误。
禁用NetworkManager服务 [root@centos6 network-scripts]#/etc/init.d/NetworkManager stop [root@centos6 network-scripts]#chkconfig NetworkManager off2、通过nmcli命令配置网卡bond 在centos7下,可以通过nmctl命名来创建多网卡bond配置。 创建bond接口并设置IP地址信息 [root@centos7 ~]#nmcli connection add type bond con-name bond0 ifname bond0 mode active-backup ipv4.method manual ipv4.addresses 192.168.20.100/24 ipv4.gateway 192.168.20.2 ipv4.dns 192.168.20.2 Connection 'bond0' (24e90eef-a160-4cc0-af86-9e13259696ba) successfully added. [root@centos7 ~]# 将物理网卡添加到bond0作为从属接口 [root@centos7 ~]#nmcli connection add type bond-slave ifname eth0 master bond0 Connection 'bond-slave-eth0' (bb89e659-a59e-4611-8fbb-a97a99840b66) successfully added. [root@centos7 ~]#nmcli connection add type bond-slave ifname eth1 master bond0 Connection 'bond-slave-eth1' (7081209c-09d0-4fb9-aaa9-2564613590b9) successfully added. [root@centos7 ~]# 启动从属接口 [root@centos7 ~]#nmcli connection up bond-slave-eth0 Connection successfully activated (D-Bus active path: /org/freedesktop/NetworkManager/ActiveConnection/46) [root@centos7 ~]#nmcli connection up bond-slave-eth1 Connection successfully activated (D-Bus active path: /org/freedesktop/NetworkManager/ActiveConnection/50) 启动bond0 [root@centos7 ~]#nmcli connection up bond0 查看bond连接状态 [root@centos7 ~]#nmcli connection show NAME UUID TYPE DEVICE bond0 24e90eef-a160-4cc0-af86-9e13259696ba bond bond0 bond-slave-eth0 bb89e659-a59e-4611-8fbb-a97a99840b66 ethernet eth0 bond-slave-eth1 7081209c-09d0-4fb9-aaa9-2564613590b9 ethernet eth1 virbr0 08a6c628-bae9-4157-a4c3-d954bf07fbb9 bridge virbr0 eth0 f82cab29-1dd2-4e17-9c66-4a8726b8dd89 ethernet 查看一下bond0运行模式状态 [root@centos7 ~]#cat /proc/net/bonding/bond0 Ethernet Channel Bonding Driver: v3.7.1 (April 27, 2011) Bonding Mode: fault-tolerance (active-backup) Primary Slave: None Currently Active Slave: eth0 MII Status: up MII Polling Interval (ms): 100 Up Delay (ms): 0 Down Delay (ms): 0 Slave Interface: eth0 MII Status: up Speed: 1000 Mbps Duplex: full Link Failure Count: 0 Permanent HW addr: 00:0c:29:d3:63:8c Slave queue ID: 0 Slave Interface: eth1 MII Status: up Speed: 1000 Mbps Duplex: full Link Failure Count: 0 Permanent HW addr: 00:0c:29:d3:63:96 Slave queue ID: 0 [root@centos7 ~]#最后通过ifconfig或ip a 命令确认bond0接口IP获取状态,ping命令检测IP能ping通,至此网卡绑定完成。 Linux网络组(team)网络组相关概念: 网络组:是将多个网卡聚合在一起方法,从而实现冗错和提高吞吐量 网络组不同于旧版中bonding技术,提供更好的性能和扩展性 网络组由内核驱动和teamd守护进程实现. 多种方式runner broadcast roundrobin activebackup loadbalance lacp (implements the 802.3ad Link Aggregation Control Protocol) 网络组相关特性 启动网络组接口不会自动启动网络组中的port接口 启动网络组接口中的port接口总会自动启动网络组接口 禁用网络组接口会自动禁用网络组中的port接口 没有port接口的网络组接口可以启动静态IP连接 启用DHCP连接时,没有port接口的网络组会等待port接口的加入 网络组的相关配置:1、通过nmctl命令创建 创建网络接口组 [root@centos7 ~]#nmcli connection add type team con-name team0 ifname team0 config '{"runner":{"name":"activebackup"}}' Connection 'team0' (b59f80dc-c425-4fa6-b1ef-2935d290fa6a) successfully added. 创建port接口 [root@centos7 ~]#nmcli connection add type team-slave con-name team0-eth0 ifname eth0 master team0 Connection 'team0-eth0' (5d7e5824-4d87-449c-8fff-42b2f20bc877) successfully added. [root@centos7 ~]#nmcli connection add type team-slave con-name team0-eth1 ifname eth1 master team0 Connection 'team0-eth1' (920f9f03-9f24-40bc-89eb-509e44ee606f) successfully added. 启动team接口 [root@centos7 network-scripts]#nmcli connection up team0 [root@centos7 network-scripts]#nmcli connection up team0-eth0 [root@centos7 network-scripts]#nmcli connection up team0-eth1 查看team连接状态 [root@centos7 ~]#teamdctl team0 stat setup: runner: activebackup ports: eth0 link watches: link summary: up instance[link_watch_0]: name: ethtool link: up down count: 0 eth1 link watches: link summary: up instance[link_watch_0]: name: ethtool link: up down count: 0 runner: active port: eth12、手动创建配置文件 创建team0接口配置文件 vim /etc/sysconfig/network-scripts/ifcfg-team0 DEVICE=team0 DEVICETYPE=Team TEAM_CONFIG="{\"runner\": {\"name\": \"broadcast\"}}" BOOTPROTO=none IPADDR0=172.16.0.100 PREFIX0=24 NAME=team0 ONBOOT=yes 创建port接口配置文件 /etc/sysconfig/network-scripts/ifcfg-team0-eth0 DEVICE=eth0 DEVICETYPE=TeamPort TEAM_MASTER=team0 NAME=team0-eth0 ONBOOT=yes /etc/sysconfig/network-scripts/ifcfg-team0-eth1 DEVICE=eth1 DEVICETYPE=TeamPort TEAM_MASTER=team0 NAME=team0-eth1 ONBOOT=yes 启动team接口 [root@centos7 ~]#nmcli connection up team0 Connection successfully activated (master waiting for slaves) (D-Bus active path: /org/freedesktop/NetworkManager/ActiveConnection/69)说明:本文部分资料参考来自https://blog.51cto.com/2979193/2095134,感谢作者的热心分享。 |


【本文地址】