| How to use Workflow to automate tasks on iPhone | 您所在的位置:网站首页 › qq三国副本防御有用吗 › How to use Workflow to automate tasks on iPhone |
How to use Workflow to automate tasks on iPhone
|
There are plenty of tasks we repeat every day on our iPhones: from checking the news on our favourite websites, to texting a loved one what time we’ll be home from work. Now, thanks to Apple’s recently acquired Workflow app, these activities can be automated so it only takes a single tap to make them happen. In this short tutorial we’ll show you how to save previous seconds each day by using Workflow to automate tasks on iPhone. See also: How to use an iPad for work | Best iPhone & iPad apps for organising your life What is Workflow?The Workflow app has been around for a while now, but it was recently acquired by Apple and made available for free on the App Store. Essentially it’s a useful tool that allows you to string together actions which complete a task. Now, this might sound like programming, and it kind of is, but there are no commands to type or jargon to learn. Instead it’s a drag and drop interface that makes it easy to put together small little automations that will quickly rid you of jobs you’d otherwise have to waste time doing each day. These jobs don’t have to be big or complex, they could be just tweeting the song that you’re currently listening to on Apple Music, or seeing how long it will take to travel between the meetings you have scheduled that day. The idea is to make it simpler for you to complete these often used processes, saving you time for other, more interesting diversions. How does a Workflow actually function?Each automated task you put together is called a Workflow. These are small, step-by-step routines that accomplish usually a single goal. Probably the best way to see how you put a Workflow together is to look at one of the many examples that come included with the app. To start off you’ll need to take a trip to the App Store and download Workflow itself. Once installed, launch it and take a few seconds to read the introductory explanation about how you use the app.
When these are over you’ll arrive at the Workflow homepage where all of your creations will be stored. At the top of the screen you’ll see options for My Workflows and Gallery. Tap the latter and you’ll access a wealth of existing Workflows to get you started. These are broken into sections, just like on the iTunes and App stores. At the time of writing included Apple Music Workflows, Essentials, Quick Shortcuts, Morning routine, Stay Healthy, and several other collections. Find one that would be useful to you, tap on it, then tap the Get Workflow button.
Return to the My Workflows area, by choosing the option at the top of the screen, and you should see the one you’ve picked is now available. If you want to launch the Workflow, double-tap on it and then tap the Play button at the top of the screen. Depending on the type of Workflow you’ve selected it will either go and do everything immediately, or ask you to select further elements – such as which news site you want to get headlines from – before completing the task. Seeing how a Workflow is put togetherThis is all well and good, but the real power in Workflow comes from creating personalised automations. To see how they are put together tap the existing Workflow you’ve chosen and you’ll be taken to the list of commands used to complete its assigned task. These run in order from top to bottom so you can follow how the Workflow, well, flows. We choose the Laundry Timer Workflow, which is a basic example that lets you set a timer and then be sent a reminder when the task is finished. If you follow the commands you’ll see that they appear in individual boxes, that’s because they are all selected from a menu and then slotted together like a digital version of Lego.
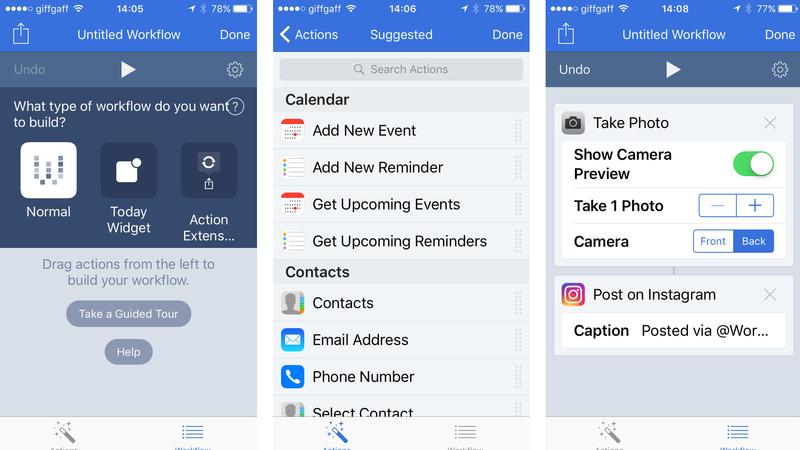
In our Laundry Timer you’ll see that the first thing the Workflow does is Ask for Input, with the question How many minutes for the laundry? Beneath this there is a field for a Default answer, which has been left blank as the length of the timer could vary depending on what you’re washing or the cycle you’re using. The Input Type field is set to Number, as you’ll only be entering minutes, and there’s finally an option to use Apple Watch dictation if you wish. The next box is Date, which is set to always use today and is there so the Workflow can add an entry to your Reminders. This is accompanied by another box entitled Adjust Date which adds the value from the Ask for Input box (how long you wanted the timer to run for) and displays it in Minutes, again for your Reminders. The last box is Add New Reminder, which is the where the Workflow actually sends the information to your Reminder list once the timer is finished, letting you know that you can now unload the washing machine. If you’ve not already done so then tap on the Grant Access button so the Workflow can appear on your Reminders. At first all of this might seem a bit bewildering, but after looking through a few different Workflows you should start to get a better understanding of how the automations are assembled. Of course, you could just use the ones already created, and there are plenty, but if you prefer to dabble then Workflow is only too happy to oblige. Making your own WorkflowCreating a Workflow is reasonably easy, but there will inevitably be a bit of trial and error involved. The first, most important step is to have a clear idea in your head of what you want to automate. Once you’ve decided on this it’s well worth running through that process a few times, making a note of the steps you normally take to achieve it. With that sorted out you can now try to put it into a Workflow. To start the process, tap on the Create Workflow option on the Homepage. You’ll be asked what type of Workflow you want to build. These come in three flavours: Normal, Today Widget, and Action Extensions. The Normal option creates a Workflow that you launch from within the app. A Today Widget will appear in the Notifications area, while Action Extensions will be available from the iOS Share sheet (the various options that appear when you tap the Share button). For now select Normal. When you tap the option nothing much will happen except for it being highlighted. To actually begin creating you’ll need to swipe right, which opens up all the commands that are available to you. to add these to your Workflow simply tap and hold, then drag them to the right.
Slowly build up your Workflow and you’ll soon have an automated solution that’s tailor-made to your needs. As an example we added the Take Photo command, followed by Post to Instagram. Now when we select that Workflow the Camera app opens, we take a picture as normal, then the image is sent to Instagram where we can apply filters. All without launching any apps ourselves. Experiment with your own creations, adding complexity as you grow in confidence. On the Create Workflow page there is also a step-by-step tutorial you can try which takes you through the process. Well worth spending a little time with that. So there you go: a quick look at the brave new world of Workflow. It’s a very useful addition to your iPhone and a great way to speed up certain repeated tasks, just so long as you’re willing to put in a little work at the beginning. |


【本文地址】
| 今日新闻 |
| 推荐新闻 |
| 专题文章 |