| Python与机器视觉(x)图像差分 | 您所在的位置:网站首页 › pytorch分割同一张图像中相同元素 › Python与机器视觉(x)图像差分 |
Python与机器视觉(x)图像差分
|
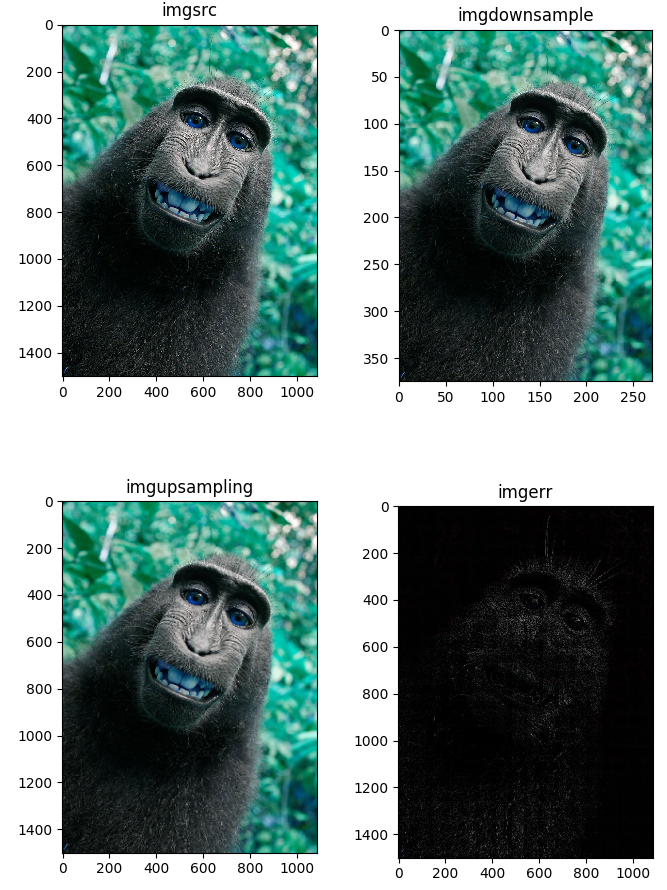
本系列博客主要分享Python在机器视觉/计算机视觉下的编程应用 cv2包是著名的视觉库OpenCV的Python实现 在求峰值信噪比PSNR时,我们需要求取目标图像和实际图像之间的误差。 err = abs(imgsrc-imgobj) opencv 提供了一个便捷的函数cv2.absdiff来获取误差。 import cv2 import numpy as np img = cv2.imread('img.jpg') imgd = cv2.resize(img,(img.shape[1]/4,img.shape[0]/4)) #先下采样4倍再上采样恢复图像 imgu = cv2.resize(imgd,(img.shape[1],img.shape[0])) err = cv2.absdiff(img,imgu) #差值的绝对值 cv2.imshow('img',img) cv2.imshow('imgd',imgd) cv2.imshow('imgu',imgu) cv2.imshow('err',err) cv2.waitKey() cv2.destroyAllWindows()我们可以用matplotlib来显示一下结果 import matplotlib.pyplot as plt fig = plt.figure('result') plt.axis('off') #关闭坐标轴 plt.subplot(2,2,1) #将窗口分为两行两列四个子图,则可显示四幅图片 plt.title('imgsrc') #第一幅图片标题 plt.imshow(img) plt.subplot(2,2,2) plt.title('imgdownsample') plt.imshow(imgd) plt.subplot(2,2,3) plt.title('imgupsampling') plt.imshow(imgu) plt.subplot(2,2,4) plt.title('imgerr') plt.imshow(err) fig.tight_layout()#调整整体空白 plt.subplots_adjust(wspace =0)#调整子图间距 plt.show() #显示需要注意的是,如果使用图像矩阵直接相减再求绝对值,会得到错误的结果: ```python import cv2 import numpy as np img = cv2.imread('img.jpg') imgd = cv2.resize(img,(img.shape[1]/4,img.shape[0]/4)) #先下采样4倍再上采样恢复图像 imgu = cv2.resize(imgd,(img.shape[1],img.shape[0])) err = cv2.absdiff(img,imgu) #差值的绝对值 err1 = np.abs(img - imgu) #差值 errdiff =err-err1 print(err1.mean()) #>>> 108.2134 #两种方法计算的误差不一样!!!!这主要是由于图像中的元素为numpy.array,其数据类型为uint8,无符号导致负数不能够正确表示 type(err1[0,0,0])>>>numpy.uint8 为了解决这个问题,需要在读入数据的时候对图像进行数据类型转换: import cv2 import numpy as np img = cv2.imread('img.jpg').astype(np.int16) ''' np.float32变为np.int32/int16也可以, int32可以保存-2147483648~214748364 int16可以保存-32768~32767, int16类似于CV_16SC1 int32类似于CV_32SC1''' imgd = cv2.resize(img,(img.shape[1]/4,img.shape[0]/4)) #先下采样4倍再上采样恢复图像 imgu = cv2.resize(imgd,(img.shape[1],img.shape[0])) err = cv2.absdiff(img,imgu) #差值的绝对值 err1 = np.abs(img - imgu) #差值 errdiff =err-err1 print(errdiff.mean()) #>>>0.0 #这时结果就相同了要求取两幅图像差值,建议使用cv2.absdiff(img1,img2) ref: datatype:http://blog.sina.com.cn/s/blog_662c7859010105za.html datatype:https://blog.csdn.net/liu13364876993/article/details/83538095 abs sign:https://blog.csdn.net/u012494876/article/details/80629474 img:https://www.pexels.com/photo/black-chimpanzee-smiling-50582/ matplot write:https://blog.csdn.net/GAN_player/article/details/78543643 https://blog.csdn.net/jifaley/article/details/79687000 http://www.cnblogs.com/nju2014/p/5620776.html cmap: https://matplotlib.org/users/colormaps.html https://matplotlib.org/xkcd/examples/color/colormaps_reference.html TODO http://pyhogs.github.io/colormap-examples.html psnr: http://www.cnblogs.com/tiandsp/archive/2012/11/14/2770462.html https://blog.csdn.net/szfhy/article/details/49615833 |
 pic from pexels.com
【本文地址】