| Stm32f103c8t6(proteus仿真)学习 | 您所在的位置:网站首页 › protues仿真灯不亮 › Stm32f103c8t6(proteus仿真)学习 |
Stm32f103c8t6(proteus仿真)学习
|
目录
**一、按键控制原理图****二、按键代码****1. led.c文件的代码****2. led.h头文件的代码****3. key.c文件的代码****4. key.h头文件的代码****5. main.c文件的代码****5.1 按键按下实现LED亮或者灭****5.2 按键按下实现LED状态取反**
**三、项目(代码+仿真)分享链接**
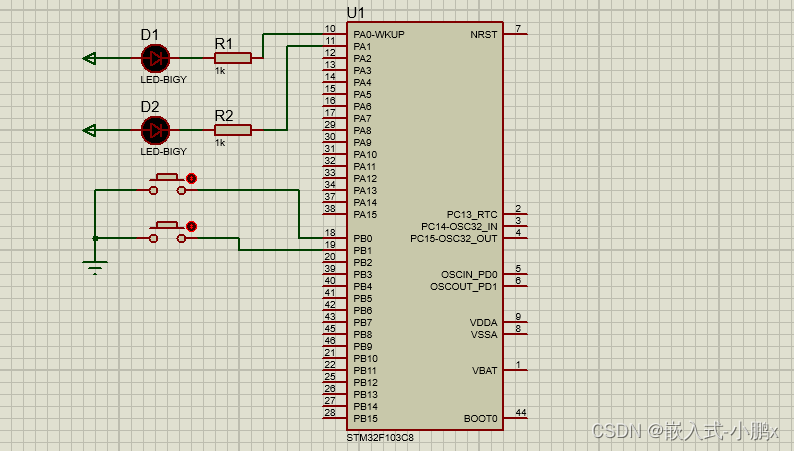
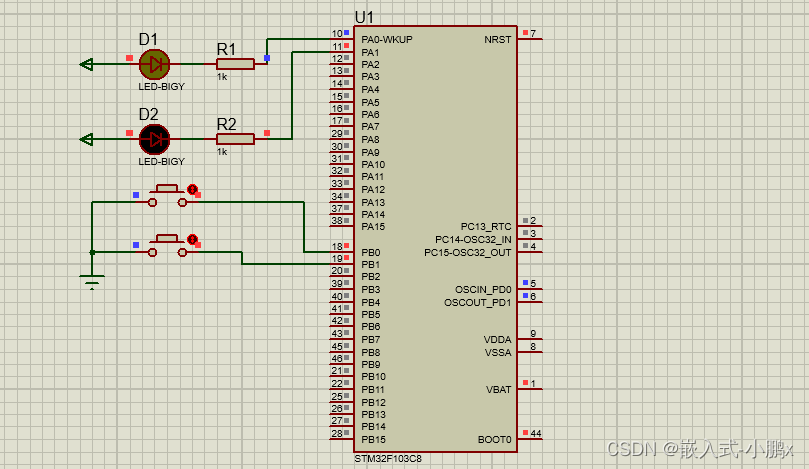
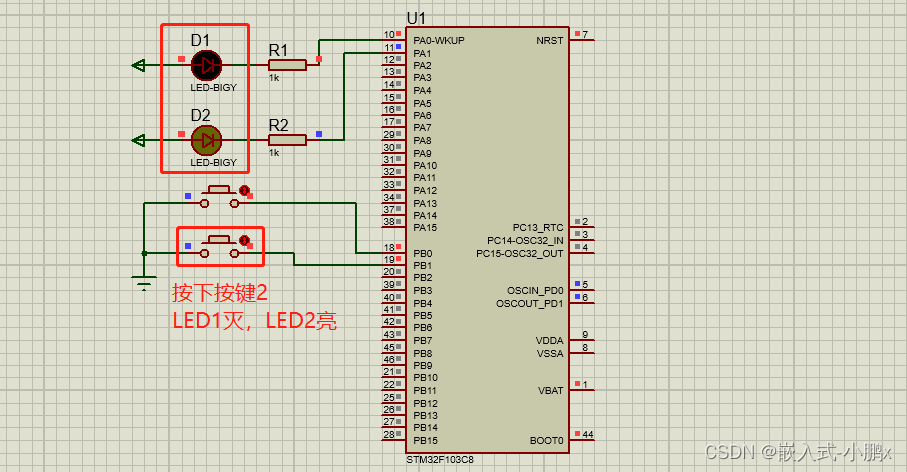
一、按键控制原理图
按键:button 电阻:res 先配置LED灯的GPIO //LED 初始化函数 void Led_Init(void){ //声明一个结构体,名字是GPIO_InitStructure GPIO_InitTypeDef GPIO_InitStructure; //使能GPIOA的时钟,ENABLE代表使能 RCC_APB2PeriphClockCmd(RCC_APB2Periph_GPIOA,ENABLE);//GPIOA //设置引脚为推挽输出Out_PP GPIO_InitStructure.GPIO_Mode=GPIO_Mode_Out_PP; //定义引脚为 0号引脚 和 1号引脚 GPIO_InitStructure.GPIO_Pin=GPIO_Pin_0 | GPIO_Pin_1; //设置引脚的速度50MHz GPIO_InitStructure.GPIO_Speed=GPIO_Speed_50MHz; //初始化GPIO,初始化哪个引脚就对应哪个 GPIO_Init(GPIOA,&GPIO_InitStructure);//初始化GPIOA,所以引脚对应PA0和PA1 //初始化时LED应为熄灭状态,所以要拉高LED引脚的电平 GPIO_SetBits(GPIOA,GPIO_Pin_0 | GPIO_Pin_1); //PA0 和 PA1引脚拉高电平 }编写LED亮灭的函数 //LED灯状态函数 void Ledx_state(int x , int t){ //x表示第几个LED,t==1表示点亮,t==0表示熄灭 if(x==1){ //x==1对应LED1 if(t==1)GPIO_ResetBits(GPIOA,GPIO_Pin_0); //LED1点亮 if(t==0)GPIO_SetBits(GPIOA,GPIO_Pin_0); //LED1熄灭 } if(x==2){ //x==2对应LED2 if(x==1)GPIO_ResetBits(GPIOA,GPIO_Pin_1); //LED2点亮 if(x==0)GPIO_SetBits(GPIOA,GPIO_Pin_1); //LED2熄灭 } }实现按下按键LED灯的状态取反 //***** 实现按下按键LED灯的状态取反 *****// void Led1_Turn(void){ //如果PA0的输出寄存器的值为0,证明LED1为点亮状态 if(GPIO_ReadOutputDataBit(GPIOA , GPIO_Pin_0)==0){ //取反,PA0置高电平,LED1熄灭 GPIO_SetBits(GPIOA , GPIO_Pin_0); } else{ //PA0的输出寄存器的值为1,证明LED1为熄灭状态 //取反,PA0置低电平,LED1点亮 GPIO_ResetBits(GPIOA , GPIO_Pin_0); } } void Led2_Turn(void){ //如果PA1的输出寄存器的值为0,证明LED2为点亮状态 if(GPIO_ReadOutputDataBit(GPIOA , GPIO_Pin_1)==0){ //取反,PA1置高电平,LED2熄灭 GPIO_SetBits(GPIOA , GPIO_Pin_1); } else{ //PA1的输出寄存器的值为1,证明LED2为熄灭状态 //取反,PA1置低电平,LED2点亮 GPIO_ResetBits(GPIOA , GPIO_Pin_1); } }led.c总代码 #include "led.h" #include "stm32f10x.h" void Led_Init(void) { GPIO_InitTypeDef GPIO_InitStructure; RCC_APB2PeriphClockCmd(RCC_APB2Periph_GPIOA,ENABLE);//GPIOA GPIO_InitStructure.GPIO_Mode=GPIO_Mode_Out_PP; GPIO_InitStructure.GPIO_Pin=GPIO_Pin_0|GPIO_Pin_1; GPIO_InitStructure.GPIO_Speed=GPIO_Speed_50MHz; GPIO_Init(GPIOA,&GPIO_InitStructure); GPIO_SetBits(GPIOA,GPIO_Pin_0|GPIO_Pin_1); } //LED灯状态函数 void Ledx_state(int x , int t){ //x表示第几个LED,t==1表示点亮,t==0表示熄灭 if(x==1){ if(t==1)GPIO_ResetBits(GPIOA,GPIO_Pin_0); if(t==0)GPIO_SetBits(GPIOA,GPIO_Pin_0); } if(x==2){ if(t==1)GPIO_ResetBits(GPIOA,GPIO_Pin_1); if(t==0)GPIO_SetBits(GPIOA,GPIO_Pin_1); } } //***** 实现按下按键LED灯的状态取反 *****// void Led1_Turn(void){ //如果PA0的输出寄存器的值为0,证明LED1为点亮状态 if(GPIO_ReadOutputDataBit(GPIOA , GPIO_Pin_0)==0){ //取反,PA0置高电平,LED1熄灭 GPIO_SetBits(GPIOA , GPIO_Pin_0); } else{ //PA0的输出寄存器的值为1,证明LED1为熄灭状态 //取反,PA0置低电平,LED1点亮 GPIO_ResetBits(GPIOA , GPIO_Pin_0); } } void Led2_Turn(void){ //如果PA1的输出寄存器的值为0,证明LED2为点亮状态 if(GPIO_ReadOutputDataBit(GPIOA , GPIO_Pin_1)==0){ //取反,PA1置高电平,LED2熄灭 GPIO_SetBits(GPIOA , GPIO_Pin_1); } else{ //PA1的输出寄存器的值为1,证明LED2为熄灭状态 //取反,PA1置低电平,LED2点亮 GPIO_ResetBits(GPIOA , GPIO_Pin_1); } } 2. led.h头文件的代码 #ifndef __LED_H #define __LED_H void Led_Init(void); //LED初始化 void Ledx_state(int i , int x); //LED灯状态函数 #endif 3. key.c文件的代码先配置按键的GPIO //按键 初始化函数 void Key_Init(void){ //声明一个结构体,名字是GPIO_InitStructure GPIO_InitTypeDef GPIO_InitStructure; //使能GPIOA的时钟,ENABLE代表使能 RCC_APB2PeriphClockCmd(RCC_APB2Periph_GPIOB,ENABLE);//GPIOB //按键需要设置引脚模式为上拉模式GPIO_Mode_IPU GPIO_InitStructure.GPIO_Mode=GPIO_Mode_IPU; //上拉模式GPIO_Mode_IPU //定义引脚为 0号引脚 和 1号引脚 GPIO_InitStructure.GPIO_Pin=GPIO_Pin_0 | GPIO_Pin_1; //设置引脚的速度50MHz GPIO_InitStructure.GPIO_Speed=GPIO_Speed_50MHz; //初始化GPIO,初始化哪个引脚就对应哪个 GPIO_Init(GPIOB,&GPIO_InitStructure);//初始化GPIOB,所以引脚对应PA0和PA1 //初始化时LED应为熄灭状态,所以要拉高LED引脚的电平 GPIO_SetBits(GPIOB,GPIO_Pin_0 | GPIO_Pin_1); //PB0 和 PB1引脚拉高电平 }获取当前按键键值的函数 uint8_t Key_GetNum(void){ //获取当前按键键值 uint8_t KeyNum = 0; //检测PB0引脚是否为低电平,按键按下时为低电平 if(GPIO_ReadInputDataBit(GPIOB , GPIO_Pin_0)==0){ //PB0为低电平,按键1已按下 delay_ms(20); //延时,消抖 //消抖,等待PB0重新变成高电平,如果一直为低电平则一直进入死循环 while(GPIO_ReadInputDataBit(GPIOB , GPIO_Pin_0)==0); delay_ms(20); //延时,消抖 KeyNum=1; //键值赋值为1,代表按键1已按下 } //检测PB1引脚是否为低电平,按键按下时为低电平 if(GPIO_ReadInputDataBit(GPIOB , GPIO_Pin_1)==0){ //PB1为低电平,按键2已按下 delay_ms(20); //延时,消抖 //消抖,等待PB1重新变成高电平,如果一直为低电平则一直进入死循环 while(GPIO_ReadInputDataBit(GPIOB , GPIO_Pin_1)==0); delay_ms(20); //延时,消抖 KeyNum=2; //键值赋值为2,代表按键1已按下 } return KeyNum; //返回键值 }key.c总代码 #include "key.h" void Key_Init(void){ GPIO_InitTypeDef GPIO_InitStructure; RCC_APB2PeriphClockCmd(RCC_APB2Periph_GPIOB,ENABLE);//GPIOB GPIO_InitStructure.GPIO_Mode = GPIO_Mode_IPU; //设置上拉模式 GPIO_Mode_IPU GPIO_InitStructure.GPIO_Pin=GPIO_Pin_0|GPIO_Pin_1; GPIO_InitStructure.GPIO_Speed=GPIO_Speed_50MHz; GPIO_Init(GPIOB,&GPIO_InitStructure); GPIO_SetBits(GPIOB,GPIO_Pin_0|GPIO_Pin_1); } uint8_t Key_GetNum(void){ uint8_t KeyNum = 0; if(GPIO_ReadInputDataBit(GPIOB , GPIO_Pin_0)==0){ delay_ms(20); while(GPIO_ReadInputDataBit(GPIOB , GPIO_Pin_0)==0); delay_ms(20); KeyNum=1; } if(GPIO_ReadInputDataBit(GPIOB , GPIO_Pin_1)==0){ delay_ms(20); while(GPIO_ReadInputDataBit(GPIOB , GPIO_Pin_1)==0); delay_ms(20); KeyNum=2; } return KeyNum; } 4. key.h头文件的代码 #ifndef __KEY_H #define __KEY_ #include "stm32f10x.h" // Device header #include "delay.h" void Key_Init(void); //按键初始化 uint8_t Key_GetNum(void); //获取当前按键按下的键值 #endif 5. main.c文件的代码 5.1 按键按下实现LED亮或者灭 #include "stm32f10x.h" #include "led.h" #include "key.h" #include "delay.h" uint8_t KeyNum = 0; int main(void) { delay_init(); Led_Init(); Key_Init(); while(1){ KeyNum = Key_GetNum(); //获取键值 if(KeyNum == 1){ //按下按键1,LED1灯亮,LED2灯灭 Ledx_state(1 , 1); Ledx_state(2 , 0); } if(KeyNum == 2){ //按下按键2,LED2灯亮,LED1灯灭 Ledx_state(1 , 0); Ledx_state(2 , 1); } }仿真效果图: 仿真效果图: 百度网盘 链接:https://pan.baidu.com/s/1pcVtAcER2mAwnQnyRL3aXQ 提取码:p8q4 |
【本文地址】
公司简介
联系我们