| linux7.4邮件服务器,centos7搭建邮件服务器postfix | 您所在的位置:网站首页 › postfix邮件服务器搭建 › linux7.4邮件服务器,centos7搭建邮件服务器postfix |
linux7.4邮件服务器,centos7搭建邮件服务器postfix
|
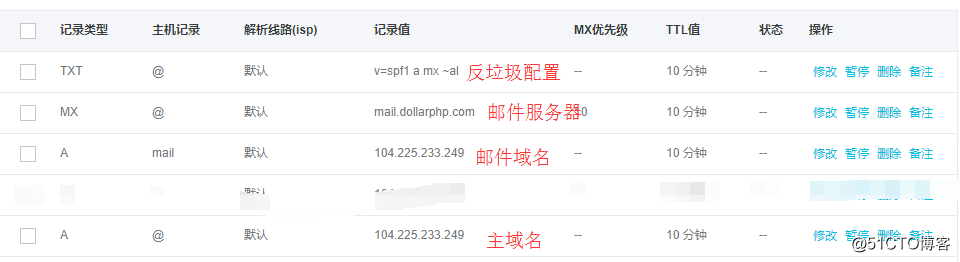
域名解析: 角色 记录类型 主机记录 记录值 主域名 A @ 104.225.233.249 邮件域名 A mail 104.225.233.249 邮件服务器 MX @ mail.dollarphp.com 反垃圾配置 TXT @ v=spf1 a mx ~al
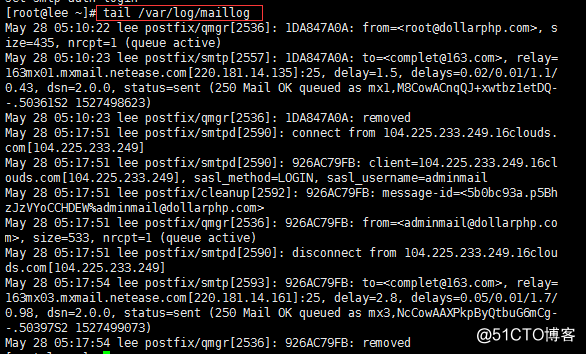
卸载sendmail: yum -y remove sendmail 安装软件: yum -y install postfix dovecot cyrus-sasl-* mailx 配置postfix: vim /etc/postfix/main.cf queue_directory = /var/spool/postfix command_directory = /usr/sbin daemon_directory = /usr/libexec/postfix data_directory = /var/lib/postfix mail_owner = postfix myhostname = mail.dollarphp.com #这里要换成你自己的邮箱服务器 mydomain = dollarphp.com #这里换成你自己的主机服务器 myorigin = $mydomain inet_interfaces = all inet_protocols = ipv4 mydestination = $myhostname, localhost.$mydomain, localhost,$mydomain,mail.$mydomain,www.$mydomain, ftp.$mydomain local_recipient_maps = unknown_local_recipient_reject_code = 550 mynetworks = 0.0.0.0/0 relay_domains = $mydestination alias_maps = hash:/etc/aliases alias_database = hash:/etc/aliases home_mailbox = Maildir/ smtpd_banner = $myhostname ESMTP debug_peer_level = 2 debugger_command = PATH=/bin:/usr/bin:/usr/local/bin:/usr/X11R6/bin ddd $daemon_directory/$process_name $process_id & sleep 5 sendmail_path = /usr/sbin/sendmail.postfix newaliases_path = /usr/bin/newaliases.postfix mailq_path = /usr/bin/mailq.postfix setgid_group = postdrop html_directory = no manpage_directory = /usr/share/man sample_directory = /usr/share/doc/postfix-2.10.1/samples readme_directory = /usr/share/doc/postfix-2.10.1/README_FILES smtpd_sasl_auth_enable = yes smtpd_sasl_security_options = noanonymous broken_sasl_auth_clients = yes smtpd_recipient_restrictions = permit_sasl_authenticated,reject_unauth_destination,permit_mynetworks smtpd_client_restrictions = permit_sasl_authenticated 配置dovecot: a. 配置监听协议: vim /etc/dovecot/dovecot.conf protocols = imap pop3 lmtp listen = * dict { } !include conf.d/*.conf !include_try local.conf b. 配置登录方式: vim /etc/dovecot/conf.d/10-auth.conf disable_plaintext_auth = no auth_mechanisms = plain login !include auth-system.conf.ext c. 配置邮件存储位置: vim /etc/dovecot/conf.d/10-mail.conf mail_location = maildir:~/Maildir namespace inbox { inbox = yes } first_valid_uid = 1000 mbox_write_locks = fcntl d. 配置ssl(关闭): vim /etc/dovecot/conf.d/10-ssl.conf ssl = no ssl_cert = ssl_key = 配置sasl2: a. 配置系统认证: vim /etc/sysconfig/saslauthd SOCKETDIR=/run/saslauthd MECH=shadow FLAGS= b. 配置登录方式(创建新文件): vim /usr/lib64/sasl2/smtpd.conf pwcheck_method: saslauthd mech_list: PLAIN LOGIN log_level:3 添加用户: useradd dollarphp passwd dollarphp 启动服务: systemctl start dovecot systemctl start postfix systemctl start saslauthd 配置mailx: vim /etc/mail.rc set hold set append set ask set crt set dot set keep set emptybox set indentprefix="> " set quote set sendcharsets=iso-8859-1,utf-8 set showname set showto set newmail=nopoll set autocollapse set markanswered ignore received in-reply-to message-id references ignore mime-version content-transfer-encoding fwdretain subject date from to set bsdcompat set smtp=mail.dollarphp.com set smtp-auth-user=adminmail set smtp-auth-password=123456 set smtp-auth=login 发送邮件: echo "内容" | mail -s "标题" [email protected] 或 mail -s "标题" [email protected] < test.txt 查看发送日志: tail /var/log/maillog
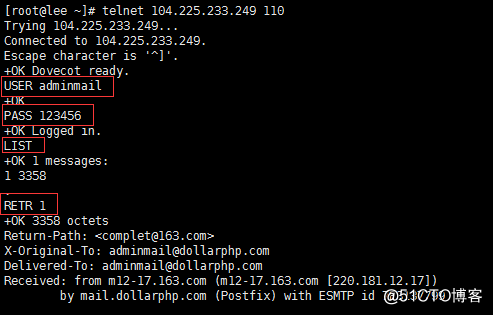
二、客户端: linux(接收): a. 安装telnet: yum -y install telnet b. 登录(dovecot的默认端口是110): telnet 104.225.233.249 110 c. 测试:
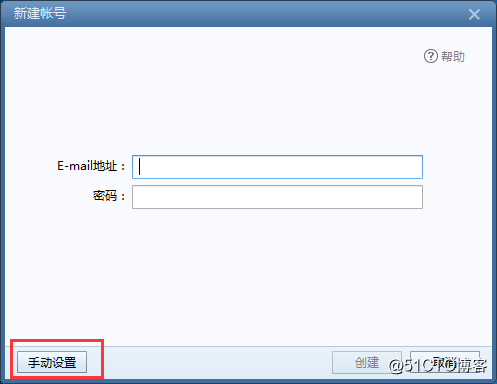
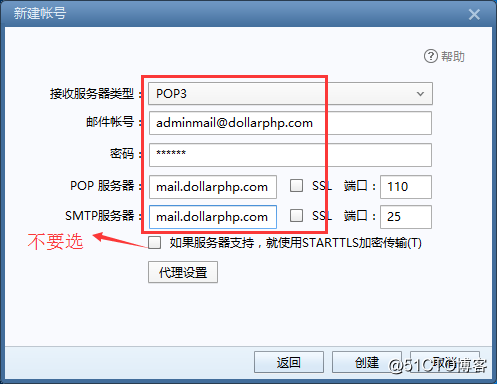
d. 命令介绍: USER xxx:输入用户名 PASS xxx:输入密码 LIST:显示信箱 RETR n:打开第n封信 e. 退出telnet: ctl+] quit windows(发送+接收): a. 安装foxmail(官网:http://www.foxmail.com/):
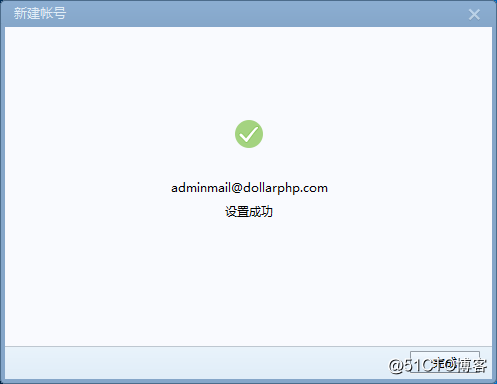
b. 登录:
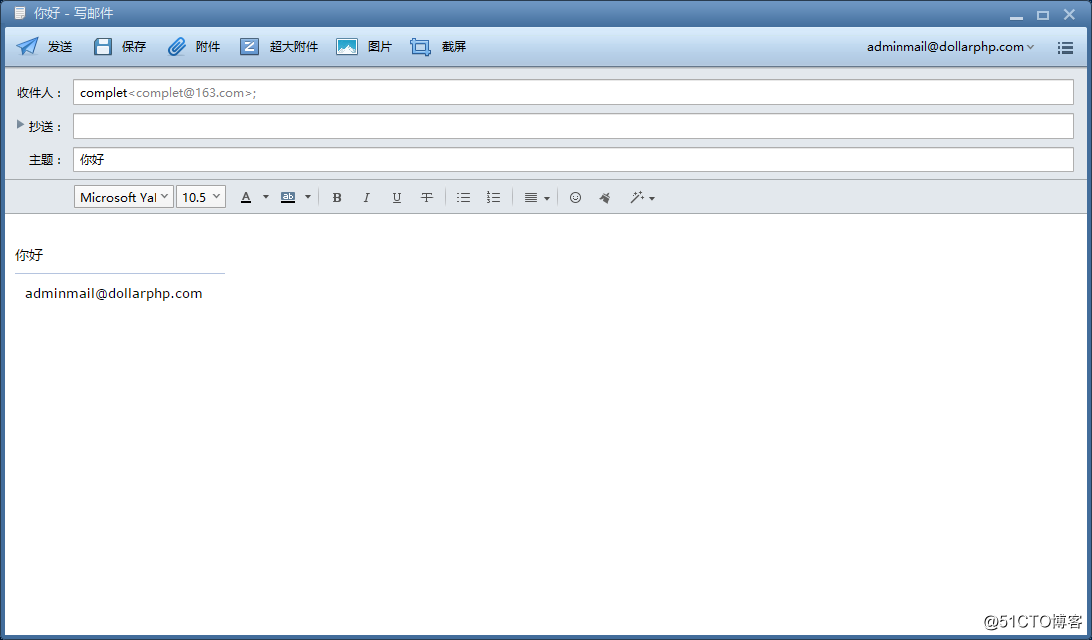
c. 测试:
|
【本文地址】