| 前端nginx配置并且同一域名配置多个项目以及nginx跨域设置 | 您所在的位置:网站首页 › nginx服务器配置多个域名怎么办 › 前端nginx配置并且同一域名配置多个项目以及nginx跨域设置 |
前端nginx配置并且同一域名配置多个项目以及nginx跨域设置
|
前端nginx配置并且同一域名配置多个项目
前端nginx配置并且同一域名配置多个项目first of all下载配置nginx配置nginx开机自启动nginx -t 找不到nginx的修复nginx进行重启Nginx同一个域名配置多个项目nginx按不同的目录分发给不同的项目启用二级域名,不同的项目分配不同的二级域名
nginx 跨域配置
前端nginx配置并且同一域名配置多个项目
前端小白一枚之前没有太多接触nginx,周末看着文档和网上各位大佬们的教程一步一步搭建了nginx并可以再同一域名通过文件夹不同访问多个项目。 first of all我使用的是阿里云服务器,下次看着那个便宜买哪个~~~~ 下载配置nginx在安装nginx前首先要确认系统中安装了 gcc、pcre-devel、zlib-devel、openssl-devel。 yum -y install gcc pcre-devel zlib-devel openssl openssl-devel安装完成,下载nginx安装包,我学习前人下载到/usr/local wget https://nginx.org/download/nginx-1.9.9.tar.gz下载完成之后,解压 tar -zxvf nginx-1.9.9.tar.gz解压完成之后,进入解压目录里,我的解压位置 /usr/local/nginx-1.9.9 配置nginx安装参数 ./configure --prefix=/usr/local/nginx注意: 此处引用了csdn一位前辈 hello 威威的配置,因为我主要学习了威威的安装 nginx编译选项 make是用来编译的,它从Makefile中读取指令,然后编译。 make install是用来安装的,它也从Makefile中读取指令,安装到指定的位置。 configure命令是用来检测你的安装平台的目标特征的。它定义了系统的各个方面,包括nginx的被允许使用的连接处理的方法,比如它会检测你是不是有CC或GCC,并不是需要CC或GCC,它是个shell脚本,执行结束时,它会创建一个Makefile文件。nginx的configure命令支持以下参数: –prefix=path 定义一个目录,存放服务器上的文件 ,也就是nginx的安装目录。默认使用 /usr/local/nginx。 –sbin-path=path 设置nginx的可执行文件的路径,默认为 prefix/sbin/nginx. –conf-path=path 设置在nginx.conf配置文件的路径。nginx允许使用不同的配置文件启动,通过命令行中的-c选项。默认为prefix/conf/nginx.conf. –pid-path=path 设置nginx.pid文件,将存储的主进程的进程号。安装完成后,可以随时改变的文件名 , 在nginx.conf配置文件中使用 PID指令。默认情况下,文件名 为prefix/logs/nginx.pid. –error-log-path=path 设置主错误,警告,和诊断文件的名称。安装完成后,可以随时改变的文件名 ,在nginx.conf配置文件中 使用 的error_log指令。默认情况下,文件名 为prefix/logs/error.log. –http-log-path=path 设置主请求的HTTP服务器的日志文件的名称。安装完成后,可以随时改变的文件名 ,在nginx.conf配置文件中 使用 的access_log指令。默认情况下,文件名 为prefix/logs/access.log. –user=name 设置nginx工作进程的用户。安装完成后,可以随时更改的名称在nginx.conf配置文件中 使用的 user指令。默认的用户名是nobody。 –group=name 设置nginx工作进程的用户组。安装完成后,可以随时更改的名称在nginx.conf配置文件中 使用的 user指令。默认的为非特权用户。 –with-select_module --without-select_module 启用或禁用构建一个模块来允许服务器使用select()方法。该模块将自动建立,如果平台不支持的kqueue,epoll,rtsig或/dev/poll。 –with-poll_module --without-poll_module 启用或禁用构建一个模块来允许服务器使用poll()方法。该模块将自动建立,如果平台不支持的kqueue,epoll,rtsig或/dev/poll。 –without-http_gzip_module — 不编译压缩的HTTP服务器的响应模块。编译并运行此模块需要zlib库。 –without-http_rewrite_module 不编译重写模块。编译并运行此模块需要PCRE库支持。 –without-http_proxy_module — 不编译http_proxy模块。 –with-http_ssl_module — 使用https协议模块。默认情况下,该模块没有被构建。建立并运行此模块的OpenSSL库是必需的。 –with-pcre=path — 设置PCRE库的源码路径。PCRE库的源码(版本4.4 - 8.30)需要从PCRE网站下载并解压。其余的工作是Nginx的./ configure和make来完成。正则表达式使用在location指令和 ngx_http_rewrite_module 模块中。 –with-pcre-jit —编译PCRE包含“just-in-time compilation”(1.1.12中, pcre_jit指令)。 –with-zlib=path —设置的zlib库的源码路径。要下载从 zlib(版本1.1.3 - 1.2.5)的并解压。其余的工作是Nginx的./ configure和make完成。ngx_http_gzip_module模块需要使用zlib 。 –with-cc-opt=parameters — 设置额外的参数将被添加到CFLAGS变量。例如,当你在FreeBSD上使用PCRE库时需要使用:–with-cc-opt="-I /usr/local/include。.如需要需要增加 select()支持的文件数量:–with-cc-opt="-D FD_SETSIZE=2048". –with-ld-opt=parameters —设置附加的参数,将用于在链接期间。例如,当在FreeBSD下使用该系统的PCRE库,应指定:–with-ld-opt="-L /usr/local/lib".编译安装 make make install编译安装完成之后,进入/usr/lcoal/nginx,查看是否安装成功 ./sbin/nginx -t正常的情况下,信息输出如下: [root@ nginx]# ./sbin/nginx -t nginx: the configuration file /usr/local/nginx/conf/nginx.conf syntax is ok nginx: configuration file /usr/local/nginx/conf/nginx.conf test is successful 启动nginx /usr/local/nginx/sbin/nginx查看是否启动成功 [root@~]# ps -ef | grep nginx root 22786 1 0 16:30 ? 00:00:00 nginx: master process /usr/local/nginx/sbin/nginx nobody 22787 22786 0 16:30 ? 00:00:00 nginx: worker process root 22789 22760 0 16:30 pts/1 00:00:00 grep --color=auto nginx启动成功,打开浏览器,在浏览器中输入服务器的ip地址 1、创建nginx.service 如果是自己编译安装,则需要自己编写nginx.service vim /lib/systemd/system/nginx.service内容如下: [Unit] # 服务说明 Description=nginx # 服务描述 After=network.target # After:服务类别 [Service] # Service:服务 Type=forking # Type:类型,forking代表后台运行 # ExecStart:启动命令 ExecStart=/path/to/nginx/sbin/nginx -c /path/to/nginx/conf/nginx.conf # ExecReload:重启命令 ExecReload=/path/to/nginx/sbin/nginx -s reload # ExecStop:停止命令 ExecStop=/path/to/nginx/sbin/nginx -s quit # PrivateTmp:true表示给服务分配独立的空间 PrivateTmp=true # Install:设置成多用户 [Install] WantedBy=multi-user.target2、设置开机自动启动 systemctl enable nginx.service配置完毕 nginx -t 找不到nginx的修复1:进入 vim /etc/profile 文件 2:添加配置 如下 让环境变量立即生效需要执行如下命令: source /etc/profile更多修改方式请参照 Linux配置环境变量 此时就可以直接使用nginx -t的方式了!!!! nginx进行重启 nginx -s reload # 第二种方式,只单独重新加载配置 nginx -c /usr/local/nginx/conf/nginx.conf Nginx同一个域名配置多个项目使用Nginx要在同一个域名下配置多个项目有两种方式: nginx按不同的目录分发给不同的项目 http { include mime.types; default_type application/octet-stream; #log_format main '$remote_addr - $remote_user [$time_local] "$request" ' # '$status $body_bytes_sent "$http_referer" ' # '"$http_user_agent" "$http_x_forwarded_for"'; #access_log logs/access.log main; sendfile on; #tcp_nopush on; #keepalive_timeout 0; keepalive_timeout 65; #gzip on; server { listen 80; server_name localhost; #charset koi8-r; #access_log logs/host.access.log main; location / { root html; index index.html index.htm; } # 新配置的 location /blog { root /opt; # 服务启动目录 index index.html index.htm; # 默认访问文件 } # 新配置的 location /test { root /opt; index index.html; } #配置Nginx动静分离,定义的静态页面直接从Nginx发布目录读取。 location /client { alias /home/work/****/static/client/; #expires定义用户浏览器缓存的时间为7天,如果静态页面不常更新,可以设置更长,这样可以节省带宽和缓解服>务器的压力 expires 1d; index index.html; autoindex on; } #error_page 404 /404.html; # redirect server error pages to the static page /50x.html # error_page 500 502 503 504 /50x.html; location = /50x.html { root html; } # proxy the PHP scripts to Apache listening on 127.0.0.1:80 # #location ~ \.php$ { # proxy_pass http://127.0.0.1; #} # pass the PHP scripts to FastCGI server listening on 127.0.0.1:9000 # #location ~ \.php$ { # root html; # fastcgi_pass 127.0.0.1:9000; # fastcgi_index index.php; # fastcgi_param SCRIPT_FILENAME /scripts$fastcgi_script_name; # include fastcgi_params; #} # deny access to .htaccess files, if Apache's document root # concurs with nginx's one # #location ~ /\.ht { # deny all; #} } # another virtual host using mix of IP-, name-, and port-based configurati # #server { # listen 8000; # listen somename:8080; # server_name somename alias another.alias; # location / { # root html; # index index.html index.htm; # } #} # HTTPS server # #server { # listen 443 ssl; # server_name localhost; # ssl_certificate cert.pem; # ssl_certificate_key cert.key; # ssl_session_cache shared:SSL:1m; # ssl_session_timeout 5m; # ssl_ciphers HIGH:!aNULL:!MD5; # ssl_prefer_server_ciphers on; # location / { # root html; # index index.html index.htm; # } #} }当然,需要看这个文件下面有没有一个includes,如果有,则在includes下面的那个文件路径下进行配置 先看一下nginx.conf文件,如果有下面的一行 include /etc/nginx/sites-enabled/*; 表示配置文件加载sites-enabled下的文件。在配置这个的时候,遇到一个坑,就是alias 和root 的区别,导致获取的静态文件的获取的路径不对,一直报404;郁闷的很; 在配置ng 的location 的生活;一般不要加后面的斜杆;然后加上autoindex on; 自动首页;这样就会自动跳转到首页了; alias 和 root 的区别; root 的话;location 中的地址会拼接到root后面;alias就直接代替后面的东西 如: location /admin { root /admin/res/; index html.html; autoindex no; } location /admin { alias /admin/res/; index html.html; autoindex no; } 访问地址:localhost:8080/admin/res/app.js; root实际访问的地址就是: localhost:8080/admin/res/admin/res/app.js 也就是说这个实际访问的地址 ./admin/res/admin/res/app.js ;这样根本找不到文件;alias 实际的访问地址就是: localhost:8080/admin/res/app.js; 访问的地址是 ./admin/res/app.js或者可以这样配置: server { listen 80; server_name example.com; location ^~ /project1 { proxy_pass http://localhost:8081; proxy_set_header Host $host; proxy_set_header X-Real-IP $remote_addr; proxy_set_header X-Forwarded-For $proxy_add_x_forwarded_for; } location ^~ /project2 { proxy_pass http://localhost:8082; proxy_set_header Host $host; proxy_set_header X-Real-IP $remote_addr; proxy_set_header X-Forwarded-For $proxy_add_x_forwarded_for; } location / { proxy_pass http://localhost:8080; proxy_set_header Host $host; proxy_set_header X-Real-IP $remote_addr; proxy_set_header X-Forwarded-For $proxy_add_x_forwarded_for; } } 这里配置了三个项目: http://example.com/project1路径分发到http://localhost:8081 http://example.com/project2路径分发到http://localhost:8082 其他路径分发到http://localhost:8080 启用二级域名,不同的项目分配不同的二级域名 server { listen 80; server_name example.com; location / { proxy_pass http://localhost:8080; proxy_set_header Host $host; proxy_set_header X-Real-IP $remote_addr; proxy_set_header X-Forwarded-For $proxy_add_x_forwarded_for; } } server { listen 80; server_name project1.example.com; location / { proxy_pass http://localhost:8081; proxy_set_header Host $host; proxy_set_header X-Real-IP $remote_addr; proxy_set_header X-Forwarded-For $proxy_add_x_forwarded_for; } } server { listen 80; server_name project2.example.com; location / { proxy_pass http://localhost:8082; proxy_set_header Host $host; proxy_set_header X-Real-IP $remote_addr; proxy_set_header X-Forwarded-For $proxy_add_x_forwarded_for; } }注意:这三个项目属于不同的域名,项目之间通过http访问会存在跨域问题。 nginx 跨域配置 location / { if ($request_method = OPTIONS ) { add_header Access-Control-Allow-Origin "*"; add_header Access-Control-Allow-Methods "POST, GET, PUT, OPTIONS, DELETE"; add_header Access-Control-Max-Age "3600"; add_header Access-Control-Allow-Headers "Origin, X-Requested-With, Content-Type, Accept, Authorization"; add_header Access-Control-Allow-Credentials "true"; add_header Content-Length 0; add_header Content-Type text/plain; return 200; } add_header 'Access-Control-Allow-Origin' '*'; add_header 'Access-Control-Allow-Credentials' 'true'; add_header 'Access-Control-Allow-Methods' 'GET, PUT, POST, DELETE, OPTIONS'; add_header 'Access-Control-Allow-Headers' 'Content-Type,*'; } |
 如果打不开,查看下服务器80端口是否打开。
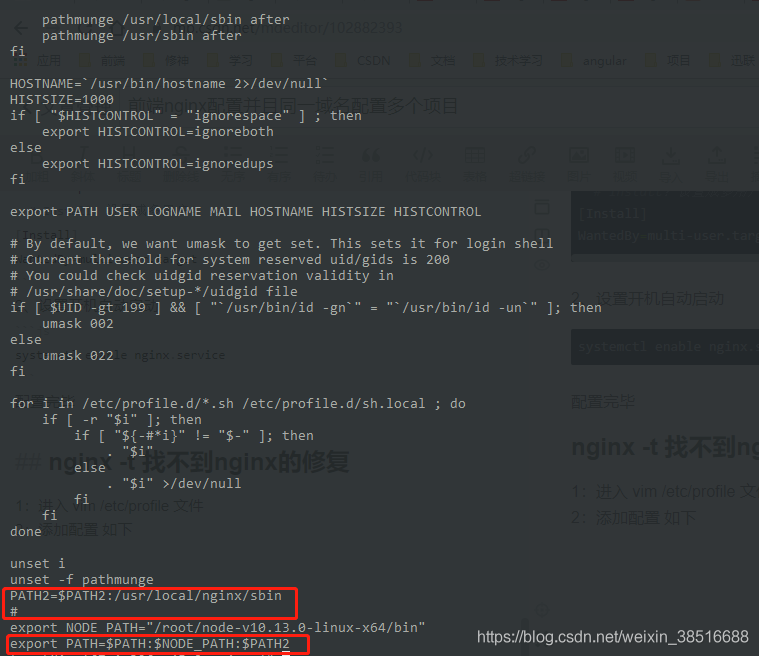 因为我之前添加了node的path,一次在导出path时采用
【本文地址】