| 虚拟机磁盘大小变更后的Ubuntu动态分区调整 | 您所在的位置:网站首页 › linux修复根分区 › 虚拟机磁盘大小变更后的Ubuntu动态分区调整 |
虚拟机磁盘大小变更后的Ubuntu动态分区调整
|
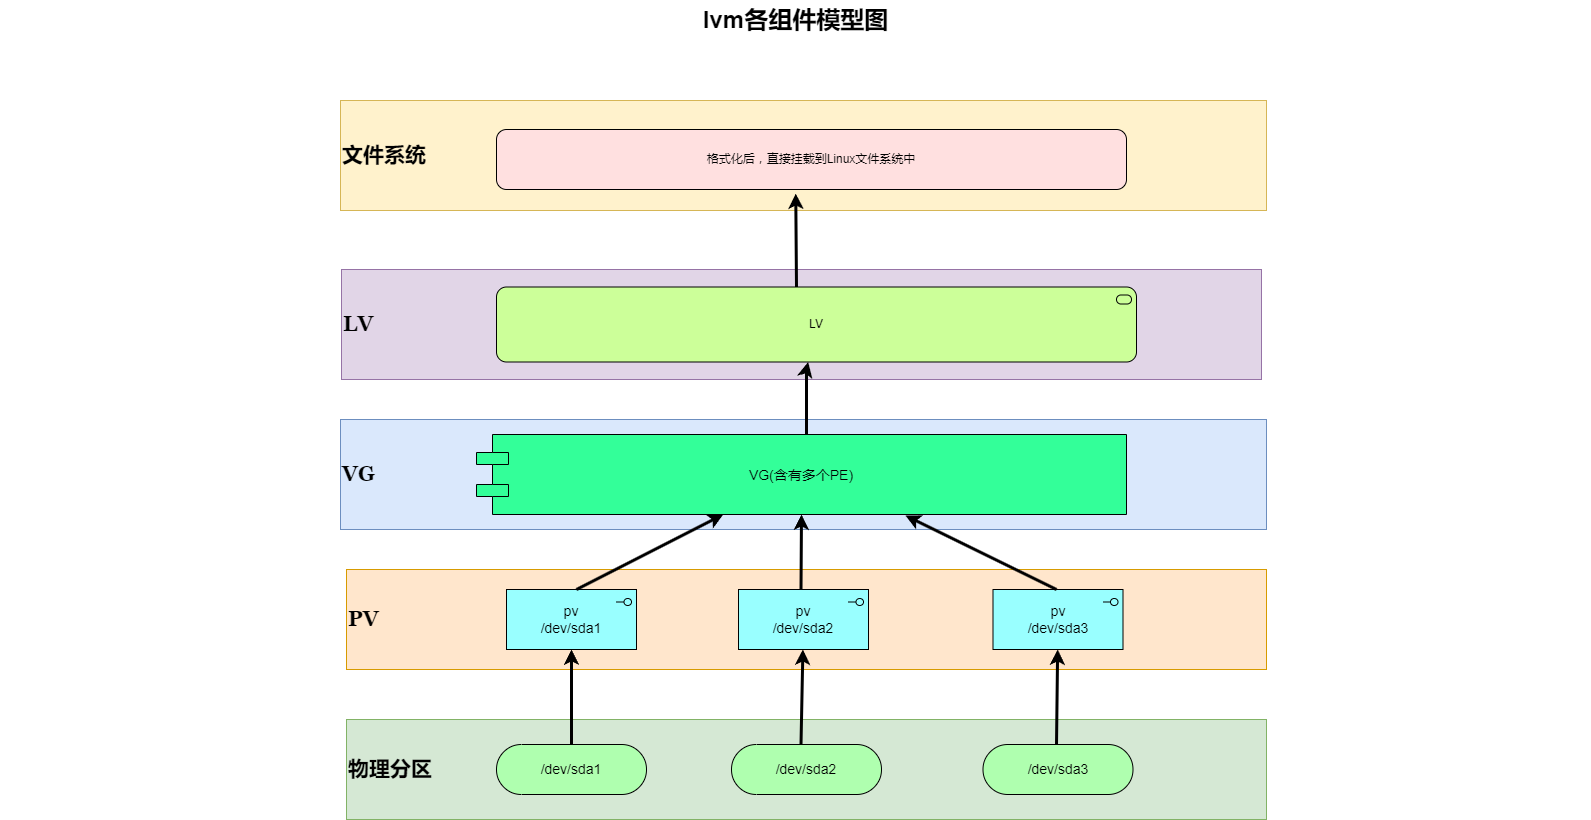
家人们,今天我们来分享一下关于虚拟机磁盘大小变更后,在Ubuntu操作系统中如何进行动态分区调整的技巧。随着虚拟化技术的发展,虚拟机已经成为许多开发者和系统管理员的首选工具之一。在使用虚拟机过程中,可能会遇到需要扩展磁盘容量的情况,而Ubuntu作为一种常见的操作系统,我们将介绍如何动态调整分区以适应磁盘大小的变更。 pv、lv、vg 介绍PV(Phsical Volume,物理卷),PV是VG的组成部分,由分区构成,多块盘的时候,可以把一块盘格式化成一个主分区,然后用这个分区做成一个PV,只有一块盘的时候,可以这块盘的某一个分区做成一个PV,实际上一个PV就一个分区。 VG(Volume Group, 卷组),有若干个PV组成,作用就是将PV组成到以前,然后再重新划分空间。 LV(Logical Volume,逻辑卷),LV就是从VG中划分出来的卷,LV的使用要比PV灵活的多,可以在空间不够的情况下,增加空间。 可以说成是PV就是硬盘,而VG就是管理硬盘的操作系统,而LV就是操作系统分出来的各个分区. PV->VG->LV-> 文件系统使用(挂载到某个目录) 硬盘或分区做成pv,然后将pv或多个pv建立vg,vg上建立lv,其模型如下 PV pvcreate :根据物理盘,创建pv pvscan :查询目前系统里的pv pvdisplay:显示pv的状态 pvremove:将pv属性移除 VG vgcreate:创建vg vgscan:查找当前系统里面的vg vgdisplay:显示当前系统vg的状态 vgextend:给vg添加额外的pv vgreduce:在vg内删除pv vgchange:设置vg是否是启动状态(active) vgremove:删除一个vg LV lvcreate:创建lv lvscan:查询当前系统的lv lvdisplay:显示lv的属性 lvextend:给lv添加容量 lvredurce:给lv减少容量 lvremove:删除一个lv lvresize:对lv大小的容量进行调整 实战案例 查看文件系统的磁盘空间使用情况df -hl Filesystem Size Used Avail Use% Mounted on tmpfs 791M 2.2M 789M 1% /run /dev/mapper/ubuntu--vg-ubuntu--lv 38G 26G 11G 72% / tmpfs 3.9G 0 3.9G 0% /dev/shm tmpfs 5.0M 0 5.0M 0% /run/lock /dev/sda2 2.0G 253M 1.6G 14% /boot tmpfs 791M 4.0K 791M 1% /run/user/1000可以看到 / 由 /dev/mapper/ubuntu–vg-ubuntu–lv 挂载 创建分区 sda4,将设置为 lvm 类型:sudo fdisk /dev/sda xiuji@xiuji:~$ sudo fdisk /dev/sda Welcome to fdisk (util-linux 2.37.2). Changes will remain in memory only, until you decide to write them. Be careful before using the write command. GPT PMBR size mismatch (83886079 != 209715199) will be corrected by write. This disk is currently in use - repartitioning is probably a bad idea. It's recommended to umount all file systems, and swapoff all swap partitions on this disk. Command (m for help): p Disk /dev/sda: 100 GiB, 107374182400 bytes, 209715200 sectors Disk model: VMware Virtual S Units: sectors of 1 * 512 = 512 bytes Sector size (logical/physical): 512 bytes / 512 bytes I/O size (minimum/optimal): 512 bytes / 512 bytes Disklabel type: gpt Disk identifier: D80D8A91-AB36-4BB8-A669-783F46148D68 Device Start End Sectors Size Type /dev/sda1 2048 4095 2048 1M BIOS boot /dev/sda2 4096 4198399 4194304 2G Linux filesystem /dev/sda3 4198400 83884031 79685632 38G Linux filesystem Command (m for help): n Partition number (4-128, default 4): 4 First sector (83884032-209715166, default 83884032): 83884032 Last sector, +/-sectors or +/-size{K,M,G,T,P} (83884032-209715166, default 209715166): 104857583 Created a new partition 4 of type 'Linux filesystem' and of size 10 GiB. Command (m for help): p Disk /dev/sda: 100 GiB, 107374182400 bytes, 209715200 sectors Disk model: VMware Virtual S Units: sectors of 1 * 512 = 512 bytes Sector size (logical/physical): 512 bytes / 512 bytes I/O size (minimum/optimal): 512 bytes / 512 bytes Disklabel type: gpt Disk identifier: D80D8A91-AB36-4BB8-A669-783F46148D68 Device Start End Sectors Size Type /dev/sda1 2048 4095 2048 1M BIOS boot /dev/sda2 4096 4198399 4194304 2G Linux filesystem /dev/sda3 4198400 83884031 79685632 38G Linux filesystem /dev/sda4 83884032 104857583 20973552 10G Linux filesystem Command (m for help): t Partition number (1-4, default 4): 4 Partition type or alias (type L to list all): lvm Changed type of partition 'Linux filesystem' to 'Linux LVM'. Command (m for help): p Disk /dev/sda: 100 GiB, 107374182400 bytes, 209715200 sectors Disk model: VMware Virtual S Units: sectors of 1 * 512 = 512 bytes Sector size (logical/physical): 512 bytes / 512 bytes I/O size (minimum/optimal): 512 bytes / 512 bytes Disklabel type: gpt Disk identifier: D80D8A91-AB36-4BB8-A669-783F46148D68 Device Start End Sectors Size Type /dev/sda1 2048 4095 2048 1M BIOS boot /dev/sda2 4096 4198399 4194304 2G Linux filesystem /dev/sda3 4198400 83884031 79685632 38G Linux filesystem /dev/sda4 83884032 104857583 20973552 10G Linux LVM Command (m for help): w The partition table has been altered. Syncing disks. sda4 创建成功,查看所有可用空间:sudo lsblk xiuji@xiuji:~$ sudo lsblk NAME MAJ:MIN RM SIZE RO TYPE MOUNTPOINTS loop0 7:0 0 63.4M 1 loop /snap/core20/1950 loop1 7:1 0 53.3M 1 loop /snap/snapd/19457 loop2 7:2 0 53.3M 1 loop /snap/snapd/19361 loop3 7:3 0 63.5M 1 loop /snap/core20/1891 loop4 7:4 0 111.9M 1 loop /snap/lxd/24322 sda 8:0 0 100G 0 disk ├─sda1 8:1 0 1M 0 part ├─sda2 8:2 0 2G 0 part /boot ├─sda3 8:3 0 38G 0 part │ └─ubuntu--vg-ubuntu--lv 253:0 0 38G 0 lvm / └─sda4 8:4 0 10G 0 part sr0 11:0 1 1.8G 0 rom 将 sda4创建成 PV(Physical Volume):sudo pvcreate /dev/sda4 xiuji@xiuji:~$ sudo pvcreate /dev/sda4 Physical volume "/dev/sda4" successfully created.sudo pvdisplay xiuji@xiuji:~$ sudo pvdisplay --- Physical volume --- PV Name /dev/sda3 VG Name ubuntu-vg PV Size |
【本文地址】