| jquery 实现图片上传,并在前端显示出来 | 您所在的位置:网站首页 › jquery图片展示 › jquery 实现图片上传,并在前端显示出来 |
jquery 实现图片上传,并在前端显示出来
|
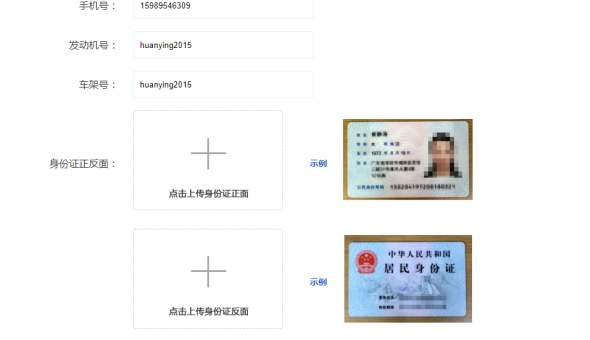
目前遇到一个图片上上传的需求,突然发现,原来之前都没有做过此种类型的需求,以下是需求样式:
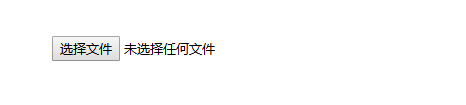
看到需求后之所以有点懵,是因为我接触到的文件上传,一般都是按钮类型的,例如以下这种:
深呼吸,好好想一下,整理整理思路: 1.需要有一个虚线框,这里为一个div元素 2.再有一个十字框(和文字说明一起,可以集成组合为一张图片),这里可以可以为一个img元素,这样:当没有上传图片时,显示默认图片,当上传了,显示上传的图片 3.要实现点击能够上传,需要有一个 input 元素:首先input元素不能显示出来,初步想了一下,有两种实现方法,一种是使用 label标签 加input元素(label 标签关联input,input影藏,label设置为与div 同样大小),另一种是使用input单标签,设置它的z-index层级在最上层,然后设置为行块元素即与div一般大小,然后设置input的 opacity 为0,即透明状态; 4.需要可以删除图片,那就在div里再加一个span 元素,点击span元素时,删除图片 得到以下html: 1 2 3 4 5全部html如下:   1 DOCTYPE html>
2
3
4
5
6
7
8
9
10
11
12
13
14
15
16
17 {include file="common/header1"}
18
19 提交商业投保资料
20
21
22 手机号
23
24
25
26 发动机号
27
28
29
30 车架号
31
32
33
34 身份证正反面
35
36
37
38
39
40
41
42
43 示例
44
45
46
47
48
49
50
51
52
53
54
55
56
57
58
59
60 示例
61
62
63
64
65
66
67
68 自拍照
69
70
71
72
73
74
75
76
77 查看示例
78
79
80
81
82
83
84
85
86 确定
87
88
89
90 var otijiourl = "{:url('insorder/submitInsInfo')}";
91
92
93
View Code
1 DOCTYPE html>
2
3
4
5
6
7
8
9
10
11
12
13
14
15
16
17 {include file="common/header1"}
18
19 提交商业投保资料
20
21
22 手机号
23
24
25
26 发动机号
27
28
29
30 车架号
31
32
33
34 身份证正反面
35
36
37
38
39
40
41
42
43 示例
44
45
46
47
48
49
50
51
52
53
54
55
56
57
58
59
60 示例
61
62
63
64
65
66
67
68 自拍照
69
70
71
72
73
74
75
76
77 查看示例
78
79
80
81
82
83
84
85
86 确定
87
88
89
90 var otijiourl = "{:url('insorder/submitInsInfo')}";
91
92
93
View Code
根据以上的规则设置css样式:
1 .insbox{
2 width:1200px;
3 position:relative;
4 margin:0 auto;
5 border:1px solid #333;
6 color:#333;
7 border-radius: 20px;
8 margin-bottom:150px;
9 }
10 .inul {
11 min-height:44px;
12 margin:20px 0;
13 }
14
15 ul.inul>div{
16 float:left;
17 }
18 h3.institle{
19 background:#333;
20 color:#fff;
21 text-align: center;
22 height:78px;
23 border-top-left-radius:20px;
24 border-top-right-radius:20px;
25 position:relative;
26 width:100%;
27 display:flex;
28 align-items: center;
29 justify-content:center;
30 }
31 .isnnei{
32 background:url(../../img/ins/card.png)no-repeat 0 center;
33 background-size: 50px auto;
34 }
35 h3.institle span{
36 padding-left: 58px;
37 font-size: 22px;
38 letter-spacing: 3px;
39 font-weight: normal;
40 }
41 .toleft{
42 width:25%;
43 text-align: right;
44 }
45 .toright{
46 width:75%;
47 }
48 input.xiangton{
49 border:1px solid #eee;
50 border-radius: 3px;
51 width:290px;
52 height:42px;
53 text-indent: 10px;
54 }
55 .toyilei{
56 line-height:44px;
57 }
58 span.nming {
59 margin-right:40px;
60 position:relative;
61 }
62 .maohaos::after{
63 content:":";
64 display:inline;
65 position:absolute;
66 right:0;
67 right:-10px;
68
69 }
70 .erlei{
71 height:172px;
72 line-height:172px;
73 }
74 div.toright>div{
75 float:left;
76 }
77 div.chuans{
78 position:relative;
79 width:240px;
80 height:160px;
81 border-radius: 3px;
82 border:1px dashed #ccc;
83 margin-right: 44px;
84 overflow: hidden;
85 }
86 div.chuans img{
87 position:absolute;
88 max-width:238px;
89 left:0;
90 right:0;
91 top:0;
92 bottom:0;
93 margin:auto;
94 }
95 div.shangshili>div{
96 float:left;
97 }
98 div.shangshili {
99 height:160px;
100 position:relative;
101 }
102 div.shuom{
103 margin-right:10px;
104 }
105 div.shulitu{
106 width:242px;
107 height:100%;
108 position:relative;
109 }
110 div.shulitu img{
111 position:absolute;
112 max-width:240px;
113 left:0;right:0;
114 top:0;bottom:0;
115 margin:auto;
116 }
117 div.btns{
118 margin-top:180px;
119 margin-bottom:40px;
120 position:relative;
121 text-align: center;
122 }
123 span.tibtn{
124 padding:8px 30px;
125 background:#333;
126 border-radius: 5px;
127 color:#fff;
128 }
129 div.chuans{
130 line-height:30px;
131 }
132 input.uploadImg{
133 display: inline-block;
134 width: 100%;
135 height: 100%;
136 opacity: 0;
137 z-index: 999;
138 }
139 span.delx {
140 position:absolute;
141 top:5px;
142 right:5px;
143 z-index: 9999;
144 font-size: 30px;
145 float:right;
146 display:none;
147 border-radius: 50%;
148 }
149 span.delx:hover{
150 background:#333;
151 color:#fff;
152 cursor:pointer;
153 }
154 div.shuom span.chsa {
155 color:#e5000c;
156 margin-right:10px;
157 font-size: 20px;
158 font-weight: normal;
159 }
160 div.shuom{
161 color:#1f5fc3;
162 font-size: 14px;
163 font-weight: bold;
164 }
View Code
得到如下的样式:
下面开始写js: 首先需要判断上传的图片格式,如果不是jpeg,jpg,png,bmp,则提示图片上传格式错误,需重新上传;如果格式正确,那就或者上传图片的地址,把当前div 下 img 的src 设置为此图片地址,即可达到显示图片的目的 1 $("body").on("change","div.chuans input.uploadImg",function(){ 2 3 var reads = new FileReader(); 4 var f = $(this).get(0).files[0]; 5 var rep = /jpeg|png|gif|bmp/ig; 6 var gstyle = f.type.split("/")[1]; 7 if(rep.test(gstyle)){ 8 reads.readAsDataURL(f); 9 var that = this; 10 reads.onload = function(e) { 11 $(that).parent().find("img").attr("src",this.result) 12 }; 13 }else{ 14 layer.msg("图片格式不正确,请上传 jpeg|png|gif|bmp 格式的图片") 15 } 16 17 });
以下是删除图片: 1 $("body").on("click","span.delx",function(){ 2 var odatasrc = $(this).parents(".chuans").find("img").data("imgsrc"); 3 var osrc = $(this).parents(".chuans").find("img").attr("src"); 4 $(this).parents(".chuans").find("img").attr("src",odatasrc); 5 $(this).hide(); 6 $(this).parents(".chuans").find("input").val(""); 7 });图片上传时,这里突然遇到一个报错:
这个错误找了好久,都没有发现是哪里出了问题,代码是这样的: 1 $.ajax({ 2 type:"post", 3 url:otijiourl, 4 data:odata, 5 dataType: 'json', //返回值类型 一般设置为json 6 success:function(res){ 7 console.log(res); 8 },error:function(){ 9 console.log("后台处理错误"); 10 } 11 })看了半天,也没有发现是哪里错了 最后百度了一下,发现别人也遇到了这样的问题,原因是使用 jquery ajax 发送请求的时候,会默认把data中的数据进行序列化。只要不进行序列化,就可以了。如果不进行序列化,需要增加一个参数:processData,设置为 false 变更之后的ajax 请求代码如下: 1 $.ajax({ 2 type:"post", 3 url:otijiourl, 4 data:odata, 5 dataType: 'json', //返回值类型 一般设置为json 6 processData: false, // jQuery不要去处理发送的数据 7 success:function(res){ 8 console.log(res); 9 },error:function(){ 10 console.log("后台处理错误"); 11 } 12 })改完之后就ok 了 全部js 代码如下:大功告成
1 $(function(){
2
3 $("body").on("change","div.chuans input.uploadImg",function(){
4
5 var reads = new FileReader();
6 var f = $(this).get(0).files[0];
7 var rep = /jpeg|png|gif|bmp/ig;
8 var gstyle = f.type.split("/")[1];
9 if(rep.test(gstyle)){
10 reads.readAsDataURL(f);
11 var that = this;
12 reads.onload = function(e) {
13 $(that).parent().find("img").attr("src",this.result)
14 };
15 }else{
16 layer.msg("图片格式不正确,请上传 jpeg|png|gif|bmp 格式的图片")
17 }
18
19 });
20
21 $("body").on("mouseenter","div.chuans",function(){
22 var odatasrc = $(this).find("img").data("imgsrc");
23 var osrc = $(this).find("img").attr("src");
24
25 if(osrc.indexOf(odatasrc)==-1){
26 $(this).find("span.delx").show();
27 }
28 });
29 $("body").on("mouseleave","div.chuans",function(){
30 $(this).find("span.delx").hide();
31 });
32
33 $("body").on("click","span.delx",function(){
34 var odatasrc = $(this).parents(".chuans").find("img").data("imgsrc");
35 var osrc = $(this).parents(".chuans").find("img").attr("src");
36 $(this).parents(".chuans").find("img").attr("src",odatasrc);
37 $(this).hide();
38 $(this).parents(".chuans").find("input").val("");
39 });
40
41 $("body").on("click","span.tibtn",function(){
42 var odata = getchuancan();
43 console.log(odata);
44 if(jiancecanshu()){
45 $.ajax({
46 type:"post",
47 url:otijiourl,
48 data:odata,
49 dataType: 'json', //返回值类型 一般设置为json
50 // contentType: "application/x-www-form-urlencoded; ",
51 processData: false, // jQuery不要去处理发送的数据
52 success:function(res){
53 console.log(res);
54 },error:function(){
55 console.log("后台处理错误");
56 }
57 })
58 }
59 });
60
61 function getchuancan(){
62 var formData = new FormData();
63 var ojson = {};
64
65 ojson.oshouji =$.trim( $("input.shoujihao").val());
66
67 ojson.ofdji = $("input.fadongjihao").val();
68 ojson.ochjiah = $("input.chejiahao").val();
69
70 // ojson.ozhenm = $("input.file1").get(0).files[0];
71 // ojson.opfanm = $("input.file2").get(0).files[0];
72 // ojson.oshilm = $("input.file3").get(0).files[0];
73
74
75 ojson.ozhenm = document.querySelector("input.file1").files[0];
76 ojson.opfanm = document.querySelector("input.file2").files[0];
77 ojson.oshilm = document.querySelector("input.file3").files[0];
78
79 formData.append('oshouji', ojson.oshouji);
80 formData.append('ofdji', ojson.ofdji);
81 formData.append('ochjiah', ojson.ochjiah);
82 formData.append('ozhenm', ojson.ozhenm);
83 formData.append('opfanm', ojson.opfanm);
84 formData.append('oshilm', ojson.oshilm);
85
86
87 return ojson;
88 return formData;
89 }
90
91 function jiancecanshu(){
92 var oshouji = $.trim($("input.shoujihao").val());
93 var ofdji = $("input.fadongjihao").val();
94 var ochjiah = $("input.chejiahao").val();
95 var ozhenm = $("input.file1").val();
96 var opfanm = $("input.file2").val();
97 var oshilm = $("input.file3").val();
98 var ocan = 100;
99
100
101
102 var canarr = [0,1,2,3,4,5,6];
103 if(oshouji.length==0){
104 ocan=0;
105 }else if(ofdji.length==0){
106 ocan=1;
107 }else if(ochjiah.length==0){
108 ocan=2;
109 }else if(ozhenm.length==0){
110 ocan=3;
111 }else if(opfanm.length==0){
112 ocan=4;
113 }else if(oshilm.length==0){
114 ocan=5;
115 }else if(!isPhone(oshouji)){
116 ocan=6;
117 }
118
119 var arr=[
120 "手机号为空,请输入手机号",
121 "发动机号为空,请输入发动机号",
122 "车架号为空,请输入车架号",
123 "身份证正面照为空,请输入身份证正面照",
124 "身份证反面照为空,请输入身份证反面照",
125 "自拍照为空,请输入自拍照",
126 "手机号输入错误,请输入正确的手机号"
127 ];
128
129 if(canarr.indexOf(ocan)!=-1){
130 console.log("ocan: "+ocan);
131 console.log(arr);
132 layer.msg(arr[ocan]);
133 return false;
134 }else{
135 return true;
136 }
137
138
139 }
140
141 //检测手机号码
142 function isPhone(phone) {
143 if (phone == null || phone == '') {
144 // layer.msg('请填写手机号码');
145 return false;
146 }
147 //验证号码
148 var phoneReg = /(^1[3|4|5|7|8|9]\d{9}$)|(^09\d{8}$)/ig;
149 if (!phoneReg.test(phone)) {
150 // layer.msg('请填写正确的手机号码');
151 return false;
152 } else {
153 return true;
154 }
155 };
156 })
View Code
得到的图片上传如下:
备注:之所以一开始有点懵,是因为对需求没有明确分析,认真分析之后,会发现其实都是些比较简单而且容易的功能。认真分析之后,才能把东西做出来 |


【本文地址】