| Elasticsearch 多种跨机房灾备方案对比与实战解读 | 您所在的位置:网站首页 › es集群redyellow › Elasticsearch 多种跨机房灾备方案对比与实战解读 |
Elasticsearch 多种跨机房灾备方案对比与实战解读
|
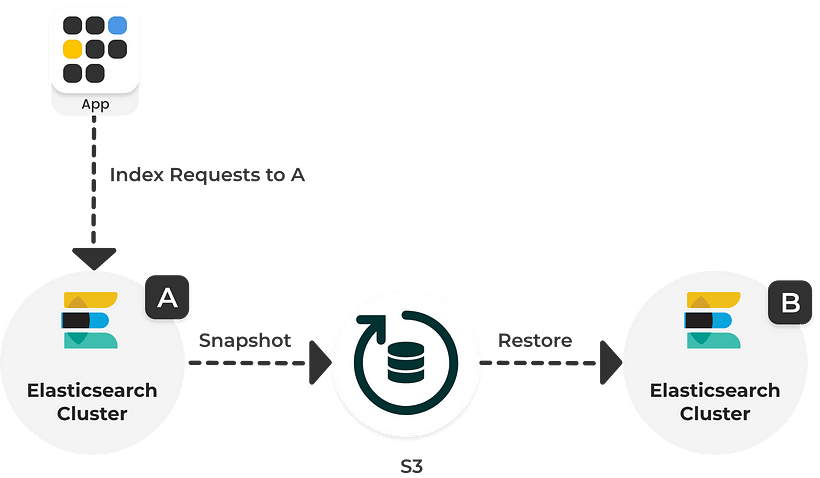
1 引言 Elasticsearch 集群的高可用,保证服务的连续性是企业最关注的需求。通常当企业达到一定规模时,不管是在云上还是线下都会有多个机房做异地灾备,确保在某个机房不可用时,还能持续对外提供业务。本文将会介绍几种 Elasticsearch 常见的灾备方案,同时提供了 Demo 案例方便大家动手体验。 2 方案概要方案定期快照跨机房部署集群应用双写借助消息队列实现双写CCR 跨集群复制极限网关描述定期将索引备份到外部存储,例如 S3,HDFS。备份的数据可以在备集群中恢复。一个集群中的节点分布在不同的机房。应用程序同时将数据写入两个集群。应用程序先将数据写入消息队列,然后由下游的消费者消费并写入集群。Elasticsearch 官方的跨集群复制功能,基于文档操作实现订阅复制。写请求交给网关,网关实时写入主集群,然后异步写备集群。优点1.一致性高。2.成本低。3.即使主集群和备集群都崩溃,仍然通过快照将数据恢复到新集群中。1.部署简单。2.成本低。3.一致性高。1.应用端灵活可控,开发简单。1.数据可靠性高,不易丢失。1.一致性高。2.设置简单。3.延迟低。4.提供完善的 API ,可以监控同步进度。1.无缝透明,应用程序无需任何调整。2.网关自动处理故障情况。3.随时可以进行主备切换。4.一致性高,通过校验任务确保数据完全一致。缺点1.数据不是实时备份,通过快照恢复时,延迟可能导致数据丢失。 2.无法实时切换到备集群。1.对网络带宽和延迟要求较高,仅适用于同城灾备。2.可能由于机房间网络中断造成脑裂问题。1.一致性差。2.集群故障时数据会丢失。3.延迟高。1.引入额外的消息队列组件,维护成本高,开发难度大。2.延迟高。1.切换复杂,需要手动操作,并且切换的时候可能会丢数据。2.属于 Elastic Stack 的白金版(PLATINUM)付费功能,需要额外付费。3.从 Elasticsearch v6.7 版本开始才可以使用。4.集群之间拉取数据会增加额外的负载并影响磁盘和网络性能。 3 定期快照Elasticsearch 提供快照和恢复功能,我们可以在远程文件系统仓库(比如共享文件系统、S3、HDFS 等)中为部分索引或者整个集群创建快照。快照有以下使用场景: 数据灾备:当发生误删索引数据的情况时,可以使用快照来还原;在主集群无法正常工作时,可以使用快照在备集群上恢复数据。归档数据:随着数据的积累,集群中磁盘存储的压力会越来越大,对于一些时效性高的数据,比如日志、指标,我们往往只关心最近一段时间内的数据。对于时间比较早的数据,我们可以选择以快照的形式归档,以备后续有查询的需求。从 Elasticsearch 7.10 版本开始我们还可以结合 ILM 索引生命周期管理,在 Cold 和 Frozen 数据层使用可搜索快照进一步降低存储成本。迁移数据:当需要将数据从一个集群迁移到另一个集群时,使用快照是一种高效的选择。
使用快照的方式做跨机房灾备的优点如下: 1.一致性高,快照是十分可靠的集群备份方式。2.成本低,可以使用廉价的存储来保存快照,例如在公有云上的 S3,OSS,GCS 等等。3.只要可以访问到外部文件系统中存储的快照数据,即使在主集群和备集群都崩溃的情况下,仍然通过快照将数据恢复到新集群中。快照方法的主要缺点如下: 1.数据无法实时备份,通过快照恢复时,延迟可能导致数据丢失。例如,如果用户指定每 5 分钟执行一次快照备份,则正在备份的数据始终会延迟 5 分钟。如果在执行最后一个快照 4 分钟后集群出现故障,则这 4 分钟的数据将完全丢失。2.快照无法实时进行恢复,当主集群不可用时,需要手动在备集群上使用快照恢复数据,在这期间将无法对外提供服务。4 跨机房部署集群跨机房部署 Elasticsearch 集群的方案在实现起来比较简单,就是将集群中的节点分布在不同的机房中,这对网络带宽和延迟要求较高,仅适用于同城灾备,异地灾备通常还是使用主备集群的方式。 跨机房部署集群时,我们应确保同一个索引主分片和副分片分布在不同的机房中,这样当某一个机房挂掉后另外一个机房仍然保留完整的数据,数据仍然可靠。 在公有云上可以支持跨多可用区的集群架构部署,得益于云上网络设施的完善,网络的延迟可以做到很低。本小节的案例来自 腾讯云 Elasticsearch 集群多可用区容灾实现原理及最佳实践,感兴趣的同学可以点击查看详情。 例如下图所示,在上海地域选择了三可用区集群的部署,数据节点数量选择 6 个。Elasticsearch 会自动将 6 个数据节点均衡地分布在三个可用区中,并对每个节点标记上可用区属性,从而可以通过可用区感知功能将索引的分片自动分布在多可用区中。
Elasticsearch 6.7 版本中引入跨集群复制(CCR, Cross-Cluster Replication)功能,支持将指定的索引从一个 Elasticsearch 集群复制到一个或多个 Elasticsearch 集群。跨集群复制属于 Elastic Stack 的白金版(PLATINUM)付费功能,需要额外付费才可以使用,关于 Elastic Stack 订阅模式参见 Elastic Stack 订阅。
跨集群复制使用主动-被动模型(active-passive model),复制更改的索引称为“追随者索引”(follower Index),被复制的索引称为“领导者索引”(leader index)。当 leader index 收到写入时,follower index 会从远程集群上的 leader index 上基于文档操作实现订阅复制。当配置复制规则时,可以指定特定的索引进行复制;也可以通过 auto-follow pattern 以通配符的形式自动匹配多个索引,创建复制规则后新创建的索引也会自动匹配。 follower index 是被动的,它可以服务于读取请求,但不能接受写入请求,只有 leader index 可以接受写入请求。当主集群发生宕机时,如果我们想让在备集群中的 follower index 接管服务,允许进行写入请求,需要依次暂停索引的复制,关闭索引,取消跟随 leader index,最后将其重新打开为普通的索引,整套操作下来非常复杂,而且无法进行回切,这也是 CCR 跨集群复制最大的一个问题。 针对上述问题,这里也提供了一种解决方案,那就是双向复制(CCR bi-directional replication)。如下图所示,我们可以在集群 cluster01 上创建索引 logs-cluster01,并在集群 cluster02 上复制该索引;在集群 cluster02 上创建索引 logs-cluster02 ,并在集群 cluster01 上复制该索引。然后在两个集群上创建别名 logs 指向索引 logs-cluster01 和 logs-cluster02,对外可以提供统一的索引名。别名指向的多个索引中,只能有一个索引是允许接收写入请求的,在 cluster01 将索引 logs-cluster01 设置为可写,logs-cluster02 索引中的数据将会通过 CCR 跨集群复制从集群 cluster02 中获取;集群 cluster02 的别名设置相反。通过以上设置,应用程序在读写的时候都往 logs 别名发送请求,假设当集群 cluster01 不可用时,我们可以继续使用集群 cluster02,并且依然是往 logs 别名发送请求,无需手动进行切换操作;当集群 cluster01 恢复后,会从上次记录的 checkpoint 继续从集群 cluster02 复制数据,也无需额外的切换操作。
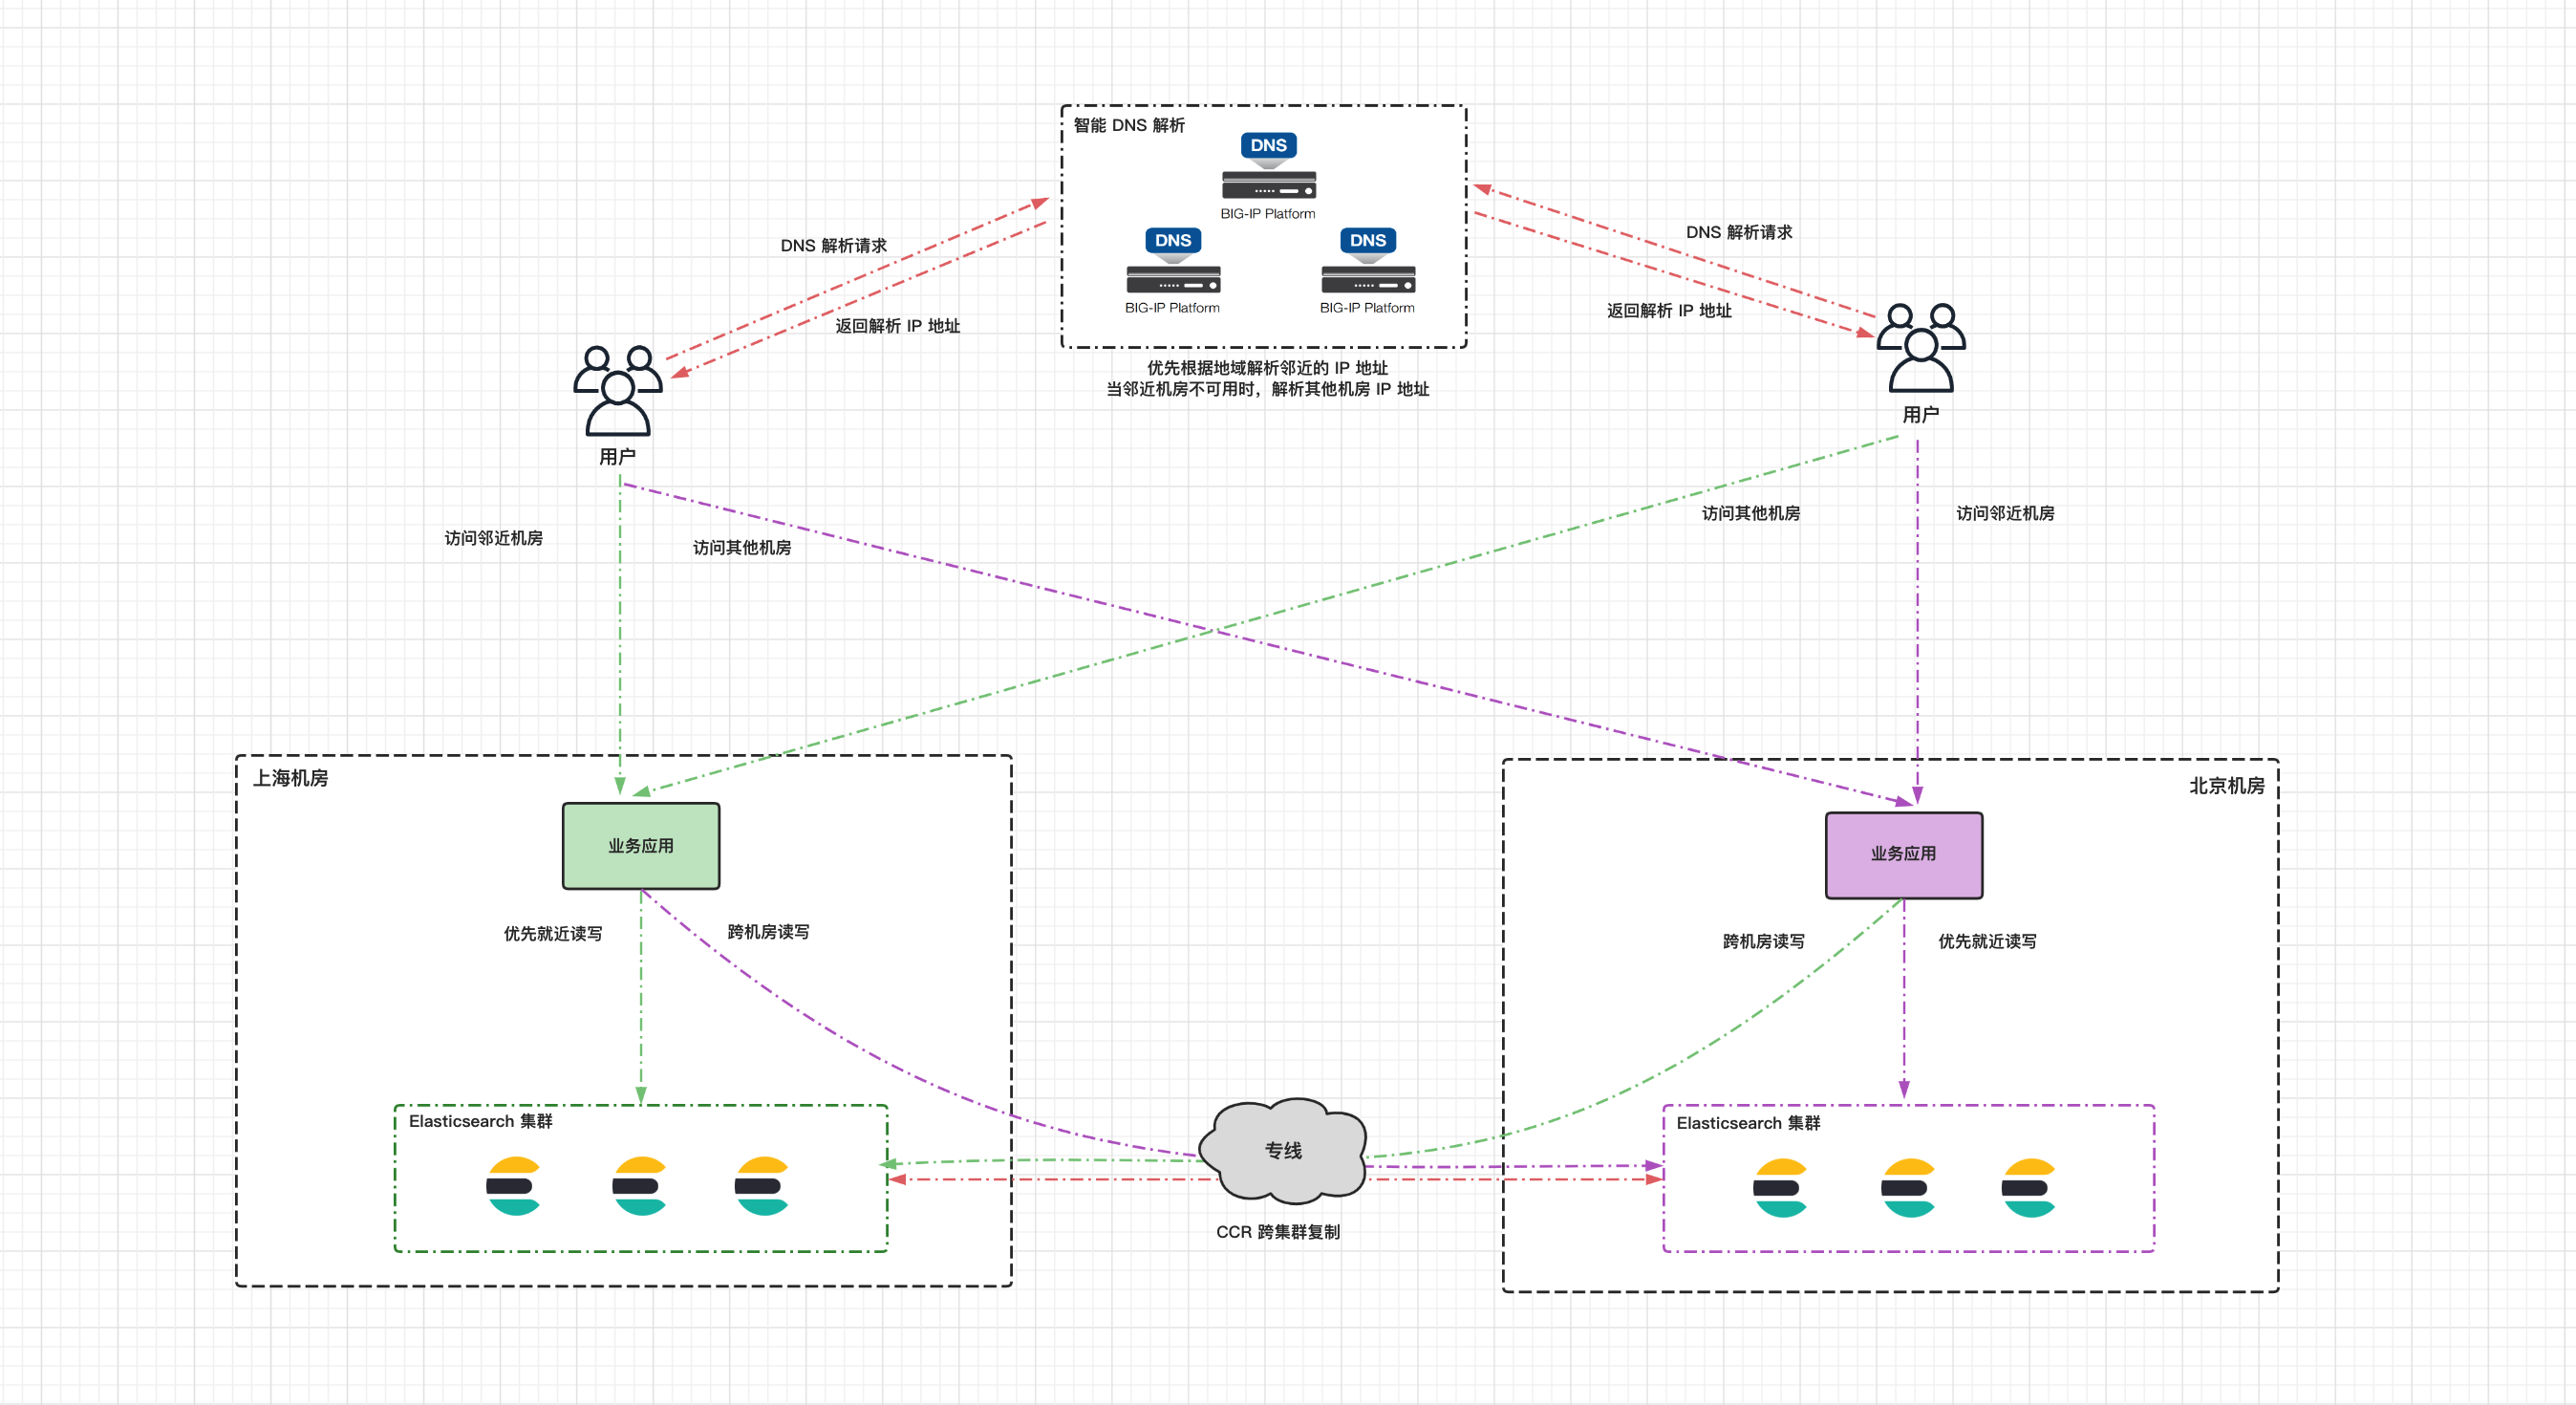
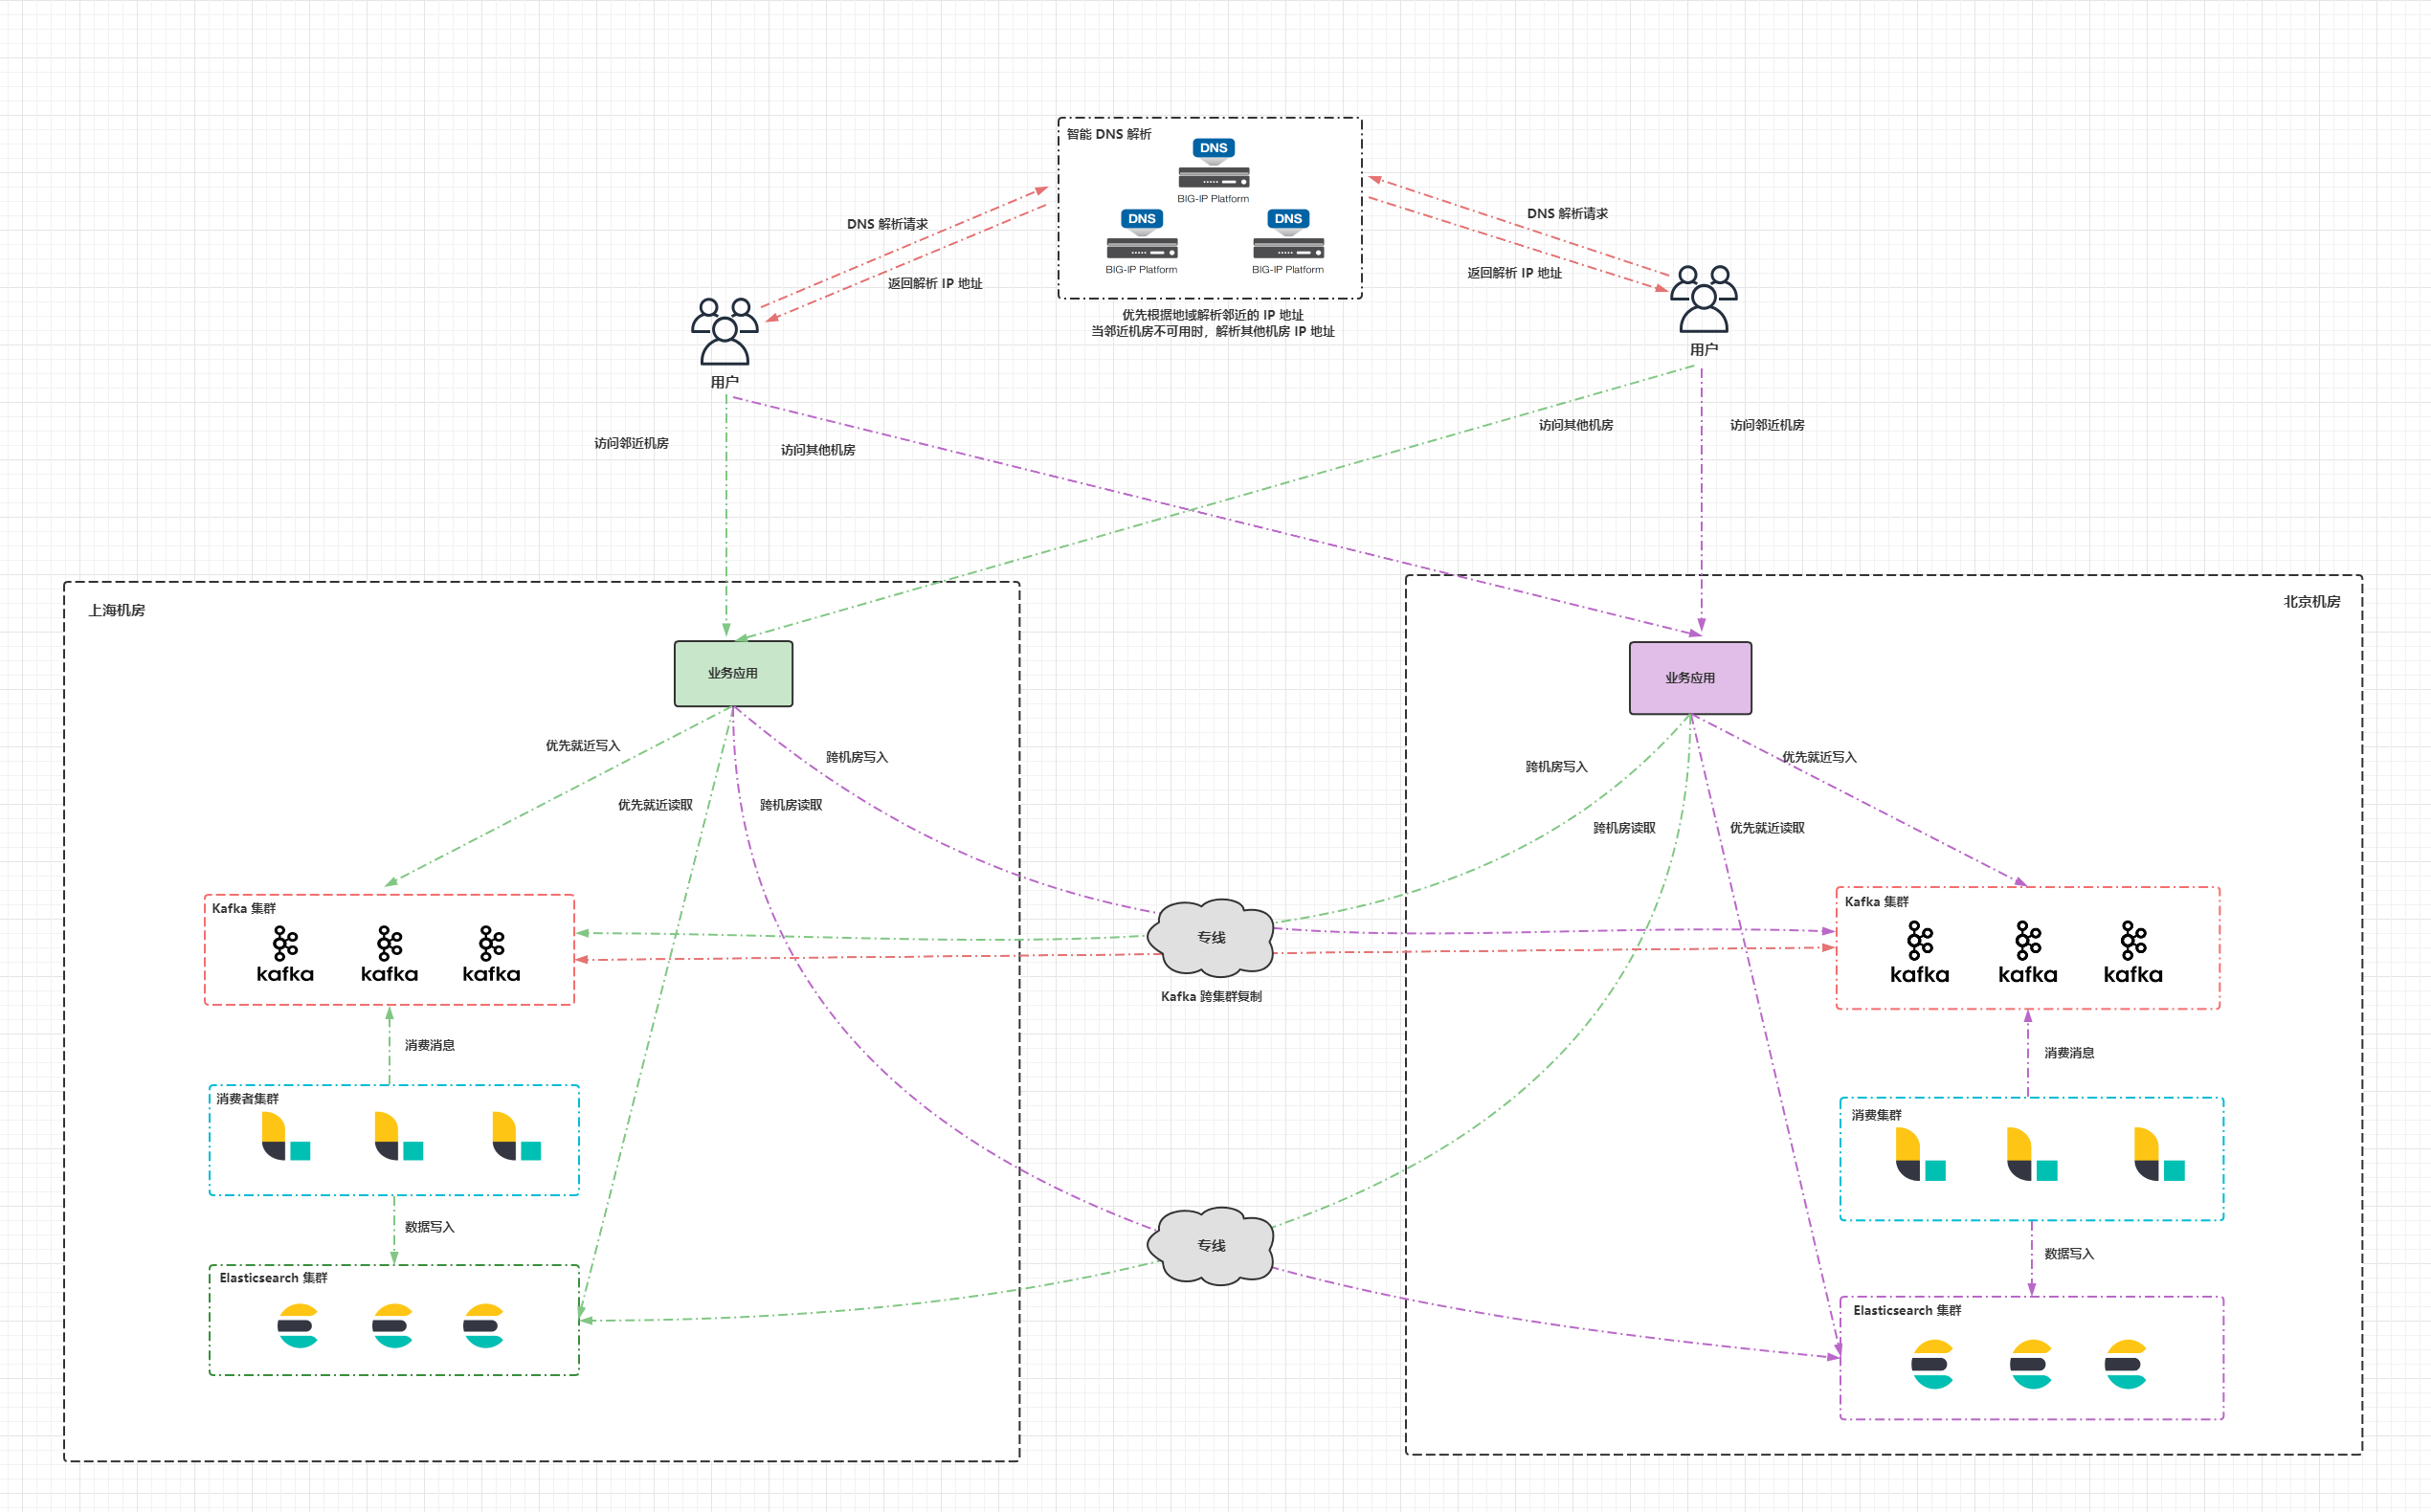
下图是双机房部署的一个整体架构图,在两个机房以双活的形式各部署一套 Elasticsearch 集群,同时对外提供服务,两个 Elasticsearch 集群配置 CCR 双向复制。机房之间的网络通过专线打通,用于承载 CCR 跨集群复制以及业务应用跨机房访问 Elasticsearch 集群的流量。业务应用的读写请求优先访问本机房的 Elasticsearch 集群,当本机房的集群出现不可用时,访问备机房的 Elasticsearch 集群。在公网部署一套智能 DNS 服务,根据用户的 IP 地址将域名解析到邻近用户机房的公网 IP,当整个机房出现故障时,才将域名解析到备机房的公网 IP。
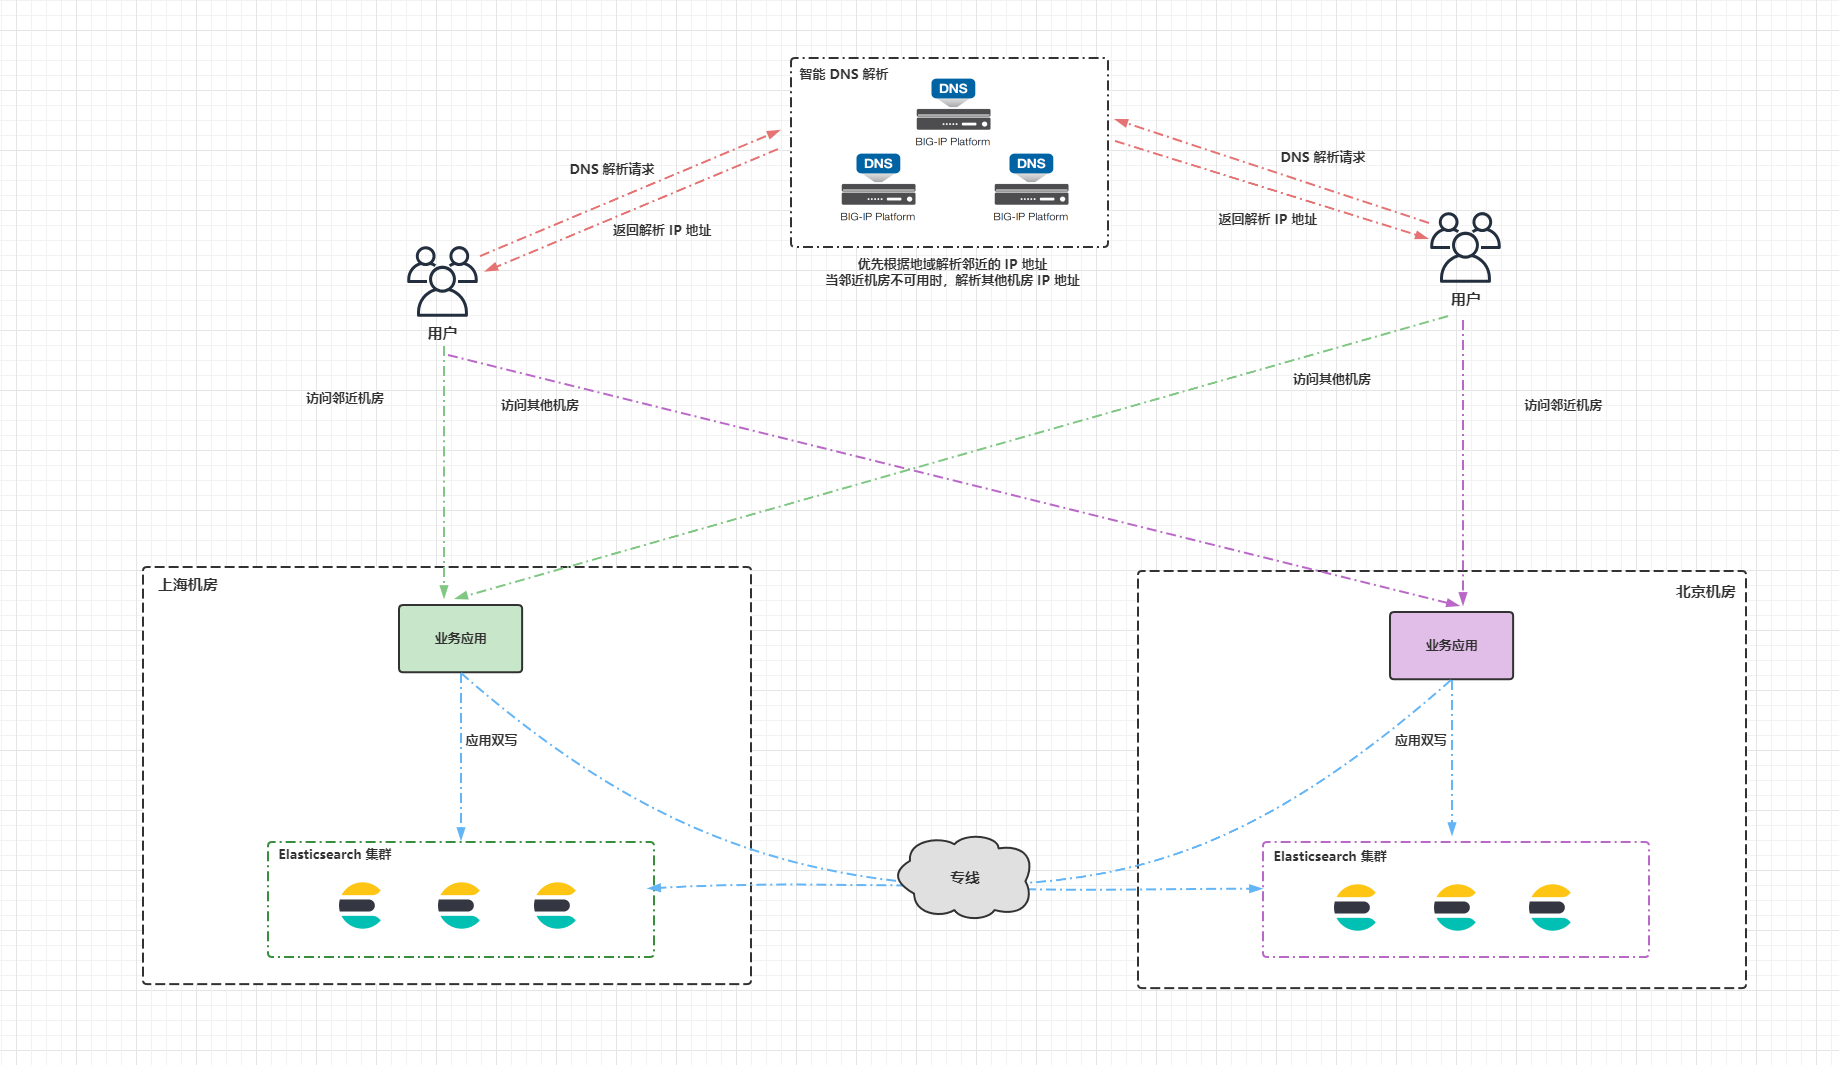
应用双写的做法就是应用程序直接将数据同时写入两个 Elasticsearch 集群,这样做的缺点比较明显: 1.一致性差,应用双写并非原子操作,假设上海机房的 Elasticsearch 集群写成功了,然而北京机房的 Elasticsearch 集群没写成功,将造成两个集群的数据不一致。2.假设北京机房的 Elasticsearch 集群宕机了,过一段时间集群又恢复了,在故障期间的数据将会丢失。3.每次写入请求都要跨机房处理,将会增加网络延迟。
借助消息队列实现双写是应用双写方案的改进版,借助消息队列(例如 Kafka,Pulsar)实现双写。应用程序优先将数据写入本机房的消息队列,当本机房的消息队列不可用时,才通过专线写入备机房的消息队列;应用程序在查询数据的时候优先访问本机房的 Elasticsearch 集群,当本机房的集群不可用时,才访问备机房的 Elasticsearch 集群。两个机房消息队列间的数据通过消息队列的跨集群复制保持最终一致。在下游通过消费者程序消费本机房消息队列中的数据,然后写入 Elasticsearch 集群中,当 Elasticsearch 集群数据写入失败或者宕机时,消费者程序要有相应的重试或者异常处理机制。当消费者程序挂掉时,数据会暂停写入 Elasticsearch 集群,消息队列会有 offset 记录消费者消费的进度,当消费者程序恢复后,可以从上一次的 offset 继续消费消息。
借助消息队列实现双写的好处就是数据可靠性高,不易丢失,诸如 Kafka,Pulsar 这类消息队列都有完善的跨集群复制方案。缺点是引入了额外的消息队列组件,增加了维护难度,消费者程序的开发也要投入额外的精力,另外在请求链路上也会带来一定的延迟。 8 极限网关极限网关 (INFINI Gateway) 是一个面向 Elasticsearch 的高性能应用网关,网关位于应用程序和 Elasticsearch 之间,应用程序将以往直接发送给 Elasticsearch 的请求都发送给网关,再由网关转发给请求到后端的 Elasticsearch 集群。网关对于应用程序而言是透明的,应用程序无需修改任何代码,就像访问 Elasticsearch 一样访问网关就可以。在网关上可以实现写入加速、查询加速、限速限流、流量监测、透明重试等一系列高级的功能。 我们可以使用极限网关透明处理主备集群的写入,进行无缝双写。写请求先同步写入主集群,当主集群写入成功以后,写入备集群的队列中,目前支持本地磁盘队列,未来将会支持 Kafka 作为队列。写入备集群的队列之后将会异步消费队列中的数据到备集群。当主集群不可用时,可以自动完成切换,将数据先同步写入原备集群,然后写入原主集群的队列,等待原主集群恢复后,再消费队列中的数据追加到原主集群中。 极限网关内置浮动 IP 功能,可以实现双机热备、故障转移的能力,提供高可用保障。当然也可以使用 F5, Nginx 等软硬件负载均衡设备下面挂多台极限网关实现高可用。相比于极限网关内置的浮动 IP 功能,使用 F5,Nginx 等负载均衡设备的方式会更加灵活,有 2 种方式实现高可用: 1.让网关以主备的方式提供服务,正常情况下只将流量分发给其中一台网关,当网关故障时,才将流量切换到另一台。2.多台极限网关同时提供服务,提升网关的吞吐量,多台网关同时工作的情况下最好基于 URL 路由等方式确保相同索引的流量分发到同一个极限网关。
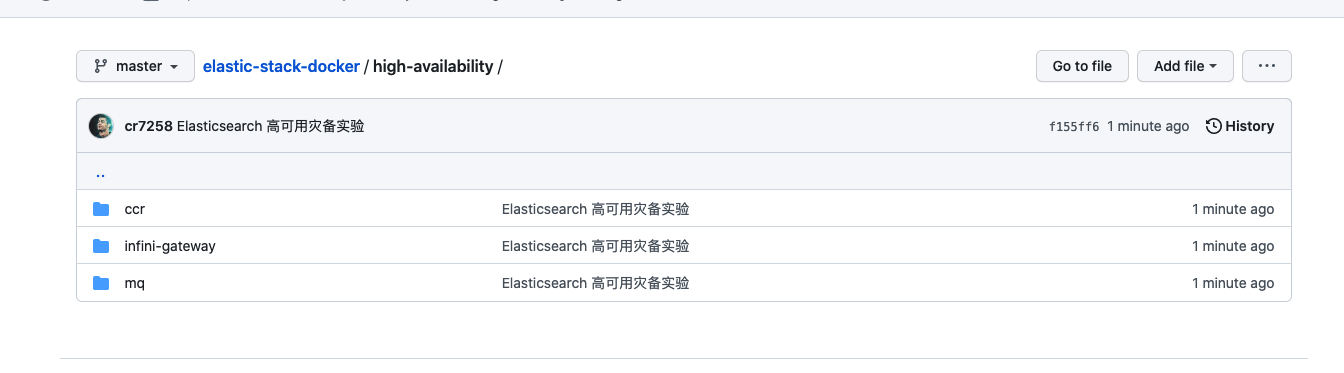
为了方便大家快速上手体验,我在 Github 上准备了 3 个 Demo 案例供大家使用。 10.1 克隆项目git clone https://github.com/cr7258/elastic-stack-docker.git在项目的 high-availability 目录下有三个目录,分别对应 3 个实验项目: ccr:跨集群复制infini-gateway:极限网关mq:借助消息队列实现双写
本次实验的环境使用 Docker 运行,需要先安装好 Docker 和 Docker Compose 工具。 10.2.1 安装 Docker关于不同平台 Docker 的安装文档参见 Install Docker Engine。使用以下命令在 Centos 操作系统安装 Docker。 sudo yum install -y yum-utils sudo yum-config-manager \ -- add-repo \ http://mirrors.aliyun.com/repo/Centos-7.repo sudo yum-config-manager \ --add-repo \ https://download.docker.com/linux/centos/docker-ce.repo sudo yum -y install slirp4netns fuse-overlayfs container-selinux sudo yum install -y docker-ce docker-ce-cli containerd.io使用以下命令启动 Docker 并设置开机自动启动。 systemctl start docker systemctl enable docker查看 Docker 进程状态。 root@ydt-net-demo01:/etc/yum.repos.d #systemctl status docker ● docker.service - Docker Application Container Engine Loaded: loaded (/usr/lib/systemd/system/docker.service; enabled; vendor preset: disabled) Active: active (running) since Mon 2021-12-27 10:55:20 CST; 12s ago Docs: https://docs.docker.com Main PID: 11269 (dockerd) CGroup: /system.slice/docker.service └─11269 /usr/bin/dockerd -H fd:// --containerd=/run/containerd/containerd.sock Dec 27 10:55:20 ydt-net-demo01 dockerd[11269]: time="2021-12-27T10:55:20.538010109+08:00" level=info msg="scheme \"unix\" not registered, fallback to def...dule=grpcDec 27 10:55:20 ydt-net-demo01 dockerd[11269]: time="2021-12-27T10:55:20.538029901+08:00" level=info msg="ccResolverWrapper: sending update to cc: {[{uni...dule=grpcDec 27 10:55:20 ydt-net-demo01 dockerd[11269]: time="2021-12-27T10:55:20.538042682+08:00" level=info msg="ClientConn switching balancer to \"pick_first\"...dule=grpcDec 27 10:55:20 ydt-net-demo01 dockerd[11269]: time="2021-12-27T10:55:20.587575323+08:00" level=info msg="Loading containers: start." Dec 27 10:55:20 ydt-net-demo01 dockerd[11269]: time="2021-12-27T10:55:20.745332083+08:00" level=info msg="Default bridge (docker0) is assigned with an IP... address"Dec 27 10:55:20 ydt-net-demo01 dockerd[11269]: time="2021-12-27T10:55:20.806689912+08:00" level=info msg="Loading containers: done." Dec 27 10:55:20 ydt-net-demo01 dockerd[11269]: time="2021-12-27T10:55:20.826460585+08:00" level=info msg="Docker daemon" commit=459d0df graphdriver(s)=ov...=20.10.12Dec 27 10:55:20 ydt-net-demo01 dockerd[11269]: time="2021-12-27T10:55:20.826606042+08:00" level=info msg="Daemon has completed initialization" Dec 27 10:55:20 ydt-net-demo01 systemd[1]: Started Docker Application Container Engine. Dec 27 10:55:20 ydt-net-demo01 dockerd[11269]: time="2021-12-27T10:55:20.876018043+08:00" level=info msg="API listen on /var/run/docker.sock"查看 Docker 版本。 root@ydt-net-demo01:/software/elastic-stack-docker/high-availability/ccr #docker version Client: Docker Engine - Community Version: 20.10.12 API version: 1.41 Go version: go1.16.12 Git commit: e91ed57 Built: Mon Dec 13 11:45:41 2021 OS/Arch: linux/amd64 Context: default Experimental: true Server: Docker Engine - Community Engine: Version: 20.10.12 API version: 1.41 (minimum version 1.12) Go version: go1.16.12 Git commit: 459d0df Built: Mon Dec 13 11:44:05 2021 OS/Arch: linux/amd64 Experimental: false containerd: Version: 1.4.12 GitCommit: 7b11cfaabd73bb80907dd23182b9347b4245eb5d runc: Version: 1.0.2 GitCommit: v1.0.2-0-g52b36a2 docker-init: Version: 0.19.0 GitCommit: de40ad010.2.2 安装 Docker Compose关于 Docker-Compose 详细的安装文档参见 Install Docker Compose。使用以下命令在 Linux 系统上安装 Docker Compose。 sudo curl -L "https://github.com/docker/compose/releases/download/1.29.2/docker-compose-$(uname -s)-$(uname -m)" -o /usr/local/bin/docker-compose sudo chmod +x /usr/local/bin/docker-compose查看 Docker Compose 版本。 root@ydt-net-demo01:/etc/yum.repos.d #docker-compose version docker-compose version 1.29.2, build 5becea4c docker-py version: 5.0.0 CPython version: 3.7.10 OpenSSL version: OpenSSL 1.1.0l 10 Sep 201910.3 CCR 跨集群复制10.3.1 环境准备10.3.1.1 配置文件docker-compose.yml 文件如下所示。 version: '3.8' services: # 集群 cluster01 # Elasticsearch es01: image: docker.elastic.co/elasticsearch/elasticsearch:7.16.2 container_name: es01 environment: # 节点名 - node.name=es01 # 集群名 - cluster.name=cluster01 # 指定单节点启动 - discovery.type=single-node # 开启内存锁定 - bootstrap.memory_lock=true # 设置内存大小 - "ES_JAVA_OPTS=-Xms2g -Xmx2g" # 启用安全 - xpack.security.enabled=true # 设置 elastic 用户密码 - ELASTIC_PASSWORD=test123 ulimits: memlock: soft: -1 hard: -1 # 映射到主机名的端口 宿主机端口:容器端口 ports: - 9200:9200 volumes: - data01:/usr/share/elasticsearch/data networks: - elastic # Kibana kib01: image: docker.elastic.co/kibana/kibana:7.16.2 container_name: kib01 ports: - 5601:5601 environment: # Elasticsearch 连接信息 ELASTICSEARCH_URL: http://es01:9200 ELASTICSEARCH_HOSTS: '["http://es01:9200"]' ELASTICSEARCH_USERNAME: elastic ELASTICSEARCH_PASSWORD: test123 networks: - elastic # 集群 cluster2 es02: image: docker.elastic.co/elasticsearch/elasticsearch:7.16.2 container_name: es02 environment: - node.name=es02 - cluster.name=cluster02 - discovery.type=single-node - bootstrap.memory_lock=true - "ES_JAVA_OPTS=-Xms2g -Xmx2g" - xpack.security.enabled=true - ELASTIC_PASSWORD=test123 ulimits: memlock: soft: -1 hard: -1 ports: - 9201:9200 volumes: - data02:/usr/share/elasticsearch/data networks: - elastic kib02: image: docker.elastic.co/kibana/kibana:7.16.2 container_name: kib02 ports: - 5602:5601 environment: ELASTICSEARCH_URL: http://es02:9200 ELASTICSEARCH_HOSTS: '["http://es02:9200"]' ELASTICSEARCH_USERNAME: elastic ELASTICSEARCH_PASSWORD: test123 networks: - elastic # 存储卷 volumes: data01: driver: local data02: driver: local # 网络 networks: elastic: driver: bridge10.3.1.2 启动容器进入 CCR 实验目录,启动容器。 cd ccr docker-compose up -d查看容器状态。 $ docker-compose ps Name Command State Ports --------------------------------------------------------------------------------------------------- es01 /bin/tini -- /usr/local/bi ... Up 0.0.0.0:9200->9200/tcp,:::9200->9200/tcp, 9300/tcp es02 /bin/tini -- /usr/local/bi ... Up 0.0.0.0:9201->9200/tcp,:::9201->9200/tcp, 9300/tcp kib01 /bin/tini -- /usr/local/bi ... Up 0.0.0.0:5601->5601/tcp,:::5601->5601/tcp kib02 /bin/tini -- /usr/local/bi ... Up 0.0.0.0:5602->5601/tcp,:::5602->5601/tcp浏览器分别通过 http://11.8.36.25:5601 和 http://11.8.36.25:5602 登录集群 cluster01 和集群 cluster02 的 Kibana 界面。用户名 elastic,密码 test123。
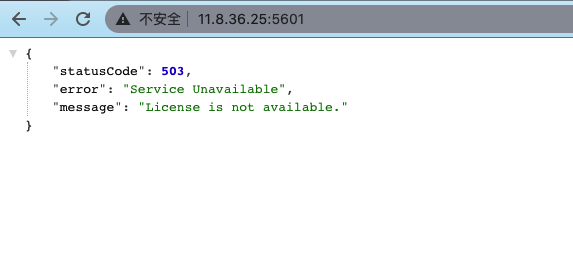
分别在 Kibana 上查看两个集群的信息。 # 查看集群 cluster01 GET / # 返回结果 { "name" : "es01", "cluster_name" : "cluster01", "cluster_uuid" : "ghl1eSfoRIegzMaVlBNSng", "version" : { "number" : "7.16.2", "build_flavor" : "default", "build_type" : "docker", "build_hash" : "2b937c44140b6559905130a8650c64dbd0879cfb", "build_date" : "2021-12-18T19:42:46.604893745Z", "build_snapshot" : false, "lucene_version" : "8.10.1", "minimum_wire_compatibility_version" : "6.8.0", "minimum_index_compatibility_version" : "6.0.0-beta1" }, "tagline" : "You Know, for Search" } # 查看集群 cluster02 GET / # 返回结果 { "name" : "es02", "cluster_name" : "cluster02", "cluster_uuid" : "u0ph2Sl7TKeWQd-Nps5QyA", "version" : { "number" : "7.16.2", "build_flavor" : "default", "build_type" : "docker", "build_hash" : "2b937c44140b6559905130a8650c64dbd0879cfb", "build_date" : "2021-12-18T19:42:46.604893745Z", "build_snapshot" : false, "lucene_version" : "8.10.1", "minimum_wire_compatibility_version" : "6.8.0", "minimum_index_compatibility_version" : "6.0.0-beta1" }, "tagline" : "You Know, for Search" }10.3.1.3 激活 LicenseCCR 是 Elastic Stack 的白金版(PLATINUM)付费功能,可以激活 30 天免费试用体验 Elastic Stack 的付费功能。点击 Stack Management > License Management > Start a 30-day trail 开启试用。
激活成功后如下图所示。
跨集群复制的工作原理是:重放对 leader index 分片执行的单个写入操作的历史记录。Elasticsearch 需要在 leader index 的分片上保留这些操作的历史记录,以便它们可以被 follower index 的分片任务拉取,用于保留这些操作的底层机制是软删除。 Elasticsearch 7.0+ 之后版本已默认开启,无需单独配置。早期版本需要在 elasticsearch.yml 配置文件中通过静态参数进行配置。 index.soft_deletes.enabled:true10.3.2 连接远程集群在集群 cluster02(备集群) 上配置连接的远程集群 cluster01(主集群)。 PUT /_cluster/settings { "persistent" : { "cluster" : { "remote" : { "es01" : { "seeds" : [ "es01:9300" ] } } } } }在集群 cluster02 上查看远程集群连接状态。 GET /_remote/info # 返回结果 { "es01" : { "connected" : true, # 已连接 "mode" : "sniff", "seeds" : [ "es01:9300" ], "num_nodes_connected" : 1, "max_connections_per_cluster" : 3, "initial_connect_timeout" : "30s", "skip_unavailable" : false } }在 Kibana 上查看远程集群。 CCR 跨集群复制可以指定特定的索引进行复制,前提是 leader index 已经在远程集群中存在。在初始化复制时,Elasticsearch 首先会将远程集群上 leader index 的 Lucence segment 文件拷贝到本地进行恢复,当恢复完成后,复制状态将会置为 Active,后续将基于文档操作进行订阅复制。 10.3.3.1 远程集群插入文档在创建 follower index 之前先往集群 cluster01 中插入 3 条文档。 POST index-1/_bulk {"index":{}} {"name":"tom","age":18} {"index":{}} {"name":"jack","age":19} {"index":{}} {"name":"tonny","age":20}10.3.3.2 创建 Follower index在集群 cluster02 上创建复制规则,复制集群 cluster01 上的索引 index-1 到本地的索引 index-1-follower 中。 PUT /index-1-follower/_ccr/follow?wait_for_active_shards=1 { "remote_cluster" : "es01", "leader_index" : "index-1" } # 返回结果 { "follow_index_created" : true, "follow_index_shards_acked" : true, "index_following_started" : true }在 Kibana 上查看 Follower index。 在集群 cluster02 上查询索引 index-1-follower 的数据,可以看到此时集群 cluster02 已经完全同步了 cluster01 上索引 index-1 中的数据。 GET index-1-follower/_search # 返回结果 { "took" : 2, "timed_out" : false, "_shards" : { "total" : 1, "successful" : 1, "skipped" : 0, "failed" : 0 }, "hits" : { "total" : { "value" : 3, "relation" : "eq" }, "max_score" : 1.0, "hits" : [ { "_index" : "index-1-follower", "_type" : "_doc", "_id" : "eipb_H0BgImMM5qOKz5h", "_score" : 1.0, "_source" : { "name" : "tom", "age" : 18 } }, { "_index" : "index-1-follower", "_type" : "_doc", "_id" : "eypb_H0BgImMM5qOKz5h", "_score" : 1.0, "_source" : { "name" : "jack", "age" : 19 } }, { "_index" : "index-1-follower", "_type" : "_doc", "_id" : "fCpb_H0BgImMM5qOKz5h", "_score" : 1.0, "_source" : { "name" : "tonny", "age" : 20 } } ] } }在集群 cluster01 上删除 name 为 tom 的文档,并插入一条新的文档。 POST index-1/_delete_by_query { "query": { "match": { "name": "tom" } } } POST index-1/_doc { "name": "peter", "age": 16 }在集群 cluster02 上查看文档,可以看到此时在集群 cluster02 也成功同步了刚刚的新增和删除的文档。 { "took" : 0, "timed_out" : false, "_shards" : { "total" : 1, "successful" : 1, "skipped" : 0, "failed" : 0 }, "hits" : { "total" : { "value" : 3, "relation" : "eq" }, "max_score" : 1.0, "hits" : [ { "_index" : "index-1-follower", "_type" : "_doc", "_id" : "eypb_H0BgImMM5qOKz5h", "_score" : 1.0, "_source" : { "name" : "jack", "age" : 19 } }, { "_index" : "index-1-follower", "_type" : "_doc", "_id" : "fCpb_H0BgImMM5qOKz5h", "_score" : 1.0, "_source" : { "name" : "tonny", "age" : 20 } }, { "_index" : "index-1-follower", "_type" : "_doc", "_id" : "fSrF_30BgImMM5qObz6_", "_score" : 1.0, "_source" : { "name" : "peter", "age" : 16 } } ] } }在集群 cluster02 上可以通过 Get follower stats API 来查看同步进度。leader_global_checkpoint 和 follower_global_checkpoint 差值表示 follower index 落后于 leader index 的程度。 GET index-1-follower/_ccr/stats # 返回结果 { "indices" : [ { "index" : "index-1-follower", "shards" : [ { "remote_cluster" : "es01", "leader_index" : "index-1", "follower_index" : "index-1-follower", "shard_id" : 0, "leader_global_checkpoint" : 2, "leader_max_seq_no" : 2, "follower_global_checkpoint" : 2, "follower_max_seq_no" : 2, "last_requested_seq_no" : 2, "outstanding_read_requests" : 1, "outstanding_write_requests" : 0, "write_buffer_operation_count" : 0, "write_buffer_size_in_bytes" : 0, "follower_mapping_version" : 2, "follower_settings_version" : 1, "follower_aliases_version" : 1, "total_read_time_millis" : 12, "total_read_remote_exec_time_millis" : 6, "successful_read_requests" : 1, "failed_read_requests" : 0, "operations_read" : 3, "bytes_read" : 312, "total_write_time_millis" : 18, "successful_write_requests" : 1, "failed_write_requests" : 0, "operations_written" : 3, "read_exceptions" : [ ], "time_since_last_read_millis" : 13903 } ] } ] }由于 follower index 是被动的,只能接受查询请求,不能处理写入请求。因此在集群 cluster02 上不允许对 follower index 进行新增、修改或者删除操作。 POST index-1-follower/_doc { "name": "mary", "age": 20 } # 返回结果 { "error" : { "root_cause" : [ { "type" : "status_exception", "reason" : "a following engine does not accept operations without an assigned sequence number" } ], "type" : "status_exception", "reason" : "a following engine does not accept operations without an assigned sequence number" }, "status" : 403 }如果想要在 cluster02 上对 index-1-follower 索引做写入、更新、删除等操作,需要依次对索引进行 pause_follow、close、unfollow 操作,以停止对 leadear index 的同步。最后再 open 索引,才可以在 cluster02 上对 index-1-follower 执行写入请求。 # 暂停同步 POST /index-1-follower/_ccr/pause_follow # 关闭索引 POST index-1-follower/_close # 停止同步 POST /index-1-follower/_ccr/unfollow # 打开索引 POST index-1-follower/_open # 此时可以写入数据 POST index-1-follower/_doc { "name": "mary", "age": 20 }但是需要特别注意的是,在关闭同步并插入新的数据以后,如果重新同步,这些新插入的数据将会丢失。 10.3.4 通过 Auto-follow pattern 自动跟随模式进行复制除了指定特定索引进行复制以外,Elasticsearch 还支持通过 auto-follow pattern 自动跟随模式进行复制,auto-follow pattern 允许以通配符的方式匹配多个索引,这非常适合复制时间序列的索引。例如 my-app-* 可以匹配 my-app-2021.12.30 和 my-app-2021.12.31 等多个索引。使用 auto-follow pattern 时,不需要主集群上已经存在 leader index,对于主集群上新创建的索引,也会自动应用复制规则。 10.3.4.1 创建 Auto-follow pattern在集群 cluster02 上创建复制规则,复制集群 cluster01 上以 my-index- 和 my-app- 开头的索引,并在复制的索引名后加上 copy 字符串。 PUT /_ccr/auto_follow/my-index { "remote_cluster" : "es01", "leader_index_patterns" : [ "my-index-*", "my-app-*" ], "follow_index_pattern" : "{{leader_index}}-copy" }查看 Auto-follow patterns 复制规则。 在集群 cluster01 上 分别往索引 my-index-1 和 my-app-1 中各插入 3 条文档。 POST my-index-1/_bulk {"index":{}} {"name":"tom","age":18} {"index":{}} {"name":"jack","age":19} {"index":{}} {"name":"tonny","age":20} POST my-app-1/_bulk {"index":{}} {"color":"blue","price":100} {"index":{}} {"color":"yellow","price":50} {"index":{}} {"color":"green","price":20}10.3.4.3 验证同步在集群 cluster02 上可以看到两个索引都已经成功复制过来了。 GET my-index-1-copy/_search # 返回结果 { "took" : 0, "timed_out" : false, "_shards" : { "total" : 1, "successful" : 1, "skipped" : 0, "failed" : 0 }, "hits" : { "total" : { "value" : 3, "relation" : "eq" }, "max_score" : 1.0, "hits" : [ { "_index" : "my-index-1-copy", "_type" : "_doc", "_id" : "girm_30BgImMM5qO_z6h", "_score" : 1.0, "_source" : { "name" : "tom", "age" : 18 } }, { "_index" : "my-index-1-copy", "_type" : "_doc", "_id" : "gyrm_30BgImMM5qO_z6h", "_score" : 1.0, "_source" : { "name" : "jack", "age" : 19 } }, { "_index" : "my-index-1-copy", "_type" : "_doc", "_id" : "hCrm_30BgImMM5qO_z6h", "_score" : 1.0, "_source" : { "name" : "tonny", "age" : 20 } } ] } } GET my-app-1-copy/_search # 返回结果 { "took" : 0, "timed_out" : false, "_shards" : { "total" : 1, "successful" : 1, "skipped" : 0, "failed" : 0 }, "hits" : { "total" : { "value" : 3, "relation" : "eq" }, "max_score" : 1.0, "hits" : [ { "_index" : "my-app-1-copy", "_type" : "_doc", "_id" : "hSrn_30BgImMM5qOBT5A", "_score" : 1.0, "_source" : { "color" : "blue", "price" : 100 } }, { "_index" : "my-app-1-copy", "_type" : "_doc", "_id" : "hirn_30BgImMM5qOBT5A", "_score" : 1.0, "_source" : { "color" : "yellow", "price" : 50 } }, { "_index" : "my-app-1-copy", "_type" : "_doc", "_id" : "hyrn_30BgImMM5qOBT5A", "_score" : 1.0, "_source" : { "color" : "green", "price" : 20 } } ] } }10.3.5 双向复制通过双向复制(CCR bi-directional replication)可以做到:当 cluster01 集群不可用时,我们可以继续通过 log 别名往 cluster02 集群上读写数据,无需手动进行切换。当 cluster01 集群恢复后,会自动继续从集群 cluster02 同步数据。 在 10.3.2 连接远程集群 小节中我们已经在集群 cluster02 上添加了集群 cluster01 为远程集群,要启用双向复制,需要在集群 cluster01 上也添加集群 cluster02 为远程集群。 PUT /_cluster/settings { "persistent" : { "cluster" : { "remote" : { "es02" : { "seeds" : [ "es02:9300" ] } } } } }在 Kibana 上查看 cluster01 的远程集群。 在集群 cluster01 上创建索引。 PUT logs-cluster1在集群 cluster02 上创建索引。 PUT logs-cluster210.3.5.2 创建复制规则在集群 cluster01 上创建复制规则。 PUT logs-cluster2/_ccr/follow { "remote_cluster" : "es02", "leader_index" : "logs-cluster2" }在集群 cluster02 上创建复制规则。 PUT logs-cluster1/_ccr/follow { "remote_cluster" : "es01", "leader_index" : "logs-cluster1" }10.3.5.3 设置别名在集群 cluster01 上设置别名。 POST _aliases { "actions": [ { "add": { "index": "logs-cluster1", "alias": "logs", "is_write_index": true } } ] }在集群 cluster02 上设置别名。 POST _aliases { "actions": [ { "add": { "index": "logs-cluster2", "alias": "logs", "is_write_index": true } } ] }稍等几秒等待别名同步完成。在集群 cluster01 上查看别名。 GET _cat/aliases/logs?v # 返回结果 alias index filter routing.index routing.search is_write_index logs logs-cluster2 - - - false logs logs-cluster1 - - - true在集群 cluster02 上查看别名。 GET _cat/aliases/logs?v # 返回结果 alias index filter routing.index routing.search is_write_index logs logs-cluster1 - - - false logs logs-cluster2 - - - true可以看到在集群 cluster01 上别名 logs 中包含两个索引,其中 logs-cluster-1 是在 cluster01 集群上可以进行写操作的,logs-cluster-2 索引只读,用于从 cluster02 集群上复制数据。集群 cluster02 上别名 logs 中也包含两个索引,和集群 cluster01 上的情况相反。 10.3.5.4 验证同步往集群 cluster01 中插入一条文档。 POST logs/_doc { "message": "log from cluster01" }往集群 cluster02 中插入一条文档。 POST logs/_doc { "message": "log from cluster02" }在集群 cluster01 和集群 cluster02上都可以通过查询 log 别名找到两个文档。 GET logs/_search # 返回结果 { "took" : 695, "timed_out" : false, "_shards" : { "total" : 2, "successful" : 2, "skipped" : 0, "failed" : 0 }, "hits" : { "total" : { "value" : 2, "relation" : "eq" }, "max_score" : 1.0, "hits" : [ { "_index" : "logs-cluster1", "_type" : "_doc", "_id" : "uyomAH4BgImMM5qO9z4z", "_score" : 1.0, "_source" : { "message" : "log from cluster01" } }, { "_index" : "logs-cluster2", "_type" : "_doc", "_id" : "tZYnAH4BzSYcxWyKEv6B", "_score" : 1.0, "_source" : { "message" : "log from cluster02" } } ] } }10.3.6 故障测试基于双向复制的情况下,停止 es01 容器,模拟 Elasticsearch 集群故障场景。 docker-compose stop es01此时集群 cluster01 已经不可用。
接着往集群 cluster02 中插入 1 条文档。 POST logs/_doc { "message": "new log from cluster02" }重新启动 es01 容器。 docker-compose start es01在集群 cluster01 上查看数据,可以看到新写入的文档也已经成功复制过来了。 GET logs/_search # 返回结果 { "took" : 9, "timed_out" : false, "_shards" : { "total" : 2, "successful" : 2, "skipped" : 0, "failed" : 0 }, "hits" : { "total" : { "value" : 3, "relation" : "eq" }, "max_score" : 1.0, "hits" : [ { "_index" : "logs-cluster1", "_type" : "_doc", "_id" : "UnNID34BlVYq_ve0ntZy", "_score" : 1.0, "_source" : { "message" : "log from cluster01" } }, { "_index" : "logs-cluster2", "_type" : "_doc", "_id" : "d9dID34BhqtuOGGDt6wB", "_score" : 1.0, "_source" : { "message" : "log from cluster02" } }, { "_index" : "logs-cluster2", "_type" : "_doc", "_id" : "ftdLD34BhqtuOGGDRKyS", "_score" : 1.0, "_source" : { "message" : "new log from cluster02" # 新插入的文档 } } ] } }10.3.7 清理现场cd ccr # -v 参数表示删除 volume docker-compose down -v 10.4 借助消息队列实现双写10.4.1 环境准备10.4.1.1 配置文件docker-compose.yml 文件如下所示。 version: '3.8' services: # 集群 cluster01 # Elasticsearch es01: image: docker.elastic.co/elasticsearch/elasticsearch:7.16.2 container_name: es01 environment: # 节点名 - node.name=es01 # 集群名 - cluster.name=cluster01 # 指定单节点启动 - discovery.type=single-node # 开启内存锁定 - bootstrap.memory_lock=true # 设置内存大小 - "ES_JAVA_OPTS=-Xms2g -Xmx2g" # 启用安全 - xpack.security.enabled=true # 设置 elastic 用户密码 - ELASTIC_PASSWORD=test123 ulimits: memlock: soft: -1 hard: -1 # 映射到主机名的端口 宿主机端口:容器端口 ports: - 9200:9200 volumes: - data01:/usr/share/elasticsearch/data networks: - elastic # Kibana kib01: image: docker.elastic.co/kibana/kibana:7.16.2 container_name: kib01 ports: - 5601:5601 environment: # Elasticsearch 连接信息 ELASTICSEARCH_URL: http://es01:9200 ELASTICSEARCH_HOSTS: '["http://es01:9200"]' ELASTICSEARCH_USERNAME: elastic ELASTICSEARCH_PASSWORD: test123 networks: - elastic # 集群 cluster2 es02: image: docker.elastic.co/elasticsearch/elasticsearch:7.16.2 container_name: es02 environment: - node.name=es02 - cluster.name=cluster02 - discovery.type=single-node - bootstrap.memory_lock=true - "ES_JAVA_OPTS=-Xms2g -Xmx2g" - xpack.security.enabled=true - ELASTIC_PASSWORD=test123 ulimits: memlock: soft: -1 hard: -1 ports: - 9201:9200 volumes: - data02:/usr/share/elasticsearch/data networks: - elastic kib02: image: docker.elastic.co/kibana/kibana:7.16.2 container_name: kib02 ports: - 5602:5601 environment: ELASTICSEARCH_URL: http://es02:9200 ELASTICSEARCH_HOSTS: '["http://es02:9200"]' ELASTICSEARCH_USERNAME: elastic ELASTICSEARCH_PASSWORD: test123 networks: - elastic zookeeper: image: bitnami/zookeeper:latest container_name: zookeeper user: root ports: - 2181:2181 environment: - ALLOW_ANONYMOUS_LOGIN=yes networks: - elastic # 消息队列 kafka: image: bitnami/kafka:latest container_name: kafka user: root ports: - 9092:9092 environment: - KAFKA_BROKER_ID=1 - KAFKA_CFG_LISTENERS=PLAINTEXT://:9092 - KAFKA_CFG_ADVERTISED_LISTENERS=PLAINTEXT://kafka:9092 - KAFKA_CFG_ZOOKEEPER_CONNECT=zookeeper:2181 - ALLOW_PLAINTEXT_LISTENER=yes depends_on: - zookeeper networks: - elastic # 消费者 logstash01: image: docker.elastic.co/logstash/logstash:7.16.2 container_name: logstash01 ports: - 9600:9600 volumes: - ./logstash-cluster01.conf:/usr/share/logstash/pipeline/logstash.conf networks: - elastic logstash02: image: docker.elastic.co/logstash/logstash:7.16.2 container_name: logstash02 ports: - 9601:9600 volumes: - ./logstash-cluster02.conf:/usr/share/logstash/pipeline/logstash.conf networks: - elastic # 存储卷 volumes: data01: driver: local data02: driver: local # 网络 networks: elastic: driver: bridge这里使用 Logstash 来消费 Kafka 集群中的数据,然后写入 Elasticsearch 集群。集群 cluster01 和 cluster02 分别对应一组 Logstash,使用不同的消费者组 id。Logstash 的配置文件如下: input { kafka { codec => "json" topics => ["index-1"] group_id => "logstash_cluster01" consumer_threads => 1 bootstrap_servers => "kafka:9092" } } output { elasticsearch { hosts => ["es01:9200"] index => "index-1" user => "elastic" password => "test123" } }10.4.1.2 启动容器进入消息队列实验目录,启动容器。 cd mq docker-compose up -d查看容器状态。 $ docker-compose ps Name Command State Ports ---------------------------------------------------------------------------------------------------------------------------- es01 /bin/tini -- /usr/local/bi ... Up 0.0.0.0:9200->9200/tcp,:::9200->9200/tcp, 9300/tcp es02 /bin/tini -- /usr/local/bi ... Up 0.0.0.0:9201->9200/tcp,:::9201->9200/tcp, 9300/tcp kafka /opt/bitnami/scripts/kafka ... Up 0.0.0.0:9092->9092/tcp,:::9092->9092/tcp kib01 /bin/tini -- /usr/local/bi ... Up 0.0.0.0:5601->5601/tcp,:::5601->5601/tcp kib02 /bin/tini -- /usr/local/bi ... Up 0.0.0.0:5602->5601/tcp,:::5602->5601/tcp logstash01 /usr/local/bin/docker-entr ... Up 5044/tcp, 0.0.0.0:9600->9600/tcp,:::9600->9600/tcp logstash02 /usr/local/bin/docker-entr ... Up 5044/tcp, 0.0.0.0:9601->9600/tcp,:::9601->9600/tcp zookeeper /opt/bitnami/scripts/zooke ... Up 0.0.0.0:2181->2181/tcp,:::2181->2181/tcp, 2888/tcp, 3888/tcp, 8080/tcp10.4.2 创建 Topic使用 exec 命令进入 Kafka 容器中。 docker-compose exec kafka bash创建 Topic index-1 ,Logstash 将会消费这个 Topic 的消息并将数据写入 Elasticsearch 的 index-1 索引中。 kafka-topics.sh --bootstrap-server 127.0.0.1:9092 \ --create --topic index-1 --partitions 1 --replication-factor 1查看创建的 Topic。 # 列出 topic kafka-topics.sh --bootstrap-server 127.0.0.1:9092 --list # 返回结果 index-1 # 查看 topic index-1 分区和副本信息 kafka-topics.sh --bootstrap-server 127.0.0.1:9092 \ --describe --topic index-1 # 返回结果 Topic: index-1 TopicId: ppi1f_loTn2p6BEGjM640w PartitionCount: 1 ReplicationFactor: 1 Configs: segment.bytes=1073741824 Topic: index-1 Partition: 0 Leader: 1 Replicas: 1 Isr: 110.4.3 验证同步往 Topic index-1 中写入 3 条消息。 kafka-console-producer.sh --bootstrap-server 127.0.0.1:9092 \ --topic index-1 # 输入 JSON 格式的数据 > {"name":"tom", "age": 18} > {"name":"mike", "age": 19} > {"name":"lisa", "age": 20}通过 Kibana 分别在 cluster01 和 cluster02 集群上查看索引 index-1 的数据,可以看到 Logstash 成功从 Kafka 消费消息并写入 Elasticsearch。 GET index-1/_search # 返回结果 { "took" : 3, "timed_out" : false, "_shards" : { "total" : 1, "successful" : 1, "skipped" : 0, "failed" : 0 }, "hits" : { "total" : { "value" : 3, "relation" : "eq" }, "max_score" : 1.0, "hits" : [ { "_index" : "index-1", "_type" : "_doc", "_id" : "Oa09CX4BZrgW9YGKOkMg", "_score" : 1.0, "_source" : { "@version" : "1", "@timestamp" : "2021-12-30T02:48:34.242Z", "name" : "tom", "age" : 18 } }, { "_index" : "index-1", "_type" : "_doc", "_id" : "Oq09CX4BZrgW9YGKRkO3", "_score" : 1.0, "_source" : { "@version" : "1", "@timestamp" : "2021-12-30T02:48:37.708Z", "name" : "mike", "age" : 19 } }, { "_index" : "index-1", "_type" : "_doc", "_id" : "O609CX4BZrgW9YGKWEPF", "_score" : 1.0, "_source" : { "@version" : "1", "@timestamp" : "2021-12-30T02:48:42.330Z", "name" : "lisa", "age" : 20 } } ] } }10.4.4 故障测试10.4.4.1 模拟 Elasticsearch 集群故障接下来模拟 Elasticsearch 集群故障的场景,停止 es01 容器。 docker-compose stop es01接着继续往 Kafka 中写入 2 条消息。 kafka-console-producer.sh --bootstrap-server 127.0.0.1:9092 \ --topic index-1 # 输入 JSON 格式的数据 > {"name":"peter", "age": 18} > {"name":"frank", "age": 19}此时 es01 已经无法正常访问。
查询集群 cluster02 可以看到数据可以正常写入,不受影响。 { "took" : 694, "timed_out" : false, "_shards" : { "total" : 1, "successful" : 1, "skipped" : 0, "failed" : 0 }, "hits" : { "total" : { "value" : 5, "relation" : "eq" }, "max_score" : 1.0, "hits" : [ { "_index" : "index-1", "_type" : "_doc", "_id" : "Oa09CX4BZrgW9YGKOkMg", "_score" : 1.0, "_source" : { "@version" : "1", "@timestamp" : "2021-12-30T02:48:34.242Z", "name" : "tom", "age" : 18 } }, { "_index" : "index-1", "_type" : "_doc", "_id" : "Oq09CX4BZrgW9YGKRkO3", "_score" : 1.0, "_source" : { "@version" : "1", "@timestamp" : "2021-12-30T02:48:37.708Z", "name" : "mike", "age" : 19 } }, { "_index" : "index-1", "_type" : "_doc", "_id" : "O609CX4BZrgW9YGKWEPF", "_score" : 1.0, "_source" : { "@version" : "1", "@timestamp" : "2021-12-30T02:48:42.330Z", "name" : "lisa", "age" : 20 } }, { "_index" : "index-1", "_type" : "_doc", "_id" : "Pa1GCX4BZrgW9YGK2UOd", "_score" : 1.0, "_source" : { "@version" : "1", "@timestamp" : "2021-12-30T02:59:05.139Z", "name" : "peter", "age" : 18 } }, { "_index" : "index-1", "_type" : "_doc", "_id" : "Pq1GCX4BZrgW9YGK7EMI", "_score" : 1.0, "_source" : { "@version" : "1", "@timestamp" : "2021-12-30T02:59:09.854Z", "name" : "frank", "age" : 19 } } ] } }现在我们重新启动 es01,logstash01 将会重试之前写入 es01 失败的数据。 docker-compose start es01在集群 cluster01 上查询数据,可以看到在集群宕机期间产生的 2 条数据也成功追加进来了。 { "took" : 1, "timed_out" : false, "_shards" : { "total" : 1, "successful" : 1, "skipped" : 0, "failed" : 0 }, "hits" : { "total" : { "value" : 6, "relation" : "eq" }, "max_score" : 1.0, "hits" : [ { "_index" : "index-1", "_type" : "_doc", "_id" : "lrROCX4BVL35GcLwNcG1", "_score" : 1.0, "_source" : { "age" : 19, "@version" : "1", "name" : "frank", "@timestamp" : "2021-12-30T03:07:07.466Z" } }, { "_index" : "index-1", "_type" : "_doc", "_id" : "lLRLCX4BVL35GcLws8Hi", "_score" : 1.0, "_source" : { "age" : 18, "@version" : "1", "name" : "peter", "@timestamp" : "2021-12-30T02:59:05.139Z" } }, { "_index" : "index-1", "_type" : "_doc", "_id" : "tv49CX4BAcbk4YbwWMvF", "_score" : 1.0, "_source" : { "age" : 20, "@version" : "1", "name" : "lisa", "@timestamp" : "2021-12-30T02:48:42.330Z" } }, { "_index" : "index-1", "_type" : "_doc", "_id" : "tf49CX4BAcbk4YbwRsu4", "_score" : 1.0, "_source" : { "age" : 19, "@version" : "1", "name" : "mike", "@timestamp" : "2021-12-30T02:48:37.708Z" } }, { "_index" : "index-1", "_type" : "_doc", "_id" : "tP49CX4BAcbk4YbwOsse", "_score" : 1.0, "_source" : { "age" : 18, "@version" : "1", "name" : "tom", "@timestamp" : "2021-12-30T02:48:34.243Z" } } ] } }10.4.4.2 模拟消费者故障为了方便我们观察,先清空 cluster01 和 cluster02 集群上 index-1 索引中的数据。 POST index-1/_delete_by_query { "query": { "match_all": {} } }接下来模拟消费者故障的场景,停止 logstash01。 docker-compose stop logstash01往 Kafka 中写入 3 条消息。 kafka-console-producer.sh --bootstrap-server 127.0.0.1:9092 \ --topic index-1 # 输入 JSON 格式的数据 > {"name":"cris", "age": 16} > {"name":"james", "age": 17} > {"name":"kavin", "age": 18}此时查询 cluster01 集群的索引 index-1 是没有数据的,因为 logstash01 已经停止工作。 GET index-1/_search # 返回结果 { "took" : 1, "timed_out" : false, "_shards" : { "total" : 1, "successful" : 1, "skipped" : 0, "failed" : 0 }, "hits" : { "total" : { "value" : 0, "relation" : "eq" }, "max_score" : null, "hits" : [ ] } }cluster02 集群上的索引 index-1 数据正常写入。 GET index-1/_search # 返回结果 { "took" : 2, "timed_out" : false, "_shards" : { "total" : 1, "successful" : 1, "skipped" : 0, "failed" : 0 }, "hits" : { "total" : { "value" : 3, "relation" : "eq" }, "max_score" : 1.0, "hits" : [ { "_index" : "index-1", "_type" : "_doc", "_id" : "Qq11CX4BZrgW9YGKTUNS", "_score" : 1.0, "_source" : { "@version" : "1", "@timestamp" : "2021-12-30T03:49:49.228Z", "name" : "cris", "age" : 16 } }, { "_index" : "index-1", "_type" : "_doc", "_id" : "Q611CX4BZrgW9YGKX0O_", "_score" : 1.0, "_source" : { "@version" : "1", "@timestamp" : "2021-12-30T03:49:54.135Z", "name" : "james", "age" : 17 } }, { "_index" : "index-1", "_type" : "_doc", "_id" : "RK11CX4BZrgW9YGKb0N_", "_score" : 1.0, "_source" : { "@version" : "1", "@timestamp" : "2021-12-30T03:49:58.166Z", "name" : "kavin", "age" : 18 } } ] } }此时分别查看 logstash01 和 logstash02 在 Kafka 上的消费情况。logstash01 所属的消费者组 logstash_cluster01 中已经没有活跃的成员了,并且剩余未消费的消息数(LAG)为 3,这 3 条就是我们在停止 logstash01 后写入的 3 条消息;logstash_cluster02 消费者组已经成功消费了所有的消息。 # 进入 Kafka 容器 $ docker-compose exec kafka bash # 查看消费者组 root@e23acd56e9e2:/# kafka-consumer-groups.sh --bootstrap-server 127.0.0.1:9092 --list # 两个 logstash 分别属于不同的消费者组 logstash_cluster01 logstash_cluster02 # 查看 logstash01 的消费情况 root@e23acd56e9e2:/# kafka-consumer-groups.sh --bootstrap-server 127.0.0.1:9092 --describe --group logstash_cluster01 Consumer group 'logstash_cluster01' has no active members. GROUP TOPIC PARTITION CURRENT-OFFSET LOG-END-OFFSET LAG CONSUMER-ID HOST CLIENT-ID logstash_cluster01 index-1 0 5 8 3 - - - # 查看 logstash02 的消费情况 root@e23acd56e9e2:/# kafka-consumer-groups.sh --bootstrap-server 127.0.0.1:9092 --describe --group logstash_cluster02 GROUP TOPIC PARTITION CURRENT-OFFSET LOG-END-OFFSET LAG CONSUMER-ID HOST CLIENT-ID logstash_cluster02 index-1 0 8 8 0 logstash-0-0925ce14-66c9-42a8-ae19-5d8186afada3 /192.168.32.5 logstash-0现在我们重新启动 logstash01,logstash01 会根据在 Kafka 中消费的 offset 继续消费消息 。 docker-compose start logstash01查看 cluster01 上的数据,可以看到 logstash01 已经将这剩余的 3 条数据写入 Elasticsearch 中了。 { "took" : 1, "timed_out" : false, "_shards" : { "total" : 1, "successful" : 1, "skipped" : 0, "failed" : 0 }, "hits" : { "total" : { "value" : 3, "relation" : "eq" }, "max_score" : 1.0, "hits" : [ { "_index" : "index-1", "_type" : "_doc", "_id" : "N6WCCX4BEydPylz69S3g", "_score" : 1.0, "_source" : { "age" : 16, "name" : "cris", "@version" : "1", "@timestamp" : "2021-12-30T04:04:44.503Z" } }, { "_index" : "index-1", "_type" : "_doc", "_id" : "NaWCCX4BEydPylz69S3f", "_score" : 1.0, "_source" : { "age" : 18, "name" : "kavin", "@version" : "1", "@timestamp" : "2021-12-30T04:04:44.527Z" } }, { "_index" : "index-1", "_type" : "_doc", "_id" : "NqWCCX4BEydPylz69S3g", "_score" : 1.0, "_source" : { "age" : 17, "name" : "james", "@version" : "1", "@timestamp" : "2021-12-30T04:04:44.526Z" } } ] } }10.4.5 清理现场cd mq # -v 参数表示删除 volume docker-compose down -v 10.5 极限网关10.5.1 环境准备10.5.1.1 配置文件docker-compose.yml 文件如下所示。 version: '3.8' services: # 集群 cluster01 # Elasticsearch es01: image: docker.elastic.co/elasticsearch/elasticsearch:7.16.2 container_name: es01 environment: # 节点名 - node.name=es01 # 集群名 - cluster.name=cluster01 # 指定单节点启动 - discovery.type=single-node # 开启内存锁定 - bootstrap.memory_lock=true # 设置内存大小 - "ES_JAVA_OPTS=-Xms2g -Xmx2g" # 启用安全 - xpack.security.enabled=true # 设置 elastic 用户密码 - ELASTIC_PASSWORD=test123 ulimits: memlock: soft: -1 hard: -1 # 映射到主机名的端口 宿主机端口:容器端口 ports: - 9200:9200 volumes: - data01:/usr/share/elasticsearch/data networks: - elastic # Kibana kib01: image: docker.elastic.co/kibana/kibana:7.16.2 container_name: kib01 ports: - 5601:5601 environment: # Elasticsearch 连接信息 ELASTICSEARCH_URL: http://es01:9200 ELASTICSEARCH_HOSTS: '["http://es01:9200"]' ELASTICSEARCH_USERNAME: elastic ELASTICSEARCH_PASSWORD: test123 networks: - elastic # 集群 cluster02 es02: image: docker.elastic.co/elasticsearch/elasticsearch:7.16.2 container_name: es02 environment: - node.name=es02 - cluster.name=cluster02 - discovery.type=single-node - bootstrap.memory_lock=true - "ES_JAVA_OPTS=-Xms2g -Xmx2g" - xpack.security.enabled=true - ELASTIC_PASSWORD=test123 ulimits: memlock: soft: -1 hard: -1 ports: - 9201:9200 volumes: - data02:/usr/share/elasticsearch/data networks: - elastic kib02: image: docker.elastic.co/kibana/kibana:7.16.2 container_name: kib02 ports: - 5602:5601 environment: ELASTICSEARCH_URL: http://es02:9200 ELASTICSEARCH_HOSTS: '["http://es02:9200"]' ELASTICSEARCH_USERNAME: elastic ELASTICSEARCH_PASSWORD: test123 networks: - elastic # 极限网关 infini-gateway: image: infinilabs/gateway:latest container_name: infini-gateway ports: - 2900:2900 - 8000:8000 - 8001:8001 - 8002:8002 volumes: - ./gateway.yml:/gateway.yml - data03:/software/infini-gateway networks: - elastic # 存储卷 volumes: data01: driver: local data02: driver: local data03: driver: local # 网络 networks: elastic: driver: bridge极限网关的配置文件 gateway.yml 如下所示。 # 数据路径 path.data: /software/infini-gateway/data # 日志路径 path.logs: /software/infini-gateway/log # 定义 Elasticsearch 集群地址 elasticsearch: # cluster01 集群 - name: cluster01 enabled: true endpoint: http://es01:9200 basic_auth: username: elastic password: test123 # cluster02 集群 - name: cluster02 enabled: true endpoint: http://es02:9200 basic_auth: username: elastic password: test123 # 定义网关入口 entry: - name: my_es_entry enabled: true router: my_router network: binding: 0.0.0.0:8000 # 定义工作流 flow: # 写请求优先发给主集群, 当主集群不可用时发给备集群 # 当主集群数据写入成功时,记录到队列中,异步消费写入备集群 - name: write-flow filter: - if: # 当主集群可用时 cluster_available: ["cluster01"] then: # 先将数据写入主集群 - elasticsearch: elasticsearch: "cluster01" # 写入消息队列,等待 pipeline 异步消费到备集群 - queue: queue_name: "cluster02-queue" else: - elasticsearch: elasticsearch: "cluster02" - queue: queue_name: "cluster01-queue" # 读请求优先发给主集群, 当主集群不可用时发给备集群 - name: read-flow filter: - if: cluster_available: ["cluster01"] then: - elasticsearch: elasticsearch: "cluster01" else: - elasticsearch: elasticsearch: "cluster02" # 路由规则 router: - name: my_router # 默认路由 default_flow: write-flow # 读请求路由 rules: - method: - "GET" - "HEAD" pattern: - "/{any:*}" flow: - read-flow - method: - "POST" - "GET" pattern: - "/_refresh" - "/_count" - "/_search" - "/_msearch" - "/_mget" - "/{any_index}/_count" - "/{any_index}/_search" - "/{any_index}/_msearch" - "/{any_index}/_mget" flow: - read-flow # 定义管道, 异步将数据写入备集群 pipeline: - name: cluster01-consumer auto_start: true keep_running: true processor: - queue_consumer: input_queue: "cluster01-queue" elasticsearch: "cluster01" when: cluster_available: ["cluster01"] # 当集群可用时,才消费队列中的数据 - name: cluster02-consumer auto_start: true keep_running: true processor: - queue_consumer: input_queue: "cluster02-queue" elasticsearch: "cluster02" when: cluster_available: ["cluster02"]10.5.1.2 启动容器进入极限网关实验目录,启动容器。 cd infini-gateway docker-compose up -d查看容器状态。 $ docker-compose ps Name Command State Ports ----------------------------------------------------------------------------------------------------------------------------------------- es01 /bin/tini -- /usr/local/bi ... Up 0.0.0.0:9200->9200/tcp,:::9200->9200/tcp, 9300/tcp es02 /bin/tini -- /usr/local/bi ... Up 0.0.0.0:9201->9200/tcp,:::9201->9200/tcp, 9300/tcp infini-gateway /gateway Up 0.0.0.0:2900->2900/tcp,:::2900->2900/tcp, 0.0.0.0:8000->8000/tcp,:::8000->8000/tcp, 0.0.0.0:8001->8001/tcp,:::8001->8001/tcp, 0.0.0.0:8002->8002/tcp,:::8002->8002/tcp kib01 /bin/tini -- /usr/local/bi ... Up 0.0.0.0:5601->5601/tcp,:::5601->5601/tcp kib02 /bin/tini -- /usr/local/bi ... Up 0.0.0.0:5602->5601/tcp,:::5602->5601/tcp查看极限网关日志,可以看到此时极限网关已经成功连接到集群 cluster01 和 cluster02。 $ docker-compose logs -f infini-gateway
当两个集群都正常时,cluster01 是主集群,通过极限网关查看集群将返回集群 cluster01 的信息。 $ curl -u elastic:test123 http://11.8.36.25:8000 { "name" : "es01", "cluster_name" : "cluster01", "cluster_uuid" : "0Fj2oq0LRxyNfMbTX2TqZA", "version" : { "number" : "7.16.2", "build_flavor" : "default", "build_type" : "docker", "build_hash" : "2b937c44140b6559905130a8650c64dbd0879cfb", "build_date" : "2021-12-18T19:42:46.604893745Z", "build_snapshot" : false, "lucene_version" : "8.10.1", "minimum_wire_compatibility_version" : "6.8.0", "minimum_index_compatibility_version" : "6.0.0-beta1" }, "tagline" : "You Know, for Search" }10.5.2 验证同步插入 3 条数据。 for i in {1..3};do curl -XPUT -u elastic:test123 -H "Content-Type: Application/json" \ http://11.8.36.25:8000/index-1/_doc/$i \ -d "{\"name\":\"tom_$i\",\"age\":\"$i\"}";done在集群 cluster01 和 cluster02 分别查询索引 index-1,可以查到相同的数据。 GET index-1/_search # 返回结果 { "took" : 3, "timed_out" : false, "_shards" : { "total" : 1, "successful" : 1, "skipped" : 0, "failed" : 0 }, "hits" : { "total" : { "value" : 3, "relation" : "eq" }, "max_score" : 1.0, "hits" : [ { "_index" : "index-1", "_type" : "_doc", "_id" : "1", "_score" : 1.0, "_source" : { "name" : "tom_1", "age" : "1" } }, { "_index" : "index-1", "_type" : "_doc", "_id" : "2", "_score" : 1.0, "_source" : { "name" : "tom_2", "age" : "2" } }, { "_index" : "index-1", "_type" : "_doc", "_id" : "3", "_score" : 1.0, "_source" : { "name" : "tom_3", "age" : "3" } } ] } }修改 id 为 2 的数据。 curl -XPUT -u elastic:test123 -H "Content-Type: Application/json" \ http://11.8.36.25:8000/index-1/_doc/2 \ -d '{"name":"jack_2","age":"100"}'再次查询,可以看到两个集群上 id 为 2 的文档都已经修改成功。 GET index-1/_doc/2 # 返回结果 { "_index" : "index-1", "_type" : "_doc", "_id" : "2", "_version" : 2, "_seq_no" : 3, "_primary_term" : 1, "found" : true, "_source" : { "name" : "jack_2", "age" : "100" } }删除 id 为 1 的数据。 curl -XDELETE -u elastic:test123 \ http://11.8.36.25:8000/index-1/_doc/1查询索引 index-1 ,此时两个集群上 id 为 1 的文档都已经删除。 GET index-1/_search # 返回结果 { "took" : 795, "timed_out" : false, "_shards" : { "total" : 1, "successful" : 1, "skipped" : 0, "failed" : 0 }, "hits" : { "total" : { "value" : 2, "relation" : "eq" }, "max_score" : 1.0, "hits" : [ { "_index" : "index-1", "_type" : "_doc", "_id" : "3", "_score" : 1.0, "_source" : { "name" : "tom_3", "age" : "3" } }, { "_index" : "index-1", "_type" : "_doc", "_id" : "2", "_score" : 1.0, "_source" : { "name" : "jack_2", "age" : "100" } } ] } }在网关上对数据进行查询,也是可以正确得到结果的。 curl -XGET -u elastic:test123 \ http://11.8.36.25:8000/index-1/_search?pretty # 返回结果 { "took" : 3, "timed_out" : false, "_shards" : { "total" : 1, "successful" : 1, "skipped" : 0, "failed" : 0 }, "hits" : { "total" : { "value" : 2, "relation" : "eq" }, "max_score" : 1.0, "hits" : [ { "_index" : "index-1", "_type" : "_doc", "_id" : "3", "_score" : 1.0, "_source" : { "name" : "tom_3", "age" : "3" } }, { "_index" : "index-1", "_type" : "_doc", "_id" : "2", "_score" : 1.0, "_source" : { "name" : "jack_2", "age" : "100" } } ] } }10.5.3 故障测试10.5.3.1 模拟备集群(cluster02)故障停止 cluster02 集群。 docker-compose stop es02此时 es02 已经无法正常访问。
此时在极限网关上可以看到报错说集群 cluster02 不可用。 $ docker-compose logs -f infini-gateway
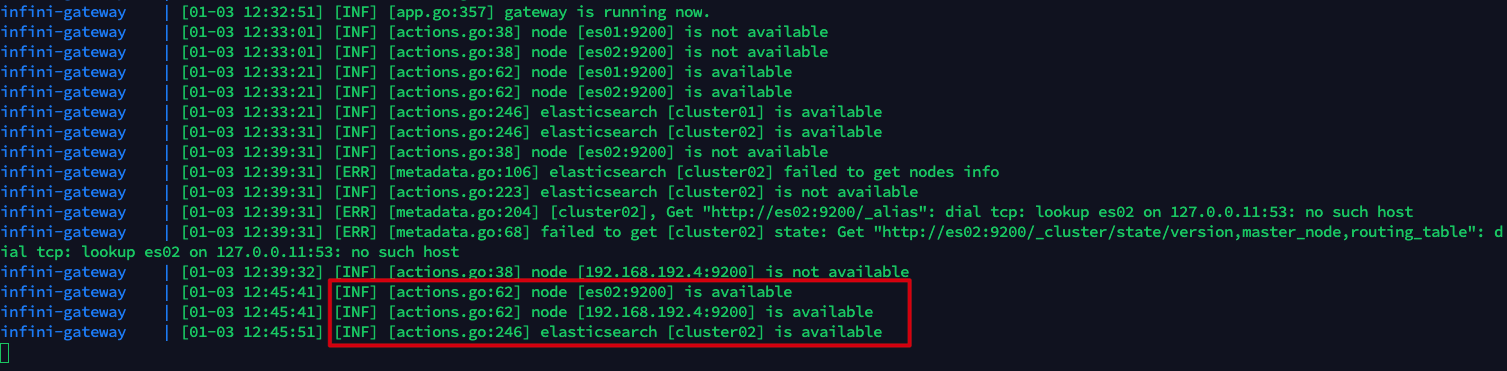
接下来继续往索引 index-1 中插入 2 条数据。 for i in {4..5};do curl -XPUT -u elastic:test123 -H "Content-Type: Application/json" \ http://11.8.36.25:8000/index-1/_doc/$i \ -d "{\"name\":\"tom_$i\",\"age\":\"$i\"}";done查看集群 cluster01 发现新的 2 条数据插入成功。 GET index-1/_search # 返回结果 { "took" : 399, "timed_out" : false, "_shards" : { "total" : 1, "successful" : 1, "skipped" : 0, "failed" : 0 }, "hits" : { "total" : { "value" : 4, "relation" : "eq" }, "max_score" : 1.0, "hits" : [ { "_index" : "index-1", "_type" : "_doc", "_id" : "3", "_score" : 1.0, "_source" : { "name" : "tom_3", "age" : "3" } }, { "_index" : "index-1", "_type" : "_doc", "_id" : "2", "_score" : 1.0, "_source" : { "name" : "jack_2", "age" : "100" } }, # 新插入的 2 条数据 { "_index" : "index-1", "_type" : "_doc", "_id" : "4", "_score" : 1.0, "_source" : { "name" : "tom_4", "age" : "4" } }, { "_index" : "index-1", "_type" : "_doc", "_id" : "5", "_score" : 1.0, "_source" : { "name" : "tom_5", "age" : "5" } } ] } }访问极限网关的 API 接口查看本地队列状态,由于集群 cluster02 当前不可用,因此刚刚插入的 2 条消息保存在队列中,待集群 cluster02 恢复后再尝试消费。 $ curl http://11.8.36.25:2900/queue/stats # 返回结果 { "queue": { "disk": { "cluster01-queue": { "depth": 0, "metadata": { "source": "dynamic", "id": "c79eq49r8oo0golornmg", "name": "cluster01-queue", "label": null } }, "cluster02-queue": { "depth": 2, # 未成功异步写入集群 cluster02 的 2 条消息 "metadata": { "source": "dynamic", "id": "c79eq6pr8oo0golornt0", "name": "cluster02-queue", "label": null } }, "cluster_state_change": { "depth": 8, "metadata": { "source": "dynamic", "id": "c79eq6pr8oo0golorns0", "name": "cluster_state_change", "label": null } } } } }恢复 es02。 docker-compose start es02查看网关日志可以看到集群 cluster02 恢复的信息。 $ docker-compose logs -f infini-gateway
查询集群 cluster02 的数据,可以在 es02 停止期间的数据已经成功写入。 GET index-1/_search # 返回结果 { "took" : 3, "timed_out" : false, "_shards" : { "total" : 1, "successful" : 1, "skipped" : 0, "failed" : 0 }, "hits" : { "total" : { "value" : 4, "relation" : "eq" }, "max_score" : 1.0, "hits" : [ # 新插入的 2 条数据 { "_index" : "index-1", "_type" : "_doc", "_id" : "4", "_score" : 1.0, "_source" : { "name" : "tom_4", "age" : "4" } }, { "_index" : "index-1", "_type" : "_doc", "_id" : "5", "_score" : 1.0, "_source" : { "name" : "tom_5", "age" : "5" } }, { "_index" : "index-1", "_type" : "_doc", "_id" : "2", "_score" : 1.0, "_source" : { "name" : "jack_2", "age" : "100" } }, { "_index" : "index-1", "_type" : "_doc", "_id" : "3", "_score" : 1.0, "_source" : { "name" : "tom_3", "age" : "3" } } ] } }此时查看队列状态,cluster02-queue 中的消息已经消费完毕。 $ curl http://11.8.36.25:2900/queue/stats # 返回结果 { "queue": { "disk": { "cluster01-queue": { "depth": 0, "metadata": { "source": "dynamic", "id": "c79eq49r8oo0golornmg", "name": "cluster01-queue", "label": null } }, "cluster02-queue": { "depth": 0, # 消费完毕 "metadata": { "source": "dynamic", "id": "c79eq6pr8oo0golornt0", "name": "cluster02-queue", "label": null } }, "cluster_state_change": { "depth": 10, "metadata": { "source": "dynamic", "id": "c79eq6pr8oo0golorns0", "name": "cluster_state_change", "label": null } } } } }10.5.3.2 模拟主集群(cluster01)故障停止 cluster01 集群。 docker-compose stop es01此时 es01 已经无法正常访问。
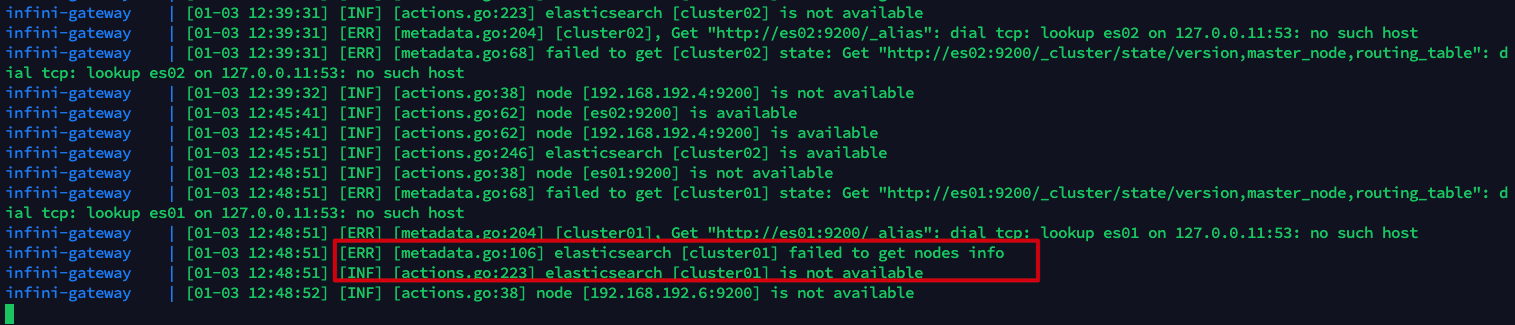
此时在极限网关上可以看到报错说 cluster01 集群不可用。 docker-compose logs -f infini-gateway
接下来继续往 index-1 索引中插入 2 条数据。 for i in {6..7};do curl -XPUT -u elastic:test123 -H "Content-Type: Application/json" \ http://11.8.36.25:8000/index-1/_doc/$i \ -d "{\"name\":\"tom_$i\",\"age\":\"$i\"}";done查看集群 cluster02 发现新的 2 条数据插入成功。 GET index-1/_search # 返回结果 { "took" : 3, "timed_out" : false, "_shards" : { "total" : 1, "successful" : 1, "skipped" : 0, "failed" : 0 }, "hits" : { "total" : { "value" : 6, "relation" : "eq" }, "max_score" : 1.0, "hits" : [ { "_index" : "index-1", "_type" : "_doc", "_id" : "4", "_score" : 1.0, "_source" : { "name" : "tom_4", "age" : "4" } }, { "_index" : "index-1", "_type" : "_doc", "_id" : "5", "_score" : 1.0, "_source" : { "name" : "tom_5", "age" : "5" } }, { "_index" : "index-1", "_type" : "_doc", "_id" : "2", "_score" : 1.0, "_source" : { "name" : "jack_2", "age" : "100" } }, { "_index" : "index-1", "_type" : "_doc", "_id" : "3", "_score" : 1.0, "_source" : { "name" : "tom_3", "age" : "3" } }, # 新插入的 2 条数据 { "_index" : "index-1", "_type" : "_doc", "_id" : "6", "_score" : 1.0, "_source" : { "name" : "tom_6", "age" : "6" } }, { "_index" : "index-1", "_type" : "_doc", "_id" : "7", "_score" : 1.0, "_source" : { "name" : "tom_7", "age" : "7" } } ] } }访问极限网关的 API 接口查看本地队列状态,由于集群 cluster01 当前不可用,因此刚刚插入的 2 条消息保存在队列中,待集群 cluster01 恢复后再尝试消费。 $ curl http://11.8.36.25:2900/queue/stats # 返回结果 { "queue": { "disk": { "cluster01-queue": { "depth": 2, # 未成功异步写入集群 cluster01 的 2 条消息 "metadata": { "source": "dynamic", "id": "c79eq49r8oo0golornmg", "name": "cluster01-queue", "label": null } }, "cluster02-queue": { "depth": 0, "metadata": { "source": "dynamic", "id": "c79eq6pr8oo0golornt0", "name": "cluster02-queue", "label": null } }, "cluster_state_change": { "depth": 10, "metadata": { "source": "dynamic", "id": "c79eq6pr8oo0golorns0", "name": "cluster_state_change", "label": null } } } } }恢复 es01。 docker-compose start es01查看网关日志可以看到集群 cluster01 恢复的信息。 docker-compose logs -f infini-gateway
查询集群 cluster01 的数据,可以在 es01 停止期间的数据已经成功写入。 GET index-1/_search # 返回结果 { "took" : 3, "timed_out" : false, "_shards" : { "total" : 1, "successful" : 1, "skipped" : 0, "failed" : 0 }, "hits" : { "total" : { "value" : 6, "relation" : "eq" }, "max_score" : 1.0, "hits" : [ { "_index" : "index-1", "_type" : "_doc", "_id" : "3", "_score" : 1.0, "_source" : { "name" : "tom_3", "age" : "3" } }, { "_index" : "index-1", "_type" : "_doc", "_id" : "2", "_score" : 1.0, "_source" : { "name" : "jack_2", "age" : "100" } }, { "_index" : "index-1", "_type" : "_doc", "_id" : "4", "_score" : 1.0, "_source" : { "name" : "tom_4", "age" : "4" } }, { "_index" : "index-1", "_type" : "_doc", "_id" : "5", "_score" : 1.0, "_source" : { "name" : "tom_5", "age" : "5" } }, # 新插入的 2 条数据 { "_index" : "index-1", "_type" : "_doc", "_id" : "6", "_score" : 1.0, "_source" : { "name" : "tom_6", "age" : "6" } }, { "_index" : "index-1", "_type" : "_doc", "_id" : "7", "_score" : 1.0, "_source" : { "name" : "tom_7", "age" : "7" } } ] } }此时查看队列状态,cluster01-queue 中的消息已经消费完毕。 $ curl http://11.8.36.25:2900/queue/stats # 返回结果 { "queue": { "disk": { "cluster01-queue": { "depth": 0, # 消费完毕 "metadata": { "source": "dynamic", "id": "c79eq49r8oo0golornmg", "name": "cluster01-queue", "label": null } }, "cluster02-queue": { "depth": 0, "metadata": { "source": "dynamic", "id": "c79eq6pr8oo0golornt0", "name": "cluster02-queue", "label": null } }, "cluster_state_change": { "depth": 12, "metadata": { "source": "dynamic", "id": "c79eq6pr8oo0golorns0", "name": "cluster_state_change", "label": null } } } } }10.5.4 清理现场cd infini-gateway # -v 参数表示删除 volume docker-compose down -v 11 总结本文分析对比了定期快照,跨机房部署集群,应用双写,借助消息队列实现双写,CCR 跨集群复制,极限网关 6 种 Elasticsearch 跨机房灾备的方案。同时准备了 Demo 案例方便大家动手体验,希望本文对你有所帮助。 12 作者介绍Se7en,熟悉 Elastic 和云原生相关技术栈,ECE 认证工程师,CKA,CKS 认证工程师。 13 参考资料Cross-cluster replicationBi-directional replication with Elasticsearch cross-cluster replication (CCR)追随领导者:Elasticsearch 中的跨集群复制简介Elasticsearch 主从同步之跨集群复制使用 Elasticsearch 跨集群复制进行跨数据中心复制ES异地双活方案Elasticsearch数据迁移与集群容灾Elasticsearch 数据迁移与容灾实践,看这一篇就够了!日均 5 亿查询量的京东订单中心,为什么舍 MySQL 用 ES?Running the Elastic Stack on DockerES容灾技术探讨和测试使用极限网关来实现 Elasticsearch 多写Elasticsearch异地容灾方案Control startup and shutdown order in ComposeDead letter queues (DLQ)Elasticsearch output pluginHigh Availability in Elasticsearch – Cross Cluster Replication and AlternativesElasticsearch数据迁移与集群容灾Elasticsearch 跨机房灾备建设腾讯云 Elasticsearch 集群多可用区容灾实现原理及最佳实践Clustering Across Multiple Data CentersSnapshot and restoreElasticsearch snapshot 备份的使用方法]Elasticsearch可搜索快照技术原理及最佳实践极限网关 浮动 IP欢迎关注
|
 客户端可以直接通过 VIP 连接集群,由于 VIP 下绑定了集群内部的所有数据节点,因此客户端所有的读写请求会均衡的分布到各个数据节点上。
 为了保障集群的稳定性和高可用性,当选择多可用区集群架构部署时,需强制设置三个专用主节点。其中专用主节点的分布机制如下:
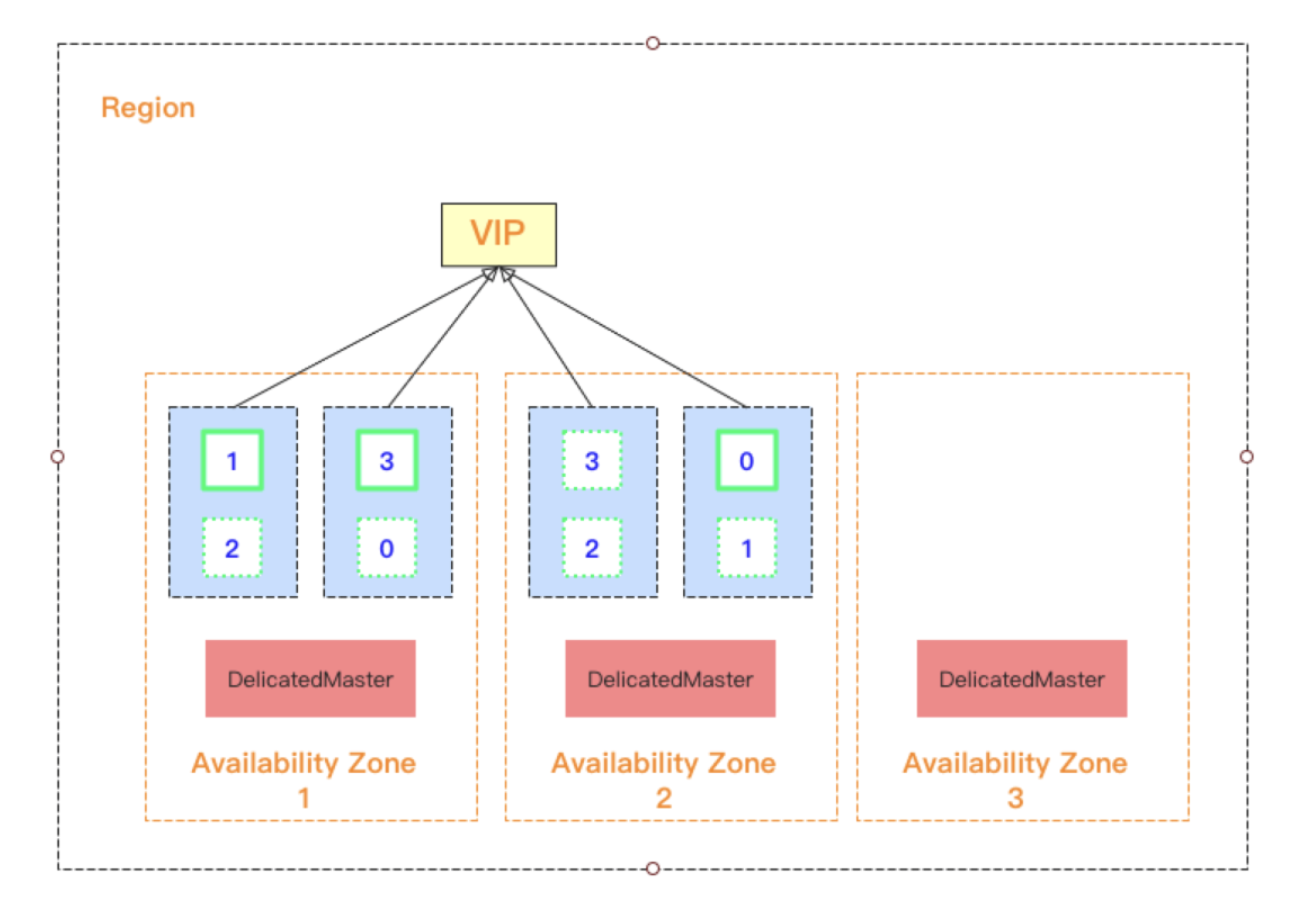


 此时查看 logstash01 的日志,可以看到连接 es01 报错的信息。


【本文地址】