| ESXi 网络配置笔记 | 您所在的位置:网站首页 › esxi网络配置ip › ESXi 网络配置笔记 |
ESXi 网络配置笔记
|
ESXi 6.5 & 7.0 给虚机添加双网卡
当宿主机的多个网口分别连接不同网关或子网,希望虚机也具备同时通过多网卡连接不同网段的能力,可以直接通过界面配置 宿主机新增虚拟交换机,新增端口组对于宿主机,先确认各网口对应物理适配器的编号,可在服务器的网络配置界面查看链接状态;并选择需要连接的网络适配器。 通过左侧导航网络->虚拟交换机, ESXi默认内建了一个虚拟交换机vSwitch0,对应1条上行线路网口vmnic0,对应了两个端口组,一个是用于管理的Management Network,这个端口组有一个就可以了;另一个是用于虚机的VM Network;新建虚拟交换机,名称[vSwitch1],MTU默认[1500],上行链路1选择另一个需要绑定的网口例如[vmnic1],链路发现使用默认的模式[侦听],协议[Cisco Dis...(CDP)],安全的三个选项全使用默认的[拒绝]。然后就可以新建端口组了,通过左侧导航网络->端口组,添加端口组,名称[VM Network 2],VLAN ID使用默认的[0],虚拟交换机选择刚才新建的vSwitch1,安全全部默认继承。 虚机新增网卡 虚机先关机打开虚机详情页,点击编辑,在编辑设置页,点击添加网络适配器 在多出来的新建网络适配器这行,选择[VM Network 2],其他全部默认:勾选连接,适配器类型VMXNET3,MAC地址自动后面全零。 保存后虚机打开电源开机后连接shell,通过ifconfig应该能看到新产生的网卡,记录新网卡的名称,例如ens224, 需要前往 /etc/sysconfig/network-scripts/ 添加这个网卡的ifcfg文件,在本例中使用ifcfg-ens224, # 复制原配置文件作为基础 cp ifcfg-ens192 ifcfg-ens224 # 修改 vi ifcfg-ens224 # 修改其中的 TYPE=Ethernet PROXY_METHOD=none BROWSER_ONLY=no BOOTPROTO=static IPADDR=172.31.13.7 # 要改 NETMASK=255.255.255.0 GATEWAY=172.31.13.1 # 要改 DNS1=114.114.114.114 DNS2=8.8.8.8 DEFROUTE=yes IPV4_FAILURE_FATAL=no IPV6INIT=yes IPV6_AUTOCONF=yes IPV6_DEFROUTE=yes IPV6_FAILURE_FATAL=no IPV6_ADDR_GEN_MODE=stable-privacy NAME=ens224 # 要改 UUID=44bdb213-d3ff-4e3a-8b9e-0262a5a1f522 # 这行要删除 DEVICE=ens224 # 要改 ONBOOT=yes修改完,重启网络,在ifconfig中就能看到变化了 systemctl restart network ESXi 6.0 添加静态路由首先打开ESXi的SSH服务, 在Configuration -> Security Profile -> Services, start SSH 用管理员登录后, 在命令行下执行 ~ # esxcli network ip route ipv4 add --gateway 192.168.20.59 --network 10.8.0.0/24 # 检查路由是否正确添加 ~ # esxcfg-route -l对于5.0及5.0之前的ESXi, 执行 esxcfg-route -a 192.168.100.0/24 192.168.0.1 # or esxcfg-route -a 192.168.100.0 255.255.255.0 192.168.0.1因为这个版本还不能持久化路由配置, 需要在 /etc/rc.local 中添加这个路由命令 ESXi 6.7安装完成后添加Realtek驱动ESXi 6.7 (VMware-VMvisor-Installer-6.7.0-8169922.x86_64.iso), 安装完成后, 开启SSH, 连接后执行 # check your network cards: lspci -v | grep "Class 0200" -B 1 0000:00:1f.6 Ethernet controller Network controller: Intel Corporation Ethernet Connection I219-LM [vmnic0] Class 0200: 8086:156f -- 0000:6c:00.0 Ethernet controller Network controller: Realtek Semiconductor Co., Ltd. RTL8111/8168/8411 PCI Express Gigabit Ethernet Controller Class 0200: 10ec:8168可以看到realtek网卡, 但是vendor ID 10ec:8168 对应的驱动不可用. 可以通过VMware Compatibility Guide 搜索(选择过滤条件“IO Devices”). 或者使用命令进行下载: # allow ESXI to use Community Supported VIB's esxcli software acceptance set --level=CommunitySupported esxcli network firewall ruleset set -e true -r httpClient esxcli network firewall ruleset set -e true -r dns # install net55-r8168 esxcli software vib install -d https://vibsdepot.v-front.de -n net55-r8168 the driver download and installation was successfull: Installation Result Message: The update completed successfully, but the system needs to be rebooted for the changes to be effective. Reboot Required: true VIBs Installed: Realtek_bootbank_net55-r8168_8.045a-napi VIBs Removed:然后输入reboot重启ESXi服务器 参考 https://networkguy.de/installing-realtek-driver-on-esxi-6-7/ 制作带Realtek驱动的ESXi安装镜像 需要的软件 网卡驱动, 在下面找到 Offline Bundle of version xxx 下载https://vibsdepot.v-front.de/wiki/index.php/Net55-r8168PowerCLI, 需要安装https://code.vmware.com/web/tool/12.2.0/vmware-powercli下载ESXi的update zip包, 注意下载的是zip包不是ISO, 这个需要是客户才行https://my.vmware.com/cn/group/vmware/downloads/info/slug/datacenter_cloud_infrastructure/vmware_vsphere/6_7 安装PowerCLI 用ZIP包安装将前一步下载的ZIP解开 # 查看有哪些路径 > $env:PSModulePath C:\Users\millt\Documents\WindowsPowerShell\Modules;C:\Program Files\WindowsPowerShell\Modules;C:\Windows\system32\WindowsPowerShell\v1.0\Modules # 使用其中的一个路径, 将ZIP包解开的文件都放入, 然后执行下面的命令, 注意Path改成使用的路径 > Get-ChildItem -Path 'C:\Program Files\WindowsPowerShell\Modules' -Recurse | Unblock-File # 检查是否已经安装 > Get-Module VMware* -ListAvailable # 降低执行安全级别, 否则后面执行时会报错 > Set-ExecutionPolicy Unrestricted # 导入模块 > Import-Module VMware.DeployAutomation # 检查命令 > Get-DeployCommand 用命令行安装 > Install-Module -Name VMware.PowerCLI 制作过程首先使用两个bundle创建仓库(software depot) Add-EsxSoftwareDepot "C:\7_KIT\VMW\net55-r8168-8.045a-napi-offline_bundle.zip", "C:\7_KIT\VMW\VMware-ESXi-6.7.0-8169922-depot.zip"查看现有的image profile, see what profiles exist Get-EsxImageProfile然后, 创建一个新的image profile, 使用现有的clone并设置acceptance level为"community" (因为要添加的驱动是社区签名的): New-EsxImageProfile -CloneProfile ESXi-6.7.0-8169922-standard -name ESXi-6.7.0-8169922-standard-RTL8111 -Vendor Razz Set-EsxImageProfile -ImageProfile ESXi-6.7.0-8169922-standard-RTL8111 -AcceptanceLevel CommunitySupported查看已经添加到仓库的驱动 Get-EsxSoftwarePackage | Where {$_.Vendor -eq "Realtek"}使用上面看到的驱动名称, 添加到image profile: Add-EsxSoftwarePackage -ImageProfile ESXi-6.7.0-8169922-standard-RTL8111 -SoftwarePackage net55-r8168这时候就可以创建包含驱动的ISO了 Export-EsxImageProfile -ImageProfile ESXi-6.7.0-8169922-standard-RTL8111 -ExportToIso -filepath C:\7_KIT\VMW\VMware-ESXi-6.7.0-8169922-RTL8111.iso过程截图 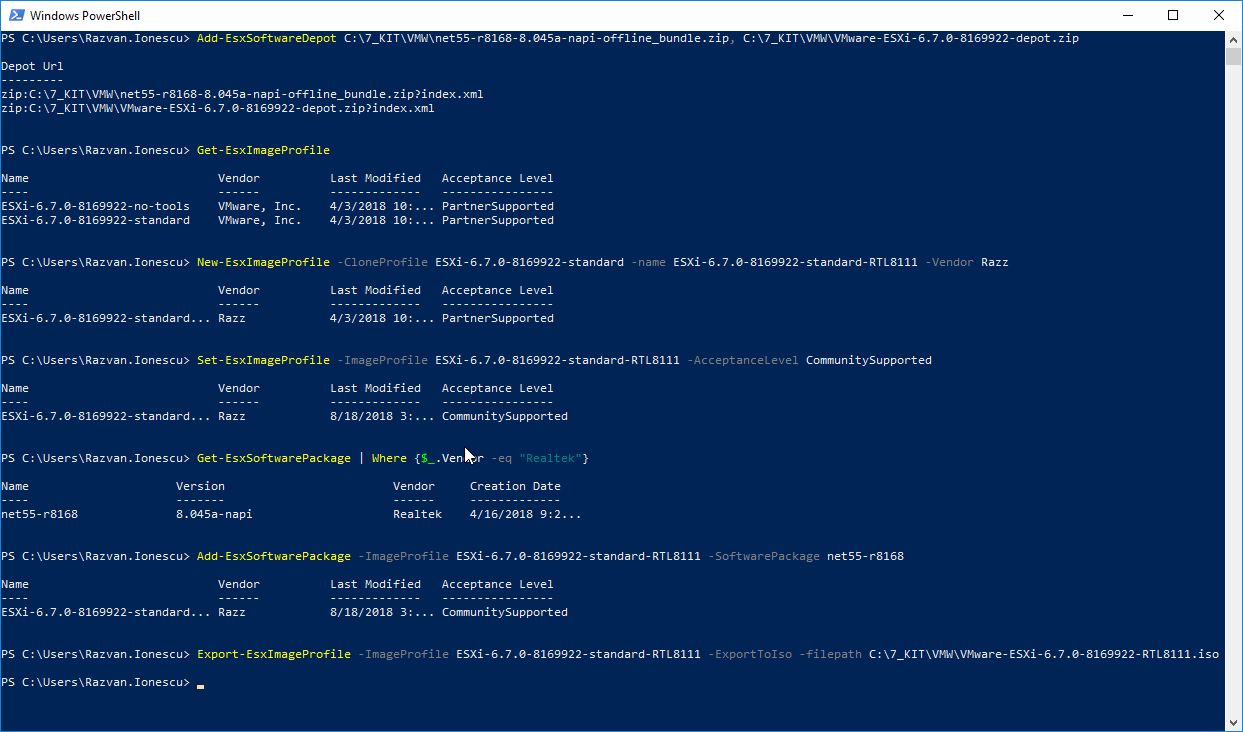
|
【本文地址】