| Pytorch实现: BERT | 您所在的位置:网站首页 › bert获取mask的索引 › Pytorch实现: BERT |
Pytorch实现: BERT
|
本文前置知识: Transformer: 详见Transformer精讲BERT: 详见ELMo, GPT, BERTPytorch实现: Transformer2022.04.03: 修正Pre Norm效果好于Post Norm的错误描述. Pytorch实现: BERT本文是BERT的Pytorch版本实现. 实现并没有完全参照BERT原论文中的设置, 有些细枝末节的地方可能没有考虑进去, 每个人实现的方法可能也不同, 可以不必过于纠结这些. BERT的实现比Transformer更简单, 因为不用考虑Decoder. 本文参考如下文章: Hugging Face的BERT实现BERT 的 PyTorch 实现本文的代码已经放到了Colab上, 打开设置GPU就可以复现(需要科学上网).
如果你不能科学上网, 应该看不到Open in Colab的图标. Preparing先导包: import random import re from math import sqrt as msqrt import torch import torch.functional as F from torch import nn from torch.optim import Adadelta from torch.utils.data import DataLoader, Dataset定义与BERT相关的参数: max_len = 30 max_vocab = 50 max_pred = 5 d_k = d_v = 64 d_model = 768 # n_heads * d_k d_ff = d_model * 4 n_heads = 12 n_layers = 6 n_segs = 2 p_dropout = .1 # BERT propability defined p_mask = .8 p_replace = .1 p_do_nothing = 1 - p_mask - p_replace device = "cuda" if torch.cuda.is_available() else "cpu" device = torch.device(device)max_len: 输入序列的最大长度. max_vocab: 字典的最大大小. max_pred: Mask时最大的Mask数量. d_k, d_v: 自注意力中K和V的维度, Q的维度直接用K的维度代替, 因为这二者必须始终相等. d_model: Embedding的大小. d_ff: 前馈神经网络的隐藏层大小, 一般是d_model的四倍. n_heads: 多头注意力的头数. n_layers: Encoder的堆叠层数. n_segs: 输入BERT的句子段数. 用于制作Segment Embedding. p_dropout: BERT中所有dropout的概率. p_mask, p_replace, p_do_nothing: 80%的概率将被选中的单词替换为[MASK]. 10%的概率将被选中的单词替换为随机词. 10%的概率对被选中的单词不进行替换. Mask and GELU在BERT中没有Decoder, 所以我们的Mask实际上只为Padding服务. Mask因为预期的Token输入序列大小为[batch, seq_len], 如果token中的索引与pad索引相同, 那么则 def get_pad_mask(tokens, pad_idx=0): ''' suppose index of [PAD] is zero in word2idx tokens: [batch, seq_len] ''' batch, seq_len = tokens.size() pad_mask = tokens.data.eq(pad_idx).unsqueeze(1) pad_mask = pad_mask.expand(batch, seq_len, seq_len) return pad_maskGELU在BERT中采用GELU作为激活函数, 它与ReLU相比具有一些概率上的性质:$$\displaylines{\operatorname{GELU}(x)=x P(X \leq x)= x \Phi(x)=x \cdot \frac{1}{2}[1+\operatorname{erf}(x / \sqrt{2})] \\or \\0.5 x\left(1+\tanh \left[\sqrt{2 / \pi}\left( x+ 0.044715 x^{3}\right)\right]\right)}$$第二行的是GELU的近似表达式. 它实现起来非常简单: def gelu(x): ''' Two way to implements GELU: 0.5 * x * (1 + torch.tanh(math.sqrt(2 / math.pi) * (x + 0.044715 * torch.pow(x, 3)))) or 0.5 * x * (1. + torch.erf(torch.sqrt(x, 2))) ''' return .5 * x * (1. + torch.erf(x / msqrt(2.)))两种方式均可, 我这里采用第一种. EmbeddingBERT中含有三种编码, Word Embedding, Position Embedding, Segment Embedding: 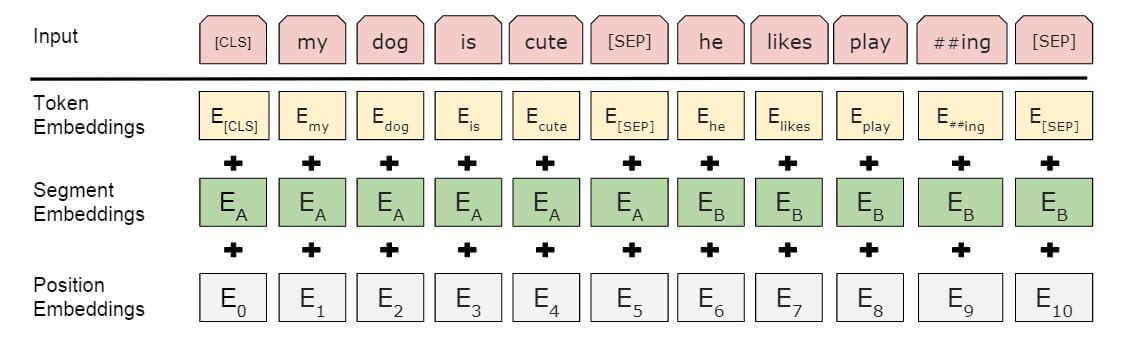 其中Position Embedding不像Transformer中是用正余弦编码计算得到, 而是通过学习获得. class Embeddings(nn.Module): def __init__(self): super(Embeddings, self).__init__() self.seg_emb = nn.Embedding(n_segs, d_model) self.word_emb = nn.Embedding(max_vocab, d_model) self.pos_emb = nn.Embedding(max_len, d_model) self.norm = nn.LayerNorm(d_model) self.dropout = nn.Dropout(p_dropout) def forward(self, x, seg): ''' x: [batch, seq_len] ''' word_enc = self.word_emb(x) # positional embedding pos = torch.arange(x.shape[1], dtype=torch.long, device=device) pos = pos.unsqueeze(0).expand_as(x) pos_enc = self.pos_emb(pos) seg_enc = self.seg_emb(seg) x = self.norm(word_enc + pos_enc + seg_enc) return self.dropout(x) # return: [batch, seq_len, d_model]这里的LayerNorm有些版本的实现加了, 有些没有加, 看个人爱好吧. Attention这里的点积缩放注意力和多头注意力完全和Transformer一致, 不再细说, 直接照搬过来就行. Scaled DotProduct Attention$$\operatorname{Attention}(Q, K, V) = \operatorname{softmax}(\frac{QK^T}{\sqrt{d_k}})V$$ class ScaledDotProductAttention(nn.Module): def __init__(self): super(ScaledDotProductAttention, self).__init__() def forward(self, Q, K, V, attn_mask): scores = torch.matmul(Q, K.transpose(-1, -2) / msqrt(d_k)) # scores: [batch, n_heads, seq_len, seq_len] scores.masked_fill_(attn_mask, -1e9) attn = nn.Softmax(dim=-1)(scores) # context: [batch, n_heads, seq_len, d_v] context = torch.matmul(attn, V) return contextMulti - Head Attention$$\begin{aligned}\operatorname{MultiHead}(Q, K, V) &= \operatorname{Concat}(\text{head}_1, \text{head}_2, \dots, \text{head}_h)W^O \\\text{where } \text{head}_i &= \operatorname{Attention}(QW^Q_i, KW^K_i, VW^V_i)\end{aligned}$$ class MultiHeadAttention(nn.Module): def __init__(self): super(MultiHeadAttention, self).__init__() self.W_Q = nn.Linear(d_model, d_k * n_heads, bias=False) self.W_K = nn.Linear(d_model, d_k * n_heads, bias=False) self.W_V = nn.Linear(d_model, d_v * n_heads, bias=False) self.fc = nn.Linear(n_heads * d_v, d_model, bias=False) def forward(self, Q, K, V, attn_mask): ''' Q, K, V: [batch, seq_len, d_model] attn_mask: [batch, seq_len, seq_len] ''' batch = Q.size(0) ''' split Q, K, V to per head formula: [batch, seq_len, n_heads, d_k] Convenient for matrix multiply opearation later q, k, v: [batch, n_heads, seq_len, d_k / d_v] ''' per_Q = self.W_Q(Q).view(batch, -1, n_heads, d_k).transpose(1, 2) per_K = self.W_K(K).view(batch, -1, n_heads, d_k).transpose(1, 2) per_V = self.W_V(V).view(batch, -1, n_heads, d_v).transpose(1, 2) attn_mask = attn_mask.unsqueeze(1).repeat(1, n_heads, 1, 1) # context: [batch, n_heads, seq_len, d_v] context = ScaledDotProductAttention()(per_Q, per_K, per_V, attn_mask) context = context.transpose(1, 2).contiguous().view( batch, -1, n_heads * d_v) # output: [batch, seq_len, d_model] output = self.fc(context) return outputFeed Forward Neural NetworkBERT中的FFN实现将激活函数换为了GELU:$$\operatorname{FFN}(x)=\operatorname{GELU}(xW_1+b_1)W_2 + b_2$$ class FeedForwardNetwork(nn.Module): def __init__(self): super(FeedForwardNetwork, self).__init__() self.fc1 = nn.Linear(d_model, d_ff) self.fc2 = nn.Linear(d_ff, d_model) self.dropout = nn.Dropout(p_dropout) self.gelu = gelu def forward(self, x): x = self.fc1(x) x = self.dropout(x) x = self.gelu(x) x = self.fc2(x) return x我把残差部分移到了EncoderLayer的设计中, 见下节. Encoder我对Encoder的实现进行了调整. 在Encoder中控制两个Sub Layer的Layer Norm和Residual connection. 在论文ON LAYER NORMALIZATION IN THE TRANSFORMER ARCHITECTURE中曾经提到, Transformer中Layer Norm的位置加的有问题, 在Sub Layer后加Layer Norm被称为Post Norm, 它是不规范的. Layer Norm如果调整到Sub Layer前会对训练有很大帮助, 称为Pre Norm: 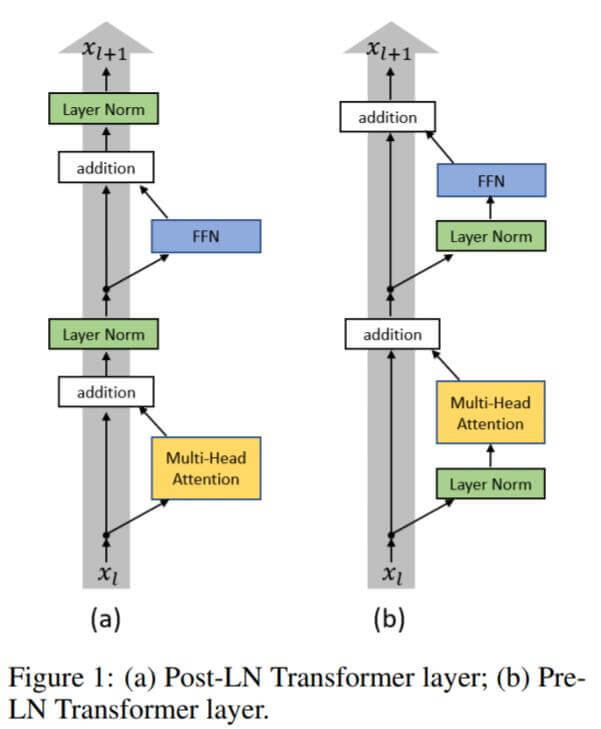 事实上, 截止到2022年4月3日, 研究表明, Pre Norm并不是比Post Norm效果好, 而是因为Pre Norm比Post Norm更好训练. 实际上, 如果能够训练完全, Post Norm效果是比Pre Norm好的, 原因见为什么Pre Norm的效果不如Post Norm?. 我这里采用了Pre Norm版本的实现: class EncoderLayer(nn.Module): def __init__(self): super(EncoderLayer, self).__init__() self.norm1 = nn.LayerNorm(d_model) self.norm2 = nn.LayerNorm(d_model) self.enc_attn = MultiHeadAttention() self.ffn = FeedForwardNetwork() def forward(self, x, pad_mask): ''' pre-norm see more detail in https://openreview.net/pdf?id=B1x8anVFPr x: [batch, seq_len, d_model] ''' residual = x x = self.norm1(x) x = self.enc_attn(x, x, x, pad_mask) + residual residual = x x = self.norm2(x) x = self.ffn(x) return x + residualPoolerPooler是Hugging Face实现BERT时加上的额外组件. NSP任务需要提取[CLS]处的特征, Hugging Face的做法是将[CLS]处的输出接上一个FC, 并用tanh激活, 最后再接上二分类输出层. 他们将这一过程称为”Pool“. class Pooler(nn.Module): def __init__(self): super(Pooler, self).__init__() self.fc = nn.Linear(d_model, d_model) self.tanh = nn.Tanh() def forward(self, x): ''' x: [batch, d_model] (first place output) ''' x = self.fc(x) x = self.tanh(x) return x因为额外添加了一个FC层, 所以能增强表达能力, 同样提升了训练难度. BERT现在大框架中的Embedding, EncoderLayer, Pooler已经定义好了, 只需要额外定义输出时需要的其他组件. 在NSP任务输出时需要额外定义一个二分类输出层next_cls, 还有MLM任务输出所需的word_classifier, 以及前向传递forward. class BERT(nn.Module): def __init__(self, n_layers): super(BERT, self).__init__() self.embedding = Embeddings() self.encoders = nn.ModuleList([ EncoderLayer() for _ in range(n_layers) ]) self.pooler = Pooler() self.next_cls = nn.Linear(d_model, 2) self.gelu = gelu # Sharing weight between some fully connect layer shared_weight = self.pooler.fc.weight self.fc = nn.Linear(d_model, d_model) self.fc.weight = shared_weight # Sharing weight between word embedding and classifier shared_weight = self.embedding.word_emb.weight self.word_classifier = nn.Linear(d_model, max_vocab, bias=False) self.word_classifier.weight = shared_weight def forward(self, tokens, segments, masked_pos): output = self.embedding(tokens, segments) enc_self_pad_mask = get_pad_mask(tokens) for layer in self.encoders: output = layer(output, enc_self_pad_mask) # output: [batch, max_len, d_model] # NSP Task hidden_pool = self.pooler(output[:, 0]) logits_cls = self.next_cls(hidden_pool) # Masked Language Model Task # masked_pos: [batch, max_pred] -> [batch, max_pred, d_model] masked_pos = masked_pos.unsqueeze(-1).expand(-1, -1, d_model) # h_masked: [batch, max_pred, d_model] h_masked = torch.gather(output, dim=1, index=masked_pos) h_masked = self.gelu(self.fc(h_masked)) logits_lm = self.word_classifier(h_masked) # logits_lm: [batch, max_pred, max_vocab] # logits_cls: [batch, 2] return logits_cls, logits_lm做个说明: 为了减少模型训练上的负担, 这里对pooler的fc和MLM输出时使用的fc做了权重共享, 也对Word Embedding和word_classifier的权重做了共享.torch.gather能收集特定维度的指定位置的数值. h_masked使用的gather是为了检索output中 max_len维度上被Mask的位置上的表示, 总大小[batch, max_pred, d_model]. 因为masked_pos大小为[batch, max_pred, d_model]. 可能我表述不太清楚, 请参照Pytorch之张量进阶操作中的例子理解.没在模型中使用Softmax和Simgoid的原因是nn.CrossEntropyLoss自带将Logits转为概率的效果.Data这部分主要是准备数据. Text data采用一段简单的对话来作为原始数据. 为了方便起见, 这里没有采用Subword. test_text = ( 'Hello, how are you? I am Romeo.\n' # R 'Hello, Romeo My name is Juliet. Nice to meet you.\n' # J 'Nice meet you too. How are you today?\n' # R 'Great. My baseball team won the competition.\n' # J 'Oh Congratulations, Juliet\n' # R 'Thank you Romeo\n' # J 'Where are you going today?\n' # R 'I am going shopping. What about you?\n' # J 'I am going to visit my grandmother. she is not very well' # R ) # we need [MASK] [SEP] [PAD] [CLS] word2idx = {f'[{name}]': idx for idx, name in enumerate(['PAD', 'CLS', 'SEP', 'MASK'])} # {'[PAD]': 0, '[CLS]': 1, '[SEP]': 2, '[MASK]': 3} sentences = re.sub("[.,!?\\-]", '', test_text.lower()).split('\n') word_list = list(set(" ".join(sentences).split())) holdplace = len(word2idx) for idx, word in enumerate(word_list): word2idx[word] = idx + holdplace idx2word = {idx: word for word, idx in word2idx.items()} vocab_size = len(word2idx) assert len(word2idx) == len(idx2word) token_list = [] for sentence in sentences: token_list.append([ word2idx[s] for s in sentence.split() ])这里需要编写两个函数: padding: 句子长度不够时, 用[PAD]补全.masking_produce: 按照BERT论文中提到的Mask方式.def padding(ids, n_pads, pad_symb=0): return ids.extend([pad_symb for _ in range(n_pads)]) def masking_procedure(cand_pos, input_ids, masked_symb=word2idx['[MASK]']): masked_pos = [] masked_tokens = [] for pos in cand_pos: masked_pos.append(pos) masked_tokens.append(input_ids[pos]) if random.random() (p_mask + p_replace): rand_word_idx = random.randint(4, vocab_size - 1) input_ids[pos] = rand_word_idx return masked_pos, masked_tokens我们需要给句子加上[CLS], ['SEP'], [MASK]来符合BERT的输入格式. 并且保持样本中句子相邻和不相邻的比例是半对半, 即有一半样本中输入句子对是相邻的, 有一半不相邻. 这里简单的用两个句子的index是否相邻来判断上下文是否相邻, 不是很严谨, 只用于自己实现测试. def make_data(sentences, n_data): batch_data = [] positive = negative = 0 len_sentences = len(sentences) # 50% sampling adjacent sentences, 50% sampling not adjacent sentences while positive != n_data / 2 or negative != n_data / 2: tokens_a_idx = random.randrange(len_sentences) tokens_b_idx = random.randrange(len_sentences) tokens_a = sentences[tokens_a_idx] tokens_b = sentences[tokens_b_idx] input_ids = [word2idx['[CLS]']] + tokens_a + [word2idx['[SEP]']] + tokens_b + [word2idx['[SEP]']] segment_ids = [0 for i in range( 1 + len(tokens_a) + 1)] + [1 for i in range(1 + len(tokens_b))] n_pred = min(max_pred, max(1, int(len(input_ids) * .15))) cand_pos = [i for i, token in enumerate(input_ids) if token != word2idx['[CLS]'] and token != word2idx['[SEP]']] random.shuffle(cand_pos) # shuffle all candidate position index, to sampling maksed position from first n_pred masked_pos, masked_tokens = masking_procedure( cand_pos[:n_pred], input_ids, word2idx['[MASK]']) # zero padding for tokens padding(input_ids, max_len - len(input_ids)) padding(segment_ids, max_len - len(segment_ids)) # zero padding for mask if max_pred > n_pred: n_pads = max_pred - n_pred padding(masked_pos, n_pads) padding(masked_tokens, n_pads) if (tokens_a_idx + 1) == tokens_b_idx and positive |
【本文地址】