| 【TensorFlow2&Keras】训练手语图像数据集 | 您所在的位置:网站首页 › asl美国手语词汇 › 【TensorFlow2&Keras】训练手语图像数据集 |
【TensorFlow2&Keras】训练手语图像数据集
|
文章目录
一、前言二、入门参考--mnist数据集三、训练自己的图像数据集1. 数据集2.数据集预处理(1)图片按0~10类别存放
3.基于tf2+CNN手势识别(1)图像分类(2)预处理(3)构建卷积神经网络(4)训练模型(5)模型评估
四、源码
一、前言
在手语视频识别中,视频序列大约有几十甚至上百张图片,因此手语识别数据集由万张以上图片组成,需要检测大量的数据样本。 对手语中的手势检测任务,可将它作为目标检测的一个分支,视为分类回归任务。从中国手语的图例来看,可以得到以下几个特性: 手语图像序列中,左右手有着不同的形状轨迹信息,人手因运动而产生模糊的情况经常出现。运动中存在大量的双手相交或接触的情况,人手不断进行着单手向双手,双手向单手之间的过渡转换,而且具有单双手难以区分的特点;   手语中的手势伴随着人脸,手臂等大量类肤色区域的干扰,并且经常出现手与脸之间,手与手臂之间的遮挡 手语中的手势伴随着人脸,手臂等大量类肤色区域的干扰,并且经常出现手与脸之间,手与手臂之间的遮挡  手势区域小却包含丰富的信息,由于手语中手形复杂多变而且特殊手形多,但是手势在图片中却总是只有很少的像素区域,而且往往分辨率低; 手势区域小却包含丰富的信息,由于手语中手形复杂多变而且特殊手形多,但是手势在图片中却总是只有很少的像素区域,而且往往分辨率低;  中小词汇量手语识别中需要用到大量(几千个)的手语视频序列,每21个视频序列大约有百张图片,因此手语识别数据集由万张以上图片组成,需要检测大量的数据样本。
二、入门参考–mnist数据集 中小词汇量手语识别中需要用到大量(几千个)的手语视频序列,每21个视频序列大约有百张图片,因此手语识别数据集由万张以上图片组成,需要检测大量的数据样本。
二、入门参考–mnist数据集
环境:win10 + anaconda3 + TensorFlow 2 + keras 第一步:安装包 精确除法tf 深度学习模型keras是tf2最经典的数据集处理工具,深度学习模型的设计、调试、评估、应用和可视化plt 绘图 from __future__ import absolute_import, division, print_function, unicode_literals import tensorflow as tf from tensorflow.keras import datasets, layers, models import matplotlib.pyplot as plt第二步:下载数据集(可以在线下载) 注意: 官网示例——CIFAR10数据集 该数据集共有60000张彩色图像,这些图像是32*32,分为10个类,每类6000张图。 或者:(后面我用的这一个演示) 经典示例——mnist数据集 这是手写数字的数据集,来自美国国家标准与技术研究所, National Institute of Standards and Technology (NIST). 训练集 (training set) 由来自 250 个不同人手写的数字构成, 其中 50% 是高中学生, 50% 来自人口普查局 (the Census Bureau) 的工作人员. 测试集(test set) 也是同样比例的手写数字数据.
第三步:构建模型 通过堆叠图层构建tf.keras.Sequential模型。选择用于训练的优化器和损失函数: #构造网络 model = models.Sequential() #卷积层 model.add(layers.Conv2D(input_shape=(x_train.shape[1], x_train.shape[2], x_train.shape[3]), filters=32, kernel_size=(3,3), strides=(1,1), padding='valid', activation='relu')) #池化层 model.add(layers.MaxPool2D(pool_size=(2,2))) #全连接层 model.add(layers.Flatten()) model.add(layers.Dense(32, activation='relu')) # 分类层 model.add(layers.Dense(10, activation='softmax')) #模型配置 model.compile(optimizer='adam', loss='sparse_categorical_crossentropy', metrics=['accuracy']) model.summary() # 显示模型的架构模型这里很重要,选取网络模型有卷积神经网络CNN之经典LeNet-5层模型,进化到AlexNet模型,大家可以到网上搜索。这里是重难点!!! 本次参考的模型源于:tf2实现cnn对mnist分类 5次迭代效果:
总结: CNN的过程 Mon 06 Mon 13 Mon 20 导入tf模型 加载数据集 数据集预处理 创建卷积模型 训练模型 模型评估 CNN 卷积神经网络构建过程这里放一个完整的片段: from __future__ import absolute_import, division, print_function, unicode_literals import matplotlib.pyplot as plt import tensorflow as tf from tensorflow.keras import datasets, layers, models #加载模型 (x_train, y_train), (x_test, y_test) = datasets.mnist.load_data() #查看数据集的容量 print(x_train.shape, ' ', y_train.shape) print(x_test.shape, ' ', y_test.shape) #查看一张图片 import matplotlib.pyplot as plt plt.imshow(x_train[0]) plt.show() #调整图片的比例大小 x_train = x_train.reshape((-1,28,28,1)) x_test = x_test.reshape((-1,28,28,1)) #构造网络 model = models.Sequential() #卷积层 model.add(layers.Conv2D(input_shape=(x_train.shape[1], x_train.shape[2], x_train.shape[3]), filters=32, kernel_size=(3,3), strides=(1,1), padding='valid', activation='relu')) #池化层 model.add(layers.MaxPool2D(pool_size=(2,2))) #全连接层 model.add(layers.Flatten()) model.add(layers.Dense(32, activation='relu')) # 分类层 model.add(layers.Dense(10, activation='softmax')) #模型配置 model.compile(optimizer='adam', loss='sparse_categorical_crossentropy', metrics=['accuracy']) model.summary()#显示模型 #模型训练 history = model.fit(x_train, y_train, batch_size=64, epochs=5, validation_split=0.1) #模型评估 plt.plot(history.history['accuracy']) plt.plot(history.history['val_accuracy']) plt.legend(['training', 'valivation'], loc='upper left') plt.show() #识别正确率 test_loss, test_acc = model.evaluate(x_train, y_train) print(test_acc) 三、训练自己的图像数据集贴一个前人的演示视频:(侵删!) 【手势识别】基于CNN的手势识别 1. 数据集我们的手语训练集在毕业答辩后开源,先用kaggle上的一部分手势数据集作为测试样本: 下载链接:https://www.kaggle.com/gti-upm/leapgestrecog (补充说明:下载需要注册,科学上网才能验证。) 参考数据集有10个手势(1.9G左右): 将分别提取10个人文件夹,每个文件夹有10个手势,每个手势有200张图片;按手势类型汇总(2000张图片): 目录整理(将00-09文件夹的图片汇总) 移动前后: 参考:经典猫狗识别案例,识别10种手势。 (1)图像分类读取全部汇总的图像20000张,将图片按10000:5000:5000比例——分为训练集、验证集和测试集, 目录结构: 20000 5000 10000 5000 500 500 500 1000 1000 1000 500 500 500 dataset CNN test train valition 1 ... 10 1 ... 10 1 ... 1010种手势训练图片各1000张,验证图片各500张,测试图片各500张。 分类代码: import os, shutil # The path to the directory where the original # dataset was uncompressed original_dataset_dir = 'D:/myworkspace/dataset/leapGestRecog/orig_data/' # The directory where we will # store our smaller dataset base_dir = 'D:/myworkspace/dataset/CNN/train_data/' if not os.path.exists(base_dir): os.makedirs(base_dir) # Directories for our training, # validation and test splits train_dir = os.path.join(base_dir, 'train') if not os.path.exists(train_dir): os.mkdir(train_dir) validation_dir = os.path.join(base_dir, 'validation') if not os.path.exists(validation_dir): os.mkdir(validation_dir) test_dir = os.path.join(base_dir, 'test') if not os.path.exists(test_dir): os.mkdir(test_dir) for num in os.listdir(original_dataset_dir):#1~10 #文件夹1~10 train_idx_dir = os.path.join(train_dir,num) if not os.path.exists(train_idx_dir): os.mkdir(train_idx_dir) validation_idx_dir = os.path.join(validation_dir, num) if not os.path.exists(validation_idx_dir): os.mkdir(validation_idx_dir) test_idx_dir = os.path.join(test_dir, num) if not os.path.exists(test_idx_dir): os.mkdir(test_idx_dir) # original_idx_dir = original_dataset_dir+'/'+num #print(original_idx_dir) j =0 for fname in os.listdir(original_idx_dir):#1有2000张 if j=1000 and j=1500):# Copy next 500 images to test_idx_dir src = os.path.join(original_idx_dir, fname) dst = os.path.join(test_idx_dir, fname) shutil.copyfile(src, dst) j=j+1 print("[INFO]Copy finished! :",train_idx_dir) print('[INFO]training files:', len(os.listdir(train_dir))) print('[INFO]validation files:', len(os.listdir(validation_dir))) print('[INFO]test files:', len(os.listdir(test_dir))) print('[INFO]1 training images:', len(os.listdir(train_dir+"/1/"))) print('[INFO]1 validation images:', len(os.listdir(validation_dir+"/1/"))) print('[INFO]1 test images:', len(os.listdir(test_dir+"/1/")))
要把图像读取格式改为TensorFlow读取的格式;这一步卡了我很多天,因为TensorFlow2用的图像读取方式和TensorFlow1的方式大有修改,难受!这里注意 (3)构建卷积神经网络搭建模型 model.summary()输出模型各层的参数状况 模型参考的猫狗训练集采用的模型,至于正则化、图像增强、参数选取等操作,后续会根据需要来进行。 from keras import layers from keras import models model = models.Sequential() model.add(layers.Conv2D(32, (3, 3), activation='relu', input_shape=(150, 150, 3))) model.add(layers.MaxPooling2D((2, 2))) model.add(layers.Conv2D(64, (3, 3), activation='relu')) model.add(layers.MaxPooling2D((2, 2))) model.add(layers.Conv2D(128, (3, 3), activation='relu')) model.add(layers.MaxPooling2D((2, 2))) model.add(layers.Conv2D(128, (3, 3), activation='relu')) model.add(layers.MaxPooling2D((2, 2))) model.add(layers.Flatten()) model.add(layers.Dense(512, activation='relu')) model.add(layers.Dense(1, activation='sigmoid')) model.summary()
模型配置 model.compile()优化器(loss:计算损失,这里用的是交叉熵损失,metrics: 列表,包含评估模型在训练和测试时的性能的指标) #模型配置 from keras import optimizers model.compile(optimizer=optimizers.RMSprop(lr=1e-4), loss='binary_crossentropy', metrics=['acc'])模型大小 for data_batch,label_batch in train_generator: print("data batch shape:",data_batch.shape) print("labels batch shape:",label_batch) break
这里epochs=10只训练了10次 #模型训练 history = model.fit_generator( train_generator, steps_per_epoch=100, epochs=10, validation_data=validation_generator, validation_steps=50) #保存模型 model.save('D:/myworkspace/dataset/CNN/leapGestRecog_small_1.h5')(基本上CPU1分钟跑一次epochs,这里有条件的话还是上GPU) loss 损失函数值,与你定义的损失函数值相关 acc 准确率 mean_absolute_error 平均绝对误差 前面带val_表示你的模型在验证集上进行验证时输出的这三个值,验证在每个epoch后进行 一个选拔的故事(acc,loss,val_acc,val_loss的区别): http://www.pianshen.com/article/5415291383/ (5)模型评估 结果可视化 #结果可视化 import matplotlib.pyplot as plt acc = history.history['acc'] val_acc = history.history['val_acc'] loss = history.history['loss'] val_loss = history.history['val_loss'] epochs = range(len(acc)) plt.figure(figsize=(15,4)) plt.subplot(1,2,1) plt.plot(epochs, acc, 'b', label='Training acc',color='green') plt.plot(epochs, val_acc, 'b', label='Validation acc') plt.title('Training and validation accuracy') plt.legend() plt.subplot(1,2,2) plt.plot(epochs, loss, 'bo', label='Training loss',color='green') plt.plot(epochs, val_loss, 'b', label='Validation loss') plt.title('Training and validation loss') plt.legend() plt.show()
除此之外,还可以运用 图片增强的方法、增加模型结构 进行调整模型,能够大幅度提升准确率。 30次效果:
补充学习:模型评估的方法 模型运用: from keras.models import load_model model = load_model('D:/myworkspace/dataset/CNN/leapGestRecog_small_1.h5') #查看模型结构 model.summary() #一张测试图(不在训练图集) img_path = 'D:/myworkspace/dataset/CNN/train_data/test/1/frame_07_01_0105.png' # We preprocess the image into a 4D tensor from keras.preprocessing import image import numpy as np img = image.load_img(img_path, target_size=(150, 150)) img_tensor = image.img_to_array(img) img_tensor = np.expand_dims(img_tensor, axis=0) # Remember that the model was trained on inputs # that were preprocessed in the following way: img_tensor /= 255. # Its shape is (1, 150, 150, 3) print(img_tensor.shape) import matplotlib.pyplot as plt #第一层图片 plt.imshow(img_tensor[0]) plt.show() from keras import models layer_outputs=[layer.output for layer in model.layers[:8]] activation_model=models.Model(inputs=model.input,outputs=layer_outputs) activations = activation_model.predict(img_tensor) first_layer_activation=activations[0] print('第一层网络结构大小:',first_layer_activation.shape) #第三个通道的图片 plt.matshow(first_layer_activation[0,:,:,3],cmap="viridis") plt.show() #第10个通道图片 plt.matshow(first_layer_activation[0,:,:,30],cmap="viridis") plt.show()可对每个通道模型进行分析调整: 本次笔记: https://gitee.com/cungudafa/Python-notes/blob/master/CNN/CNNtest.ipynb 总结: CNN卷积神经网络能解决: 我们从二维图片只能提取前景特征的弊端,仅靠前景图片学习训练,容易受移动和遮挡等因素。 |


 统一数据集大小
 第四步:编译和训练模型 epochs的次数就是你即将训练的次数,训练次数越多越精确,也越耗时。
 第五步:评估模型
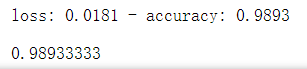 简单的CNN网络模型识别率98%😅牛,如果再调调参岂不是…
 10个手势动作:
 主要是:shutil.move()


 由结果来看,拟合效果也是比较好的。目前只迭代了10次,如果加强到30,100次,效果会更好。


【本文地址】